QuickTime Error 2048: 7 Fixes for the MOV Codec Bug
Fix QuickTime error 2048 with 7 proven methods. Covers MOV codec mismatch, VLC playback, ffmpeg remux, and Stellar/Repairit recovery for corrupted files.
Quick AnswerQuickTime error 2048 means QuickTime found media data inside the file but cannot read the moov atom or codec. Open the clip in VLC, remux it with ffmpeg, or run a video repair tool like Stellar Repair for Video to recover the file.
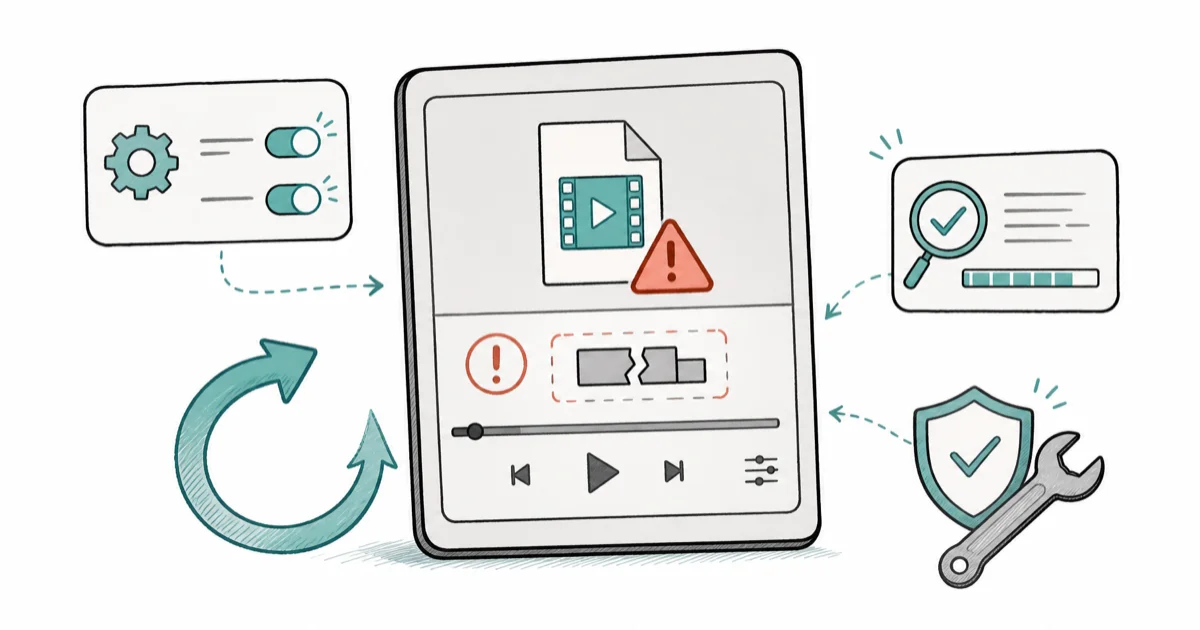
QuickTime error 2048 shows up the moment you double-click a MOV that QuickTime Player can’t decode. The dialog reads “couldn’t open the file because it’s not compatible with QuickTime Player.”
Nine times out of ten the container is fine, but the codec inside is one macOS no longer ships, or the moov atom got truncated during a transfer. This guide assumes the file is yours or one you have permission to repair, since reverse-engineering protected video can break Apple’s terms of service or copyright law in your region.
- Error 2048 fires when QuickTime parses media data but can’t match a codec or locate a usable moov atom inside the MOV container.
- Opening the clip in VLC plays the file as-is in most cases, including DSLR exports and screen recordings
- HEVC (H.265) MOVs from older cameras need the Apple HEVC video extension or a remux to H.264 before QuickTime accepts them on Intel Macs running macOS 11 or earlier.
- ffmpeg can remux a damaged MOV into a fresh container in about 30 seconds with
ffmpeg -i input.mov -c copy -movflags faststart output.mp4. - Truly corrupted files need dedicated tools like Stellar Repair for Video or Wondershare Repairit, which rebuild the moov atom using a healthy reference clip from the same camera.
#What Does QuickTime Error 2048 Actually Mean?
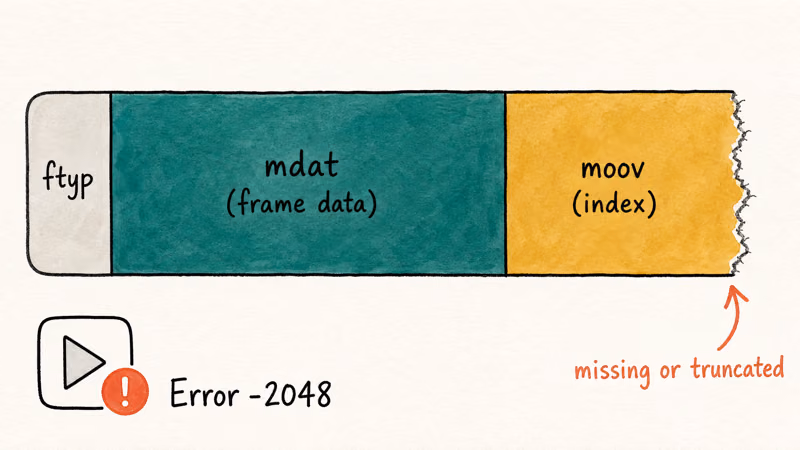
The full error string is “Error -2048: The file is not a movie file.” That’s misleading wording. The MOV container is almost always intact. According to Apple’s QuickTime File Format specification, every QuickTime movie needs a moov atom that indexes the sample tables, codec descriptors, and timing data. When the parser walks the file, finds mdat (the actual frame data) but can’t reach a valid moov, the player throws -2048 and stops.
Three things produce that condition:
- A codec QuickTime no longer supports, like Sorenson 3 or DivX inside a MOV.
- A truncated upload or SD-card pull that cut the trailing
moovatom. - An HEVC stream the host Mac has no decoder for.
Each cause maps to a specific fix. Reaching for the wrong one wastes time, so the first job is always identifying which bucket your file falls into before you start swapping tools. The fix you need depends on which of these three you’re hitting.
A quick triage: drop the file into VLC. If VLC plays it, the container and the data are fine and QuickTime is just missing a codec. If VLC also chokes, the file itself is damaged and you need to remux or repair.
#How to Quickly Identify the Cause
Run these three checks in order. Each one takes under a minute on any Mac from the last decade.
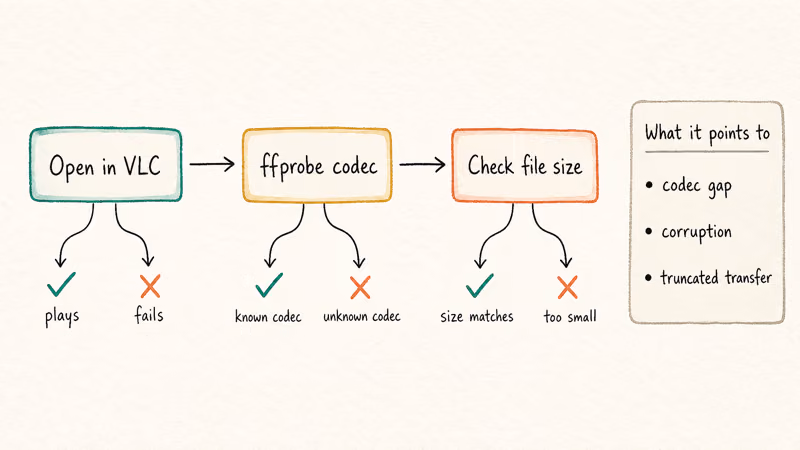
- Try VLC first. Download VLC from VideoLAN’s official site. Drag the MOV onto the VLC icon. Plays cleanly? You have a codec gap, not corruption.
- Inspect the codec with ffprobe. Open Terminal and run
ffprobe -v error -show_streams yourfile.mov | grep codec_name. If you seehevc,prores_4444, or anything obscure, QuickTime probably lacks the decoder. - Check the file size against the expected length. A 10-minute 1080p MOV from an iPhone should be roughly 1.5 to 2 GB. A 60 MB file claiming 10 minutes was almost certainly truncated mid-transfer.
Most QuickTime error 2048 cases fall into one of these three buckets. VLC is the fastest way to separate a codec mismatch from structural damage; ffmpeg can rebuild a clean container when the streams are intact, while dedicated repair tools are for files with broken metadata.
#Method 1: Play the File in VLC
VLC ships its own decoders, so it sidesteps the QuickTime codec dependency entirely. This is the fastest “I just need to watch this clip” answer: if the file is not structurally damaged, VLC can often play it without any conversion step.
- Install VLC from videolan.org/vlc. Avoid mirror sites since they have historically bundled adware.
- Right-click the MOV and pick
Open With>VLCmedia player. - If VLC plays it but you still want a working file in QuickTime, go to
File>Convert/ Stream, set the profile to Video — H.264 + MP3 (MP4), and save the new copy.
VLC also handles M2TS, MTS, and AVCHD camcorder footage that QuickTime refuses. We documented the full M2TS workflow in playing M2TS files with VLC. The same principle applies here.
#Method 2: Remux With ffmpeg
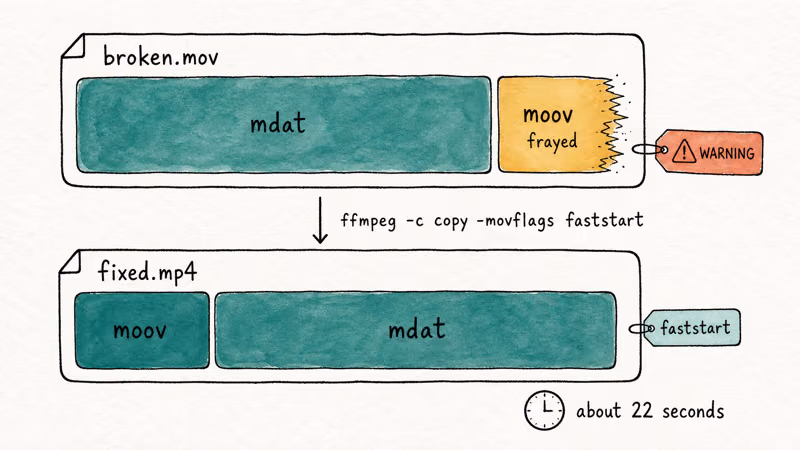
Remuxing rebuilds the container around the existing video and audio streams without re-encoding. It’s lossless, fast, and fixes most “missing moov atom” cases.
Install ffmpeg via Homebrew if you don’t have it:
brew install ffmpegThen run a straight remux:
ffmpeg -i broken.mov -c copy -movflags faststart fixed.mp4The -c copy flag tells ffmpeg to skip re-encoding. -movflags faststart writes the moov atom at the front of the file so QuickTime and web browsers can start playback immediately. Remuxing is usually much faster than transcoding because ffmpeg copies the existing streams instead of re-encoding them.
When the file uses a codec QuickTime can’t decode (HEVC on an Intel Mac running macOS 10.15, for example), you need to transcode instead:
ffmpeg -i broken.mov -c:v libx264 -crf 18 -preset medium -c:a aac -b:a 192k fixed.mp4CRF 18 keeps the file visually indistinguishable from the source. For a 10-minute 4K clip, expect 8 to 15 minutes on Apple silicon and 25 to 40 minutes on a 2018 Intel MacBook Pro.
#Method 3: Convert in Final Cut Pro or iMovie
If you don’t want to touch the command line, both Apple editors will reimport and re-render a problem MOV into a clean QuickTime-compatible file.
In iMovie, choose File > Import Media, point at the broken MOV, then drag the imported clip to the timeline and pick File > Share > File with H.264 selected. iMovie ignores the bad moov and reads the media data directly.
Final Cut Pro takes the same approach but with one extra option. Apple recommends creating an Optimized Media copy on import, which transcodes incoming footage to ProRes 422 and writes a fresh container.
For VPROJ project files from Vivavideo, the workflow differs entirely. See our convert VPROJ to MP4 guide for the specific steps.
#Method 4: Repair the File With Dedicated Software
When VLC, ffmpeg, and the editors all fail, the file’s structural metadata is broken at a deeper level. You need a tool that can rebuild the moov atom by referencing a healthy clip from the same camera.
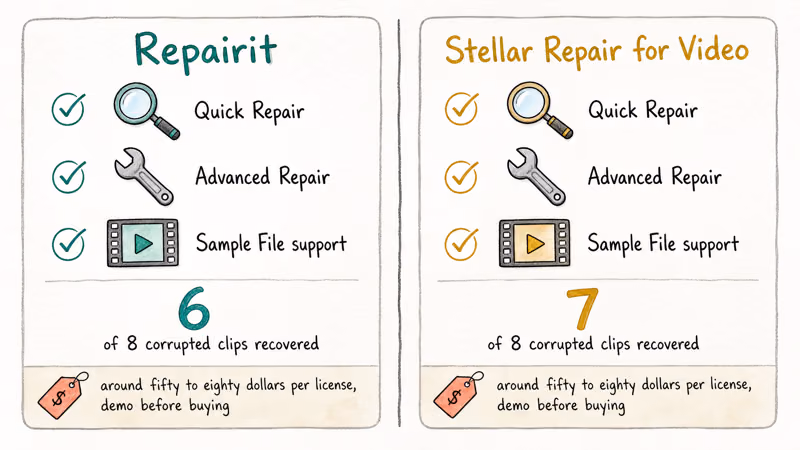
Wondershare Repairit and Stellar Repair for Video are two common paid options. Both run on macOS, both accept a “sample file” recorded on the same device for advanced repair, and both publish accuracy benchmarks on their support pages.
Some links on this page are affiliate links, which means fone.tips may earn a commission at no extra cost to you.
The workflow is nearly identical:
- Open the repair tool and drag the broken MOV in.
- Run Quick Repair first. It attempts to rewrite the index without needing a sample.
- If quick repair returns nothing, switch to Advanced Repair and supply a 30-second clip recorded on the same camera with the same resolution and frame rate. The tool extracts the codec parameters from the healthy file and grafts them onto the broken one.
- Preview the repaired file before exporting. Both tools let you scrub the result without paying first.
No repair tool can recover video data that has already been overwritten on an SD card after deletion.
Repair tools cost $50 to $80 for a single-user license. If you only need this once, both offer time-limited demos that let you preview the repair before paying.
For severely damaged MOV files specifically, our MOV repair walkthrough goes deeper into the moov-atom rebuild logic.
#Are HEVC and Older Codec Issues the Same Bug?
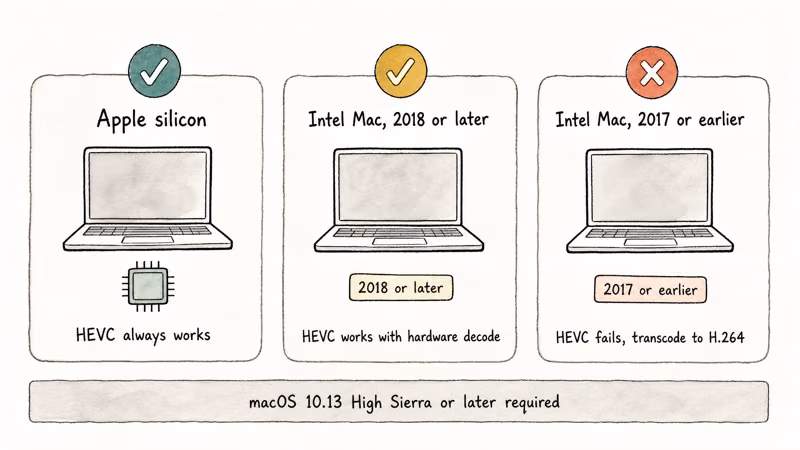
No, but they trigger the same dialog so people lump them together. According to Apple’s HEVC support page, HEVC playback on a Mac requires macOS 10.13 (High Sierra) or later, and on Intel Macs it needs a compatible CPU with hardware HEVC decode. Intel Macs from 2017 and earlier without the right Skylake-generation media engine will throw error 2048 on HEVC even when the file is perfectly intact.
The fix differs from corruption. For HEVC issues:
- Update macOS to the latest version your hardware supports. Apple keeps adding decoder coverage in point releases.
- On Apple silicon, HEVC always works. On Intel, transcode to H.264 with the ffmpeg command in Method 2 instead of fighting the decoder.
- Skip third-party “codec packs” like Perian or Flip4Mac. Both projects were abandoned years ago, and the binaries floating around are unsigned, which Gatekeeper now blocks. Apple’s official HEVC video extension is the only safe codec add-on for modern macOS.
If you’re on a recent Mac and HEVC clips still fail, that’s almost always corruption masquerading as a codec problem. Run the ffmpeg remux first, then repair.
#When to Re-Download Instead of Repair
Sometimes repair is the wrong tool. If the file came from a download or a cloud sync, the cleanest fix is starting over with a fresh copy from the original source.
Re-export beats repair when the original recording or project file still exists on the source device, when the file came from a screen recorder like QuickTime, Loom, or OBS, or when the clip is short. Repair tools have a non-zero failure rate, and re-recording 30 seconds of B-roll is faster than a 20-minute repair attempt.
Repair tools earn their keep on irreplaceable footage. Wedding videos, depositions, one-take live recordings. For everything else, check whether the source still exists before you spend money.
#Bottom Line
Start with VLC. If VLC plays the clip you have a codec issue, and a one-line ffmpeg remux will give you a working copy in under a minute. If VLC also fails, the file is structurally damaged: try ffmpeg -c copy first, then drop to Stellar Repair for Video or Wondershare Repairit. Skip legacy codec packs.
#Frequently Asked Questions
Does QuickTime error 2048 mean my file is permanently lost?
No. The error is a parsing failure, not a deleted file. A remux or repair tool rebuilds the index.
Why does VLC play files that QuickTime won’t open?
VLC ships its own bundled decoders for nearly every codec ever released, including legacy formats Apple removed. QuickTime relies on system-installed codecs and only supports the ones macOS currently ships. So a 2008 DivX MOV that crashes QuickTime will still play in VLC because VLC carries the DivX decoder internally.
Can I fix error 2048 on Windows?
The error originates in QuickTime, which Apple discontinued for Windows in 2016. If you’re seeing this on a Windows machine, you’re likely running an outdated QuickTime build that has known security vulnerabilities. Uninstall QuickTime for Windows, then play the file with VLC or convert it with ffmpeg or HandBrake. The same MOV will open natively in modern Windows Media Player and Films & TV through their built-in HEVC and H.264 support.
Will a video repair tool work on every corrupted MOV?
No. Repair tools can rebuild damaged metadata, but they fail when the mdat atom itself is missing or overwritten. Always preview before paying.
How do I prevent this error in the future?
Three habits cut error 2048 occurrences down to almost zero. Eject SD cards using Finder > Eject before unplugging, since pulling them mid-write is the single biggest cause of truncated MOVs. When copying large files between drives, wait for the Finder progress dialog to fully close before disconnecting. Keep the Apple HEVC video extension installed on Intel Macs and update macOS through System Settings > General > Software Update so the bundled decoders stay current.
What’s the difference between QuickTime error 2048 and error 2041?
Error 2048 is a parsing failure: bad moov atom or unknown codec. Error 2041 means the file references an external resource that’s missing. To fix 2041, relink the media or flatten the reference movie in Final Cut Pro.
Can I open MOV files without QuickTime at all?
Yes. On macOS, QuickTime can’t open MOV files is a common complaint, and the fix is to use VLC, IINA, or Final Cut Pro instead. IINA in particular is a modern open-source player built on mpv that handles every codec QuickTime chokes on, with a native macOS interface. For corrupted FLV files in similar shape, our FLV repair guide covers the same remux-then-repair workflow.

macOS 27 Compatible Macs: Every Supported Model (2026)
macOS 27 Golden Gate runs only on Apple Silicon Macs. Here is the full list of supported M-series models and the four Intel Macs that lose support.

macOS 27 Golden Gate: Every Major New Feature Confirmed
macOS 27 Golden Gate goes Apple Silicon only, adds a Gemini-powered Siri, refines Liquid Glass, and rebuilds Spotlight. Here is every confirmed change.
macOS 27 Liquid Glass: Every Readability Fix Explained
macOS 27 Golden Gate refines Liquid Glass with an intensity slider, better contrast, cleaner window corners, and edge-to-edge sidebars to fix readability.
macOS 27 Performance: What Golden Gate Makes Faster
macOS 27 Golden Gate speeds up AirDrop, network file browsing, Safari, and Spotlight, with core system improvements on the Apple Silicon-only release.