How to Fix NAT Type Failed on PS4: 5 Working Solutions
Fix NAT type failed on PS4 with five practical solutions: enable UPnP, set a static IP, forward Sony's official ports, and use DMZ only as a last resort.

Quick AnswerNAT type failed on PS4 means your router is blocking the inbound traffic the console needs for PlayStation Network. Enabling UPnP in the router admin panel resolves most cases within minutes; if UPnP is unavailable, assign a static IP to the PS4 and forward TCP ports 80, 443, 3478, 3479, 3480 plus UDP 3478 and 3479.
The NAT type failed error on PS4 appears during the Test Internet Connection step, when your console can reach the internet but can’t finish the NAT type check that voice chat, party features, and matchmaking depend on.
The goal is to restore an Open or Moderate NAT without exposing the console to unnecessary security risks. Most cases resolve quickly once you know which router setting to change.
- NAT type failed means the PS4 can’t complete its NAT type test, so the console still loads games and downloads updates while voice chat, multiplayer matchmaking, and party features stop working
- Enabling UPnP in your router admin panel is usually the fastest fix because it lets the PS4 negotiate its own port mappings without manual configuration
- Sony’s PSN port list covers TCP 80, 443, 3478, 3479, 3480 and UDP 3478, 3479; forwarding these to a static IP on the PS4 produces a stable Moderate NAT
- Carrier-grade NAT on some ISP plans makes manual port forwarding ineffective, so users behind CGNAT need to ask the ISP for a public IPv4 address before any router fix will work
- DMZ exposes the PS4 to the open internet and should only be a last resort, since DMZ removes the router-level filtering that protects the console from unsolicited traffic
#What Does “NAT Type Failed” Mean on PS4?
NAT (Network Address Translation) is how your router rewrites your PS4’s private LAN address into the public IP that PlayStation Network sees on the open internet. According to the Wikipedia entry on Network Address Translation, most home networks rely on NAT because public IPv4 addresses are scarce and one router shares a single public address across every device on the LAN.
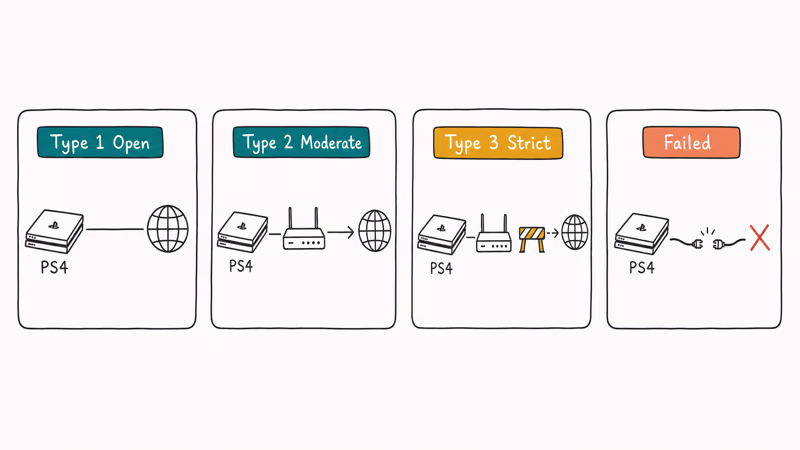
The PS4 reports the result of its NAT test as one of three categories:
- NAT Type 1 (Open): the PS4 connects directly to the internet with no router or firewall in between. Open NAT gives the smoothest voice chat and matchmaking but is rare on home networks because almost every household has a router.
- NAT Type 2 (Moderate): the PS4 sits behind a router that allows the inbound traffic PSN needs. Moderate NAT works for the vast majority of online games and party chat sessions and is the practical target for a healthy home setup.
- NAT Type 3 (Strict): the router blocks at least one of the PSN ports, so voice chat drops in and out and matchmaking fails when the other player is also on a Strict NAT.
When the test can’t finish at all, the PS4 displays NAT type failed instead of any of the three numbered types. Sony’s official PSN connectivity support documentation confirms that 7 ports are required: TCP 80, 443, 3478, 3479, 3480 and UDP 3478, 3479. If even one of those ports can’t be reached, the test stops short.
#Why Does NAT Type Fail on PS4?
Most NAT type failed errors trace back to one of five root causes:
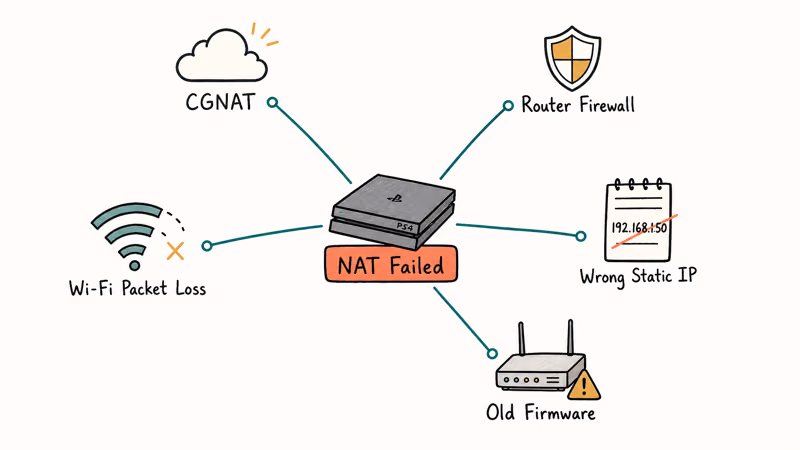
- ISP-level CGNAT: shared IPv4 networks behind your ISP’s gateway make the test fail because the PS4 sits behind two layers of NAT, and the second layer is outside your control.
- Restrictive router firewall: many ISP-supplied routers ship with strict default filtering that blocks unsolicited inbound UDP, which the PSN ports need to complete the test.
- Misconfigured static IP: if you previously set a static IP on the PS4 but typed the wrong subnet mask or default gateway, the console can’t reach DNS during the test even though Wi-Fi looks connected.
- Outdated router firmware: older firmware sometimes drops UPnP support after a security update without showing an obvious notice in the admin panel.
- Wi-Fi packet loss: the NAT type probe sends short bursts of UDP packets, and if your 2.4 GHz link drops one at the wrong moment, the test reports failed even though the underlying connection works.
A cold modem-and-router restart is the lowest-risk first fix because it clears stale NAT bindings without changing settings. If the failure persists after a restart, enabling UPnP is usually the next best router-level fix. CGNAT is different: no router-level fix will solve it until the ISP issues a public IPv4 address.
#Solution 1: Restart Your Modem, Router, and PS4
A full power cycle clears stale NAT bindings on the router and on your ISP’s gateway. It’s the fastest fix to try first because it requires no admin login or settings change.
- Power off the PS4 by holding the power button until the indicator light stops blinking, then unplug the console’s power cable.
- Unplug both your modem and router from the wall. Wait at least 60 seconds so the cached NAT bindings on the ISP side time out.
- Plug the modem in first and wait until all front-panel LEDs are stable (usually 90 to 120 seconds).
- Plug the router in next and wait until its Wi-Fi LED stops blinking.
- Reconnect the PS4’s power cable, boot the console, and run
Settings>Network>Test Internet Connectionto recheck the NAT type.
If the result is now Type 1 or Type 2, you are done. If the test still reports failed, move to Solution 2.
#Solution 2: Enable UPnP on Your Router
UPnP (Universal Plug and Play) lets devices on your LAN ask the router to open the ports they need on demand. According to the Wikipedia entry on Universal Plug and Play, UPnP is the most common method modern game consoles use to negotiate inbound port access without manual configuration. Sony’s PSN client tries UPnP first before falling back to anything else, which is why enabling it resolves most NAT type failed errors with no other changes.
- On a phone or laptop on the same Wi-Fi, open a browser and type your router’s admin IP. Common defaults are 192.168.1.1, 192.168.0.1, or 10.0.0.1; the sticker on the bottom of the router lists the correct one.
- Sign in with the admin username and password printed on the same sticker. If the sticker shows the factory defaults but you previously changed them, use the credentials you set during initial setup.
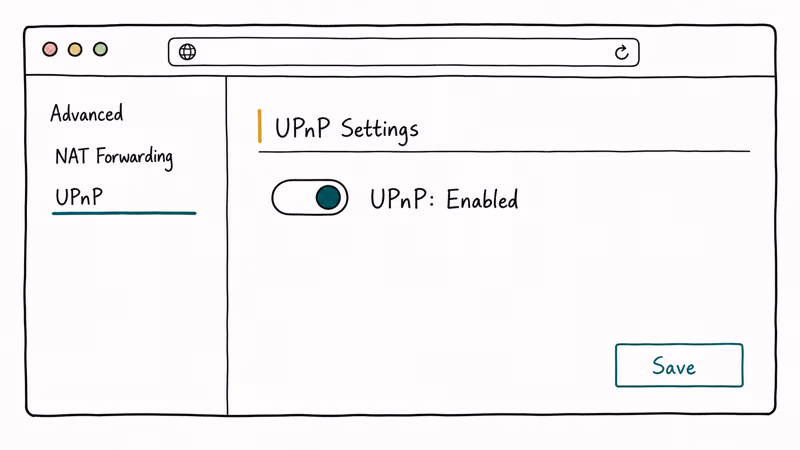
- Find the UPnP toggle. TP-Link routers usually list it under
Advanced>NAT Forwarding>UPnP, Netgear routers underAdvanced>Advanced Setup>UPnP, and ASUS routers underWAN>Internet Connection. - Set UPnP to Enabled and save the settings. Some routers require a reboot for the change to take effect.
- Back on the PS4, run
Settings>Network>Test Internet Connection.
Older routers without firmware updates can have known UPnP vulnerabilities, so if your router was made before 2018 and the manufacturer no longer ships updates, plan on swapping in a current model with active security patches before you leave UPnP enabled long-term.
#Solution 3: Assign a Static IP and Forward Sony’s Official Ports
If UPnP is unavailable on your router, or if you prefer explicit control over which ports are open, manual port forwarding works on every PS4 model. The trick is forwarding to a static IP on the PS4; otherwise DHCP will reassign the address within hours and break your forwarding rules.
Step 1. Read your PS4’s current network settings. Go to Settings > Network > View Connection Status on the console. Note the IP address, subnet mask, default gateway, primary DNS, secondary DNS, and the MAC address of whichever interface you currently use. Step 2 needs the MAC address, and Step 4 needs every other value, so keep all of them somewhere you can read while logged into the router admin panel.
Step 2. Reserve that IP for the PS4. In your router admin panel, find DHCP > Address Reservation (called Static DHCP on Netgear, DHCP IP Reservation on ASUS). Add the PS4’s MAC address and the IP you noted in Step 1.
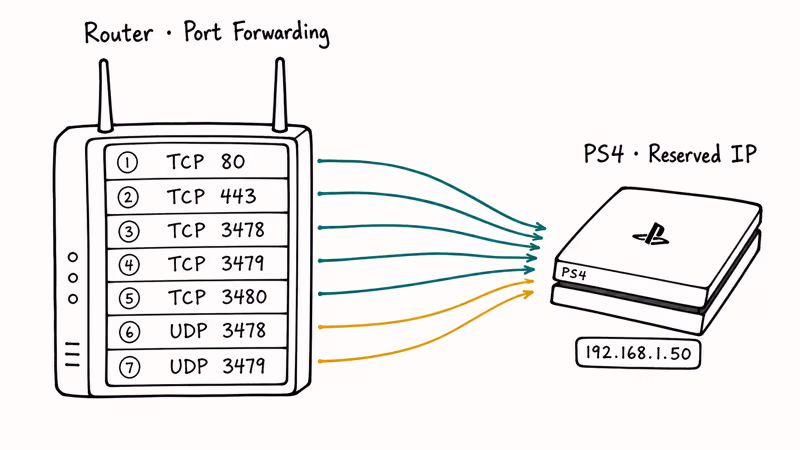
Step 3. Forward Sony’s official ports to that IP. Go to Port Forwarding (named Virtual Servers on some routers, Applications & Gaming on Linksys). Add entries pointing to the PS4’s reserved IP for the following ports:
- TCP: 80, 443, 3478, 3479, 3480
- UDP: 3478, 3479
Step 4. Reconfigure the PS4 to use the static IP. On the console: Settings > Network > Set Up Internet Connection > Use Wi-Fi (or LAN Cable) > Custom. Pick Manual for IP Address Settings and type the reserved IP, subnet mask, gateway, and DNS values from Step 1. Skip the DHCP hostname (leave it blank), pick Automatic for MTU, and disable the proxy server.
Step 5. Run Test Internet Connection again. NAT type should now read Type 2 (Moderate). If it still says failed and your DNS values look wrong, the DNS_PROBE_FINISHED_NO_INTERNET fix guide covers how to test DNS reachability from any device on the same LAN.
#Solution 4: Put Your PS4 in the Router’s DMZ (Last Resort)
DMZ (demilitarized zone) places the PS4 outside the router’s firewall, so all unsolicited inbound traffic flows directly to the console. This forces an Open NAT but also strips the firewall protection your router normally provides for that one device. According to the Wikipedia entry on DMZ in computing, a DMZ host is the standard way to expose a single device when port-by-port forwarding becomes impractical, but it should only be used on a network you trust.
- Sign in to the router admin panel.
- Reserve a static DHCP IP for the PS4 if you haven’t already (same process as Solution 3, Step 2).
- Find DMZ in the admin panel. TP-Link lists it under
Advanced>NAT Forwarding>DMZ, Netgear underAdvanced>WAN Setup, ASUS underWAN>DMZ. - Toggle DMZ on and enter the PS4’s reserved IP.
- Save and reboot the router.
- On the PS4, run Test Internet Connection. NAT type should display Type 1 (Open).
Most security guidance recommends keeping DMZ disabled when you are not actively gaming, especially if children’s tablets, smart-home devices, or work laptops share the same network. Toggle DMZ off when you finish your gaming session or restrict the rule to PS4-only with a schedule if your router supports one.
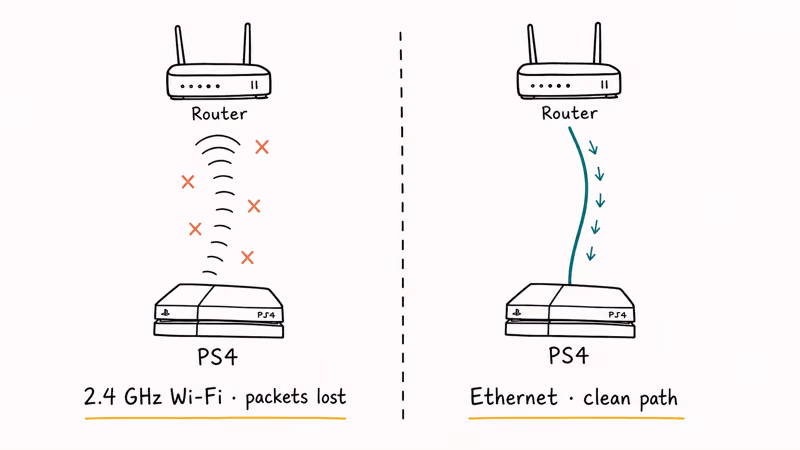
#Solution 5: Switch From Wi-Fi to Wired Ethernet
Wi-Fi packet loss is a quiet cause of NAT type failed errors that even experienced players miss. Sony’s PS4 system software support page recommends a wired connection for any latency-sensitive online play because Wi-Fi adds a noisy hop that the NAT type probe is sensitive to.
- Power off the PS4.
- Run an Ethernet cable from a free LAN port on your router to the PS4’s Ethernet port on the back. Cat5e or Cat6 cables both work fine.
- Boot the PS4 and go to
Settings>Network>Set Up Internet Connection>UseaLAN Cable>Easy. - Accept the automatic settings if your router DHCP is working normally.
- Run Test Internet Connection.
Ethernet removes Wi-Fi packet loss from the NAT test path. If a cable isn’t practical, try a powerline adapter.
#How to Test Your NAT Type After Each Fix
Every solution above ends in Settings > Network > Test Internet Connection. Only the last two of the six results matter for online play:
- Internet Connection: Successful confirms the basic IP path works.
- PlayStation Network Sign-In: Successful confirms PSN reachability.
- NAT Type: Type 1 / Type 2 / Type 3 / Failed decides whether voice chat and matchmaking will work.
If the result still says Failed after Solutions 1 through 5, the issue is almost always at the ISP layer. Call your ISP and ask whether your plan uses CGNAT (sometimes labeled “shared IPv4”) and whether they can move you to a public IPv4 address. Some ISPs offer this for free, others charge a small monthly fee, and a few require switching to a business plan.
While you are testing, watch for two related PS4 errors that share the same root cause: the PS4 error CE-34878-0 game crash and the corrupted database message at boot often appear after a NAT type failure during a multiplayer session. Resolving the NAT type usually clears those secondary errors as well.
#Bottom Line
For the average home network, enable UPnP first and stop there. UPnP resolves the majority of NAT type failed errors in under five minutes and survives router reboots without breaking.
If your router doesn’t support UPnP or strips it after a firmware update, manually forward Sony’s seven PSN ports to a reserved static IP for the PS4 (TCP 80, 443, 3478, 3479, 3480 and UDP 3478, 3479).
Save DMZ for the cases where everything else fails and you understand the security trade-off, and check whether your ISP uses CGNAT before you spend hours on router settings that no admin panel change will fix. If your aging router is the bottleneck rather than the PS4, our Wi-Fi router buying guide lists models that handle PSN traffic well in a single-console household.
#Frequently Asked Questions
Can I fix NAT type failed without changing router settings?
Usually no. Two exceptions worth trying without admin access are a full power cycle of all three devices and switching from Wi-Fi to wired Ethernet to bypass packet loss.
What is the best NAT type for online gaming?
Type 2 (Moderate) is the practical sweet spot for most home networks. It allows full voice chat and matchmaking while preserving the router’s firewall protection for every other device on the LAN. Type 1 (Open) gives slightly faster initial peer connections but exposes the PS4 to the open internet, which is rarely worth the security trade-off for a small latency improvement.
Will enabling UPnP slow down my other devices?
No. UPnP only changes how port mappings are negotiated; bandwidth, speed, and existing connections for your laptop, phone, and smart TV all stay the same.
Do I need to reboot my router after every NAT change?
Most routers apply settings without a full reboot, but a reboot guarantees the new rules take effect immediately. If a setting saves but the PS4 still reports the same NAT type after Test Internet Connection, reboot the router and run the test once more before assuming the fix did not work.
Can a VPN cause NAT type failed on PS4?
Yes. Most consumer VPN services run their exit nodes behind shared NAT, which means every device using the VPN looks identical to PSN. Disconnect any router-level VPN before running Test Internet Connection. Gaming-focused VPN services that explicitly support port forwarding preserve NAT type, but most general-purpose VPNs don’t.
Why does my NAT type keep changing back to failed?
There are two common reasons. First, your PS4 is using DHCP and gets a new IP address each time it reconnects, so any port forwarding rules you set point at the old IP; reserve a static IP in the router DHCP table to fix this. Second, some ISPs reset CGNAT bindings every few hours, which restores the failed state until you ask the ISP for a public IPv4 address.
Does NAT type failed mean my internet is broken?
No. The PS4 reports Internet Connection Successful even when NAT type fails, because basic web traffic such as game updates, store browsing, and software downloads only needs outbound connections. NAT type failures only block features that require inbound peer connections, such as voice chat, party features, and player-versus-player matchmaking. If you also need a second screen during this troubleshooting, our PS4 to laptop screen guide covers Remote Play setup so you can keep gaming while the main TV is unavailable.

Bluetooth Not Working on Snapdragon X? Fixes for 2026
Bluetooth not working on your Snapdragon X Copilot+ PC? Generic audio, mice, and keyboards work, but vendor apps often lack an ARM build. Fixes inside.

Docker Desktop and WSL2 Not Working on Snapdragon X? Fix It
WSL2 runs fine on Snapdragon X, but Docker Desktop ARM is Early Access and throws WSL errors. Use WSL2 plus native ARM64 Ubuntu and Docker Engine.

Does iTunes Work on Snapdragon X? ARM Windows 11 Guide
Yes, iTunes runs on Snapdragon X laptops through Prism emulation, but the Apple Devices app is the smoother route. Here is what to install on ARM.

Does OBS Studio Work on Snapdragon X? ARM64 Build Guide
Yes, OBS Studio has an experimental ARM64 build since version 31.1, but x64 plugins won't load and hardware encoding is missing. Here is what works.