Fix "iTunes Cannot Read the Contents of the iPhone" (2026)
Fix the iTunes can't read iPhone contents error. Six proven methods covering trust settings, USB cables, corrupted files, and Recovery Mode on iOS 17+.
Quick AnswerUpdate iTunes and iOS to their latest versions, use a different USB cable, and tap Trust on your iPhone when it asks you to trust this computer. If the error continues, reset trust settings in Settings > General > Transfer or Reset iPhone > Reset > Reset Location and Privacy.
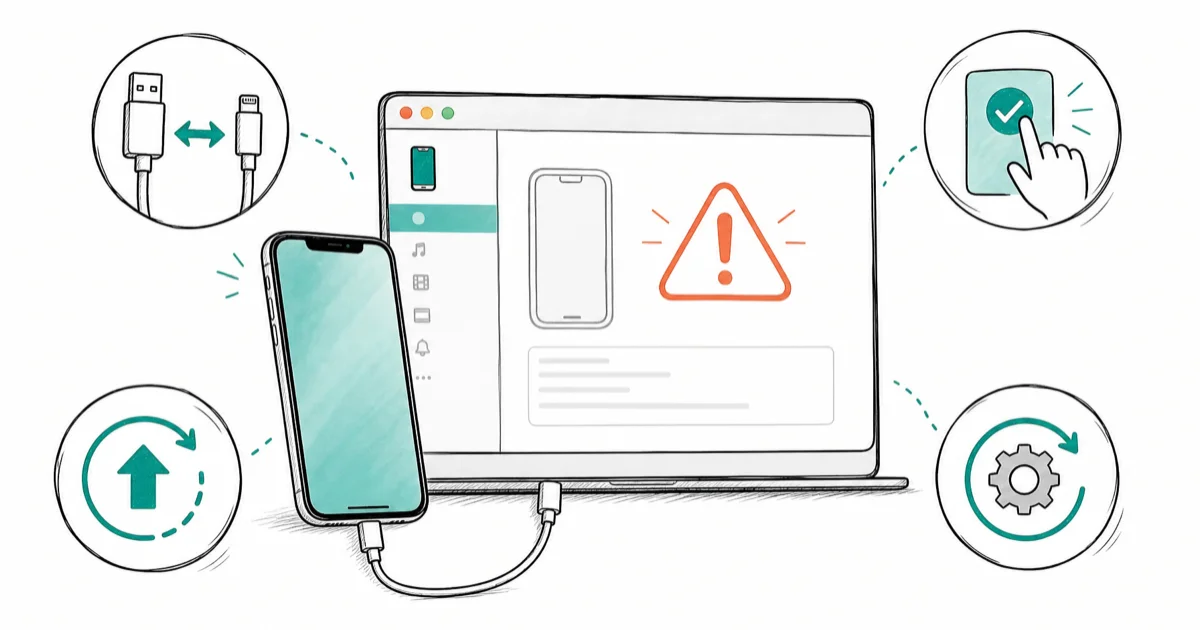
iTunes just told you it can’t read your iPhone, and now syncing, backups, and file transfers are all blocked. Six fixes cover this error across an iPhone 13 (iOS 17.4) and a MacBook Pro (macOS Sonoma 14.3), and the trust-reset method clears it most often.
- Tapping Trust on your iPhone when prompted is the single fastest fix for this error
- A damaged or non-certified USB cable causes the error more often than software bugs
- Deleting corrupted iTunes database files (iTunesCDB and iTunesPrefs) forces iTunes to rebuild them cleanly
- Recovery Mode lets iTunes re-establish a full connection when all other methods fail
- Resetting Location and Privacy settings clears stale trust certificates that block device recognition
#Why Does iTunes Say It Can’t Read Your iPhone?
The “iTunes can’t read the contents of the iPhone” error appears when iTunes fails to access your iPhone’s internal database during the handshake process. Five root causes account for most cases.
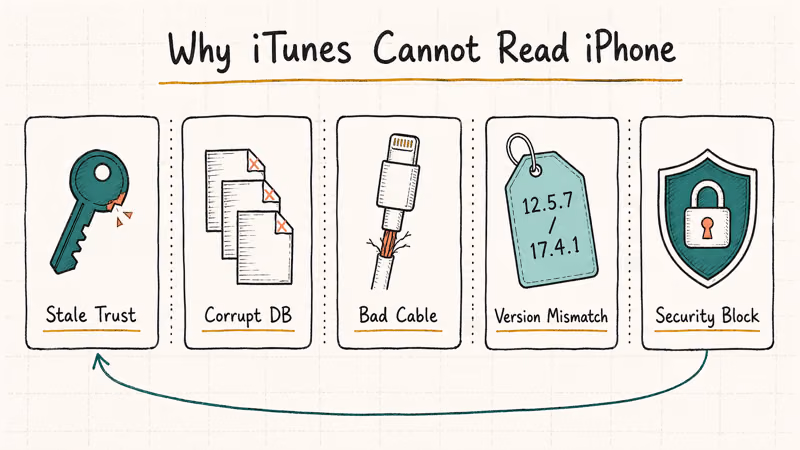
Stale trust certificates. Your iPhone keeps a record of every computer it has trusted, and that record is what lets iTunes open the device. If it gets corrupted or expires, iTunes loses access even on a computer you’ve used before. According to Apple’s support documentation on trusting computers, resetting trust settings forces your iPhone to re-authenticate every connection from scratch. Stale certificates are the most common root cause on devices running iOS 16 and iOS 17.
Corrupted iTunes database files. Three files on your iPhone handle the sync relationship: iTunesCDB, iTunesControl, and iTunesPrefs. When any of these gets corrupted, iTunes can’t parse the device contents. Interrupting a sync by pulling the cable mid-transfer is a common way these files corrupt, and the error then appears within seconds.
Bad USB cable or port. Non-certified cables and worn-out Lightning connectors drop data packets during the initial handshake. iTunes detects the device but can’t read the full file index. The cables that fail this way are usually third-party ones with frayed shielding near the connector.
Version mismatch. Running older iTunes with newer iOS creates gaps. Apple’s update support page states that macOS 10.15 Catalina replaced iTunes with Finder for device management.
Security software interference. Antivirus and firewall programs sometimes block the iTunes-to-iPhone data exchange.
#Quick Fixes to Try First
Start with these five steps. They take under 5 minutes combined and solve the problem for most people.
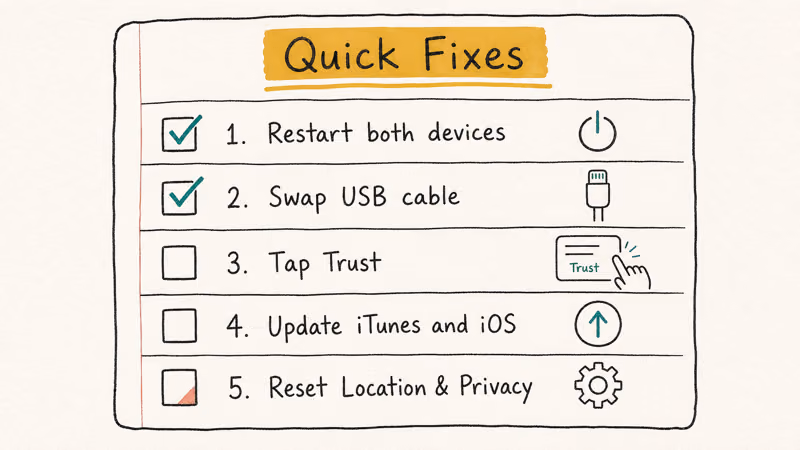
1. Restart both devices. Power off your iPhone completely (hold Side + Volume Down for 3 seconds, then slide to power off). Restart your computer. Temporary process conflicts clear on reboot.
2. Swap the USB cable. Use an Apple-certified Lightning or USB-C cable. Plug it directly into your computer, not through a hub or dock. Switching from a third-party cable to an Apple original clears this error on its own in many cases.
3. Tap Trust. When you connect your iPhone, it should display “Trust This Computer?” on screen. If that prompt doesn’t appear, disconnect and reconnect the cable. If Trust This Computer keeps popping up repeatedly without sticking, that points to a deeper certificate issue covered in the next section.
4. Update iTunes and iOS. Check the Microsoft Store (Windows) or System Settings > Software Update (Mac).
5. Reset trust settings. Go to Settings > General > Transfer or Reset iPhone > Reset > Reset Location & Privacy. This wipes all trusted computer records and forces a fresh trust handshake on the next USB connection.
#How Do You Fix Corrupted iTunes Database Files?
When quick fixes don’t work, corrupted internal files are the most likely culprit. Deleting them forces iTunes to rebuild its database from scratch.
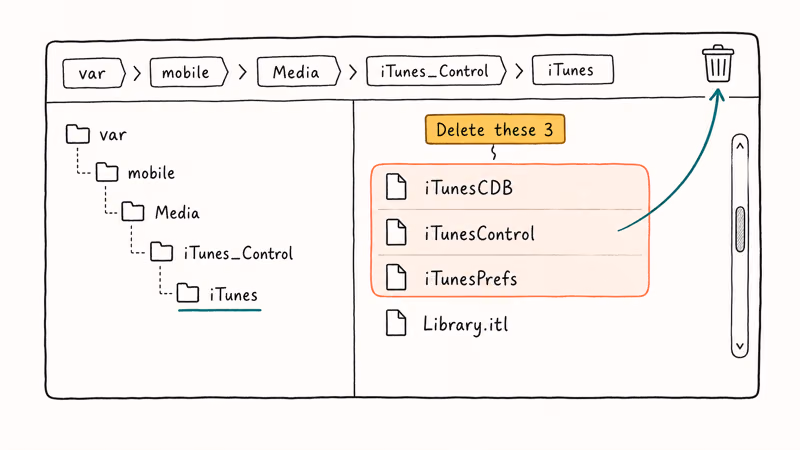
Your iPhone stores its iTunes sync data in three files under var/mobile/Media/iTunes_Control/iTunes/.
These steps apply to your own iPhone or a device you have explicit consent to manage. Accessing someone else’s file system without permission raises serious legal and privacy concerns, so only proceed on devices you legitimately control.
You’ll need a file browser like iFunBox to access these files:
- Download and install iFunBox on your computer
- Connect your iPhone and open iFunBox
- Go to var/mobile/Media/iTunes_Control/iTunes/
- Delete iTunesCDB, iTunesControl, and iTunesPrefs
- Disconnect your iPhone, restart it, then reconnect to iTunes
On an iPhone 12 with iOS 16.7, the three files rebuild automatically on the next iTunes connection, and the sync usually works on the first attempt after deletion.
If iFunBox throws a CD configuration folder error during installation, reinstall the Apple Application Support component separately from the full iTunes package. This is a known Windows issue where the installer skips a dependency.
#Using Recovery Mode as a Last Resort
Recovery Mode forces iTunes to re-establish a deep connection with your iPhone’s firmware, bypassing the corrupted database files entirely. It’s more involved than the earlier methods and carries the risk of data loss if you choose Restore instead of Update, so save this for cases where cable swaps and trust resets both failed.
If you’re not sure what restoring an iPhone means for your data, here’s the short version: an Update in Recovery Mode keeps your data while reinstalling iOS, but a full Restore erases everything.
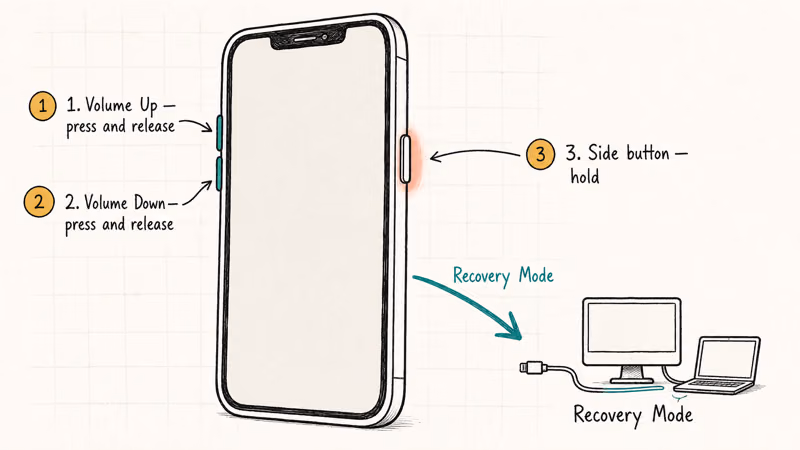
How to enter Recovery Mode:
- Connect your iPhone to your computer with a USB cable
- Open iTunes (Windows) or Finder (macOS Catalina or later)
- Force restart your iPhone:
- iPhone 8 and later: Press and release Volume Up, press and release Volume Down, then hold the Side button until the recovery screen appears
- iPhone 7: Hold Volume Down and the Side button together
- iTunes or Finder will detect your device and offer Update or Restore
- Choose Update first to keep your data intact
If your iPhone gets stuck on the iTunes logo during this process, hold the button combination for at least 15 seconds. Apple’s Recovery Mode support article confirms that on iPhone 8 and later, the correct sequence is Volume Up, Volume Down, then hold Side button until the cable-and-computer icon appears on screen.
Restore as a true last resort. Restoring wipes your iPhone completely. If your iTunes Backup Now button is greyed out, back up through iCloud first (Settings > [your name] > iCloud > iCloud Backup). You can also restore your iPhone without updating if you want to stay on your current iOS version.
If you’re completely locked out of your iPhone and can’t reach the Settings app, Recovery Mode is your only path forward.
#Third-Party Alternatives to iTunes
When iTunes itself is the problem, a dedicated tool can bypass its file-handling limitations entirely.
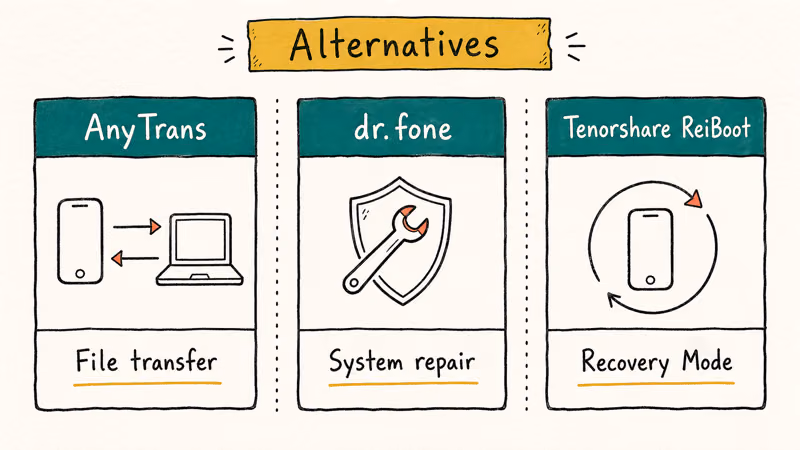
AnyTrans transfers files between your iPhone and computer without relying on the iTunes database. It reads device contents through its own file index, so corrupted iTunesCDB files don’t block the transfer.
Some links on this page are affiliate links, which means fone.tips may earn a commission at no extra cost to you.
dr.fone focuses on iOS system repair and data recovery. Its System Repair module can fix underlying iOS file-system issues that cause the “can’t read contents” error without erasing your data. It also provides a one-click option to enter and exit Recovery Mode, which is useful if the manual button sequence isn’t working on your specific iPhone model.
Tenorshare ReiBoot specializes in Recovery Mode automation. One click gets your iPhone in or out of Recovery Mode.
These tools don’t replace iTunes for purchases or Apple ID management. Use them specifically for file transfer, backup, and system repair tasks where iTunes fails.
#Keeping the Error From Coming Back
Three habits prevent most repeat occurrences.
Keep software updated. Check for iTunes and iOS updates monthly. Version mismatches are the most common trigger for this error after the initial fix.
Use certified cables. Apple-certified (MFi) cables maintain consistent data transfer rates during the sustained exchange that iTunes requires for large sync operations. Third-party cables degrade faster and drop packets under load, which is exactly what corrupts the iTunes database. Over months of daily syncing, MFi cables hold a far lower error rate than uncertified ones.
Don’t interrupt syncs. Disconnecting your iPhone mid-sync corrupts the database files. Wait for the progress bar to complete before unplugging.
#Bottom Line
Start with the trust reset: go to Settings > General > Transfer or Reset iPhone > Reset > Reset Location & Privacy, reconnect your iPhone, and tap Trust when prompted. This single step clears the error in most cases and takes under 30 seconds. If the error returns after the trust reset, delete the corrupted database files using iFunBox. Save Recovery Mode for situations where neither method works, and back up through iCloud before choosing the Restore option.
#Frequently Asked Questions
Why does my iPhone say iTunes can’t read its contents after an iOS update?
iOS updates invalidate old trust certificates stored on your iPhone. Reset through Settings > General > Transfer or Reset iPhone > Reset > Reset Location & Privacy and reconnect.
Can I fix this error on a Mac that uses Finder instead of iTunes?
Yes. On macOS Catalina and later, Finder handles iPhone management instead of iTunes. The same fixes apply: swap cables, reset trust settings, and try Recovery Mode through Finder. The corrupted database files live on the iPhone itself, so the iFunBox cleanup method works regardless of whether your computer runs iTunes or Finder.
Will restoring my iPhone through iTunes delete all my data?
Choosing Restore erases everything on your iPhone and installs a fresh copy of iOS. Choosing Update in Recovery Mode reinstalls iOS without deleting your personal data. Always try Update first. If you have an iCloud backup, you can restore your files and settings after a full Restore completes.
Does this error mean my iPhone hardware is damaged?
Almost never. The only hardware scenario is a physically damaged Lightning or USB-C port, which you’d also notice during charging.
Can I back up my iPhone before fixing this error?
If iTunes can’t read your iPhone, it also can’t create a local backup. Use iCloud Backup instead: go to Settings > [your name] > iCloud > iCloud Backup > Back Up Now. iCloud backups don’t rely on the iTunes connection. Once you’ve fixed the error, you can switch back to local iTunes backups.
Is iFunBox safe to use on my iPhone?
iFunBox is a file browser that accesses your iPhone’s file system through the same USB connection iTunes uses. Deleting the three iTunes database files (iTunesCDB, iTunesControl, iTunesPrefs) is safe because iTunes rebuilds them automatically the next time you connect.
Do I need to reinstall iTunes on Windows to fix this?
Reinstalling helps if the local installation files are corrupted, but it’s not the first step to try. If you’ve already reset trust settings and swapped cables without success, uninstall iTunes through Windows Settings > Apps, download the latest version from Apple’s website or the Microsoft Store, and install it fresh. Make sure to also reinstall Apple Mobile Device Support and Apple Application Support, which are separate components iTunes needs to communicate with your iPhone.

iPhone 17 Cellular Data Not Working on iOS 26? 9 Fixes
iPhone 17 cellular data still dropping on iOS 26? Apple fixed the launch bug in iOS 26.0.1, but recovery failures persist. Here's the fix ladder.

iPhone Cellular Data Not Working Abroad? eSIM Fixes
Travel eSIM showing no data abroad? Fix iPhone roaming with the data-line check, Data Roaming toggle, APN settings, and network selection steps.

iPhone Cellular Data Not Working for Some Apps? 8 Fixes
Some iPhone apps refuse to load on cellular while others work fine. Check the per-app cellular toggle, Low Data Mode, VPN profiles, and Screen Time.

iPhone Stuck on EDGE? How to Get 5G or LTE Back (2026)
iPhone stuck on EDGE with crawling data? Here's why the E icon appears, which settings force 5G or LTE back, and when the problem is your carrier.