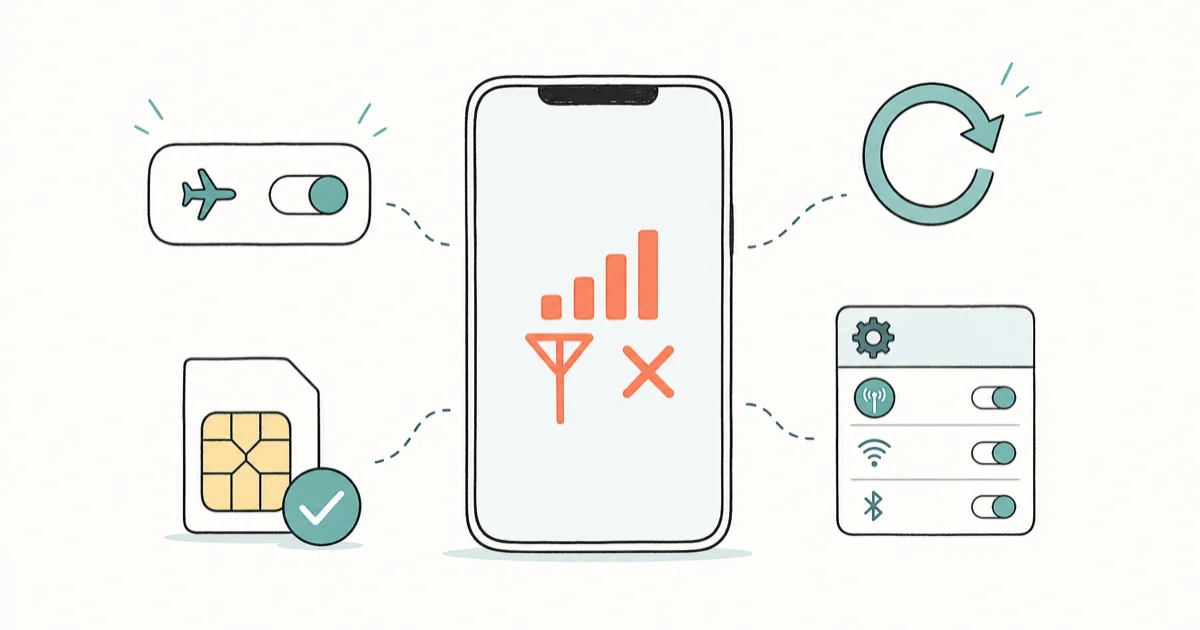
iPhone Network Not Available: 10 Fixes That Work (2026)
Fix the iPhone Network Not Available error with 10 proven fixes: Airplane Mode, network reset, SIM checks, carrier settings, and 5G/LTE switching.
Quick AnswerToggle Airplane Mode on for 30 seconds and off, restart your iPhone, then reset network settings under Settings > General > Transfer or Reset iPhone > Reset > Reset Network Settings. Those three steps clear the error for most people.
Your iPhone says “Network Not Available” and suddenly you can’t make calls, send texts, or pull data over cellular. The good news: it’s almost always a software or settings glitch, not a broken antenna. The 10 fixes below work on current and older iPhones alike, and most people can clear the error in under 5 minutes.
Start at the top and work down. Each step is ordered by how often it actually solves the problem.
- Toggling Airplane Mode for 30 seconds, then off, clears the error in many cases, making it the fastest fix to try first.
- Resetting network settings under
Settings>General>Transferor Reset iPhone>Reset>Reset Network Settingswipes saved Wi-Fi passwords and VPN configs, but leaves photos, apps, and personal data alone. - iOS point updates routinely include cellular fixes, so always check
Settings>General>Software Updatebefore doing a deeper reset. - VPN apps and third-party security tools are a known cause of the error. Disabling them is a 30-second test that often unmasks the real issue.
- In low-coverage spots, switching from 5G Auto to LTE or 4G under
Settings>Cellular>Cellular Data Options>Voice & Data often restores a usable signal within seconds.
#Common Causes of the Error
“Network Not Available” shows up when your iPhone can detect nearby cellular towers but can’t complete a connection with one. That’s different from “No Service,” which means it can’t see any tower at all. Knowing which one you’re seeing narrows the problem.
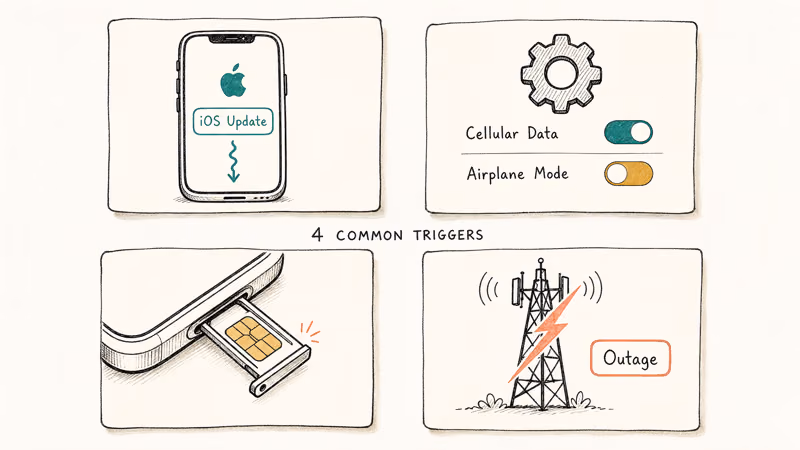
The most common triggers we see:
- A hiccup after an iOS update. Point releases sometimes reset network preferences or temporarily break carrier handshakes.
- A software setting that flipped. Cellular Data turned off, Airplane Mode stuck on, a VPN profile interfering, or a Voice & Data mode set wrong.
- A SIM that lost contact. A loose physical SIM, a dirty contact, or an eSIM that needs reprovisioning.
- A carrier-side issue. An outage in your area, an unpaid bill, or an IMEI block.
Apple’s iPhone cellular troubleshooting guide states that 3 steps come before any deeper reset: checking the carrier’s service status, toggling Airplane Mode, and restarting the device. The steps below follow that same order, then add the 7 fixes Apple’s page leaves out.
#Quick Fixes to Try First
These take less than 2 minutes each. Try them in the listed order. If the signal bars come back at any point, you’re done.

#1. Toggle Airplane Mode
This is the single highest-yield first move. It forces your iPhone to drop every wireless connection and start over.
- Open Control Center (swipe down from the top-right corner on Face ID models, up from the bottom on Home button models)
- Tap the airplane icon to turn it on
- Wait a full 30 seconds. Don’t rush this. The radio needs time to fully release the cellular session.
- Tap the airplane icon again to turn it off
Give the iPhone about a minute to reconnect. This single step resolves the error more often than not.
#2. Restart Your iPhone
A full restart clears temporary memory and resets the baseband processor. That’s the chip that handles cellular, and it sometimes gets stuck in a bad state.
- Face ID models (iPhone X and later): Press and hold the side button plus either volume button until the power-off slider appears. Drag it, wait 30 seconds, then hold the side button again to power on.
- Home button models: Hold the side or top button until the slider appears, drag it, wait 30 seconds, then power back on.
If your iPhone won’t respond to the slider at all, a force restart via recovery mode can break the loop.
#3. Check Cellular Data Settings
Sometimes the fix is embarrassingly simple. An iOS update can quietly flip this toggle off, and it’s an easy one to overlook.
- Go to
Settings>Cellular - Confirm Cellular Data is on
- If it’s already on, toggle it off, wait 10 seconds, and toggle it back on
If you recently traveled internationally, also confirm data roaming is set correctly for your home network. A dropped roaming setting can look identical to a network failure.
#Mid-Level Fixes for Stubborn Cases
If the quick fixes didn’t work, the issue is deeper. These steps target software misconfigurations and carrier-level problems that need more than a toggle.
#4. Update iOS
Outdated software is a frequent cause of cellular weirdness, especially if you skipped a couple of point releases. Apple’s iOS 18 release notes routinely call out cellular and modem fixes for specific iPhone models, so check the page after every major update.
- Go to
Settings>General>Software Update - If an update is offered, tap Download and Install
- Keep your iPhone on Wi-Fi and above 50% battery during the install
If the update itself fails, our guide on update unavailable with this Apple ID walks through the most common fixes.
One note for older models: an iPhone X tops out at iOS 16, so seeing no new update on that screen is normal, not a sign something is broken. Carrier settings updates in fix 6 still arrive on those phones independently of iOS, so don’t skip that step.
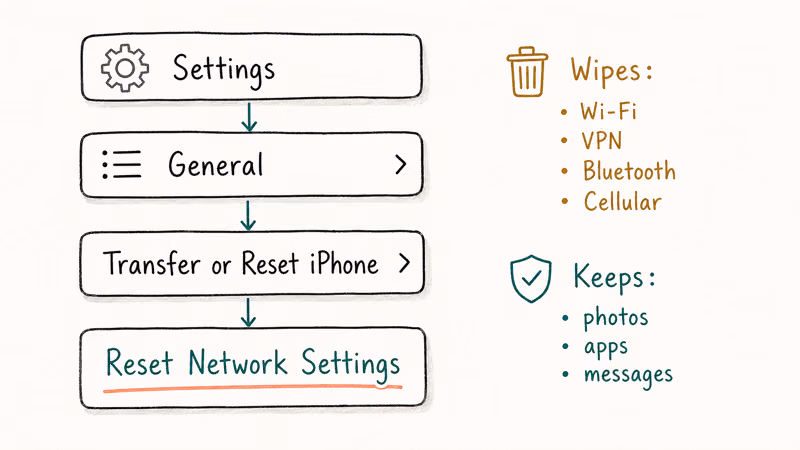
#5. Reset Network Settings
This is the heaviest fix that doesn’t touch your personal data. It wipes every saved Wi-Fi password, VPN profile, Bluetooth pairing, and cellular setting, then rebuilds them from defaults.
According to Apple’s reset iPhone settings guide, the reset takes about 1 minute, restores your device name to “iPhone,” and changes manually trusted certificates back to untrusted. Your photos, apps, messages, and accounts? They’re untouched.
- Go to
Settings>General>Transferor Reset iPhone - Tap Reset, then Reset Network Settings
- Enter your passcode and confirm
Your iPhone will restart. After it boots, you’ll need to re-enter Wi-Fi passwords, but cellular usually reconnects on its own within a minute.
#6. Update Carrier Settings
Carriers push small configuration updates that improve how your iPhone hands off between towers and registers with the network. These updates are easy to miss because they show up as a quiet popup that disappears if you tap anywhere else.
- Connect to Wi-Fi
- Go to
Settings>General>About - If a carrier update is available, a popup appears within 15 seconds. Tap Update.
No popup? Your carrier settings are current. Move on to the next step.
#7. Check and Reseat the SIM Card
A SIM card that’s slightly out of position can lose contact with the reader. This commonly happens after a drop, after airline travel where the phone gets jostled, or when pocket lint works its way into the tray.
- Power off your iPhone
- Use a SIM eject tool or a straightened paperclip to pop out the SIM tray
- Look at the gold contacts under bright light. Wipe corrosion off with a dry microfiber cloth
- Place the SIM back so it sits flat in the tray
- Slide the tray fully closed and power on
US iPhone 14 and later models ship eSIM-only, with no physical SIM tray. If that’s your model, skip this step. For persistent eSIM errors, your carrier may need to reprovision the line, which is a 5-minute support call. Older models like the iPhone X, 11, and 12 keep a physical SIM tray in every region, so the reseat step always applies there.
#What if None of the Basic Fixes Work?
At this point you’ve ruled out the easy stuff. The remaining methods target less common causes that trip up plenty of people.
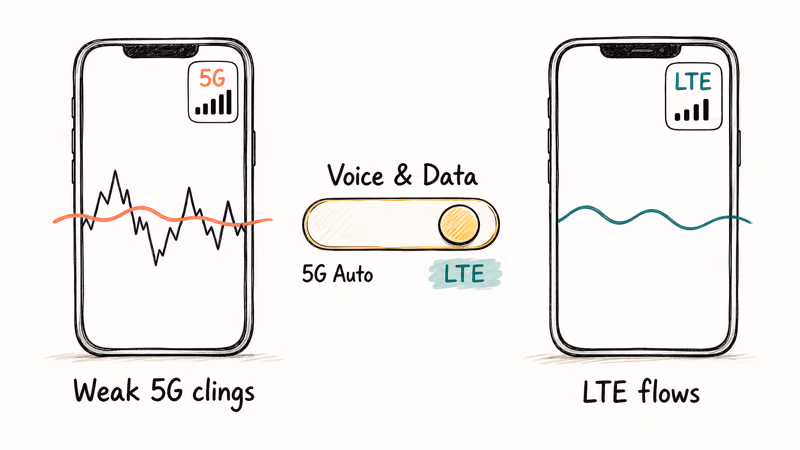
#8. Switch From 5G to LTE or 4G
Sometimes your iPhone clings to a weak 5G signal instead of falling back to a stronger LTE or 4G connection. In rural areas, an iPhone can show full 5G bars yet fail to move data. Switching to LTE-only often restores a usable connection within seconds.
- Go to
Settings>Cellular>Cellular Data Options - Tap Voice & Data
- Select LTE or 4G instead of 5G Auto or 5G On
Test for a few minutes. If your signal jumps and data flows, the issue is 5G coverage in your area, not your phone. Many readers see this near building edges and basement levels where 5G mid-band drops sharply.
Skip this step on an iPhone 11, XR, or X. Those models have no 5G modem, so Voice & Data tops out at LTE and a weak 5G signal can’t be what’s causing the error.
#9. Disable VPN and Security Apps
VPN apps reroute traffic in ways that can confuse the carrier handshake, especially on apps that use kill switches or split tunneling. Apple’s iPhone cellular troubleshooting guide recommends disabling VPN and third-party security tools as part of standard cellular troubleshooting.
Turn off any VPN, firewall, or security app. Open Settings > General > VPN & Device Management and remove any leftover profiles you don’t recognize.
Test for a minute. If the network comes back, you’ve found your culprit. Contact the VPN developer or switch providers.
#10. Contact Your Carrier
If you’ve worked through everything above and still see “Network Not Available,” the problem is likely on your carrier’s end. Call their support line and ask them to:
- Check for current outages or planned maintenance in your ZIP code
- Verify your account is active and in good standing
- Confirm your IMEI isn’t blocked (find yours under
Settings>General>About) - Re-provision your line, especially for eSIM accounts
For issues that survive a carrier reprovision, your iPhone may have a hardware problem with the antenna or modem chip. Book an appointment at an Apple Store or authorized service center for diagnostics. If your iPhone touch screen isn’t responding at the same time as the network error, hardware damage is the more likely cause.
#How Can You Prevent the Error From Coming Back?
A few habits keep “Network Not Available” from showing up again:
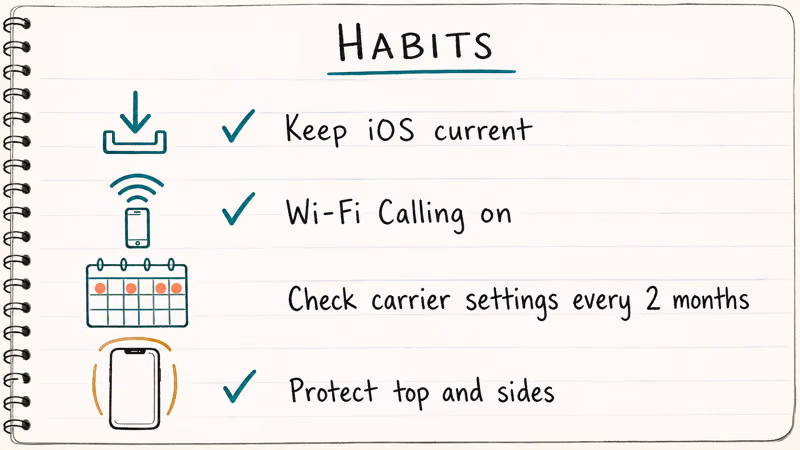
- Keep iOS updated. Each point release usually includes connectivity fixes. Don’t let updates pile up for months.
- Turn on Wi-Fi Calling as a backup. Go to
Settings>Phone>Wi-Fi Callingand toggle it on. Calls and texts then route over Wi-Fi when cellular signal weakens. - Check carrier settings every couple of months.
Open Settings>General>About andlet it sit for 15 seconds in case a popup is queued. - Protect the top and sides of your iPhone. Drops to those areas can loosen the internal antenna connections.
If your iPhone battery drains quickly at the same time as network problems, both symptoms can point to a failing modem chip. That combination is worth getting checked. And if your iPhone won’t connect to Wi-Fi along with cellular failing, the issue is more likely hardware than software.
If you’d rather hand the diagnostics to a tool, Tenorshare ReiBoot can fix common iOS-level cellular bugs without erasing data. It’s a reasonable middle step for stubborn baseband issues on older iPhones, sitting between Reset Network Settings and a full restore.
Some links on this page are affiliate links, which means fone.tips may earn a commission at no extra cost to you.
#When to Stop and Call a Professional
If you’ve worked through all 10 fixes and the error persists, the next step depends on what else is going wrong:
- Cellular fails plus rapid battery drain: likely a failing modem chip. Apple Store diagnostics are the right next call.
- Cellular fails plus screen issues: water or impact damage to the logic board. Authorized service center.
- Cellular fails on Wi-Fi too: antenna assembly. Out-of-warranty repair runs about $90 to $200 depending on the model.
- Only your line is affected on the carrier: account or provisioning issue. Carrier support can usually resolve it in one call.
Don’t keep resetting network settings hoping it sticks. After three resets without lasting fix, the issue isn’t software anymore.
#The Hardware Route for a Chronic Dead Zone
If the error follows you only at one address and your carrier confirms the nearest tower is far, no setting will conjure signal that never reaches your walls. A cell signal booster is the fix built for this: an outdoor antenna catches the faint signal, an amplifier strengthens it, and an indoor antenna rebroadcasts it. It only works when some signal exists outside, so test by a window first.
- Covers a whole home or apartment, not just one room
- Works on every US carrier at once (Verizon, AT&T, T-Mobile)
- FCC-approved and self-installable in under an hour
Last updated on Jun 13, 2026
As an Amazon Associate fone.tips earns from qualifying purchases. Prices and availability on Amazon are accurate as of the date above and subject to change.
#Bottom Line
Start with Airplane Mode and a restart. Those two fixes alone clear the “Network Not Available” error for most readers. If they don’t, the next highest-yield move is Reset Network Settings, which strips out the most common software-level causes without touching your photos, messages, or apps. Everything past that narrows down whether the issue lives in your SIM, your carrier account, or the hardware.
If you’ve worked through all 10 fixes and still have no signal, stop troubleshooting at home. Apple Support and your carrier’s tech team can run remote diagnostics that aren’t available in Settings, including modem self-tests and tower-side provisioning checks.
#Frequently Asked Questions
What is the difference between “No Service” and “Network Not Available” on iPhone?
“No Service” means your iPhone can’t detect any cellular network at all. “Network Not Available” means it sees networks but can’t connect to one. The fixes overlap, but “No Service” usually points to a SIM or carrier account problem, while “Network Not Available” leans toward software or settings issues.
Will resetting network settings delete my photos or apps?
No. It only erases saved Wi-Fi passwords, VPN configurations, Bluetooth pairings, and cellular settings. Your photos, apps, messages, contacts, and accounts stay untouched. The reset itself takes about 30 to 45 seconds, and your iPhone restarts automatically.
Can a phone case cause network problems?
Rarely, but it does happen. Thick metal cases or cases with strong magnetic mounts can interfere with antenna reception, especially on the bottom edge of the iPhone where the cellular antenna sits. Try removing the case and testing the signal for 5 minutes. If reception improves, switch to a plastic or silicone case and the issue should clear.
Does this error happen more often after iOS updates?
Yes, especially after major version jumps. Reddit threads on r/iphone and Apple Community posts spike with cellular complaints in the first two weeks after a major iOS release. Apple usually addresses the regressions in a follow-up point update within 2 to 3 weeks, so check Software Update again if you just upgraded and lost service.
Can water damage cause the “Network Not Available” error?
Water can corrode the antenna connectors inside your iPhone, even on IP68-rated models. According to Apple’s water and dust resistance guide, liquid resistance isn’t permanent and decreases with normal wear. If your phone was recently exposed to water, let it dry completely for at least 48 hours before testing. If the error continues after drying, the damage likely needs professional repair.
Should I restore my iPhone to factory settings?
Only as a last resort. A factory reset erases everything on your phone. Try all 10 methods above and contact your carrier first. If you do reset, back up to iCloud or your computer beforehand, otherwise you’ll lose photos and messages that aren’t already synced.
Why does my iPhone lose signal in certain buildings?
Building materials like concrete, metal framing, and low-emissivity coated glass block cellular signals. This isn’t iPhone-specific. The best workaround is Wi-Fi Calling under Settings > Phone > Wi-Fi Calling, which routes calls and texts over Wi-Fi when cellular drops. Most major US carriers including AT&T, T-Mobile, and Verizon support it on recent iPhones.
How long does it take for network settings to reset?
The reset itself takes about 30 to 45 seconds. Your iPhone restarts automatically, and reconnecting to Wi-Fi and cellular usually takes another 1 to 2 minutes. Have your Wi-Fi passwords ready before you start, since every saved network gets erased during the process.

iPhone 17 Cellular Data Not Working on iOS 26? 9 Fixes
iPhone 17 cellular data still dropping on iOS 26? Apple fixed the launch bug in iOS 26.0.1, but recovery failures persist. Here's the fix ladder.

iPhone Cellular Data Not Working Abroad? eSIM Fixes
Travel eSIM showing no data abroad? Fix iPhone roaming with the data-line check, Data Roaming toggle, APN settings, and network selection steps.

iPhone Cellular Data Not Working for Some Apps? 8 Fixes
Some iPhone apps refuse to load on cellular while others work fine. Check the per-app cellular toggle, Low Data Mode, VPN profiles, and Screen Time.

iPhone Stuck on EDGE? How to Get 5G or LTE Back (2026)
iPhone stuck on EDGE with crawling data? Here's why the E icon appears, which settings force 5G or LTE back, and when the problem is your carrier.