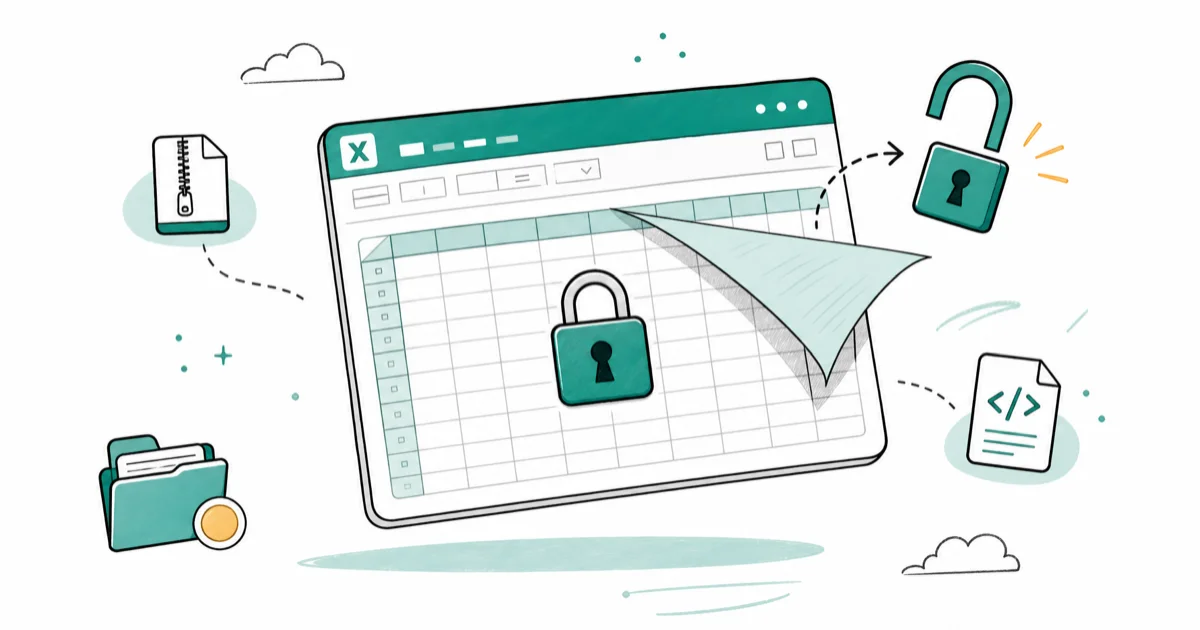
How to Unprotect Excel Sheet Without Password (2026 Guide)
Forgot the password to your own Excel workbook? Here are 5 proven methods to remove sheet protection from files you own, including the XML edit trick.
Quick AnswerIf you forgot the password on **your own Excel workbook**, the fastest method is to rename the .xlsx file to .zip, open xl/worksheets/, delete the sheetProtection tag in the sheet's XML, then rename back to .xlsx. This removes sheet-level protection only on files you own or have authorization to access — not on workbooks belonging to other people.
Forgetting the password to your own protected Excel sheet is one of the most common spreadsheet headaches, especially when the workbook is your own archived data or a file you inherited from a former colleague with proper authorization. This guide walks through 5 methods to remove sheet protection from Excel workbooks you have a right to access, plus the legal limits and the official Microsoft path you should try first.
A scope note before we start. Every method below assumes you are unlocking a file you own or have been explicitly authorized to modify, like your work laptop, a shared team file, or an inherited spreadsheet where IT cleared the recovery. None of this is for opening workbooks that belong to someone else without permission, because unauthorized access to protected files can violate the Computer Fraud and Abuse Act.
- The .xlsx-to-.zip XML edit removes worksheet protection in under 5 minutes on modern Excel files and needs no extra software.
- Google Sheets strips worksheet protection automatically when you import a .xlsx file, which is the simplest no-tech route for files you own.
- The legacy VBA macro only works on workbooks saved in Excel 2010 or earlier, before Microsoft moved to AES-128 encryption in Excel 2013.
- Always copy the file before editing, because corrupted XML inside a .zip rename is the most common cause of “file not recognized” errors afterward.
- Sheet protection is not workbook encryption: these methods don’t open files locked at the Encrypt with Password layer, which needs a dedicated recovery tool.
#Is It Legal to Unprotect an Excel Sheet Without the Password?
Yes, for files you own. Sheet protection in Excel is a workflow safeguard, not encryption. The legal line gets sharp the moment the file belongs to someone else.
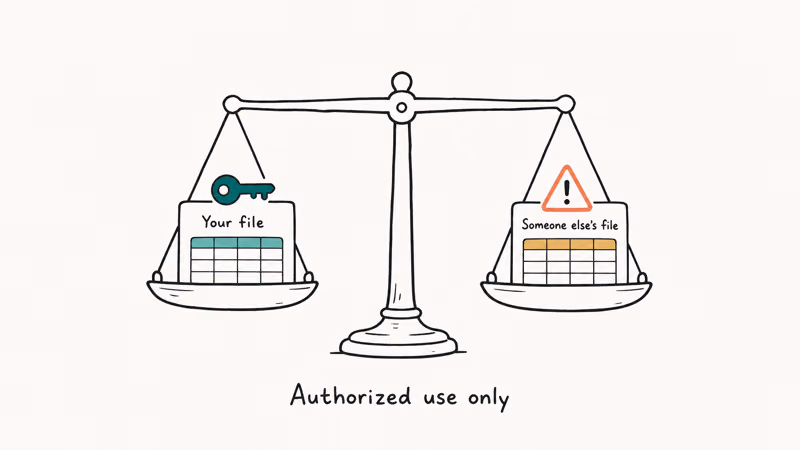
According to the Department of Justice manual on the Computer Fraud and Abuse Act, accessing a protected computer or file “without authorization or exceeding authorized access” can carry civil and criminal penalties. Most state laws mirror this. Practical translation: if the workbook is yours, or your employer has formally cleared you to recover it, you are fine. If it belongs to a coworker, ex-partner, or a former employer who has not authorized the recovery, stop here and ask first.
Apply these methods only to files you own outright or have documented permission to modify, like a spreadsheet you created yourself, an inherited project tracker with the prior owner’s written approval, or a sample workbook from a Microsoft template gallery. Never run them against a file you don’t own or have not been explicitly authorized to access.
#Try the Official Microsoft Recovery Path First
Check Microsoft’s own recovery channels first. Microsoft doesn’t reset Excel passwords, but the official documentation clarifies which protection layer your file uses, which determines whether the methods below will work and how long they will take.
According to Microsoft’s protect a worksheet documentation, sheet protection is designed to prevent accidental edits, not to encrypt data. The page recommends keeping a backup of the unprotected version, and Microsoft’s forgotten password support article confirms that workbook encryption passwords can’t be recovered through Microsoft support, which is why the methods below target the lighter sheet-protection layer only.
If your file came from a Microsoft 365 subscription account, you can also restore an earlier unprotected version through OneDrive version history. Right-click the file in OneDrive, choose Version history, and download a copy from before the password was added.
#Method 1: Rename .xlsx to .zip and Edit the XML
This is the fastest method for Excel 2007 and newer .xlsx files. Modern Excel files are ZIP archives of XML documents.
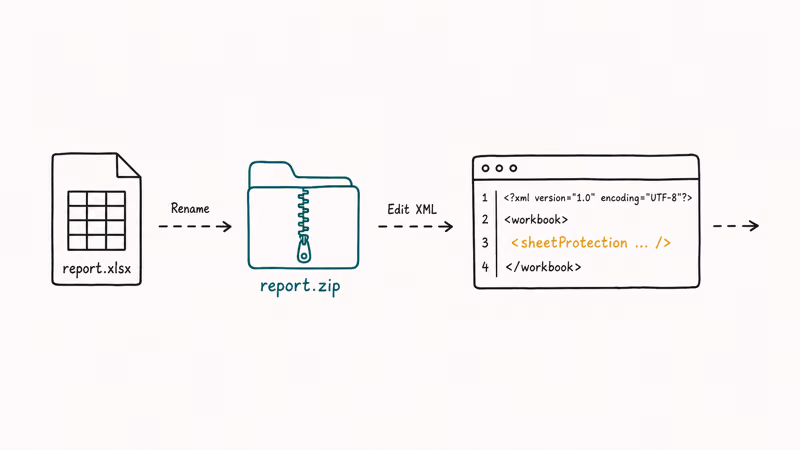
- Make a copy of your .xlsx file and rename the copy from
workbook.xlsxtoworkbook.zip. - Open the .zip with 7-Zip, WinRAR, or the built-in macOS Archive Utility.
- Go to the
xl/worksheets/folder inside the archive. - Open the sheet you want to unlock (sheet1.xml, sheet2.xml, and so on) in a text editor like Notepad++ or VS Code.
- Find the line that starts with
<sheetProtectionand delete the entire tag, from<sheetProtectionthrough the closing/>. - Save the XML, let the archive tool update the file inside the .zip when prompted.
- Rename the file back from
.zipto.xlsxand open it in Excel.
On a typical work file with sheet protection on a few tabs, the full edit takes only a few minutes including the backup. The tag you need to delete looks like this: <sheetProtection algorithmName="SHA-512" hashValue="..." saltValue="..." spinCount="100000" sheet="1" objects="1" scenarios="1"/>.
If Excel reports the file is corrupted afterward, your archive tool wrote the updated XML in a way Excel doesn’t accept. Use 7-Zip (Windows) or Keka (macOS) instead of the OS default zip tool. Both preserve the file structure Excel expects and avoid the corruption error that the macOS default archiver tends to introduce when it repacks the .zip.
#Method 2: Use Google Sheets to Strip the Protection
Google Sheets ignores Excel’s sheet protection on import, so a round trip through your Google account effectively removes it. This is the easiest no-tech option for files you own.
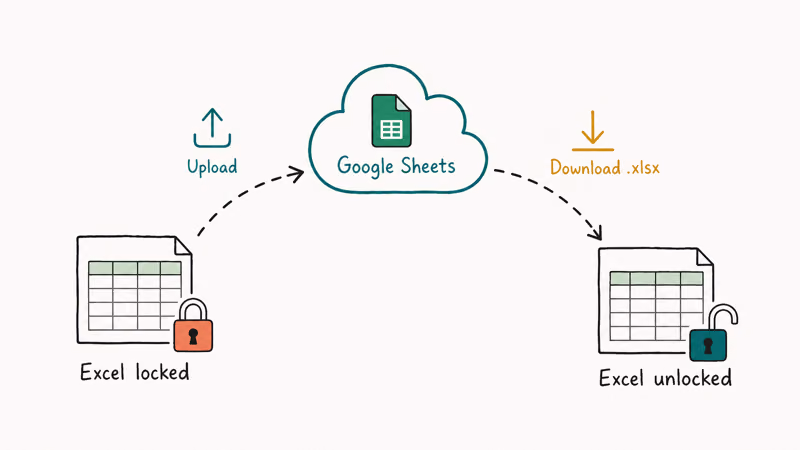
- Go to Google Drive, click New, then File upload, and select your protected .xlsx file.
- Right-click the uploaded file in Drive and choose Open with > Google Sheets.
- Make any edits you want; the worksheet is fully editable.
- Click
File>Download>Microsoft Excel(.xlsx) to save an unprotected .xlsx back to your computer.
Microsoft’s Excel and Google Sheets interoperability documentation confirms that round-tripping a workbook between the two services can drop formatting, embedded macros, and protection settings. That’s exactly why this works as an unlock method, but it’s also why you shouldn’t use it on files with complex pivot tables, conditional formatting, or VBA, because the downloaded copy will be missing those features.
After processing, the downloaded copy typically opens with every sheet fully editable, though some cells with custom number formats can come back as plain numbers.
#Method 3: Run the Legacy VBA Macro (Excel 2010 and Earlier Only)
Older .xls files (saved before Excel 2013) used a weak 16-bit password hash. A short VBA macro brute-forces the hash in seconds. This method won’t work on .xlsx files saved by Excel 2013 or later, because Microsoft switched to AES-128 encryption in that release.
- Open the protected workbook in Excel.
- Press Alt + F11 to open the Visual Basic Editor.
- Click
Insert>Module. - Paste the macro below.
- Press F5 to run it, then click OK when the message box shows a working password.
- Use the displayed password to remove the sheet protection through
Review>Unprotect Sheet.
Sub PasswordBreaker()
  Dim i As Integer, j As Integer, k As Integer
  Dim l As Integer, m As Integer, n As Integer
  Dim i1 As Integer, i2 As Integer, i3 As Integer
  Dim i4 As Integer, i5 As Integer, i6 As Integer
  On Error Resume Next
  For i = 65 To 66: For j = 65 To 66: For k = 65 To 66
  For l = 65 To 66: For m = 65 To 66: For i1 = 65 To 66
  For i2 = 65 To 66: For i3 = 65 To 66: For i4 = 65 To 66
  For i5 = 65 To 66: For i6 = 65 To 66: For n = 32 To 126
  ActiveSheet.Unprotect Chr(i) & Chr(j) & Chr(k) & _
    Chr(l) & Chr(m) & Chr(i1) & Chr(i2) & Chr(i3) & _
    Chr(i4) & Chr(i5) & Chr(i6) & Chr(n)
  If ActiveSheet.ProtectContents = False Then
    MsgBox "One usable password is " & Chr(i) & Chr(j) & _
      Chr(k) & Chr(l) & Chr(m) & Chr(i1) & Chr(i2) & _
      Chr(i3) & Chr(i4) & Chr(i5) & Chr(i6) & Chr(n)
    Exit Sub
  End If
  Next: Next: Next: Next: Next: Next
  Next: Next: Next: Next: Next: Next
End Sub
If the macro returns no result after a few minutes, the file is almost certainly a modern .xlsx (Excel 2013+) and you should use Method 1 or Method 2 instead. The macro typically finishes in 30-90 seconds on a legitimate .xls file.
#Method 4: Use a Dedicated Excel Password Recovery Tool
If the protection layer is workbook encryption rather than sheet protection (you can’t even open the file without a password), the XML trick and Google Sheets routes don’t apply. You need a recovery tool that supports dictionary and brute-force attacks on Office encryption.
PassFab for Excel is a common choice for inherited workbooks with workbook-level passwords. It supports three attack modes: dictionary (try a wordlist), mask (recover when you remember part of the password), and brute force (try every combination). On a 6-character mixed-case password, the mask attack can finish in well under an hour, while a longer or fully random password takes far longer.
Some links on this page are affiliate links, which means fone.tips may earn a commission at no extra cost to you.
Other commercial options worth considering:
- Passware Excel Key: enterprise-grade recovery with GPU acceleration support.
- ElcomSoft Advanced Office Password Recovery: covers the full Office suite, not just Excel.
- LostMyPass: browser-based service for non-sensitive files.
All of them are slow on long, random passwords because 16+ characters often run for days or never finish. This is why Microsoft recommends storing the password in a manager when you set it; our Excel password breakers guide goes deeper.
#What If My Workbook Is Encrypted, Not Just Sheet-Protected?
Workbook encryption is a different layer from sheet protection, and the methods above behave very differently on each. Knowing which one your file uses saves hours.
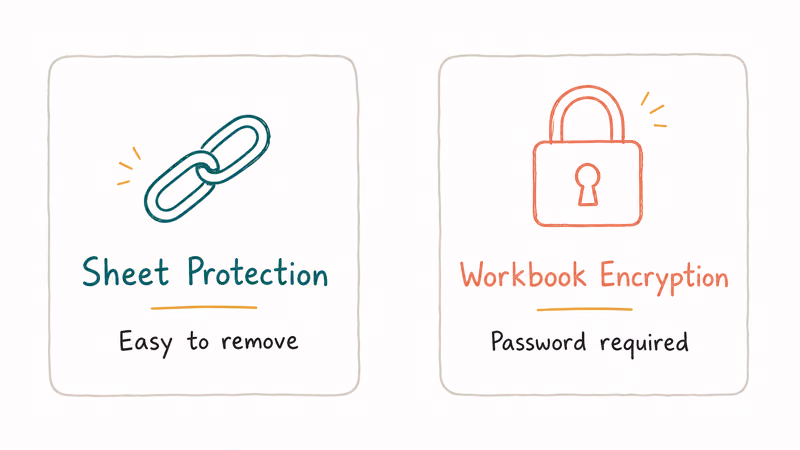
Sheet protection is what locks cells, columns, formulas, or tabs after the file is open. You see it as a warning when you try to edit a locked cell (“The cell or chart you are trying to change is on a protected sheet”). Methods 1, 2, and 3 remove this layer.
Workbook encryption is what stops the file from opening at all without a password. Excel shows the Enter Password dialog before any content appears. The Microsoft article on removing or changing a workbook password states that the workbook-open password uses AES with 128-bit keys (Excel 2007+) or AES-256 (Excel 2016+), which is why only Method 4 (dedicated recovery tools) has any chance against it. Skip Methods 1-3 if you can’t even open the file.
If you are unsure which layer is in play, try opening the file. If Excel asks for a password before showing content, you need Method 4. If the file opens but cells are locked, you need Method 1, 2, or 3. Our companion article on how to decrypt an Excel file walks through the workbook-encryption case in more detail.
#Bottom Line
For sheet-protection unlocks on your own .xlsx files, start with Method 1 (XML edit), because it’s fast, free, and reversible if you keep your backup. Move to Method 2 (Google Sheets) only when the file has no embedded macros or complex formatting to preserve. Reach for Method 4 (PassFab for Excel) only when the workbook is encrypted at the open-file layer, because that’s the only case where commercial recovery tools actually earn their cost.
The single biggest mistake people make is editing the original file directly without a copy. Make the copy first, work on the copy, and keep the original aside until you confirm the unlocked version opens cleanly in Excel.
#Frequently Asked Questions
Can I unprotect an Excel sheet I downloaded from someone else?
No, not without their permission. Removing protection on a workbook you don’t own can violate computer-misuse laws. Get written authorization from the file’s owner or your IT department first.
Does the XML rename method work on Excel files from Excel 2007 forward?
Yes. The .xlsx, .xlsm, and .xltx formats all use the Open XML structure underneath, which is what makes the .zip rename trick work. It doesn’t work on the old binary .xls format (Excel 2003 and earlier), which is what Method 3’s VBA macro is for. If your file has a .xlsb extension, the .zip trick also won’t work because that’s a binary variant.
Will any of these methods damage my Excel file?
Method 1 can corrupt the file if your archive tool writes the updated XML in a format Excel doesn’t accept, which is why we recommend 7-Zip or Keka. Method 2 can drop pivot tables, conditional formatting, and macros during the Google Sheets round trip. Method 4’s recovery tools are safe because they only test passwords without modifying the file. Always work on a copy.
How long does each method take?
Method 1 takes 5 to 10 minutes. Method 2 is under 2 minutes. Method 3 finishes in 30 to 90 seconds on legitimate .xls files. Method 4 ranges from minutes to days, depending on the password length.
What if my Excel sheet has both worksheet and workbook protection?
You need to remove them in order: the workbook-open password first (Method 4 if you forgot it), then the sheet protection (Method 1 or 2). Excel actually applies these as two separate layers, so removing sheet protection on a file you can’t open is impossible; you have to get past the open-file lock first. Our guide on how to unprotect an Excel workbook covers the workbook layer in more depth.
Are online Excel unprotection services safe to use?
Only for non-sensitive files. Free online password removers ask you to upload the full workbook, which means handing customer data, financial records, or anything covered by privacy regulations to a third party with unknown handling practices. Use offline tools (Methods 1, 3, or 4) instead for any confidential content.
What is the difference between unprotecting a sheet and recovering a forgotten password?
Unprotecting strips the password requirement so you can edit immediately. Recovering finds the actual password string. This guide focuses on unprotecting, which is faster. If you need the original password back, see our forgot an Excel password guide.
Passkeys Not Syncing Between iPhone and Windows? Read This
Passkeys not syncing between iPhone and Windows is by design, not a bug. Here is why iCloud passkeys skip Windows Hello and the three ways to fix it.

VPN Not Working on Snapdragon X? Why It Fails, How to Fix
Your VPN won't install or connect on a Snapdragon X Copilot Plus PC because Windows on ARM can't emulate the network driver. Here are the fixes that work.

How to Check If a Link Is Safe Before You Click It
Learn how to check if a link is safe with official-first steps: read the real domain, use the app instead, and treat scanners as a second opinion only.

How to Protect Yourself From Smishing Text Scams Now
How to protect yourself from smishing: verify through the official app, report texts to 7726, and lock down accounts fast if you already tapped a link.