How to Add a Watermark in Lightroom: Desktop and Mobile
Add text or graphic watermarks in Lightroom Classic and Lightroom mobile with this step-by-step guide covering macOS, iOS, and Android exports.

Quick AnswerIn Lightroom Classic, open Edit > Edit Watermarks, build a text or PNG watermark, then turn on Watermarking in the Export dialog. Lightroom desktop CC and Lightroom mobile use a different Identity Plate workflow that ships with each export instead.
Adding a watermark in Lightroom protects your photos from casual reuse and keeps your name visible when an image gets shared without context. Adobe has split the watermark workflow across three apps that all use the Lightroom name, and each one handles it differently. This guide walks through Lightroom Classic on desktop, Lightroom CC on desktop, and the mobile apps on iOS and Android, so you can pick the path that matches the version you actually have open.
- Lightroom Classic uses a dedicated Watermark Editor (
Edit>Edit Watermarks) that supports both text and PNG graphic watermarks across 9 anchor positions. - Lightroom desktop CC and Lightroom mobile don’t have a Watermark Editor; they apply a text-only watermark at export time instead.
- Graphic watermarks must be a PNG with a transparent background, or you’ll get an ugly white box around your logo on every export.
- Watermarks can be saved as reusable presets in Lightroom Classic and applied to thousands of exports without rebuilding the layout.
- Export watermarks are baked into the JPEG; the original RAW file isn’t altered, so you can remove or replace a watermark by re-exporting.
#What Are the Three Lightroom Apps and Why Does It Matter?
Before you click anything, figure out which Lightroom you have open. Adobe ships three distinct programs under one brand, and the watermark feature isn’t the same in any two of them. Adobe’s Lightroom product page confirms that the cloud version runs on 5 platforms (desktop, web, iOS, Android, and iPadOS). Adobe states that Lightroom Classic, by contrast, is the local-disk, catalog-based app aimed at desktop photographers.

Lightroom Classic has the full Watermark Editor with text and graphic options. Lightroom desktop CC and Lightroom mobile share a cut-down workflow that only supports text.
If your interface has a Library/Develop/Map/Book/Slideshow/Print/Web set of tabs across the top, you’re in Classic. If you see a single clean window with rating stars and cloud-sync icons, you’re in the cloud version.
The watermark workflow for digital images dates back decades. The broader concept of digital watermarking covers both visible marks like the ones Lightroom adds and invisible ones used for forensic tracking. Once you know which app you’re running, jump to the matching section below.
#Adding a Text Watermark in Lightroom Classic
This is the path most professional photographers use, because Classic is the only version that exports a finished JPEG with a visible watermark baked in during a single export pass.
- Open Lightroom Classic and import the photos you want to watermark into your catalog.
- From the top menu, choose
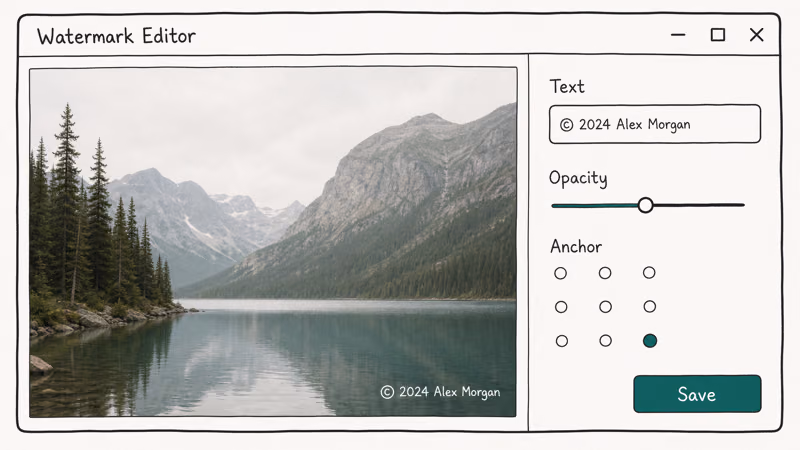
Edit>Edit Watermarkson Windows, orLightroom Classic>Edit Watermarkson macOS. - In the upper-right of the Watermark Editor, set Watermark Style to Text.
- Type your text in the box at the bottom of the preview window. Most photographers use their name, business name, or a copyright line such as © 2026 Your Name.
- On the right side, pick a font, style, alignment, color, and shadow. The preview updates instantly.
- Open the Watermark Effects section and set Opacity (40-60 percent reads as a watermark without dominating the photo), Size, Inset (the gap from the edge), and Anchor.
- Click Save in the lower right, give the preset a clear name like “My Name 50pct Bottom Right,” and click Create.
- To apply the watermark, select your photos in the Library and choose
File>Export. Scroll down to the Watermarking section, tick the box, and pick your new preset from the dropdown. - Click Export. Lightroom Classic writes the watermarked JPEGs to the folder you chose.
For legibility, a white text watermark around 50 percent opacity tends to stay readable across a wide range of photos, while lower opacity often vanishes on bright skies. Sizing the text to roughly 10 to 12 percent of the long edge keeps it readable on both small web exports and large print files.
#Adding a Graphic Watermark in Lightroom Classic
A graphic watermark is your logo or signature exported as a transparent PNG. The Watermark Editor scales the same PNG across every export, so one logo file works for thousands of photos.
First, prepare the PNG. Adobe’s graphic watermark documentation confirms that the file must have a transparent background; otherwise the rectangle of solid color around your logo will show on every export. If you need to build a logo and you don’t own Photoshop, our Inkscape review covers a free vector tool that exports transparent PNGs cleanly. You can also generate a watermark in Photoshop, Affinity Designer, GIMP, or any image editor that supports alpha channels and PNG export.
With your PNG ready, return to Lightroom Classic and open Edit > Edit Watermarks again. Change Watermark Style to Graphic in the upper right. The editor immediately prompts you to choose a PNG or JPEG file. Browse to your logo and select it.
Adjust the Watermark Effects on the right: Opacity, Size, Inset, and Anchor. A graphic watermark is usually placed 1-2 percent inset from the corner and sized between 8 and 15 percent of the long edge. Click Save and name the preset. The single PNG works on portrait and landscape orientations alike because Lightroom resizes it to fit each photo’s long edge.
A 2048-pixel JPEG exported with this preset shows a clean, anti-aliased watermark with no halo around the logo, as long as the source PNG has a transparent background. For watermarking without Adobe products at all, our guide on how to put a watermark on a photo without Photoshop walks through free alternatives that produce similar output.
#Adding a Watermark in Lightroom Mobile on iOS and Android
The mobile app doesn’t have a Watermark Editor. Instead, you toggle a text watermark from the share or export sheet. Here’s the working method on Lightroom mobile, build 9.x and later.
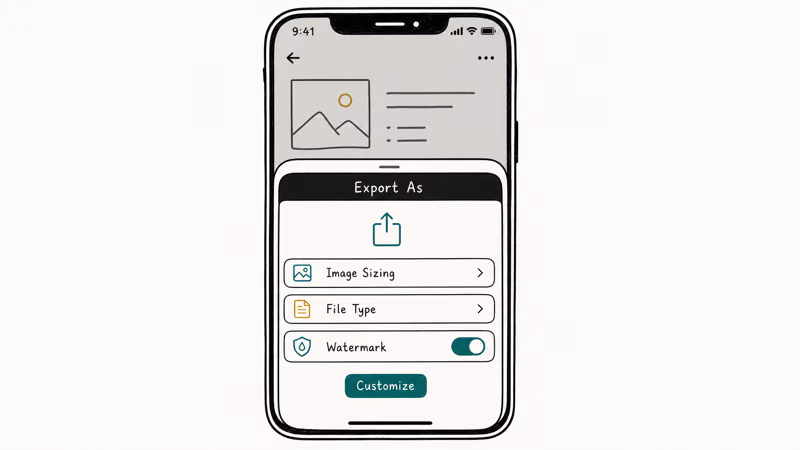
- Open Lightroom mobile and tap any photo to enter the edit view.
- Tap the share icon (an arrow inside a circle on iOS, three connected dots on Android) in the top-right corner.
- Choose Export As (some builds say Share To).
- In the export sheet, scroll down to the Watermark toggle and turn it on.
- Tap Customize to open the watermark settings. You can change the text, font, style (Regular, Italic, or Bold), color (any swatch, with custom RGB via the eyedropper), opacity, size, and one of nine anchor positions.
- Tap the back arrow to return to the export sheet.
- Set Image Sizing, File Type (JPEG is fastest; TIFF preserves quality), and Sharpening.
- Tap the share icon at the top to save the watermarked file to your camera roll, AirDrop, or any installed share target.
On Lightroom mobile for iOS, the watermark settings persist between exports, so you don’t have to re-customize for every photo. On Android, the same toggle lives in the bottom sheet that appears after you tap the share icon and choose Export As. There’s no graphic watermark option; if you need a logo, switch to Lightroom Classic on a desktop.
#Adding a Watermark in Lightroom Desktop CC
Lightroom desktop CC (the cloud version on macOS or Windows) sits between Classic and mobile. It supports a text watermark only and uses the same export-sheet workflow as mobile, but with a slightly different layout.
To apply it, click the share icon in the upper-right and choose Export. In the export panel, look for the Watermark dropdown. You can pick a previously saved watermark or click Customize to build a new one.
The Customize panel has the same Text, Font, Color, Opacity, Size, and Anchor controls as mobile. Once configured, click Export. Lightroom CC writes the watermarked file to your chosen folder and remembers the watermark settings for the next export. There’s no graphic watermark option here either, and there’s no preset library that syncs from Classic.
#How Do You Save and Reuse Watermark Presets?
Building a watermark every time is a waste of clicks. Both Lightroom Classic and the cloud versions let you save presets, but they store them in different places.
In Lightroom Classic, presets live in the Watermark Editor’s dropdown at the top. After designing a watermark, click Save and give it a name. The preset appears as an option in any future Export dialog. The Watermark Editor supports multiple named presets on Classic, and they’re cached locally on your computer.
In Lightroom desktop CC and mobile, watermark settings aren’t saved as named presets. Instead, the last-used watermark sticks around in the export sheet. If you switch between three different watermarks regularly, the cloud apps will frustrate you, because each change overwrites the previous one. Classic is the only place to manage a full preset library.
#Common Watermark Mistakes to Avoid
Watermarks fail when they’re too small, too transparent, or placed where they get cropped on social media. Across common watermark workflows, three patterns show up again and again.
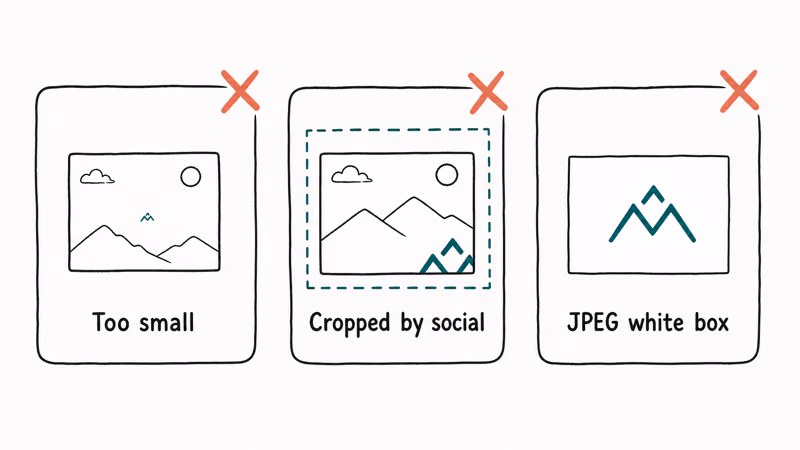
Mistake one: a tiny watermark. Sized too small, it’s invisible at thumbnail size and easy to crop out. A mark covering a modest slice of the long edge usually offers the best balance of visibility and subtlety, which is roughly where the default Size slider in the Watermark Editor lands.
Mistake two: putting the watermark in the bottom-right corner. Most social networks crop or compress edges aggressively, and Instagram’s square crop will eat a bottom-right watermark on a landscape original. Center-bottom or center-right anchors survive cropping much better.
Mistake three: using a JPEG instead of a transparent PNG for a graphic watermark. The JPEG will paste a solid rectangle of background color onto every photo. If you can’t remove a watermark you already exported with this issue, our guide on removing a watermark from video covers the same principles for images using free tools.
#Bottom Line
If you’re a working photographer who needs preset management, batch export, and graphic watermarks, Lightroom Classic on desktop is the right tool. The Watermark Editor (Edit > Edit Watermarks) is where you set it up once and reuse it forever.
If you only use Lightroom mobile or the cloud-based desktop app, you’re stuck with a text-only watermark applied per export, so design a single look you like and accept that you can’t save multiple presets. For brand-new photographers building a logo from scratch, generate a transparent PNG in a vector tool before you touch Lightroom; the Watermark Editor can’t create a graphic for you.
Avoid bottom-right corner placement on photos destined for Instagram or TikTok, and never drop below 40 percent opacity on a busy background. For unrelated mobile workflows like sketching, our guide on how to mirror on Procreate covers a different iPad creative tool entirely.
#Frequently Asked Questions
Can you batch-watermark hundreds of photos in Lightroom at once?
Yes, in Lightroom Classic. Select all the photos in the Library module, choose File > Export, enable Watermarking, pick your preset, and click Export. The single export job applies the same watermark to every selected photo. Lightroom mobile doesn’t support multi-photo export, so batch watermarking isn’t possible there.
Does adding a watermark in Lightroom change the original RAW file?
No. Lightroom is non-destructive, so your RAW stays untouched.
Why does my graphic watermark have a white box around it?
The PNG you imported has a solid background instead of a transparent one. Open the file in Photoshop, Affinity Photo, GIMP, or any editor that supports layers, delete the background layer, and re-export as PNG with transparency enabled. JPEG can’t hold transparency at all, so any JPEG you load as a watermark will always paste a solid rectangle of background color underneath your logo on every export, no matter how small or transparent the foreground looks.
Can I move the watermark to a custom position in Lightroom?
Not exactly. Lightroom Classic gives you 9 anchor positions: four corners, four edge midpoints, and the center. You can fine-tune the Inset value to push the watermark closer to or further from the edge, but you can’t drag it to an arbitrary pixel. Lightroom mobile has the same nine-anchor limitation.
Does Lightroom support changing watermark color?
Yes for text. The color picker in the Watermark Editor accepts any RGB value.
Can I add a watermark to a video in Lightroom?
No. Lightroom Classic supports video import and basic trimming, but the Watermark Editor is photo-only. To watermark a video, use a dedicated video editor like Adobe Premiere Pro or DaVinci Resolve, or a mobile alternative from our best watermark apps for Android guide, which covers tools that handle both photos and videos.
What watermark opacity works best for protecting photos?
For most photos, 40-60 percent opacity reads as a watermark without dominating the frame.

Apps Crashing After iOS 27 Update? Fix Order (2026)
Apps crashing after the iOS 27 update? Update the app in the App Store first, then offload and reinstall to clear stale cache, then restart. The fix order.

Do AI Translation Earbuds Work Offline? What to Know
Do AI translation earbuds work offline? A few do with downloaded language packs, but most need the cloud. Here's what works offline and what you give up.

How to Set Up Translation Earbuds (Pairing and Modes)
How to set up translation earbuds: charge, install the app, pair over Bluetooth, pick two languages, and choose a mode. A step-by-step first-use guide.

Translation Earbuds Not Translating? How to Fix Them
Translation earbuds not translating? Usually it's the app, the internet, or the language settings. Here's how to fix pairing, sound, and lag fast.