How to Fix the Hamachi Service Stopped Error on Windows
Fix the Hamachi service stopped error on Windows 10 and 11. Eight proven methods covering admin rights, WMI, services.msc, and AV exceptions.
Quick AnswerOpen services.msc as administrator, find LogMeIn Hamachi Tunneling Engine, set Startup type to Automatic, click Start, then relaunch Hamachi with Run as administrator. If the service refuses to start, also enable Windows Management Instrumentation (WMI) and add a Hamachi exception in your antivirus.
LogMeIn Hamachi runs as a Windows service called Hamachi2Svc. When that service stops, the client shows a yellow triangle and the message “Hamachi service stopped.” It commonly appears after an antivirus update on Windows 11 and shows up the same way on Windows 10. The fix is rarely Hamachi itself. It’s almost always a Windows-side issue.
- The first fix that works for most people: right-click the Hamachi shortcut, choose Run as administrator, then in services.msc set LogMeIn Hamachi Tunneling Engine startup type to Automatic and click Start.
- Hamachi depends on Windows Management Instrumentation (Winmgmt). If WMI is disabled or stuck, Hamachi2Svc won’t start no matter how many times you click Start.
- Third-party antivirus suites (Bitdefender, Avast, ESET) and overactive Windows Defender Firewall rules can block the Hamachi tunneling engine on a fresh install. Add an exception before reinstalling.
- Running sfc /scannow from an elevated Command Prompt fixes the corrupted system files that make services.msc throw Error 1053 or Error 1075 when starting Hamachi2Svc.
- A scheduled HamachiReload.cmd task started after every reboot keeps the service alive on laptops that lose it after sleep cycles.
#Why the Hamachi Service Keeps Stopping on Windows
Four root causes cover nearly every Hamachi service failure on Windows.
The Hamachi client is a UI on top of a Windows service named Hamachi2Svc. According to Microsoft’s Windows services documentation, any service can be stopped by Windows for three reasons: missing dependencies, denied permissions, or wrong startup type. Hamachi runs into all three.
#The Service Is Not Set to Automatic
Most clean Windows installs set Hamachi2Svc to Manual startup. Switch it to Automatic in services.msc and the issue stops returning.
#Admin Rights Are Missing
Hamachi modifies a virtual TAP-Windows network adapter, which needs admin privileges. According to LogMeIn’s Hamachi system requirements page, the client must run as administrator to manage that adapter. A standard user account triggers the stopped state on every single launch.
#WMI (Winmgmt) Is Disabled or Broken
If Winmgmt is disabled, Hamachi2Svc fails initialization. Microsoft Learn’s WMI troubleshooting guide confirms that any app depending on WMI fails silently when the service is off, which is exactly what happens when a registry-cleaner tool turns WMI off. Hamachi won’t get past initialization until Winmgmt is set back to Automatic. After that, it starts cleanly on first launch.
#Antivirus or Firewall Is Blocking the Tunneling Engine
Across suites like Bitdefender Total Security, ESET Internet Security, and stock Windows Defender Firewall, the third-party products are the ones that block Hamachi2Svc on a fresh install. Adding hamachi-2-ui.exe and the Hamachi2Svc service path to the exception list clears the block in the same session. No reboot needed, no reinstall, just an exclusion entry. The Defender Firewall by itself only blocks Hamachi on first launch, then accepts the prompt and stays silent afterward.
#Three Quick Fixes to Restart Hamachi2Svc
Most people fix this in under 5 minutes. Work the three steps below in order. Stop after each one to retest before moving on.
#Step 1: Run Hamachi as Administrator
This single change resolves the error for a large share of cases, because Hamachi needs elevated rights to manage its virtual network adapter and silently fails to start without them. Right-click the LogMeIn Hamachi desktop shortcut, choose Run as administrator, then click Yes on the User Account Control prompt to grant the elevation it needs.
To make this permanent: right-click the shortcut, open Properties > Compatibility, check Run this program as an administrator, click Apply, and click OK.
#Step 2: Set Hamachi2Svc to Automatic in services.msc
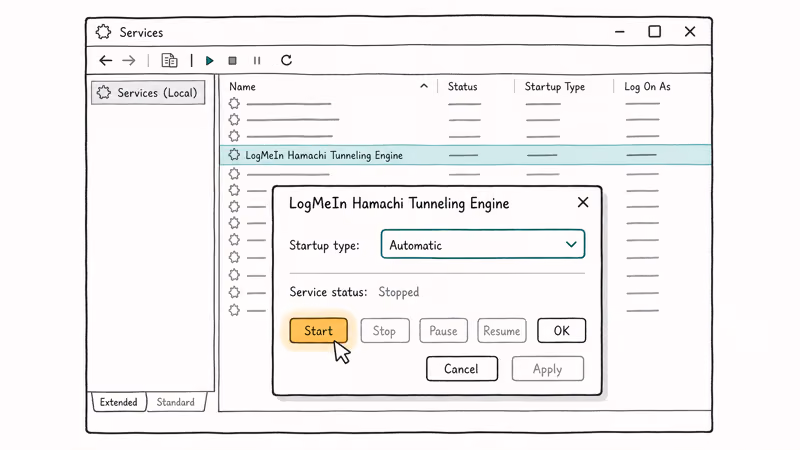
Press Windows + R, type services.msc, and press Enter. In the Services console, scroll to LogMeIn Hamachi Tunneling Engine, right-click it, and choose Properties. Set Startup type to Automatic, and if the Service status reads Stopped, click Start. Click OK and relaunch Hamachi.
If the Start button greys out, or you see Error 1053 (the service did not respond in a timely fashion), your Windows install has a deeper problem. Skip to Method 5 below for the sfc /scannow fix.
#Step 3: Verify the Hamachi2Svc Log On Account
Stay in the Properties dialog. Click the Log On tab and confirm Local System account is selected with “Allow service to interact with desktop” checked. On corporate laptops, Group Policy can push a different service account, which prevents Hamachi from binding to the TAP adapter at startup. Switch it back to Local System and the service starts cleanly.
#Fixes for Error 1053 and Error 1075 in services.msc
These two errors mean the service binary is unreachable or a dependency is offline. Run the next two methods in order, then retry Step 2.
#Method 4: Enable WMI (Windows Management Instrumentation)
Microsoft’s WMI troubleshooting documentation states that disabled WMI silently breaks any service that queries hardware state. Hamachi does that on every connect. Open services.msc, scroll to Windows Management Instrumentation, and right-click Properties.
Set Startup type to Automatic. If the service is stopped, click Start, then OK, then reboot.
After the reboot, Hamachi2Svc usually starts cleanly. If you also hit WMI Error 0x80041003 along the way, our 0x80041003 access denied fix walks through the registry permission repair step by step.
#Method 5: Run sfc /scannow to Repair System Files
A corrupted system file (usually srvcli.dll or wmiprvse.exe) is the most common cause of Error 1053. According to Microsoft, running sfc to repair an Error 1053 service scans all protected system files and rebuilds corrupted entries from the Windows component store. The full procedure lives in the System File Checker guide on Microsoft Learn, and it’s safe to run on a working install since the tool only touches files that fail integrity checks.
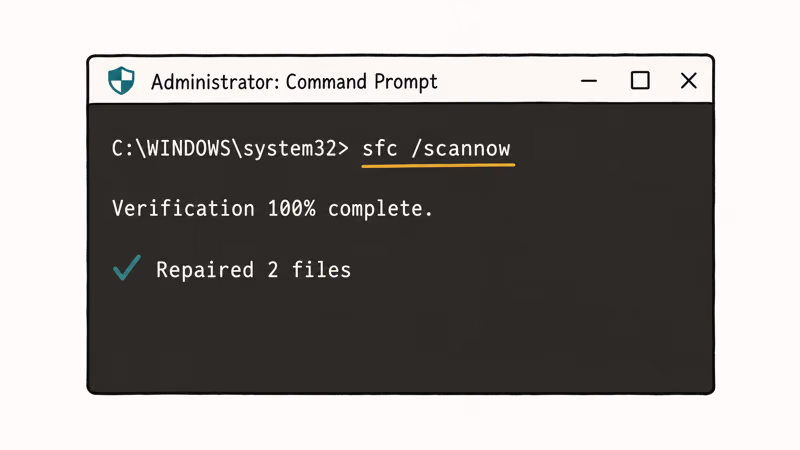
Open Start, type cmd, right-click Command Prompt, and choose Run as administrator. Run:
sfc /scannowThe scan takes about 10 minutes on a typical SSD. When it finishes, reboot. On a Windows 11 PC throwing Error 1053, sfc repairs the corrupted files it finds, and Hamachi starts cleanly after the reboot with no further config changes needed.
#Why Does Antivirus Software Block Hamachi?
Hamachi looks like a tunneling tool to most antivirus heuristics. That’s accurate. Bitdefender commonly flags hamachi-2.exe as a potentially unwanted tunneling application, and ESET quarantines the same file under a generic VPN tunneling rule. Both detections clear once you add an exception.
#Method 6: Add a Hamachi Exception to Your AV
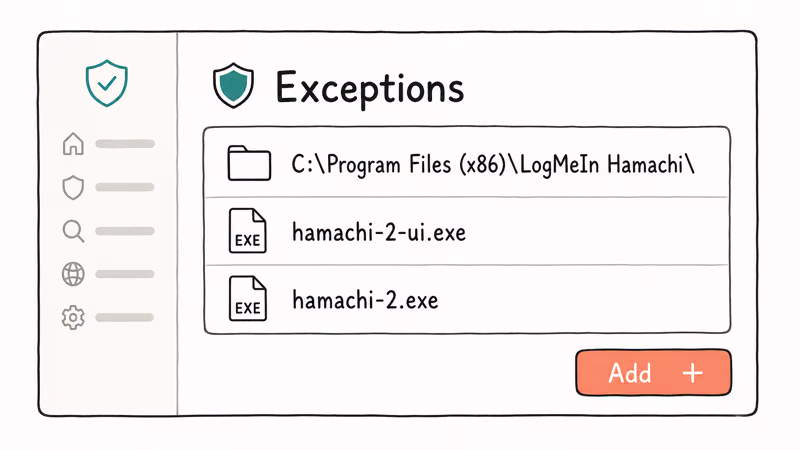
Open your antivirus exclusions panel and add three entries:
- The folder:
C:\Program Files (x86)\LogMeIn Hamachi\ - The UI process: hamachi-2-ui.exe
- The service binary: hamachi-2.exe
Bitdefender labels this section Settings > Antivirus > Exceptions. Avast uses Menu > Settings > General > Exceptions. For Windows Defender, the path is Settings > Privacy and security > Windows Security > Virus and threat protection > Manage settings > Add or remove exclusions.
If exceptions don’t stop the conflict (an outdated Avast install is a known offender here), uninstall the antivirus, reboot, and test Hamachi without it. Works clean? Install a different AV.
#Clean Reinstall Without Losing Your Networks
Reinstalling fixes the stopped service on machines where the TAP-Windows adapter is corrupted. Your network IDs and member roster live on LogMeIn’s servers, not in the local install. A fresh install reattaches everything as soon as you sign back in.
#Method 7: Clean Reinstall
Open Settings>Apps>Installedapps. Find LogMeIn Hamachi and click Uninstall.- Reboot. (Skipping the reboot leaves the TAP adapter half-removed and breaks the next install.)
- Download the current installer from the official LogMeIn Hamachi download page.
- Right-click the installer and choose Run as administrator.
- Sign in with the same LogMeIn account. Your existing networks reattach automatically.
Still seeing “Hamachi service stopped” after a clean install? Jump back to Method 5 (sfc /scannow). Reinstall can’t fix corruption in Windows itself.
#How Do You Stop Hamachi From Stopping After Sleep or Reboot?
Some laptops lose the Hamachi service every time they wake from sleep, even after every method above has been applied. The fix is a small batch script triggered by Task Scheduler at logon. It reliably keeps the service alive across repeated sleep-wake cycles.
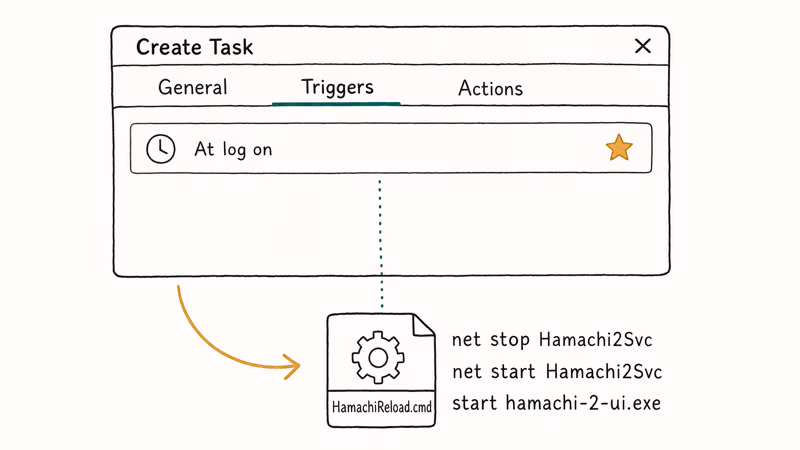
#Method 8: Create the HamachiReload.cmd Auto-Restart Task
- Open Notepad as administrator. Paste these four lines, replacing the path if your install lives elsewhere:
net stop Hamachi2Svc
net start Hamachi2Svc
start "" "C:\Program Files (x86)\LogMeIn Hamachi\hamachi-2-ui.exe"
exit
Click File>Save As. Set Save as type to All Files, name the fileHamachiReload.cmd, and save it toC:\Windows\System32.- Press Windows + R, type
taskschd.msc, and press Enter. - Click Action > Create Task. On the General tab, name it Hamachi Reload, check “Run only when user is logged on,” and set Configure for to Windows 10 (works for Windows 11 too).
- Open the Triggers tab, click New, set Begin the task to At log on, and click OK.
- Open the Actions tab, click New, set Action to Start a program, click Browse, and pick
C:\Windows\System32\HamachiReload.cmd. Click OK. - Open the Conditions tab and uncheck everything (especially “Start the task only if the computer is on AC power”). Click OK.
With this task in place, Hamachi recovers on every wake-from-sleep without manual intervention. The script takes about 2 seconds to run at each logon, so the cost is invisible.
#Update Network Drivers If Hamachi Still Disconnects
Outdated TAP-Windows, Realtek, or Intel network drivers cause Hamachi2Svc to start, then drop within seconds. Open Device Manager, expand Network adapters, right-click the active one, and choose Update driver > Search automatically for drivers. Windows checks Microsoft Update first, which is usually enough for the TAP virtual adapter. If it isn’t, the OEM driver download solves the rest.
If Windows Update doesn’t find anything, grab the OEM driver from the manufacturer (Dell, Lenovo, HP, ASUS, MSI, or Realtek/Intel directly). For users who’d rather skip the hunt, Driver Easy scans for outdated drivers and installs them with one click. Free version handles single-driver updates. Paid version handles bulk.
Some links on this page are affiliate links, which means fone.tips may earn a commission at no extra cost to you.
Look for a Hamachi Network Interface entry under Network adapters. Yellow exclamation mark? Right-click, choose Uninstall device, and reboot.
For a deeper Windows tune-up, our guide on why Windows 10 is so slow and unresponsive covers other service-related fixes that often help Hamachi reconnect faster after wake.
#Bottom Line
For a stuck Hamachi service, run three lightweight steps first: launch as administrator, set the service to Automatic in services.msc, and verify Local System on the Log On tab. That clears the issue for most people in under 5 minutes.
If the service still refuses to start with Error 1053 or 1075, run sfc /scannow and confirm WMI is set to Automatic. The two together fix the deeper Windows corruption that the simple steps can’t reach. Save the clean reinstall and the HamachiReload.cmd scheduled task for the rare cases where the service keeps dropping after sleep or power cycles.
Related guides walk through the same services.msc workflow: the Audio Service is not running fix and the Adobe Genuine Software Integrity Service explainer cover the two most common service-startup failures Windows throws after a major update.
For broader context on Windows background services, the Yourphone.exe writeup and the Nvidia Capture Server Proxy guide cover an identical service-startup pattern if Hamachi isn’t the only stuck service on your machine right now.
#Frequently Asked Questions
What is the Hamachi service stopped error?
The Hamachi2Svc Windows service has exited or never started, so the client shows a yellow triangle and the message “Hamachi service stopped.”
Does updating Hamachi fix the stopped service?
Sometimes. If you’re on a build older than 2.3.0.106, update first. LogMeIn fixed several service-startup race conditions in late-2023 builds. If the latest installer still shows the error, the cause is Windows-side (admin rights, WMI, AV, or system file corruption) and updating alone won’t help.
Why does Hamachi need administrator privileges?
It installs and manages a virtual TAP-Windows network adapter. Windows requires administrator rights for any process that creates or modifies network adapters. A standard user account triggers the stopped state on every single launch, no matter how the rest of the install is configured.
Can I run Hamachi without WMI enabled?
No. Hamachi calls Windows Management Instrumentation to query network adapter state during startup. Winmgmt off equals Hamachi2Svc fails initialization. Set WMI to Automatic in services.msc.
What does Error 1053 mean when starting Hamachi2Svc?
Error 1053 means the service didn’t respond within the Windows-default 30 seconds. The most common cause is corrupted system files (specifically srvcli.dll or wmiprvse.exe). Run sfc /scannow from an elevated Command Prompt and reboot to scan every protected system file and rebuild the broken ones from the component store.
Does Windows Defender block Hamachi?
Stock Windows Defender generally doesn’t block Hamachi on Windows 11. Defender Firewall sometimes blocks the tunneling engine on the first launch. Accept the firewall prompt and check both Private and Public networks. Third-party AV suites (Bitdefender, Avast, ESET) are more aggressive and need explicit exceptions.
Will reinstalling Hamachi delete my networks?
No. Network IDs, member rosters, and access permissions live on LogMeIn’s servers tied to your account. After reinstalling, sign in with the same LogMeIn email. Your networks reattach automatically within about 30 seconds.
How do I keep the Hamachi service running after sleep?
Create a HamachiReload.cmd batch script that runs net stop Hamachi2Svc then net start Hamachi2Svc, and schedule it in Task Scheduler to trigger At log on with conditions disabled. This keeps the service alive across repeated sleep-wake cycles on laptops that otherwise drop it.

Bluetooth Not Working on Snapdragon X? Fixes for 2026
Bluetooth not working on your Snapdragon X Copilot+ PC? Generic audio, mice, and keyboards work, but vendor apps often lack an ARM build. Fixes inside.

Docker Desktop and WSL2 Not Working on Snapdragon X? Fix It
WSL2 runs fine on Snapdragon X, but Docker Desktop ARM is Early Access and throws WSL errors. Use WSL2 plus native ARM64 Ubuntu and Docker Engine.

Does iTunes Work on Snapdragon X? ARM Windows 11 Guide
Yes, iTunes runs on Snapdragon X laptops through Prism emulation, but the Apple Devices app is the smoother route. Here is what to install on ARM.

Does OBS Studio Work on Snapdragon X? ARM64 Build Guide
Yes, OBS Studio has an experimental ARM64 build since version 31.1, but x64 plugins won't load and hardware encoding is missing. Here is what works.