DISM Error 87: What It Means and How to Fix It on Windows
Fix DISM Error 87 in Windows with step-by-step solutions for incorrect syntax, missing admin privileges, corrupted system files, and Windows Module issues.

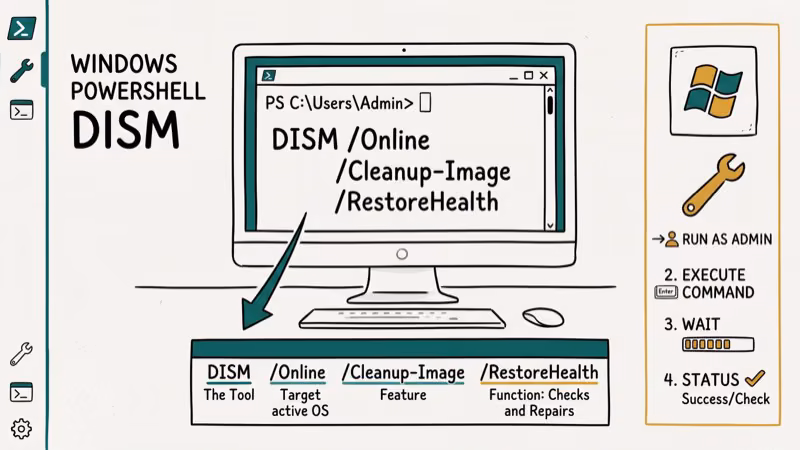
Quick AnswerDISM Error 87 is almost always caused by incorrect command spacing. Type the command as: DISM /Online /Cleanup-Image /RestoreHealth with a space before each forward slash. Run Command Prompt as Administrator and make sure Windows is up to date.
DISM Error 87 is a common error when running Windows maintenance commands. It usually points to incorrect syntax, missing administrator permissions, servicing-component problems, or broader system corruption.
- DISM Error 87 most often comes from a missing space in the command. The correct format is
DISM /Online /Cleanup-Image /RestoreHealthwith spaces before each slash - Running Command Prompt without administrator rights always triggers Error 87; right-click and select Run as administrator before typing any DISM command
- Outdated Windows builds contain known DISM bugs; running Windows Update before retrying the command fixes many cases
- The System File Checker (
sfc /scannow) can repair corrupted system files that cause DISM to fail before you resort to more complex fixes - A clean Windows installation resolves persistent DISM errors caused by deep system corruption, but should only be used after all other methods fail
#What Causes DISM Error 87?
DISM (Deployment Image Servicing and Management) is a built-in Windows tool for servicing and repairing system images. Error 87 means the command was rejected, usually because of a syntax problem or a permissions issue.
The main causes of Error 87 are:
- Incorrect spacing in the command: the most common cause. Missing a space before any
/parameter triggers the error immediately. - No administrator privileges: DISM requires elevated permissions to modify system files. Running Command Prompt normally, without right-clicking to run as administrator, always fails.
- Outdated Windows version: older builds have unresolved bugs that interfere with DISM parameter parsing.
- Corrupted system files: missing or damaged files in the Windows image block DISM from completing. Related issues can appear alongside errors like 0x80000003 or 0x00000050.
- Incompatible DISM version: using a DISM binary from one Windows build on a different build version causes parameter mismatches.
#How Do You Fix DISM Error 87?
Work through these fixes in order. The first two resolve most cases.
#Fix 1: Correct the Command Syntax
The most common cause is a missing space. Compare these two:
Correct:
DISM /Online /Cleanup-Image /RestoreHealthWrong (triggers Error 87):
DISM/Online/Cleanup-Image/RestoreHealthEvery parameter needs a space before its forward slash. Double-check for typos and extra characters before running the command.
#Fix 2: Run as Administrator
Right-click on Command Prompt and select Run as administrator, then confirm any User Account Control prompts. DISM can’t make system-level changes without elevated permissions, so this step is required. According to Windows’ User Account Control system, apps running without elevation are blocked from writing to system directories, which is why DISM can fail when not elevated.
#Fix 3: Update Windows
Go to Settings > Update & Security > Windows Update and check for pending updates. Download and install all available updates, then restart and retry the DISM command. Windows updates can replace servicing components that DISM depends on, so updating is a useful next step when syntax and elevation are already correct.
#Fix 4: Run System File Checker
Open Command Prompt as administrator and run:
sfc /scannowSFC repairs corrupted system files that can block DISM operations. Restart your computer after it completes, then retry DISM.
If SFC points to broader corruption, related issues like 0x00000002 may also appear. See the 0x80072efe guide if you also have Windows Update failures.
#Fix 5: Check Windows Modules Installer
Press Win + R, type services.msc, and start Windows Modules Installer if it isn’t running.
#Fix 6: Clean Windows Installation (Last Resort)
If all five methods above fail, deep system corruption may be the cause. Back up all important data first, then create Windows installation media from Microsoft’s official site and perform a clean install. If you hit error 0x80070652 during reinstallation, additional troubleshooting steps apply.
#Preventing Future DISM Errors
According to Microsoft’s DISM documentation, Windows Vista 2006 introduced the DISM toolset alongside the new image-based servicing model. Since Windows 10 version 1607, most DISM errors are syntax-related rather than permission or version issues. The fastest prevention strategy: copy DISM commands directly from Microsoft’s documentation rather than typing them manually.

Additional prevention steps:
- Keep Windows updated monthly
- Run
sfc /scannowevery 3-6 months for routine maintenance - Avoid running DISM commands from unofficial sources
- Use elevated Command Prompt for all system maintenance tasks
#Common DISM Commands Reference
These are the three DISM commands most Windows users need:
DISM /Online /Cleanup-Image /CheckHealth: quick check, reads cached health data, takes under 30 secondsDISM /Online /Cleanup-Image /ScanHealth: deep scan, takes 5-10 minutesDISM /Online /Cleanup-Image /RestoreHealth: repairs the Windows image, requires internet access, takes 10-30 minutes
Run them in this order when troubleshooting. Each command requires administrator privileges and correct spacing.
#DISM Error 87 on Windows 10 vs Windows 11
DISM Error 87 behavior can differ between Windows versions. Updating Windows before deeper troubleshooting is worthwhile because servicing fixes can change how DISM handles commands and repairs system images.
#When DISM Error 87 Indicates Deeper System Problems
If you’ve verified syntax, confirmed administrator mode, installed Windows updates, and Error 87 still appears, the DISM binary itself may be corrupted. This can happen after failed updates, interrupted repairs, or cleanup tools that remove servicing files. Run SFC first, then use Windows installation media to repair the component store; if both fail, a repair install keeps your personal files while replacing damaged Windows components.
#Bottom Line
Fix 1 (correct spacing) and Fix 2 (run as administrator) resolve the vast majority of DISM Error 87 cases. If those fail, run Windows Update and then SFC before trying anything more complex. Deep system corruption that survives all five methods is rare but does happen; a clean reinstall is the definitive solution. For Windows PIN issues that sometimes occur alongside DISM errors, see our Windows 10 PIN not working guide.
#Frequently Asked Questions
Can DISM Error 87 cause data loss?
No. Error 87 only means the command was rejected before it ran. No changes are made to your system when Error 87 occurs, so there’s no risk to your data from the error itself. Improper troubleshooting steps like an unplanned reinstall can affect data, which is why backing up first is important.
How often should I run DISM commands?
For most users, DISM isn’t needed for routine maintenance. Run it only when you’re experiencing specific system issues. Regular Windows Updates handle most system integrity tasks automatically.
Can antivirus software interfere with DISM?
Yes. Some real-time protection features intercept file operations that DISM needs to perform. If you get persistent errors after fixing syntax and permissions, try disabling antivirus temporarily and running the command again.
Does DISM Error 87 appear on all Windows versions?
Yes, but the frequency varies. Windows 10 and 11 have improved DISM parameter handling compared to Windows 7 and 8.1. According to Wikipedia, DISM replaced the older ImageX tool starting with Windows Vista and has been a core component of Windows since Windows 7 in 2009.
What’s the difference between DISM and SFC?
SFC (sfc /scannow) checks and repairs individual protected system files. DISM repairs the Windows component store that SFC relies on. The recommended order is SFC first; if it fails to repair something, run DISM to fix the component store, then run SFC again.
Is it safe to use DISM commands from tech forums?
Be cautious. Stick to commands from Microsoft’s official documentation or reputable sources like iFixit for Windows repair guidance. Some commands from unofficial sources use deprecated parameters that trigger Error 87 on modern Windows builds.
Why does Error 87 appear even with the correct command?
If you’ve verified syntax and administrator rights but still see Error 87, a corrupted Windows image is the likely cause. Run SFC first, then DISM with the /ScanHealth parameter to check the image state before attempting /RestoreHealth.

Bluetooth Not Working on Snapdragon X? Fixes for 2026
Bluetooth not working on your Snapdragon X Copilot+ PC? Generic audio, mice, and keyboards work, but vendor apps often lack an ARM build. Fixes inside.

Docker Desktop and WSL2 Not Working on Snapdragon X? Fix It
WSL2 runs fine on Snapdragon X, but Docker Desktop ARM is Early Access and throws WSL errors. Use WSL2 plus native ARM64 Ubuntu and Docker Engine.

Does iTunes Work on Snapdragon X? ARM Windows 11 Guide
Yes, iTunes runs on Snapdragon X laptops through Prism emulation, but the Apple Devices app is the smoother route. Here is what to install on ARM.

Does OBS Studio Work on Snapdragon X? ARM64 Build Guide
Yes, OBS Studio has an experimental ARM64 build since version 31.1, but x64 plugins won't load and hardware encoding is missing. Here is what works.