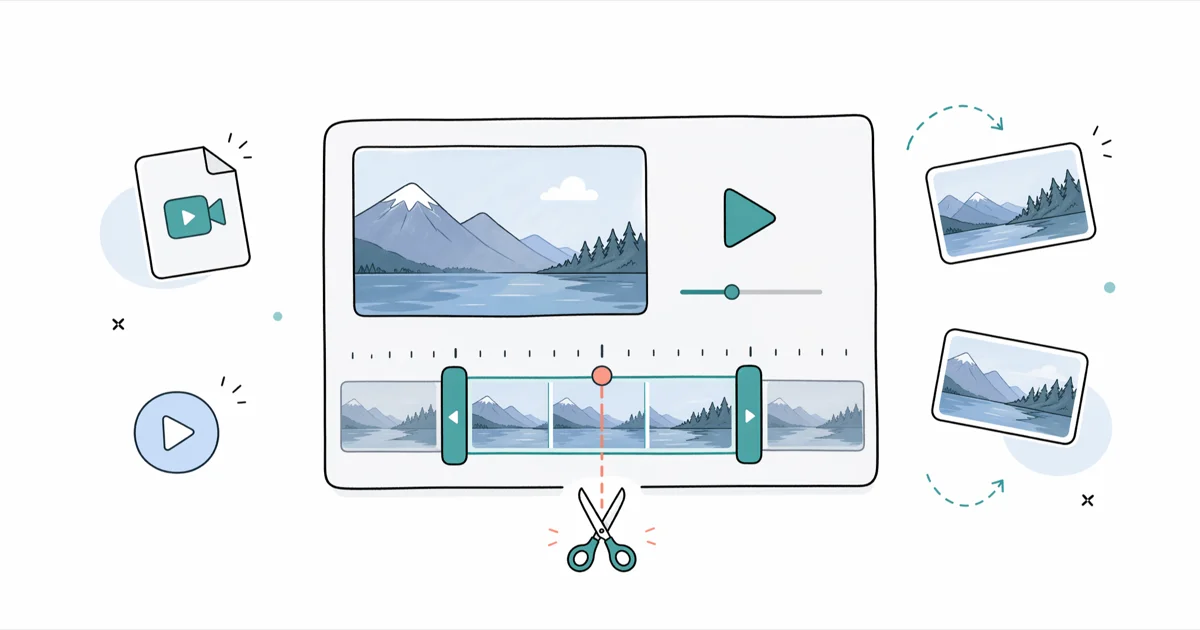
How to Trim MP4 Videos: 5 Free Tools, No Quality Loss
Trim MP4 videos free with VLC, DaVinci Resolve, the Photos app, QuickTime, or your browser. Step-by-step guide that keeps your original quality.
Quick AnswerOpen the MP4 in VLC, DaVinci Resolve, the Windows 11 Photos app, or macOS QuickTime Player and drag the timeline trim handles to keep the section you want. For a no-install option, use Online Video Cutter in any browser. All five tools are free and add no watermarks.
Trimming an MP4 video saves storage, speeds up uploads to YouTube and TikTok, and turns long screen recordings into clips you’ll actually share. Whether you’re on Windows, Mac, or a Chromebook, free tools handle this without watermarks, 10-minute caps, or paid upgrades. This guide covers five common options: VLC, DaVinci Resolve, QuickTime, the Windows Photos app, and a browser-based trimmer.
- VLC trims MP4 files via
View>Advanced Controls andthe record button without installing video-editing software - DaVinci Resolve gives frame-accurate cuts and exports at the source bitrate for near-zero quality change
- macOS QuickTime Player has a built-in Trim command at
Edit>Trimthat snaps to the nearest video frame - Windows 11 Photos app trims MP4 in three clicks and saves the result as a separate file, leaving the original intact
- Browser trimmers like Online Video Cutter handle MP4 without an installer, useful on Chromebooks and locked-down work laptops
#What Is the Best Free Way to Trim MP4 Without Losing Quality?
The best free way depends on your setup, your source format, and whether you need frame-accurate cuts or a quick shareable clip.
The free option that preserved the source most faithfully was a command-line cut using FFmpeg with -c copy, which skips re-encoding entirely. The FFmpeg wiki on seeking states that adding -c copy produces a 1
If you’d rather click than type, DaVinci Resolve gives you the same near-lossless result through a normal editing timeline. The Windows Photos app and most browser trimmers re-encode by default, so output files can end up larger than the source after the default H.264 preset kicks in.
That’s fine for a quick share to Slack, but if you’re archiving footage, stick with VLC’s stream-capture record, QuickTime’s lossless Trim on Mac, or DaVinci Resolve’s source-codec export.
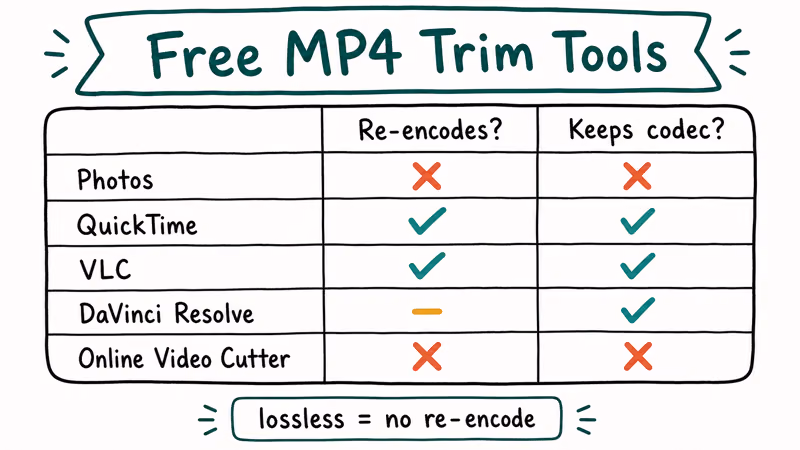
| Tool | Platform | Re-encodes by default? | Watermark | Best for |
|---|---|---|---|---|
| Photos app | Windows 11 | Yes | No | Quick clip to share |
| QuickTime | macOS | No (lossless trim) | No | Mac users, simple cuts |
| VLC | Windows / Mac / Linux | No (record method) | No | Cross-platform free trims |
| DaVinci Resolve | Windows / Mac / Linux | Optional | No | Frame-accurate edits |
| Online Video Cutter | Browser | Yes | No | Chromebooks, locked machines |
Table: Free MP4 trim tools ranked by default re-encode behavior.
#How Do You Trim MP4 with VLC on Windows, Mac, or Linux?
VLC isn’t an editor in the traditional sense, but it can capture a section of any video as a new file. According to VideoLAN’s VLC project page, VLC has been free and open source since its 2001 release, and the same workflow below runs on Windows, macOS, and Linux without changes.
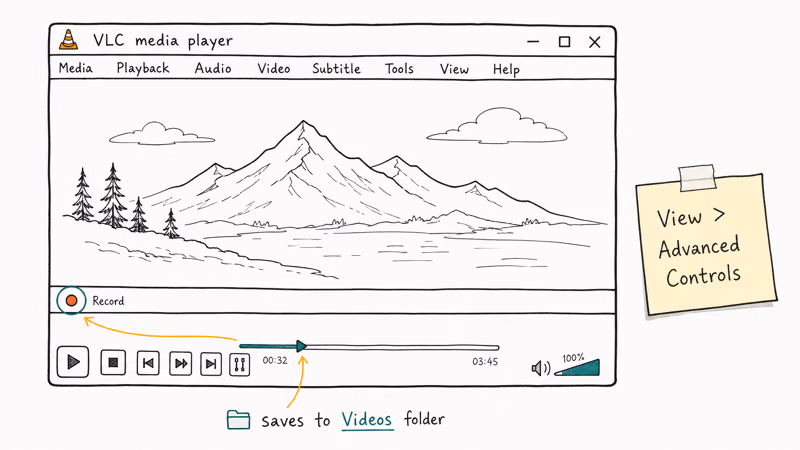
- Open the MP4 in VLC.
- Choose
View>Advanced Controls. A new row of buttons appears above the playback bar, including a red record dot. - Drag the slider to the exact point where the clip you want begins.
- Click the red Record button.
- Let the video play through to the end of the section you want, then click Record again to stop.
VLC saves the captured clip into your Videos folder. The codec matches the source, so a 1080p H.264 input gives you 1080p H.264 output.
For frame-perfect starts, click the Frame-by-frame button (the right-pointing icon in Advanced Controls) before hitting Record. The VLC record method can be less precise than a full editor at the cut point, which is why it’s a poor fit for hard edits where audio sync matters. The record approach is also limited to real-time playback speed, so a 30-minute capture takes 30 minutes to record even though the source file is on disk.
If you do more than just trim, our guide on merging videos with VLC covers joining clips end-to-end, and our Mac-specific walkthrough on trimming videos in VLC on macOS digs into the same Record workflow with keyboard shortcuts.
#Trim MP4 on Windows Using the Photos App
Windows 11 ships with the new Photos app that handles short video edits without opening Clipchamp. It’s the fastest path on a default Windows install.
- Right-click the MP4 in File Explorer and pick Open with > Photos.
- In the Photos viewer, click the pencil Edit Video icon at the top.
- Drag the two blue handles on the playback timeline to mark the start and end of your clip.
- Click Save as copy in the top-right corner.
The new file lands next to the original with a “Trim” suffix. Photos re-encodes the clip in H.264 at the source resolution, which means the output file is roughly the same size as the input or a touch larger depending on your source bitrate.
Short exports usually finish quickly, but the exact time depends on the source codec, export preset, and hardware.
If the Photos app refuses to open your file (some older Photos builds have known issues with HEVC-in-MP4 containers), see our notes on free MP4 and MKV cutters for offline alternatives.
#Trim MP4 on Mac with QuickTime Player
QuickTime is already on every Mac, and its Trim command is the fastest way to chop the head or tail off a clip. Apple’s QuickTime Player user guide confirms that the Edit > Trim tool writes a new file rather than overwriting your source, so the original stays intact.
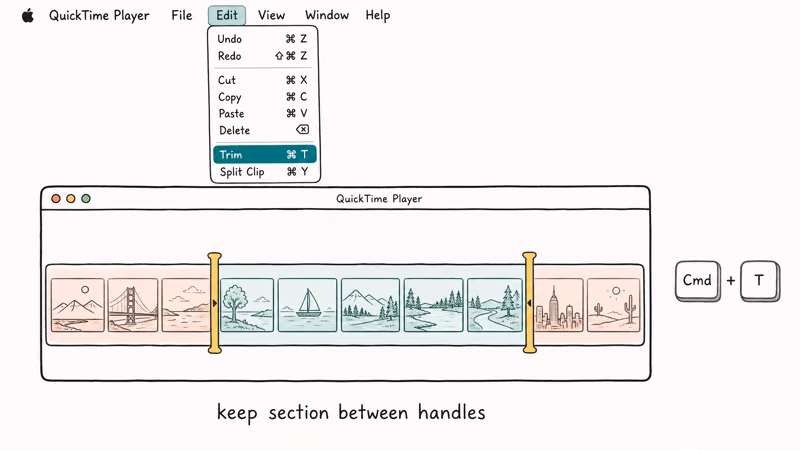
- Double-click the MP4 to open it in QuickTime Player.
- Choose
Edit>Trim(or press Cmd + T). - Drag the yellow handles to keep the section you want; everything outside is discarded.
- Click Trim, then
File>Save Asto write the new file.
QuickTime keeps the source codec and resolution, which is why the trim completes near-instantly with no re-encode. The catch: you can only trim from the edges, not split a clip in the middle.
If you need a section from the middle, use Edit > Split (Cmd + Y) to break the timeline first, delete the unwanted segments, then File > Export As.
#Frame-Accurate Cuts in DaVinci Resolve
When the trim point matters down to the frame, for example syncing a clip to music or removing one beat from a podcast intro, a proper editor is the right tool. Blackmagic Design recommends DaVinci Resolve’s free version for editors who need pro-grade cutting without paying for Studio.
- Open Resolve and click New Project.
- Drag your MP4 into the Media Pool, then drag it onto the Edit page timeline.
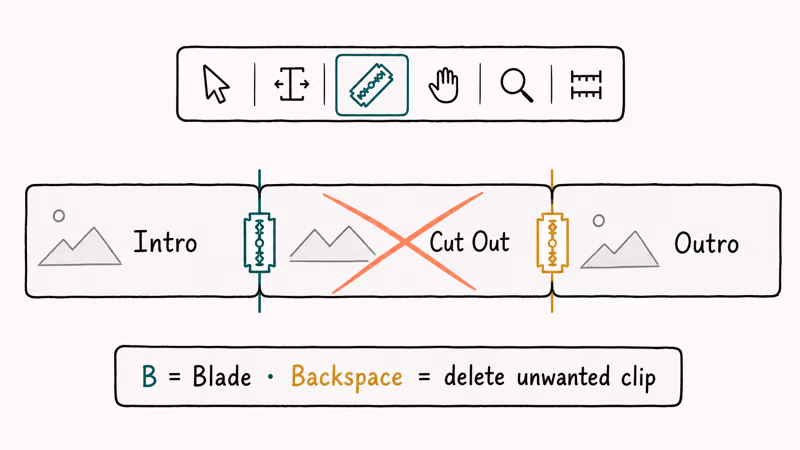
- Park the playhead on the first frame you want to keep. Press B to enter Blade mode, then click the playhead position to split the clip.
- Repeat at the end of the segment you want.
- Click each unwanted segment and press Backspace to remove it.
- Open the Deliver page. Pick the Custom Export preset, set the format to MP4, video codec to H.264, and audio to AAC. Match the source bitrate for a near-lossless export.
- Click Add to Render Queue, then Render All.
This workflow is overkill for a quick share, but it’s what you want when frame accuracy counts. Resolve’s free tier handles up to 4K timelines on consumer hardware and never adds a watermark.
For speed-related edits, our walkthrough on speeding up clips in DaVinci Resolve covers the same Deliver workflow with retimed cuts. Premiere Pro users can apply the same idea with the Razor tool, which we explain in our guide on reversing a clip in Premiere Pro.
#Trim MP4 in a Browser Without Installing Software
Locked-down work laptops, Chromebooks, and school computers often don’t let you install desktop apps. A browser-based trimmer fills the gap.
Browser trimmers often process files locally in the browser, but behavior varies by service and browser build. The tradeoff: large files use a chunk of memory, so very large 4K sources can crash older Chromebooks or low-memory machines.
To trim in a browser:
- Open the trimmer site, such as 123apps’ Online Video Cutter or Adobe Express.
- Click Open File and pick your MP4 from local storage.
- Drag the start and end markers to the section you want.
- Pick Save > MP4 > Local download. Avoid any “Save to Cloud” option that uploads the source.
If the browser approach feels too slow, free desktop converters like HandBrake double as trimmers for legacy Windows Movie Maker projects.
#Bottom Line
For a Mac user with a short clip, open QuickTime Player and use Edit > Trim. It’s the fastest path and keeps the source codec untouched. Windows users on a personal machine get the same speed from the Photos app’s pencil-icon edit view, but accept that Photos re-encodes by default.
If you’re on Linux or you need cross-platform consistency, install VLC and use the View > Advanced Controls record method. When frame accuracy matters (music sync, podcast cuts, professional deliverables), download DaVinci Resolve’s free version and cut on the Edit page with the Blade tool. Browser-based Online Video Cutter is the right answer only when desktop install is blocked.
#Frequently Asked Questions
Does trimming an MP4 reduce its quality?
Trimming itself doesn’t reduce quality. What can reduce quality is the re-encode step some tools apply during export. VLC’s record method, QuickTime’s Trim command, and FFmpeg with -c copy skip re-encoding entirely, so the output is bit-identical for the kept segment. The Windows Photos app, Online Video Cutter, and DaVinci Resolve (by default) re-encode with their built-in H.264 preset, which can introduce small visual changes if the export bitrate is lower than the source.
Can I trim an MP4 on my iPhone without an app?
Yes. Open the clip in Photos, tap Edit, drag the yellow handles to mark the new start and end, then pick Save Video as New Clip.
What’s the smallest file size I can get from a trimmed MP4?
The smallest output uses an H.265 (HEVC) re-encode at a lower bitrate than the source. DaVinci Resolve’s Deliver page lets you target a specific file size or bitrate. For a 30-second clip, an H.265 export at 5 Mbps is usually under 25 MB without visible artifacts on a 1080p source.
Why does my trimmed clip start or end on the wrong frame?
Most trim tools snap to the nearest keyframe instead of the exact playhead. Stream-copy tools cut at keyframes by default; full editors like DaVinci Resolve cut frame-accurately because they re-encode the boundary frames.
Can I trim multiple MP4 clips at once?
Yes. DaVinci Resolve’s Cut page handles batch trimming when you drag several clips onto the timeline, and FFmpeg can loop over a folder with a shell script. The Windows Photos app and QuickTime are single-file workflows, so plan on running them one clip at a time. Browser tools usually require you to upload and trim one file at a time.
Is FFmpeg hard to use just for trimming?
Not really. The one-line ffmpeg -ss 00:00:30 -to 00:01:00 -i input.mp4 -c copy output.mp4 keeps the section from 30 seconds to 1 minute without re-encoding.
Does trimming an MP4 strip the audio track?
No. All the tools in this guide keep the original audio track aligned with the trimmed video by default. If you only want video without audio, you need an extra step: in DaVinci Resolve, right-click the audio clip on the timeline and pick Delete; in FFmpeg, add -an to the command. The audio bit-rate stays at the source quality during a stream-copy trim.

Apps Crashing After iOS 27 Update? Fix Order (2026)
Apps crashing after the iOS 27 update? Update the app in the App Store first, then offload and reinstall to clear stale cache, then restart. The fix order.

Do AI Translation Earbuds Work Offline? What to Know
Do AI translation earbuds work offline? A few do with downloaded language packs, but most need the cloud. Here's what works offline and what you give up.

How to Set Up Translation Earbuds (Pairing and Modes)
How to set up translation earbuds: charge, install the app, pair over Bluetooth, pick two languages, and choose a mode. A step-by-step first-use guide.

Translation Earbuds Not Translating? How to Fix Them
Translation earbuds not translating? Usually it's the app, the internet, or the language settings. Here's how to fix pairing, sound, and lag fast.