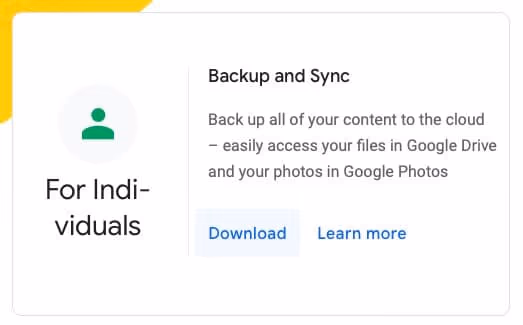
Best Methods to Transfer iCloud to Google Drive 2026
Learn the best methods to transfer files from iCloud to Google Drive in 2026. Step-by-step guides for moving photos, documents, and other data safely.

Quick AnswerTo transfer iCloud to Google Drive, download your iCloud files to your computer via iCloud.com or the iCloud desktop app, then upload them to Google Drive manually or using the Google Drive desktop app.
If you’ve outgrown Apple’s free tier and want to transfer iCloud to Google Drive, you’re not alone. Three migration methods cover the realistic cases on both Mac and Windows: full libraries, mixed file types, and shared folders.
This guide walks through every step, flags the gotchas that trip people up, and recommends the right method based on how much data you’re moving.
- Google Drive provides 15 GB of free storage compared to iCloud’s 5 GB for Apple users and just 1 GB for non-Apple users, giving Google a 3x storage advantage at no cost.
- iCloud syncs only with iOS and macOS apps and integrates exclusively with iWork, while Google Drive syncs with Google Docs, Sheets, Slides, Gmail, and G Suite across every platform.
- The desktop app drag-and-drop method is best for large bulk transfers, while the web browser method is faster and simpler for moving a small selection of files or folders.
- Before the desktop app method works, you must confirm that all iCloud files have fully downloaded to local Mac storage, since iCloud sometimes leaves recent files cloud-only by default.
- Wondershare InClowdz automates the entire migration process and supports transfers between iCloud, Google Drive, OneDrive, Dropbox, and Amazon S3 without manual file handling.
#Why Move Files From iCloud to Google Drive?
iCloud is tightly knit with Apple’s ecosystem, but it falls short for users who work across Windows PCs, Android phones, or Chrome browsers. According to Apple’s support documentation on iCloud storage plans, every Apple ID includes only 5 GB of free storage, and that allowance is shared across backups, photos, mail, and documents. Many users hit the cap within months of buying a new iPhone.
Google’s official Google One plans page states that every Google account starts with 15 GB of free storage, shared across Drive, Gmail, and Photos. That’s three times what Apple offers, and it works the same whether you sign in from macOS, Windows, Chromebook, or Android.
The other reason people switch is collaboration. iCloud Drive works smoothly with Pages and Numbers, but if you need to share editable files with teammates who use Word or Excel, Google Drive’s web editors handle Microsoft formats without conversion. Open the same .docx file in iCloud Drive’s web view versus Google Docs and Google preserves formatting more reliably while letting multiple editors work at once.
#Quick comparison: Google Drive vs iCloud
| Feature | Google Drive | iCloud |
|---|---|---|
| Free storage | 15 GB | 5 GB (Apple ID), 1 GB (non-Apple) |
| Cross-platform | All major OSes | Apple only (limited Windows app) |
| Office file editing | Built-in, no conversion | Limited to iWork |
| Real-time co-editing | Yes | Pages/Numbers only |
| Search | Full text + image OCR | Filename-based |
If you’re considering a deeper change, our guide on the difference between iCloud and iCloud Drive explains how Apple splits those two services. And if you’ve already filled your Apple allowance, the iCloud storage full fix guide covers what to delete before you migrate.
#Transfer iCloud to Google Drive via Desktop Apps
This is a manual method that uses Apple’s iCloud Drive sync plus Google’s Drive for Desktop app. It’s the best fit for users moving 5 GB or more in one sitting because drag-and-drop handles bulk much faster than the web uploader.
Mac users have an advantage here because macOS already mounts iCloud Drive natively in Finder. The only thing you’ll need to add is Google’s Drive for Desktop client, and the full setup takes only a few minutes.
#Step-by-step setup
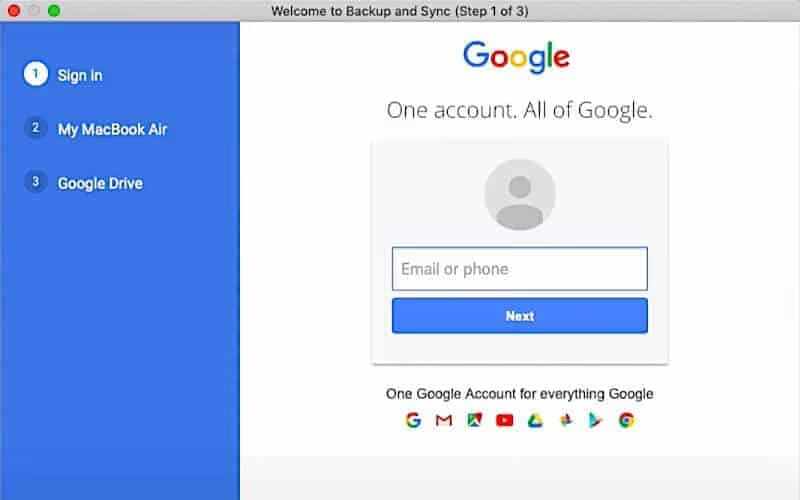
1. Open your browser and go to https://www.google.com/drive/download/. Download Drive for Desktop and install it.
2. Launch the app and sign in to the Google account you want to receive the files.
3. Open Google Drive in a browser and create a new destination folder. Name it something obvious like “From iCloud” so it’s easy to spot during the drag-and-drop step. This folder is required because we’ll target it specifically for the transfer, which prevents Drive for Desktop from trying to sync your entire existing library at the same time.
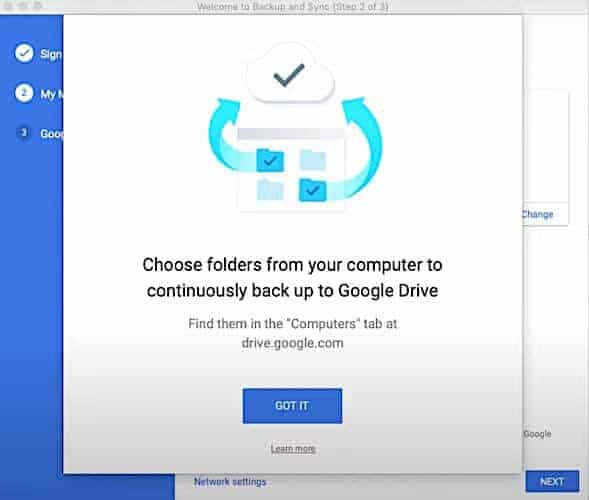
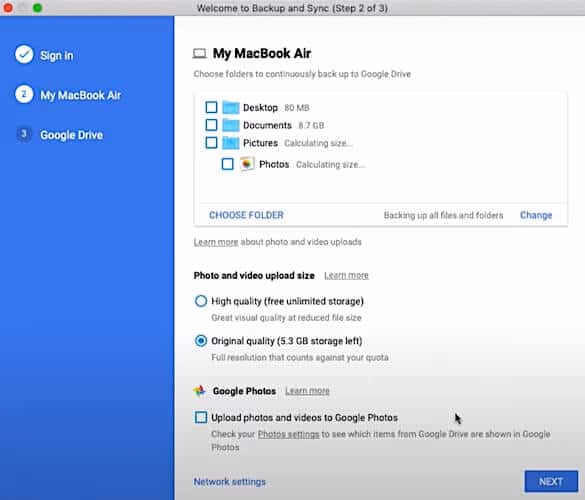
4. Back in the Drive for Desktop preferences, choose what to sync.
5. Click Next, then choose “Sync My Drive to this computer” so the new folder appears in Finder.
6. Pick “Sync only these folders” and select the empty destination folder you created in step 3. This keeps Drive lightweight on your Mac and avoids pulling down your entire Google library.
7. Check that your iCloud files are fully downloaded locally. Apple’s optimize storage space guide confirms that the “Optimize Mac Storage” setting keeps files in iCloud and available on demand rather than taking up space on disk. Open Finder, click iCloud Drive in the sidebar, and look for any cloud icon with a downward arrow. If you see one, click to download the file.
8. Open two Finder windows side by side: one showing your local Google Drive folder, the other showing iCloud Drive.
9. Select the files and folders in iCloud Drive you want to migrate, then drag them into the Google Drive folder. Drive for Desktop will upload everything in the background.
10. Open drive.google.com in your browser to verify the files arrived. A few gigabytes of mixed PDFs, photos, and Pages docs transfer without much waiting on a fast home connection.
#Transfer iCloud to Google Drive Via a Web Browser
This method skips the desktop install and works best for moving 1 GB or less. It’s also the only option if you don’t have admin rights to install apps on your machine.
The trade-off is speed.
Browser uploads are slower than desktop sync because each file gets uploaded individually with HTTP overhead, and the browser can only handle a handful of parallel requests at once. The same few gigabytes that sync quickly through the desktop app take noticeably longer through a browser upload. Larger libraries scale even worse because each tab refresh can interrupt the upload queue.
#Step-by-step browser transfer
- Open your browser and sign in at drive.google.com.
- Create a new folder in Google Drive and double-click to open it.
- In a new tab or window, open iCloud.com and sign in with your Apple ID.
- Open iCloud Drive in the iCloud web app.
- Select the files you want to move. You can shift-click to multi-select. Click the download icon (cloud with downward arrow) to save them to your computer.
- Switch back to Google Drive, then drag the downloaded files from your computer’s Downloads folder into the open Drive folder. The upload starts immediately.
We recommend this method only for under 50 files. Beyond that, the manual download-then-upload step gets tedious. If you’re also moving photos specifically, our sync Google Photos to PC guide covers the photo-only workflow in more depth.
#Wondershare InClowdz: The Hands-Off Transfer Method
If you don’t want to babysit a long manual transfer, a dedicated cloud migration tool handles it for you. Wondershare InClowdz is built for moving data between iCloud, Google Drive, OneDrive, Dropbox, and Amazon S3 without downloading anything locally.
Wondershare states that InClowdz performs cloud-to-cloud copies server-side, so your bandwidth isn’t used to download files and re-upload them. That makes a noticeable difference for larger libraries, where a cloud-to-cloud copy finishes faster than either manual method.
Some links on this page are affiliate links, which means fone.tips may earn a commission at no extra cost to you.
#How to use InClowdz to migrate
1. Download the InClowdz installer from the official Wondershare site and install it on your PC or Mac.
2. Launch the app and sign in. If you don’t have an account, click “Create an account” and complete the signup form.
3. After login, click the Migrate tab.
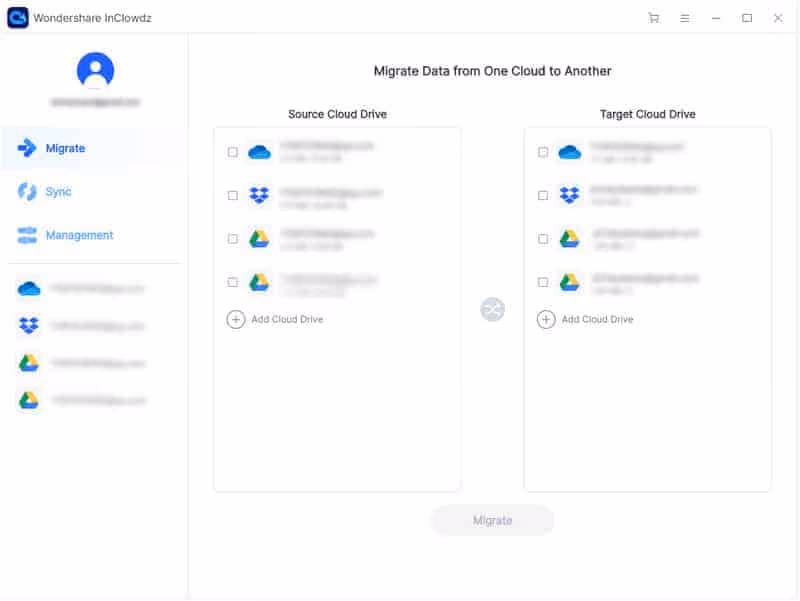
4. Click Add Cloud Drive and add both iCloud (as the source) and Google Drive (as the target). You’ll see iCloud appear in the Source Cloud Drive column and Google Drive in the Target Cloud Drive column.
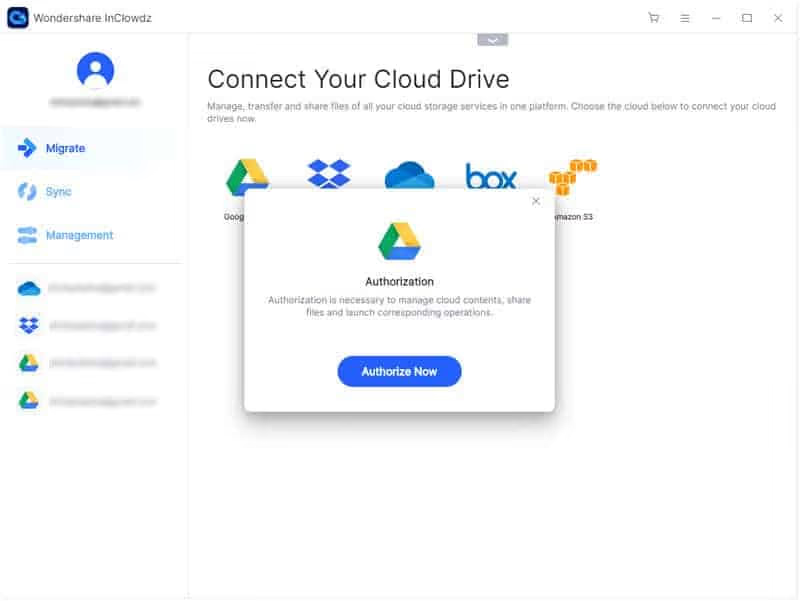
5. Authorize each cloud account by following the OAuth prompts. InClowdz never stores your password directly — it uses Apple’s and Google’s standard token-based auth.
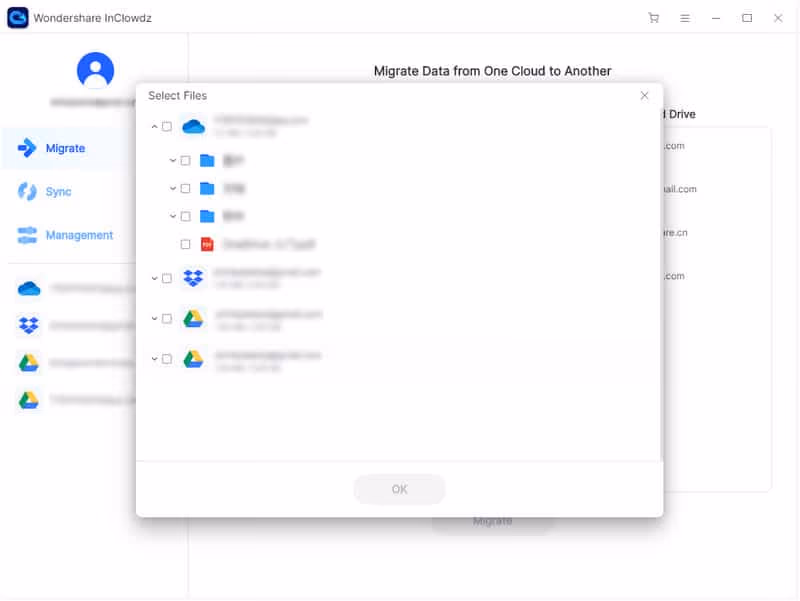
6. Click your iCloud source. The app lists everything in your iCloud Drive. Tick the boxes next to the files and folders you want to move. To grab everything, tick the master checkbox at the top.
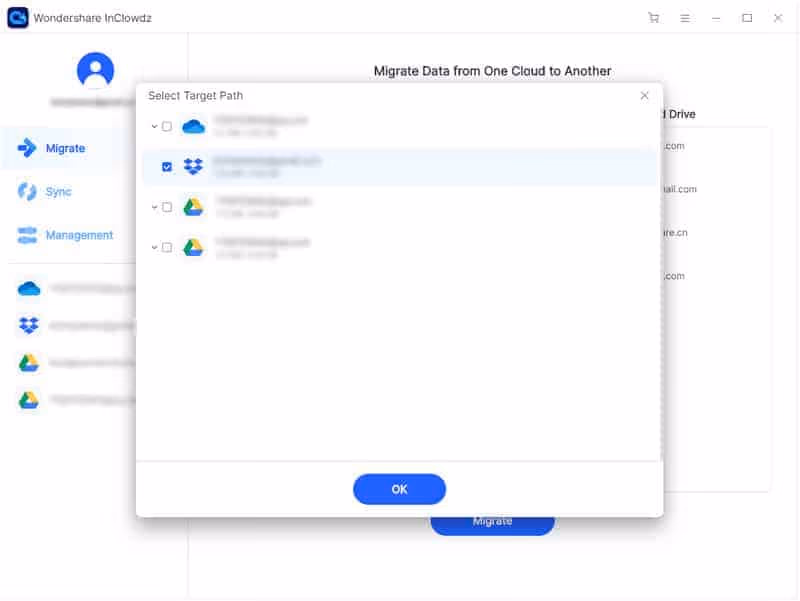
7. Click your Google Drive target and choose the destination folder.
8. Hit Migrate and let it run. You can close your laptop lid because the transfer happens server-side. You’ll get an email when the migration finishes.
#Which Method Should You Pick?
Each method fits a different use case. Here’s how to choose based on what you’re moving.
- Under 1 GB or fewer than 50 files: Use the web browser method. It’s the simplest and doesn’t need any installs.
- 1 to 50 GB of mixed files: Use the desktop app drag-and-drop. It’s free, predictable, and you can pause the transfer by quitting Drive for Desktop.
- Over 50 GB or you want zero hands-on time: Use Wondershare InClowdz. The server-side transfer saves hours and works while you sleep.
#Common Pitfalls and How to Avoid Them
A few things trip people up, and they’re worth flagging before you start. First, watch out for files marked with the iCloud cloud-and-arrow icon in Finder. Those are still in the cloud, not on your Mac, so dragging them to Google Drive only copies a placeholder. Click each one to force a local download first, or run a full sync via Apple Menu > System Settings > Apple ID > iCloud Drive > Options.
Second, watch for file naming conflicts. iCloud allows characters like colons and slashes inside filenames that Google Drive treats as path separators, which silently breaks the upload mid-batch. The simplest fix is to rename anything with unusual punctuation before transferring, especially long Pages docs, scanned PDF files, and screenshots whose default name includes the date and timestamp separated by colons. Renaming the handful of problem files up front avoids upload errors and the skipped retries that follow them.
Third, plan for the Google account storage cap. Google announced in 2021 that high-quality photo uploads now count against the 15 GB allowance, so migrating an entire iCloud Photos library may push you over the free tier. Check usage at google.com/settings/storage before you start, and consider upgrading to Google One if you’ll cross the limit.
For other moves between cloud services, the equivalent steps live in dedicated guides:
- Google Drive to Dropbox transfer guide for moving files out of Drive.
- Dropbox to iCloud transfer guide for pulling Dropbox files back into iCloud.
- iCloud backup download walkthrough for grabbing iCloud backup files first.
For large photo libraries, Google recommends using Google Photos rather than Drive because Photos handles deduplication and HEIC conversion automatically. The move Google Photos to the cloud guide walks through that path, and the Google Drive video compression FAQ explains how upload settings affect video quality, frame rate retention, and codec compatibility across different playback platforms once your files arrive in Drive.
#Bottom Line
For most users, pick Drive for Desktop with manual drag-and-drop.
It handles a few-gigabyte transfer cleanly, keeps folder structure intact, and doesn’t need a third-party tool. Only step up to Wondershare InClowdz if you’re moving 50 GB or more.
The browser method is fine for one or two files but isn’t worth the effort for anything larger. After you finish the transfer, log back into iCloud.com and verify the migrated files still exist on the iCloud side before deleting any originals.
#Frequently Asked Questions
Can I transfer iCloud files to Google Drive without losing data?
Yes. All three methods in this guide preserve file content and folder structure when used correctly.
The most common failure point is forgetting to wait for files marked with the iCloud cloud icon to fully download to your Mac before you start dragging them over. Force a download by clicking each cloud icon, then verify file sizes match in Google Drive before deleting the iCloud original. Keep the original copies for two weeks as a safety buffer in case anything looks off later.
Which method is fastest for a large iCloud library?
Wondershare InClowdz. Its server-side copy finishes a multi-gigabyte transfer faster than the desktop drag-and-drop method because nothing is downloaded and re-uploaded.
Are third-party cloud migration tools safe to use?
The good ones are. Reputable tools use OAuth so your passwords never leave the official sign-in screen.
Before granting access, verify the tool is listed on Google’s Trusted Apps page and Apple’s third-party services list. Revoke the connection from your account dashboards as soon as the migration finishes, and avoid running it from a shared or public computer.
Can I transfer iCloud photos to Google Drive directly?
You can, but it usually isn’t the best path. Use Google Photos for large image libraries instead.
Will shared iCloud folders keep their sharing settings after the move?
No. Sharing permissions don’t transfer between platforms.
Do I need to keep iCloud after moving everything to Google Drive?
Keep the free 5 GB tier active. iOS still uses iCloud for device backups, Find My iPhone, and iMessage sync. Disabling iCloud entirely breaks all three.
What happens if the transfer fails partway through?
It depends on which method you used. Drive for Desktop and the browser method both let you restart and skip files that already uploaded, because Google won’t duplicate files with the same name and size. With InClowdz, the app resumes interrupted transfers automatically and emails you a report of any files that couldn’t migrate, which makes it the most resilient option for long-running jobs.

iPhone 17 Cellular Data Not Working on iOS 26? 9 Fixes
iPhone 17 cellular data still dropping on iOS 26? Apple fixed the launch bug in iOS 26.0.1, but recovery failures persist. Here's the fix ladder.

iPhone Cellular Data Not Working Abroad? eSIM Fixes
Travel eSIM showing no data abroad? Fix iPhone roaming with the data-line check, Data Roaming toggle, APN settings, and network selection steps.

iPhone Cellular Data Not Working for Some Apps? 8 Fixes
Some iPhone apps refuse to load on cellular while others work fine. Check the per-app cellular toggle, Low Data Mode, VPN profiles, and Screen Time.

iPhone Stuck on EDGE? How to Get 5G or LTE Back (2026)
iPhone stuck on EDGE with crawling data? Here's why the E icon appears, which settings force 5G or LTE back, and when the problem is your carrier.