iPhone Cellular Data Not Working Abroad? eSIM Fixes
Travel eSIM showing no data abroad? Fix iPhone roaming with the data-line check, Data Roaming toggle, APN settings, and network selection steps.
Quick AnswerOpen Settings > Cellular, tap your travel eSIM line, and confirm it's turned on and selected as your data line with Data Roaming enabled. These three toggles fix most travel eSIM data failures abroad.
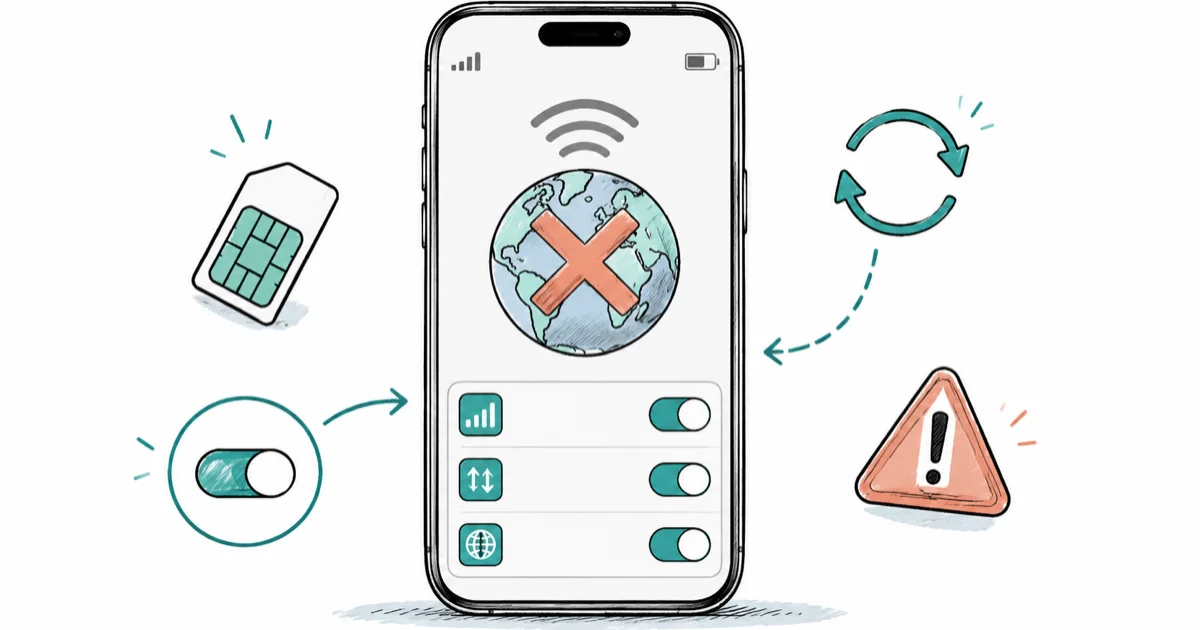
Your iPhone’s cellular data isn’t working abroad, even though the travel eSIM installed fine before you left home. You’ve got signal bars or SOS, but nothing loads. Three Settings toggles cause most of these failures, and checking them takes under a minute.
- Three toggles fix most travel eSIM data failures: the line turned on, the line selected for cellular data, and Data Roaming enabled
- Data Roaming must stay on for a travel eSIM line; it only creates roaming charges when your home carrier line has it enabled
- A travel eSIM connects only inside its coverage area, so a single-country plan drops to No Service the moment you cross a border
- Carrier Lock in
Settings>General>Aboutmust read “No SIM Restrictions” before any travel eSIM can register on a foreign network - Turning Airplane Mode on for at least 15 seconds forces your iPhone to re-register with a local network after landing
#Why Does Your iPhone Show Signal but No Data Abroad?
Signal bars only prove your iPhone found a tower. Data flows through exactly one line, the one picked under Settings > Cellular > Cellular Data, and only when that line’s roaming rules allow a foreign network to carry it.
Abroad with a travel eSIM, you’re running at least two lines: your home carrier plus the travel plan. iOS keeps cellular data on your home line unless you switch it yourself, so the eSIM you paid for sits idle while the home line refuses to move data without roaming. Bars stay full the whole time, which is why the status bar lies to you.
This failure is different from data dying everywhere. If your connection is also broken on your home network, work through the cellular data not working guide first; this article covers the traps that only show up when you land in another country with a second line on board.
One naming note before you dig in. On some carriers, iOS labels the menu Mobile Service and calls the toggle Mobile Data instead of Cellular. Same screens, same fixes.
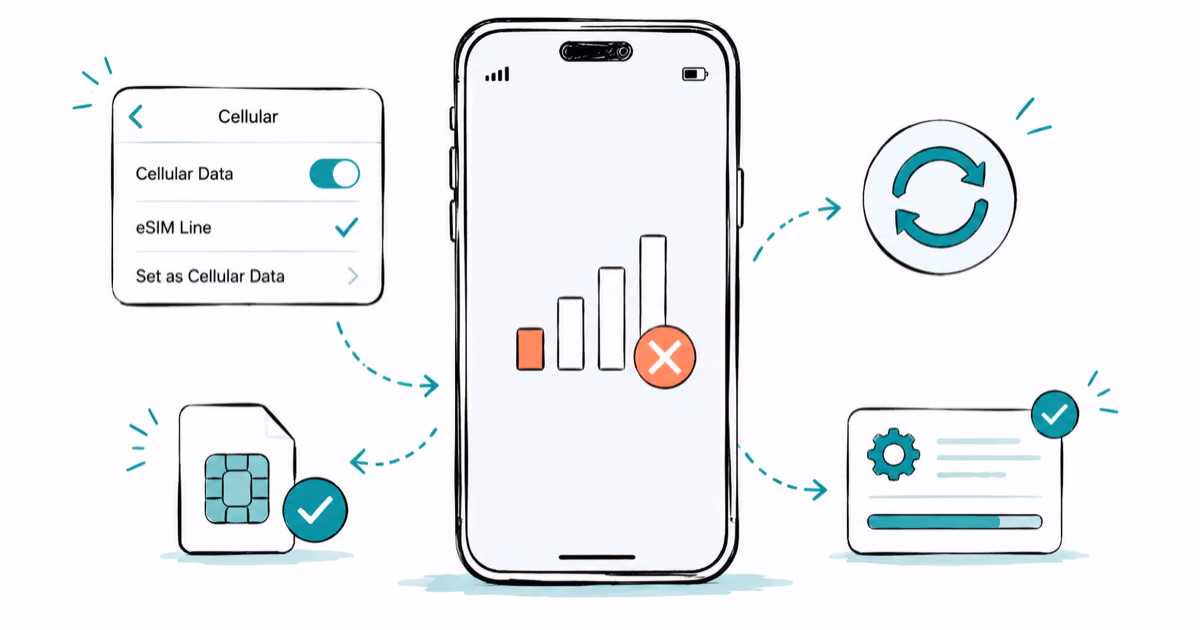
#The First 3 Checks: eSIM On, Data Line, Data Roaming
Run these in order. Each toggle silently defaults the wrong way for travelers.
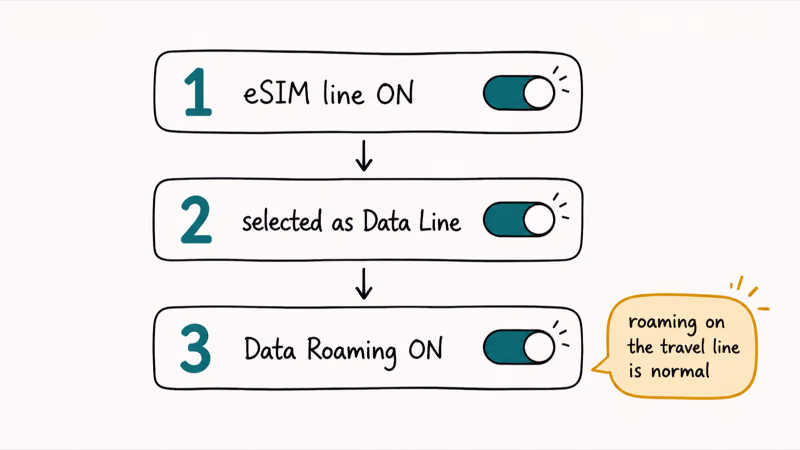
#1. Turn the Travel eSIM Line On
Installed doesn’t mean enabled. Go to Settings > Cellular, tap your travel eSIM under the SIMs list, and check that Turn On This Line shows green.
When the eSIM line is switched off, iOS keeps the line listed under Settings > Cellular but greys out its Cellular Data Options, so you can’t even reach the Data Roaming toggle until the line itself is on. That’s why this check comes first.
#2. Select It as Your Data Line
Tap Cellular Data at the top of the same screen and pick the travel eSIM instead of your home line. If the carrier name in Control Center doesn’t change, the switch didn’t take, so back out and reselect.
Leave Allow Cellular Data Switching off while you troubleshoot; otherwise iOS quietly hops back to your home line.
#3. Turn On Data Roaming for the Travel Line
Here’s the counter-intuitive part. According to Apple’s data roaming documentation, on a dual-SIM iPhone you tap the line you want to change, open Cellular Data Options, and turn on Data Roaming for that specific line.
Travelers trained to fear roaming charges leave this off, and that instinct kills travel eSIMs. Airalo’s troubleshooting guide confirms that some of its eSIMs need Data Roaming switched on before any data moves at all.
Roaming on the travel line adds nothing to your bill, because the plan already prices for foreign networks. Roaming on your home carrier line is what generates surprise charges, so leave that one off. The what data roaming does explainer covers the cost side in detail.
#How Do You Fix APN Settings From Your eSIM Vendor?
The APN (Access Point Name) tells the foreign network which gateway carries your traffic. Get it wrong and you’ll see full bars with zero throughput, the classic “connected but nothing loads” state.
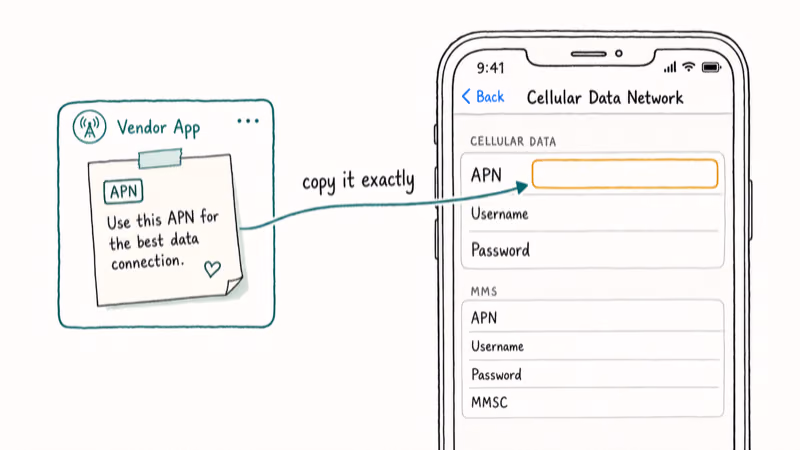
Most travel eSIMs set the APN automatically during installation. When yours doesn’t, the correct value lives in the installation instructions the vendor emailed you, and usually inside the vendor’s app under your plan details too.
Enter it at Settings > Cellular, tap the travel line, then open Cellular Data Network. Type the APN exactly as written into the Cellular Data section and leave the username and password fields blank unless your instructions say otherwise. Don’t guess values; if you mistype something, tap Reset Settings at the bottom of that screen to fall back to the automatic profile.
A wrong or missing APN can also surface as an activation error instead of silent dead data. If your iPhone shows that exact message, the could not activate cellular data fix guide walks through the error string directly.
#Select the Network Manually When Auto-Join Fails
Automatic selection sometimes camps your iPhone on a network your eSIM has no agreement with, or on a congested tower. Forcing a partner network fixes both.
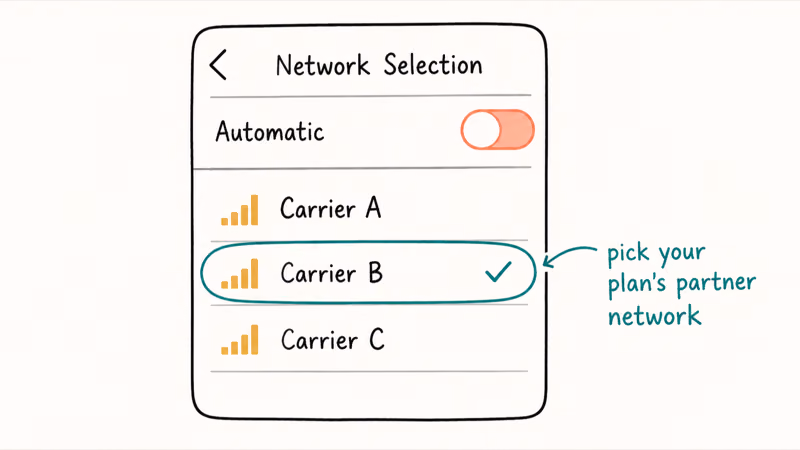
Go to Settings > Cellular, tap the travel line, then open Network Selection and switch off Automatic. Wait for the list of local carriers to load, then pick one your vendor lists as a supported network for that country. The vendor app or installation email names them.
After switching, force the iPhone to re-register. Apple’s SOS and No Service guide recommends turning Airplane Mode on for at least 15 seconds, then off again, so the phone negotiates a fresh connection from scratch.
The using Airplane Mode walkthrough covers what the toggle actually resets. A restart does the same job more slowly.
Seeing SOS instead of bars? Holafly’s help page states that No Service or SOS shortly after activation means the line hasn’t registered with a local network yet, and that the Airplane Mode cycle or enabling Data Roaming restores service in many of those cases. The same Apple guide adds that SOS still routes emergency calls through other carriers’ networks in the US, Canada, and Australia.
Two more quick wins while you’re at it:
- Check for a carrier settings update: connect to Wi-Fi, open
Settings>General>About, and install the update if a prompt appears after a few seconds - If every network in the manual list refuses to register, the radio side needs attention; the cellular network not available guide covers tower-connection failures
#Rule Out Carrier Lock and Vendor-Side Problems
When the toggles, APN, and network selection all check out, the fault sits either with the iPhone’s lock status or with the eSIM plan itself. Both take about two minutes to test.
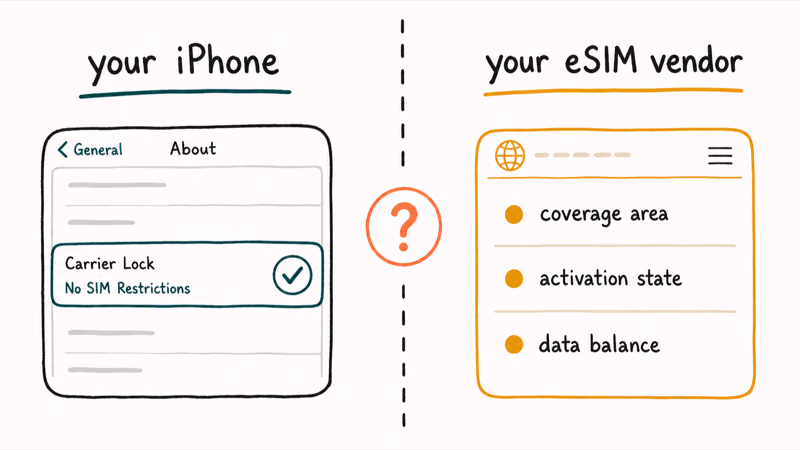
#Check Carrier Lock First
Open Settings > General > About and scroll to Carrier Lock. Apple’s travel eSIM guide states that it must read “No SIM Restrictions” for an eSIM from another provider to work, and that travel eSIMs need an iPhone XS or later.
A locked iPhone registers only lines from the carrier that sold it, so the travel eSIM installs but never connects. The fix is a lock removal from your home carrier, requested through their support channel; no setting on the phone changes it. If you’re not sure about your status, here’s how to check if iPhone is unlocked without a SIM handy.
#Then Open the Vendor App
Three plan-side causes account for the rest, and the vendor app over hotel Wi-Fi reveals all of them:
- Coverage area: an eSIM works only inside the countries its plan covers; Airalo’s help doc gives the example that a France eSIM connects in France and nowhere else
- Activation state: some plans activate on install, others only when the eSIM first touches a supported network in the destination country, so a plan that looks dead at your layover airport can be fine
- Data balance: exhausted or expired plans keep the line visible in Settings while passing nothing
If the app shows the plan active, in the right country, with balance remaining, contact the vendor’s support with your iPhone model and the network you selected manually. At that point the reissue has to come from their side. New to the tech underneath? The how eSIM works primer explains what actually got installed on your phone.
#iMessage, WhatsApp, and Verification Codes on a Travel eSIM
Your messaging apps behave differently abroad, and knowing which ones ride the travel line saves real confusion.
iMessage and FaceTime stay registered to your home number and run happily over the travel eSIM’s data. Blue bubbles keep working even though the data flows through a foreign line. If they stop after landing, the iMessage not working guide covers re-registration. WhatsApp behaves the same way: it keeps your original number and uses whatever data connection exists.
SMS verification codes are the trap. Banks and booking sites text your home number, and those texts land on the home line, not the travel eSIM. Switch the home line off completely and the codes vanish.
Keep the home line turned on with its Data Roaming off: calls and texts still reach you while every megabyte runs through the travel plan.
#Bottom Line
Run the three-toggle check in this exact order: travel eSIM line on, travel line selected under Cellular Data, Data Roaming on for that line. Each one defaults the wrong way when you land, and together they clear most dead-data cases without touching anything else.
Still stuck? Manual network selection onto a vendor-listed partner is the single highest-yield next step, followed by the vendor app checks for coverage country, activation, and balance.
Save Reset Network Settings for dead last. It wipes every saved Wi-Fi password including your hotel’s, and it fixes fewer abroad cases than the toggles above.
#Frequently Asked Questions
Why is my Airalo or Holafly eSIM not working on my iPhone?
Start with the three toggles: the eSIM line turned on, selected as your data line, and Data Roaming enabled for it. If those look right, confirm you’re inside the plan’s coverage country and that the plan shows active in the vendor app. Manual network selection onto a partner network catches most of the rest.
Should data roaming be on or off with a travel eSIM?
On, for the travel line. A travel eSIM has no home network in the country you’re visiting, so many plans only pass data while roaming is enabled. Keep Data Roaming off on your home carrier line instead, since that’s the line that generates roaming charges.
Why does my iPhone say SOS or No Service abroad?
Your iPhone hasn’t registered with a local network yet. Turn Airplane Mode on, wait at least 15 seconds, and turn it off to force a fresh registration. SOS means emergency calls can still route through other carriers’ networks, which applies in the US, Canada, and Australia. If the status persists, pick a partner network manually under Network Selection.
Do I need to turn off my home line while traveling?
No, and switching it off usually backfires. Keep the home line on so calls and verification texts still reach you, and turn its Data Roaming off so it can’t quietly bill data.
How do I find the APN settings for my travel eSIM?
Check the installation instructions the vendor sent when you bought the plan, or open your plan details in the vendor’s app. Enter the value under Settings > Cellular > your travel line > Cellular Data Network. Most plans set the APN automatically, so only touch this screen when data won’t start.
Can a carrier-locked iPhone use a travel eSIM?
No. Carrier Lock in Settings > General > About must show “No SIM Restrictions” before an eSIM from another provider can register. If your iPhone is locked, ask your home carrier to remove the lock; no on-device setting gets around it.
Why do verification code texts stop arriving abroad?
Those codes go to your home number as regular SMS, so they disappear when the home line is switched off. Turn the home line back on in Settings > Cellular. Texts arrive over its roaming connection even while all your data runs through the travel eSIM.
What if my travel eSIM still has no data after every fix?
Reset Network Settings is the last software step, found under Settings > General > Transfer or Reset iPhone. It wipes saved Wi-Fi passwords, which hurts mid-trip, so use it only after the toggles, APN entry, and manual network selection have all failed. Past that point the problem lives with the plan itself, and the vendor’s support team needs to reissue the eSIM or refund it.

iPhone 17 Cellular Data Not Working on iOS 26? 9 Fixes
iPhone 17 cellular data still dropping on iOS 26? Apple fixed the launch bug in iOS 26.0.1, but recovery failures persist. Here's the fix ladder.

iPhone Cellular Data Not Working for Some Apps? 8 Fixes
Some iPhone apps refuse to load on cellular while others work fine. Check the per-app cellular toggle, Low Data Mode, VPN profiles, and Screen Time.

iPhone Stuck on EDGE? How to Get 5G or LTE Back (2026)
iPhone stuck on EDGE with crawling data? Here's why the E icon appears, which settings force 5G or LTE back, and when the problem is your carrier.
Fix iPhone eSIM Cellular Data Not Working After Transfer
Cellular data dead after moving your eSIM to a new iPhone? Work through line checks, carrier activation, data-line fixes, and safe eSIM reinstall steps.