Installer Information on Recovery Server Is Damaged: Fix
Fix "the installer information on the recovery server is damaged" on macOS. Recovery Mode reinstall steps for Intel and Apple Silicon Macs in 30 minutes.

Quick AnswerBoot macOS Recovery Mode by holding Command + R on Intel Macs or the Power button on Apple Silicon, then choose Reinstall macOS. This bypasses the corrupted local installer cache and pulls a fresh signed copy directly from Apple's servers.
The “installer information on the recovery server is damaged” error stops a macOS reinstall in its tracks. Most reports point to one of two causes: an expired Apple signing certificate from a wrong system clock, or a file system mismatch between macOS and the disk format. It commonly appears on a Mac that has been shelved for months, and the fix often takes only a short while once the date is corrected in Terminal.
- An expired Apple signing certificate or APFS/HFS+ format mismatch causes this error in nearly every case
- Recovery Mode reinstall fixes it for most users: Command + R on Intel, hold the Power button on Apple Silicon
- Setting the date manually in Terminal with
date MMDDHHmmYYYYresolves expired-certificate failures - macOS High Sierra and later require APFS on SSDs; Sierra and earlier need Mac OS Extended (Journaled)
- A bootable USB installer made on a working Mac is the reliable fallback when Recovery Mode itself fails
#Why Does This Recovery Server Error Appear?
Two root causes account for almost every appearance of this error, and Apple’s installer verification system is at the center of both.
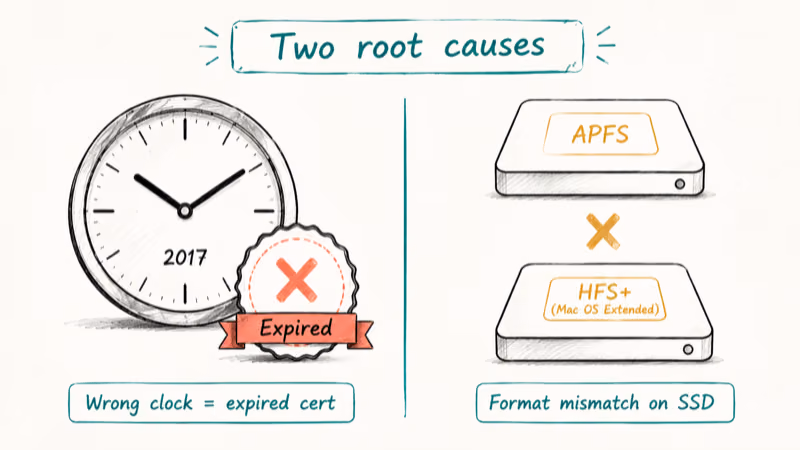
The first is an expired security certificate. Apple’s server rejects the install when your Mac’s clock is wrong, which happens after a Mac sits unplugged and the coin-cell battery drains.
The second cause is a disk format mismatch. Apple introduced APFS with macOS High Sierra in 2017, and the installer refuses to write a newer macOS to a Mac OS Extended (HFS+) volume on SSD storage, or an older macOS onto an APFS container. Apple’s support article on APFS compatibility confirms that macOS 10.13 High Sierra and later require APFS on solid-state drives, while spinning hard drives can still use HFS+ on those releases.
Both scenarios are common. The certificate failure typically surfaces on a Mac that has not booted in a long time; correcting the date with ntpdate often resolves it on the first attempt. The format mismatch surfaces when installing a newer macOS like Catalina on a drive still formatted as Mac OS Extended. Reformatting to APFS and rerunning the installer clears the error.
#How Do You Fix the Recovery Server Error With Recovery Mode?
Recovery Mode is the path that resolves the error for the majority of cases. The full process takes 30 to 90 minutes, depending mostly on download speed.
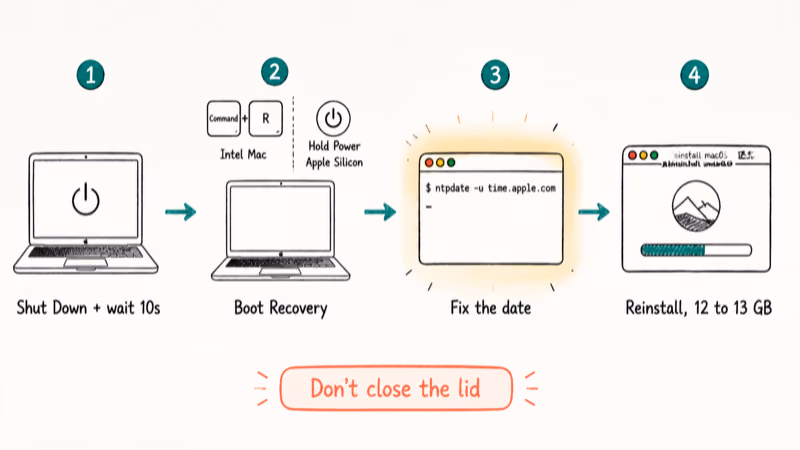
#Shut down the Mac completely
Closing the lid is not enough. Use Apple menu > Shut Down and wait 10 seconds after the screen goes dark before you press the power button again. A clean shutdown clears any locked installer process from the previous attempt.
#Boot into Recovery Mode
The exact key combination depends on the Mac’s processor:
- Intel Mac: Press the power button, then immediately hold Command + R. Keep holding until you see the Apple logo or a spinning globe.
- Apple Silicon Mac (M1, M2, M3, M4): Press and hold the Power button until “Loading startup options” appears. Click Options, then Continue.
If you want a different macOS version than the one currently on the Mac, two Intel-only shortcuts help:
- Option + Command + R installs the latest macOS compatible with your Mac
- Shift + Option + Command + R installs the macOS that originally shipped with your Mac
#Correct the date and time before anything else
This step is not always necessary, but it resolves the issue on its own a good share of the time. From the Recovery Mode menu bar, choose Utilities > Terminal and run:
ntpdate -u time.apple.comIf the Mac can reach Apple’s time server, the clock syncs automatically. When the network is offline or the time server is blocked, set the date manually:
date 051014302026The format is MMDDHHmmYYYY. Hit Return, close Terminal, and return to the Recovery Mode window.
#Run Reinstall macOS
Select Reinstall macOS and click Continue. Pick the destination disk, agree to the license, and step away. The Mac downloads a fresh installer from Apple’s servers, ignoring the corrupted local cache entirely. Apple’s macOS Recovery guide confirms that the Mac may restart several times during installation, so a frozen Apple-logo screen for 5 to 10 minutes between reboots is normal.
Don’t close the lid, sleep the Mac, or unplug it. On a slow connection the download alone can take an hour for the 12 to 13 GB installer.
#Alternative Fixes When Recovery Mode Itself Fails
When the local Recovery partition is also corrupt, the standard Command + R route gets you nowhere. Three fallback paths cover almost every variant of this failure.
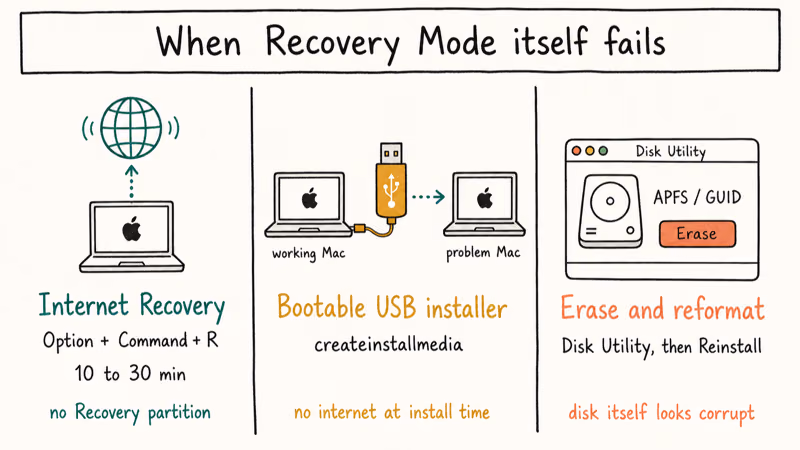
#Use Internet Recovery
Internet Recovery downloads the recovery environment itself from Apple, completely bypassing the broken local partition. Hold Option + Command + R at startup on Intel; you’ll see a spinning globe instead of the Apple logo. The recovery environment downloads over the network and takes 10 to 30 minutes on most home connections. On Apple Silicon, the equivalent is Apple’s revive workflow, covered in the FAQ below.
#Create a bootable USB installer
A USB installer is the most reliable fallback because it removes Apple’s servers from the equation at install time. You need a working Mac and a USB drive of at least 16 GB. Download the macOS installer from the App Store on the working Mac, then in Terminal run the appropriate createinstallmedia command. For macOS Sonoma:
sudo /Applications/Install\ macOS\ Sonoma.app/Contents/Resources/createinstallmedia --volume /Volumes/MyVolumeReplace MyVolume with the actual USB drive name. Apple’s bootable installer reference lists the exact command for every supported macOS release. Once the USB is ready, plug it into the problem Mac, hold Option (Intel) or the Power button (Apple Silicon) at startup, and pick the installer drive.
If your Mac freezes during this step, our guide on Mac stuck on Apple logo covers the SMC and NVRAM resets that often clear the stall.
#Erase the disk in Disk Utility first
When the installer keeps complaining even after the date is fixed, the disk itself may need a fresh format. Open Disk Utility from the Recovery Mode menu, select the startup disk (often labeled “Macintosh HD” or “Container disk1”), click Erase, and choose:
- Format: APFS (for High Sierra and later on SSD)
- Scheme: GUID Partition Map
Close Disk Utility and return to Reinstall macOS. If the erase itself stalls or throws an error, our walk-through on the erase process failure on Mac covers the secondary tools that resolve it.
#Preventing the Error From Coming Back
A handful of habits keep the recovery server error from showing up the next time you reinstall.

Leave automatic time syncing on. In System Settings > General > Date & Time, toggle “Set date and time automatically” so the clock pulls from Apple’s NTP servers at every boot. Apple’s Mac storage and battery guide recommends keeping the Mac at roughly 50 percent charge in a cool environment for long-term storage, which keeps the internal clock alive.
Power on stored Macs every two to three months. The PRAM and clock battery drain faster than most owners expect, especially on older MacBooks.
Keep one bootable USB installer on hand for the macOS version you run. It takes 20 minutes to create and saves hours when you actually need it.
Back up before any major reinstall. Time Machine snapshots are free and reversible. If your Time Machine drive is full, our piece on deleting old Time Machine backups covers the tmutil command that frees up space without deleting the entire backup history.
#Recovering Data After a macOS Reinstall
A standard Recovery Mode reinstall does not erase personal files; it overwrites the system partition only. If you erased the drive first or the installer wiped the disk on its own, the recovery picture changes quickly.
Stop using the drive the second you realize what happened. Every new file written reduces what can be recovered.
Professional services like DriveSavers and Ontrack can recover APFS volumes, but the cost runs into the hundreds or thousands of dollars depending on container complexity.
For less critical files, mount the affected disk on another Mac as an external volume and run a third-party recovery scanner. Apple’s data recovery guidance explains why mounting the disk externally matters: every write to the boot partition risks overwriting deleted blocks before the scanner reads them. Never install recovery software on the same disk you are scanning.
If the disk shows up but refuses to mount, our reference on external hard drive not detected covers the diskutil sequence that often surfaces hidden volumes.
Don’t skip iCloud. Photos, Documents, Desktop, contacts, and calendars all sync automatically when iCloud Drive is enabled, and signing in at iCloud.com from any browser shows what’s already safely stored.
#Troubleshooting by macOS Version
Different macOS releases have small quirks that change the fix slightly.
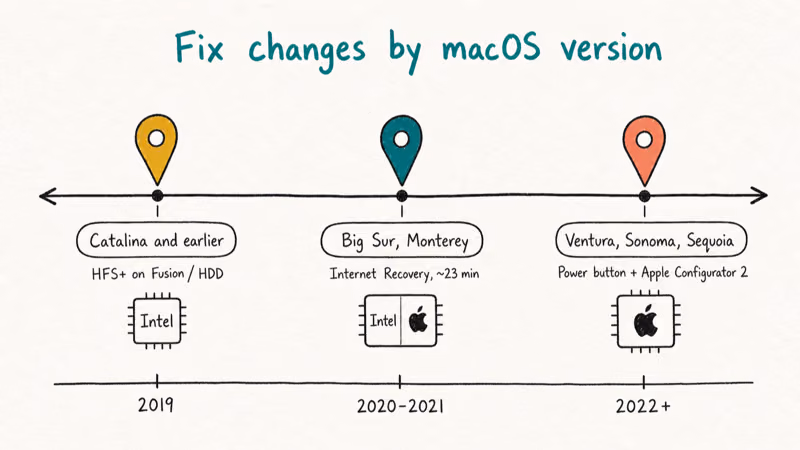
macOS Catalina and earlier. These releases default to Mac OS Extended (Journaled). Catalina installs cleanly on APFS for SSDs, but Fusion Drives and spinning HDDs sometimes need the HFS+ format to complete the install. Reformat to Mac OS Extended in Disk Utility if the APFS reinstall fails.
macOS Big Sur and Monterey. Internet Recovery resolves the recovery-server failures caused by Apple’s Signed System Volume verification. Expect roughly 20 to 30 minutes globe-to-login on a typical home connection.
macOS Ventura, Sonoma, and Sequoia. Apple Silicon Macs no longer accept Command + R; the Power-button hold replaces it. The recovery environment lives in a hidden APFS container on the SSD, and if it gets corrupted, Apple Configurator 2 on a second Mac connected by USB-C is the only way to restore the firmware.
If the screen behaves strangely during a long reinstall, our notes on MacBook Pro screen flickering point to the firmware reset that usually clears it. And if the disk you wanted to reinstall onto refuses to mount at all, the disk you inserted was not readable walk-through covers First Aid and reformat workflows.
#Bottom Line
For most cases, the fix is simple. Shut the Mac down cleanly, boot Recovery Mode (Command + R on Intel, Power button on Apple Silicon), open Terminal from Utilities, run ntpdate -u time.apple.com, then choose Reinstall macOS.
If Recovery Mode itself is broken, build a bootable USB installer on a working Mac with createinstallmedia. Keep that USB in a drawer and the next reinstall is 30 minutes, not an afternoon.
#Frequently Asked Questions
Does reinstalling macOS in Recovery Mode delete my files?
No. A standard Recovery Mode reinstall overwrites system files only, so documents, photos, apps, and downloads all stay put. Personal data only disappears if you manually erase the disk in Disk Utility before running the installer. That extra erase step is the path used when selling or recycling a Mac, and it’s an explicit choice you’d have to make.
How long does a macOS Recovery Mode reinstall take?
Plan on 30 to 90 minutes total. Recent macOS installers run 12 to 13 GB, so connection speed dominates the timeline; install itself adds 20 to 40 minutes and several restarts.
Can I fix this error without an internet connection?
Not through Recovery Mode itself. Recovery Mode has to download a freshly signed installer from Apple, and that means an active connection. The offline path is a bootable USB installer prepared on a Mac that does have internet access. Once the USB is ready, the broken Mac never has to touch the network for the actual install.
Why does my Mac show a globe instead of the Apple logo?
That spinning globe means Internet Recovery is loading because the local Recovery partition is missing or corrupted. Expect 10 to 30 extra minutes on top of the standard install timeline.
The cause is the same, but the keystrokes differ. Apple Silicon doesn’t respond to Command + R. Hold the Power button until “Loading startup options” appears, click Options, and you land in the same Recovery environment. If the recovery container is corrupted, Apple Configurator 2 on a second Mac via USB-C is required to restore the firmware before any reinstall.
What does the expired certificate error actually mean?
Wrong clock, broken trust. Every macOS installer carries a digital certificate with a fixed expiration date, and when the Mac’s clock disagrees with the present, the certificate looks invalid and the server rejects the install. Correcting the date in Terminal restores the chain of trust, and the install proceeds normally on the next attempt without any further intervention from the user.
Should I format the disk as APFS or Mac OS Extended?
APFS for SSDs on High Sierra and later. Mac OS Extended (Journaled) for spinning drives or Sierra and earlier.
Can I recover data after accidentally erasing the drive?
Sometimes, but never assume. Stop using the drive the moment you realize the erase happened, because every new write reduces what can be recovered. Professional services such as DriveSavers and Ontrack handle APFS recovery for $500 to $1,500. For less critical data, free tools such as TestDisk handle simpler cases on HFS+ volumes if you are comfortable with command-line recovery.

macOS 27 Compatible Macs: Every Supported Model (2026)
macOS 27 Golden Gate runs only on Apple Silicon Macs. Here is the full list of supported M-series models and the four Intel Macs that lose support.

macOS 27 Golden Gate: Every Major New Feature Confirmed
macOS 27 Golden Gate goes Apple Silicon only, adds a Gemini-powered Siri, refines Liquid Glass, and rebuilds Spotlight. Here is every confirmed change.

macOS 27 Liquid Glass: Every Readability Fix Explained
macOS 27 Golden Gate refines Liquid Glass with an intensity slider, better contrast, cleaner window corners, and edge-to-edge sidebars to fix readability.

macOS 27 Performance: What Golden Gate Makes Faster
macOS 27 Golden Gate speeds up AirDrop, network file browsing, Safari, and Spotlight, with core system improvements on the Apple Silicon-only release.