How to Take Pictures From Video on iPhone, Android, PC
Extract still photos from any video on iPhone, Android, Mac, or Windows using built-in tools and free apps. Step-by-step guide updated for 2026.

Quick AnswerPause the video at the frame you want, then press the screenshot shortcut on your device to capture the screen. For sharper results, open the clip in iMovie, QuickTime, or VLC and export the frame as a full-resolution image.
You can take pictures from video on almost any phone or computer without paying for software. The fastest path is a screenshot, but the file you get matches your screen size, not the source clip’s resolution. This guide covers seven methods across iPhone, Android, Mac, and Windows, and flags which ones hold up at full quality.
- Phone screenshots match your display resolution, so a 4K clip captured on a 1080p phone drops to 1080p
- VLC’s
Video>Take Snapshotmenu saves the frame at the video’s native resolution on every desktop OS - iMovie’s
Share>Image and QuickTime’sEdit>Copypaths both export full-resolution PNGs on macOS - Photoshop’s
File>Import>Video Framesto Layers loads each frame as a separate layer for surgical picking - Always check the source’s licensing before publishing a still pulled from someone else’s footage
#How Do You Take Pictures From Video on iPhone or iPad?
Pause, then press Side + Volume Up (iPhone X and later) or Side + Home (older models). Screenshots save to Photos > Screenshots.
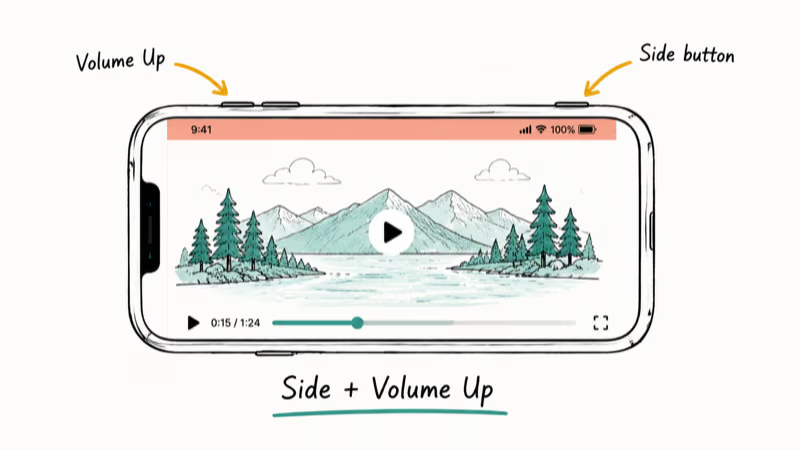
According to Apple support, the same button combo has worked on every iPhone shipped since 2015. The capture grabs whatever’s on screen, which means YouTube watermarks, playback bars, and the status bar can sneak into the frame. Tap once before pressing the buttons to fade the controls. See Apple’s screenshot guide for the full list of compatible models.
The bigger limit is resolution. Screenshot a 4K clip on a phone or tablet and the image comes out at the device’s screen resolution, not the source’s. A 4K Vimeo clip ends up around 2556x1179 on an iPhone or 2360x1640 on an iPad Air, well short of the source’s 3840x2160. For full-resolution stills, install Frame Grabber from the App Store.
If you also need fast cropping after the capture, our roundup of the best photo squarer apps for iOS and Android covers Markup, Snapseed, and TouchRetouch.
#Use Markup to Clean Up the Screenshot
Tap the thumbnail that pops up after capture, hit Crop in the top toolbar, and drag the corners in to remove status bar pixels and playback overlays. The whole step takes about 10 seconds and meaningfully improves the look when you share the still in a thread or post.
#Capture Stills From Video on Android
Press Power + Volume Down at the same time. That’s the standard combo on Pixel, Samsung, OnePlus, Xiaomi, and most Android phones since Android 4.0. Your screenshot lands in Pictures/Screenshots in the gallery.
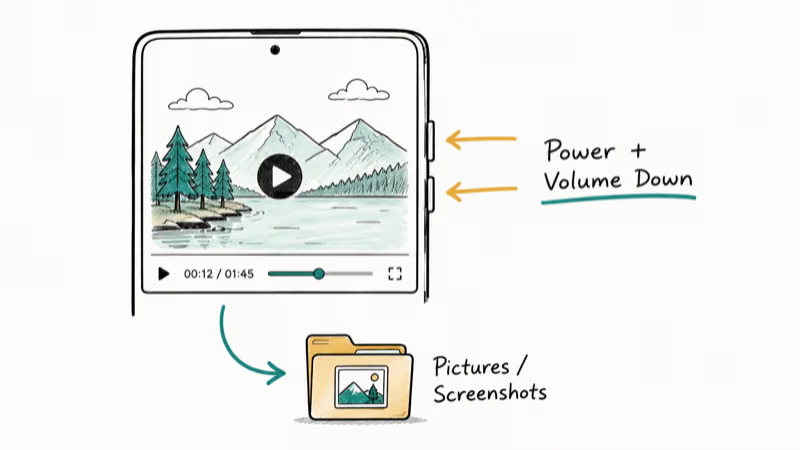
Samsung’s One UI also accepts a three-finger swipe down across the screen, but you have to enable it first under Settings > Advanced features > Motions and gestures > Palm swipe to capture. Once enabled, the gesture works from inside YouTube, the gallery, and the default video player. The button combo is more reliable across devices.
Like iPhone, Android screenshots cap out at your display resolution. A 1440x3120 Galaxy S24 screen produces a 1440x3120 PNG no matter whether the source is 720p or 4K. For higher-fidelity captures, install Video to JPG Converter from the Play Store. It decodes the video file directly and exports stills at native resolution.
After the screenshot, Google Photos handles editing. Open the image, tap Edit, then Crop & Rotate or Markup. Google’s Photos help center recommends Markup for adding arrows or callouts before sharing.
#Extract Stills on Mac With QuickTime or iMovie
Mac handles full-resolution frame extraction better than any phone, because both QuickTime and iMovie export at the source clip’s resolution rather than your screen’s. Pick the tool that matches what’s already open.
#QuickTime Player (No Install Needed)
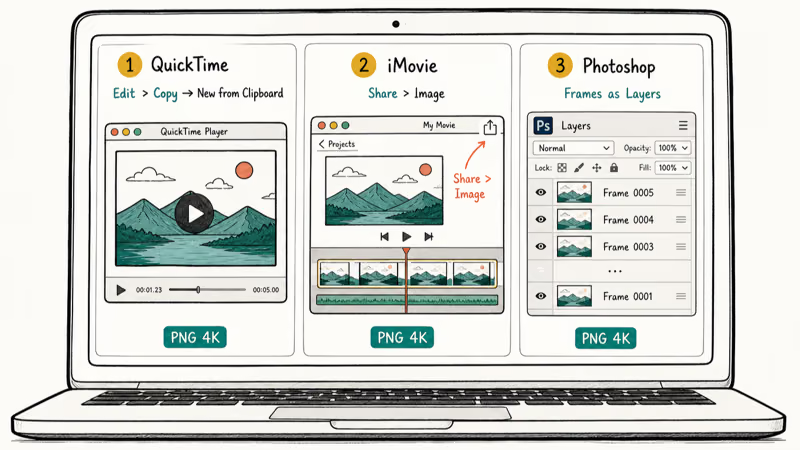
- Open the video in QuickTime, scrub to the frame you want, and pause.
- Click
Edit>Copy(Cmd+C). Click File>Newfrom Clipboard.Click File>Export As>Image, choose PNG or JPEG, and save.
With a 4K MOV file, the exported PNG comes out at 3840x2160, identical to the source. The whole process takes under 30 seconds once you know the path. If QuickTime won’t open the file at all, our fix for QuickTime player can’t open MOV covers the most common codec mismatches.
#iMovie (Better for Batches)
- Drag the clip into the Project timeline.
- Move the playhead to the frame you want.
- Click Share (the upload icon, top-right) and pick Image.
- Pick a name, location, and click Save.
Apple’s iMovie documentation confirms that the Share > Image command exports the current playhead frame at the project’s resolution, with output up to 4K for projects set that high. iMovie keeps a project history, so if you need a dozen stills from one wedding video, the playhead-then-export loop beats copy-pasting in QuickTime. Our iMovie problems and solutions post covers the most common export errors.
#Photoshop (Every Frame as a Layer)
Photoshop’s video import beats timeline scrubbing when you need exact frames. Click File > Import > Video Frames to Layers, set a 2-second range, and click OK.
Adobe states that this command imports up to 500 frames as individual Photoshop layers. Pick the one you want, hide the rest, and File > Save As > PNG. This approach is ideal for sports stills and reaction GIFs because frame-accurate picking matters there. See Adobe’s video import documentation for supported codecs, then pair it with our photoshop someone into a picture walkthrough if you also need to composite.
#Pull Stills on Windows With Free Built-In Tools
Windows 11 and 10 both ship with free tools that match QuickTime’s quality, if you pick the right one.
#Microsoft Photos (Built Into Windows 10/11)
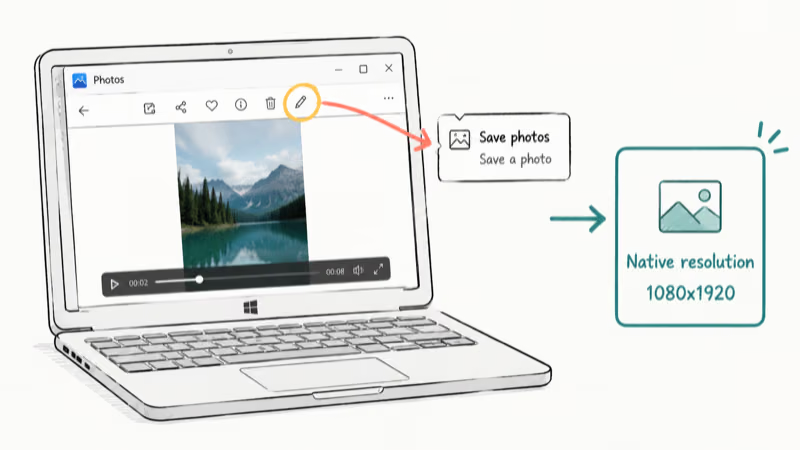
- Right-click the video, choose Open with > Photos.
- Press play, hover over the toolbar, and click the Edit pencil (or press Ctrl+E).
- Choose Save photos (Windows 11) or Save photos from video (Windows 10).
- Pause on the frame, click Save a photo, name it, and save.
The Save a photo path exports at the video’s native resolution, not the screen’s. A 1080x1920 vertical TikTok download yields a still that comes out exactly 1080x1920.
#Snipping Tool (Fastest for Low-Stakes Stills)
Press Win + Shift + S to open the snip overlay, drag to capture the video region, then paste the clipboard image into Paint or Photos and save. The capture matches screen resolution, so reach for this only when you don’t need full quality.
#Lenovo, HP, and Other Laptops
Different laptops have different Print Screen layouts. Our screenshot on Lenovo laptop walkthrough fixes the cases where your Fn key combo isn’t behaving.
#Use VLC for Frame-by-Frame Capture
VLC is the only free cross-platform tool that combines frame-by-frame stepping with native-resolution snapshot export, which makes it the go-to whenever a still has to be exact. Install VLC from videolan.org, then:
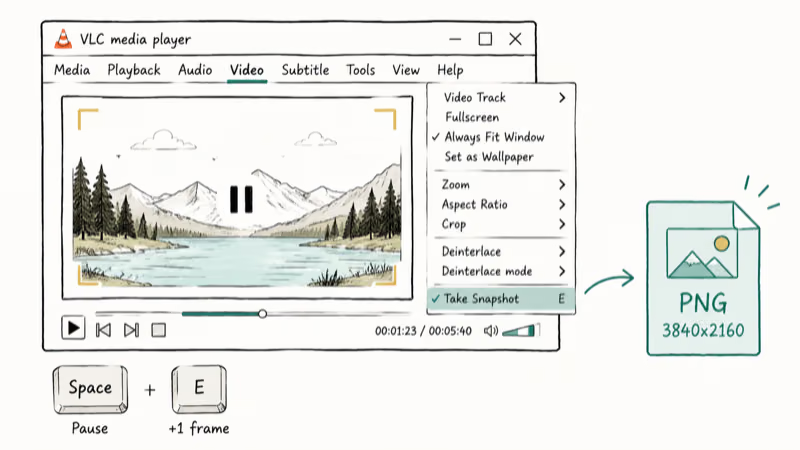
- Open the video in VLC.
- Press the spacebar to pause.
- Press E to step forward exactly one frame.
- Click
Video>Take Snapshotin the menu bar.
VLC saves the snapshot to your Pictures folder by default, and image dimensions match the video’s, not your monitor’s. A 3840x2160 source produces a 3840x2160 PNG on disk. For deeper VLC workflows, our VLC frame-by-frame guide covers preferences, custom output folders, and the auto-snapshot Scene filter. For broader format options, video to GIF software handles frame extraction too.
#Why Do Captured Frames Look Blurry or Pixelated?
The frame you stopped on probably wasn’t a keyframe. H.264 and H.265 videos store full pictures only at I-frames every 1-2 seconds; everything between is a predicted reconstruction that looks softer.
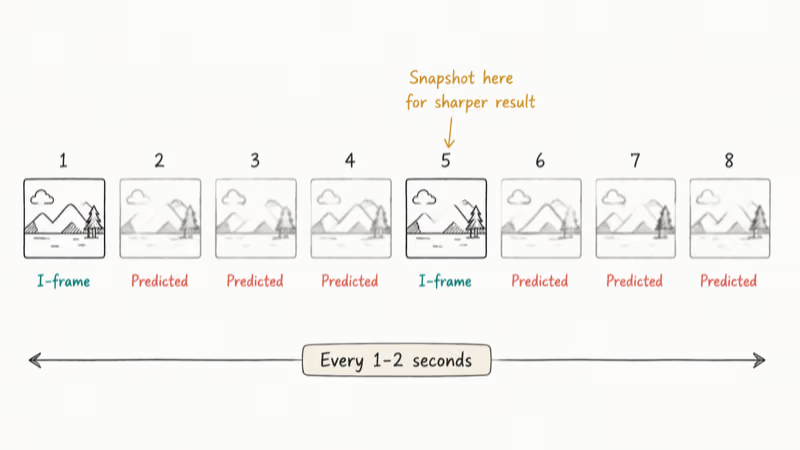
Two ways to fix this:
- Step through the video one frame at a time in VLC (the E key) until you land on a sharper-looking frame, then snapshot. The next I-frame is usually within 30 frames.
- Use Photoshop’s Video Frames to Layers — it imports every frame at full quality, so you can pick the sharpest one with no guessing.
Compression artifacts also worsen on fast-motion scenes. If you’re trying to grab a clean still of someone running or a sports highlight, try a slower scene from the same shoot, or run the result through Photoshop’s Filter > Sharpen > Shake Reduction.
#Bottom Line
For one-off stills on your phone, screenshot is fine. For anything you’ll publish or share at full quality, install VLC and use Video > Take Snapshot. It’s the only tool that runs the same way on Mac, Windows, and Linux and exports at the source clip’s native resolution. If you’re already on a Mac and don’t want another app, QuickTime’s Edit > Copy → New from Clipboard path is just as sharp.
#Frequently Asked Questions
Can you extract pictures from any video format?
VLC handles MP4, MOV, MKV, AVI, FLV, WMV, and most niche containers, so it covers nearly any source you’ll encounter. iMovie and QuickTime are pickier, and they reject FLV and some MKV variants. In that case, convert the file first or fall back to VLC.
Do extracted frames match the original video’s resolution?
VLC, QuickTime, iMovie, Photoshop, and the Microsoft Photos app all export at the source clip’s resolution. Phone screenshots stay capped at your display.
Can you extract multiple pictures from the same video at once?
Yes. Photoshop’s Video Frames to Layers loads a whole range as individual layers, and you File > Save As to PNG one at a time. Set the import range to 5 seconds and you get every frame in that span. VLC has a Scene filter under Tools > Preferences > Video > Filters that auto-saves a still every N frames during playback.
Are screenshots from Netflix or Disney+ legal?
Personal use of stills from your own playback is generally fine, but Netflix, Disney+, and Hulu apply DRM that often turns the screenshot black. Republishing the frames violates copyright.
Why are my video screenshots blurry on iPhone?
You’re either pausing on a non-keyframe (the iPhone interpolates predicted frames, which look softer than I-frames) or screenshotting a clip that’s higher resolution than your display. Step through the video using a frame-accurate app like Frame Grabber, or transfer the file to a Mac and use QuickTime to extract at full resolution.
Can you extract a still from a YouTube video without downloading it?
YouTube Frame and similar web tools let you scrub a YouTube URL to a frame, but they cap at 720p. For full quality, download first.
Does iMovie keep the original video quality?
Yes. iMovie’s Share > Image exports at the project’s source resolution, and the format defaults to PNG. If you imported a 4K clip into a 1080p project, iMovie outputs 1080p stills, not 4K. Match the project resolution to the source clip before extracting, or work in QuickTime instead, which always exports at the original size and skips the timeline import step.
What’s the fastest way to extract many frames from one video?
For ranges of a few seconds, Photoshop’s Video Frames to Layers wins. For whole clips, run ffmpeg -i input.mp4 -vf fps=1 frame_%04d.png to export one frame per second. VLC’s Scene filter is the no-command alternative.
Mac mini M6 vs M5 Pro: Which Model Should You Buy?
Mac mini M6 vs M5 Pro compared on price, memory, ports, displays, and real workloads. Find the better 2026 Mac mini for your desk and budget.
Apple Siri Settlement: Who Qualifies and How to Claim
Apple's $250 million Siri settlement covers iPhone 15 Pro and iPhone 16 models bought June 2024 to March 2025. See who qualifies and how claims work.

iOS 26.6.1 Security Update: What Apple Fixed and Who Gets It
Apple released iOS 26.6.1 on August 17 with 29 security fixes, including an IPSec interception bug. See what it patches, who gets it, and how to update.

iPhone Adaptive Power: How It Works and When to Use It
Learn how iPhone Adaptive Power works, which models support it, what it changes, and when Low Power Mode is still the better battery-saving choice.