How to Screenshot on a Lenovo Laptop or Yoga in 2026
Take screenshots on Lenovo laptops using keyboard shortcuts, Snipping Tool, or browser extensions. Covers full screen, window, and custom area captures.

Quick AnswerPress Windows + Shift + S to open the Snipping Tool and select the area you want to capture. The screenshot saves to your clipboard. Paste it into any app with Ctrl + V, or find it in the notification panel to save as a file.
Lenovo laptops use the same screenshot methods as any Windows PC. The fastest way is the Windows + Shift + S shortcut, which works on all Lenovo models including Yoga, ThinkPad, and IdeaPad. Here are all the methods.
- Windows + Shift + S opens the Snipping Tool overlay and lets you select exactly what area to capture, which is the fastest method on all Lenovo models.
- Windows + PrtSc saves a full-screen screenshot automatically to the
Pictures>Screenshotsfolder without any extra steps. - Many Lenovo keyboards require Fn + PrtSc rather than PrtSc alone, which is the most common reason Print Screen appears broken.
- In Yoga tablet mode, pressing Power and Volume Down simultaneously takes a screenshot just like on a smartphone.
- The Snipping Tool delay feature (3, 5, or 10 seconds) is essential for capturing dropdown menus and tooltips that disappear when you click away.
#Method 1: Windows + Shift + S (Recommended)
This keyboard shortcut opens the Snipping Tool overlay and lets you select exactly what to capture:
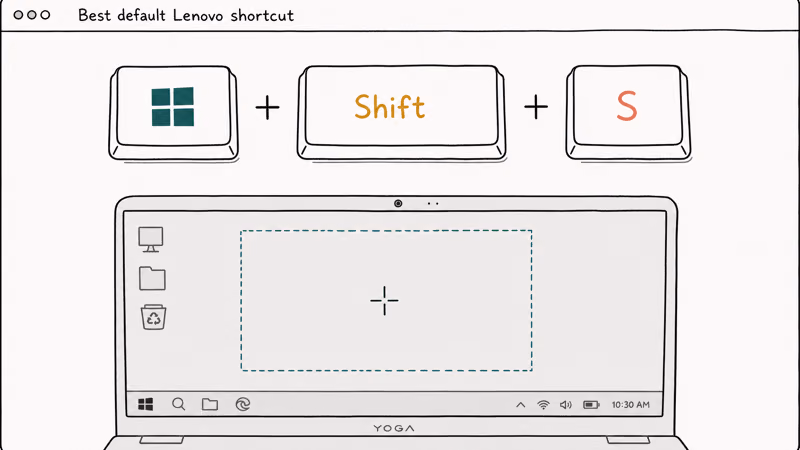
- Press Windows + Shift + S
- Your screen dims and a toolbar appears at the top
- Choose a capture mode: rectangular, freeform, window, or full screen
- Click and drag to select the area you want to screenshot
- The screenshot copies to your clipboard automatically
- A notification appears in the bottom right. Click it to open the Snip & Sketch editor
According to Microsoft’s Snipping Tool documentation, this shortcut works on Windows 10 and 11. The screenshot copies to the clipboard, and the notification lets you open it for saving or editing.
From the Snip & Sketch editor, you can annotate the screenshot with a pen, highlighter, or ruler, then save it as a PNG or JPG file.
#Method 2: Print Screen Key Shortcuts
Lenovo laptops have several Print Screen shortcuts:
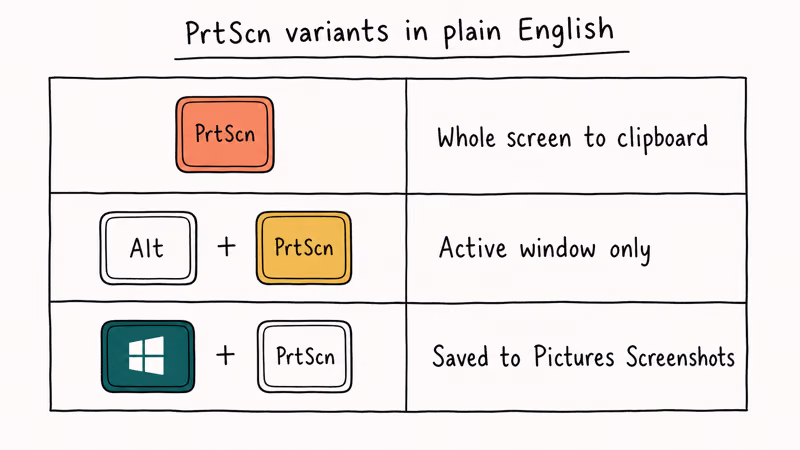
Full screen to clipboard: Press Fn + PrtSc (or just PrtSc on some models). This captures your entire screen and copies it to the clipboard. Paste it into Paint, Word, or any image editor with Ctrl + V.
Full screen auto-save: Press Windows + PrtSc. Your screen flashes briefly, and the screenshot saves automatically to Pictures > Screenshots folder.
Active window only: Press Alt + PrtSc. This captures only the currently focused window, not the entire screen. Useful when you have multiple windows open.
On Lenovo Yoga models in tablet mode, press the Power button + Volume Down simultaneously to take a screenshot, similar to a phone.
#Method 3: Snipping Tool App
The Snipping Tool app gives you more control over your captures:
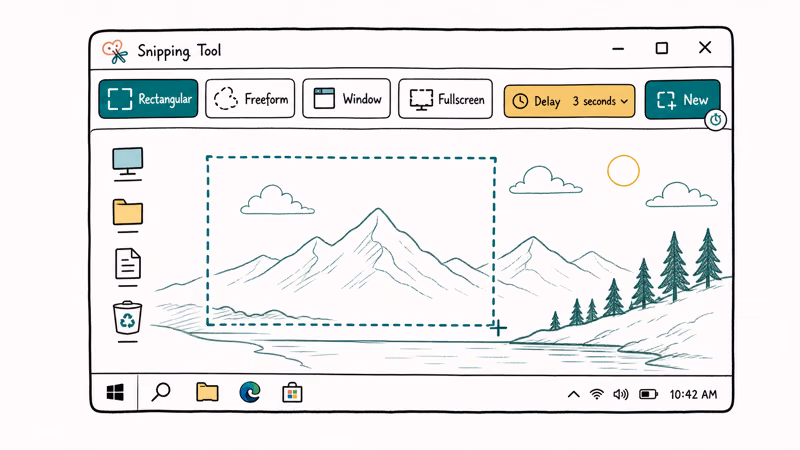
- Search for “Snipping Tool” in the Windows search bar
- Click “New” to start a capture
- Select your capture mode (rectangle, window, full screen, or freeform)
- Draw around the area you want to capture
- Edit the screenshot with the built-in annotation tools
- Click the save icon to save as a file
According to Microsoft’s Snipping Tool documentation, the Snipping Tool now includes screen recording in addition to screenshots. You can record a portion of your screen as a video, which is useful for tutorials.
#Should You Use a Browser Extension Instead?
Browser extensions like Lightshot and GoFullPage capture screenshots within Chrome or Edge. They’re useful for specific situations:
- Lightshot lets you capture any area of a webpage and upload it to get a shareable link
- GoFullPage captures an entire scrolling webpage as one long image
The downside is that browser extensions only work inside the browser. They can’t capture desktop apps, games, or system menus. For general screenshotting, the built-in Windows tools are more versatile.
#How Do You Screenshot in Lenovo Yoga Tablet Mode?
When using a Lenovo Yoga in tablet mode (screen folded back), keyboard shortcuts aren’t accessible. Use these alternatives:
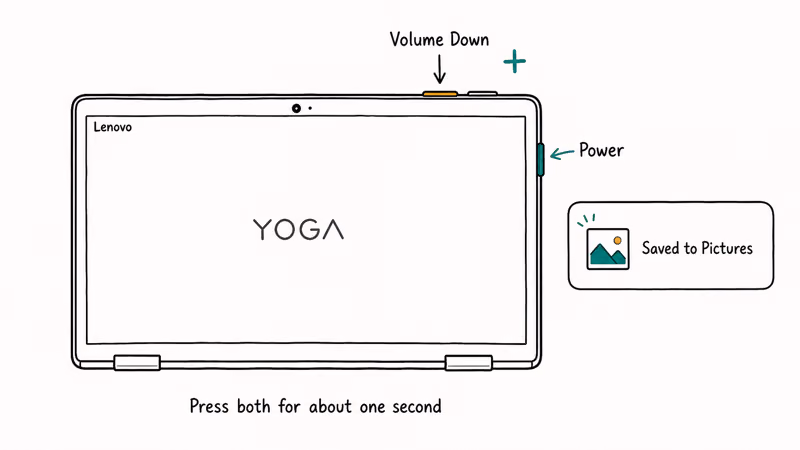
- Press Power + Volume Down simultaneously (like a phone screenshot)
- Open the Snipping Tool from the Start menu using the touchscreen
- Ask Windows voice assistant: “Hey Cortana, take a screenshot”
In tablet mode, the Power + Volume Down shortcut saves screenshots to Pictures > Screenshots automatically.
#Tips for Better Screenshots on Lenovo
Use the delay feature. According to Lenovo’s support page on screenshots, the Snipping Tool’s delay feature is useful for capturing dropdown menus and tooltips. Click the clock icon to set a 3, 5, or 10-second delay before capture. This lets you open menus that disappear when you click away.
Change the default save location. Right-click the Screenshots folder in Pictures, select Properties > Location, and choose a different folder. This is useful if you want screenshots saved to your Desktop or a cloud-synced folder.
Use clipboard history. Press Windows + V to open clipboard history, which stores your last 25 copied items including screenshots. This lets you paste older screenshots without retaking them.
For related guides, check these articles:
- How to screenshot on a Logitech keyboard
- How to take pictures from video
- Laptop won’t turn on
- Screencast-O-Matic review
- How to mirror on Procreate
#Bottom Line
Press Windows + Shift + S for the fastest screenshot on any Lenovo laptop. It works in all Windows modes and lets you select exactly what to capture. Use Windows + PrtSc for quick full-screen captures that save automatically. In tablet mode, press Power + Volume Down.
#Frequently Asked Questions
Where do screenshots save on a Lenovo laptop?
Screenshots taken with Windows + PrtSc save to Pictures > Screenshots. Screenshots taken with Windows + Shift + S or PrtSc alone copy to the clipboard and don’t save as files until you paste them into an app and save manually. Click the notification that appears after capturing to save directly.
Why isn’t Print Screen working on my Lenovo?
Some Lenovo models require pressing Fn + PrtSc instead of just PrtSc. Check if your keyboard has a Function Lock (Fn Lock) key. If Fn Lock is active, you may need to press PrtSc alone. Also verify that no other app is intercepting the Print Screen key.
Can I screenshot a specific window on a Lenovo laptop?
Yes. Press Alt + PrtSc to capture only the active window. Or use Windows + Shift + S and select “Window snip” from the toolbar at the top. Both methods capture just the focused window without the rest of your desktop.
How do I take a scrolling screenshot on a Lenovo laptop?
Windows doesn’t have a built-in scrolling screenshot feature. Use a browser extension like GoFullPage (for Chrome) to capture entire webpages. For desktop apps, use third-party tools like ShareX or PicPick, which support scrolling capture.
Does the Lenovo Yoga have a screenshot button?
No dedicated screenshot button. In laptop mode, use keyboard shortcuts (Windows + Shift + S or PrtSc). In tablet mode, press Power + Volume Down. Some Lenovo models have a Lenovo Vantage app with screenshot features, but the Windows built-in tools are faster.
Can I record my screen on a Lenovo laptop?
Yes. The Snipping Tool in Windows 11 includes screen recording. Open Snipping Tool, click the video camera icon, select the area to record, and click Start. For Windows 10, press Windows + G to open the Xbox Game Bar, which can record any app.