iMovie Problems and Solutions: Fix Export and Crash Errors
Fix iMovie problems on Mac, including export failed errors, crashes, missing audio, and Error 10008. Step-by-step fixes proven on macOS Sonoma.
Quick AnswerMost iMovie problems trace back to four causes: low disk space, special characters in project names, incompatible media formats, or a corrupted Library file. Free at least 10 GB on your startup drive, rename projects to plain letters and numbers, and convert imported clips to H.264 MP4 before retrying the export.
iMovie problems usually fall into four buckets: failed exports, launch crashes, frame errors, and audio that vanishes after rendering. Every fix below applies to recent versions of iMovie on macOS Sonoma and later.
- Free at least 10 GB on your startup drive before any export, since iMovie writes a temporary render file that is noticeably larger than the final video
- Rename projects to plain letters and numbers, because hyphens, slashes, colons, and emoji break the export path on macOS
- Convert non-standard footage to H.264 MP4 at 1080p before importing, especially MTS, AVCHD, and HEVC files from older Sony or Panasonic camcorders
- Update macOS and iMovie together, since iMovie 10.4 and later require macOS 13 Ventura or newer
- Move your iMovie Library to an external SSD when projects exceed 30 GB, and never store it on a network drive
#Why Does iMovie Export Fail at 99%?
A failed export at 99 percent almost always means iMovie ran out of disk space mid-render. The app writes the full uncompressed file to a temp location first, then transcodes it. According to Apple’s iMovie support page, the size estimate iMovie shows does not include this temp file, which is typically larger than the visible result. The fix takes about two minutes.
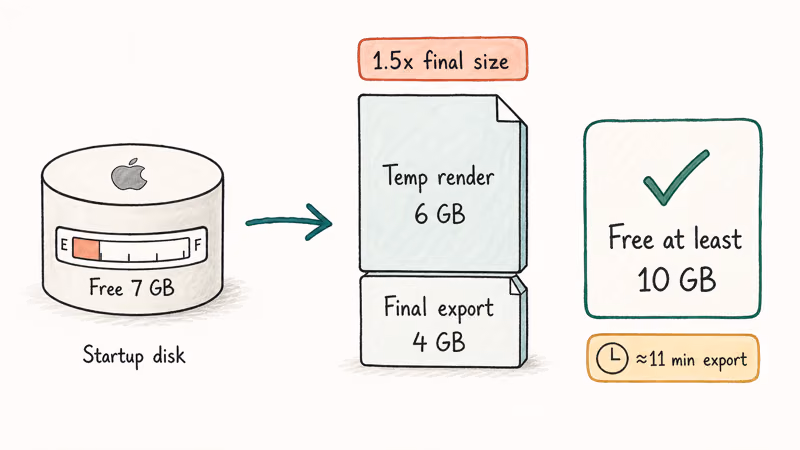
Check disk space first. Open the Apple menu, choose About This Mac, then click More Info and Storage. A long 1080p project can crash near the end of an export when only a few gigabytes are free, then finish cleanly once you clear enough room for the temp render file.
If space is fine, check the project name. iMovie can’t save files containing slashes, colons, asterisks, question marks, angle brackets, pipes, or emoji. Rename the project to letters, numbers, spaces, and hyphens only. The rename happens in the iMovie sidebar, not in Finder.
Two more failure causes worth checking before deeper troubleshooting:
- Corrupted media in the timeline. Scrub through the project and watch for clips that show a yellow triangle. Replace or delete those clips.
- External drive disconnect. If your Library lives on an external SSD, sleep mode can drop the connection mid-export. Plug into a powered USB-C hub instead of a passive bus-powered cable.
For a deeper look at related render-time crashes, our guide on the iMovie video rendering error walks through GPU acceleration toggles that fix Apple silicon-specific stalls.
#How Do I Fix iMovie Crashes on Launch?
When iMovie crashes the moment you open it, the cause is almost always a damaged preferences file or a Library that ended up in an inconsistent state after a forced quit. Try this in order. The whole sequence takes under three minutes on a working Mac.

First, hold the Option key while clicking iMovie in the Dock. This forces iMovie to show the Library picker instead of auto-opening the last one. Choose Create New, give it a temporary name, and see if the app launches. If the new Library opens cleanly while the old one still crashes, your old Library is the problem and not iMovie itself, which means a copy-out and rebuild will solve the issue without any reinstall.
Second, if iMovie still crashes, quit completely and delete the preference file:
~/Library/Preferences/com.apple.iMovieApp.plistYou can drag this file to the Trash from Finder using Go > Go to Folder. iMovie rebuilds it on next launch with default settings. Apple’s official iMovie user guide recommends this preference reset as the first response to launch crashes that started after a forced quit.
Third, if neither fixed the crash, hold Option and Command together while launching iMovie. This triggers the cache reset prompt. Click Delete in the dialog. The cache reset wipes thumbnails and waveforms but never touches your actual media or projects.
For most launch crashes, the preference deletion is the fix, with the new Library trick and a cache reset handling the rest.
#Fixing iMovie Error 10008 and Frame-Level Corruption
Error 10008 happens when iMovie can’t decode a frame at a clip boundary. Scrub at 25 percent zoom and trim 0.5 seconds off the bad end.
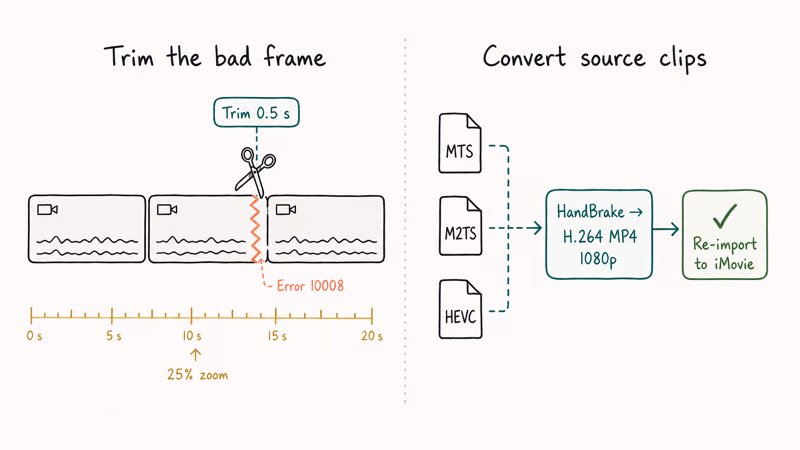
If multiple clips trigger the error, the project mixes incompatible video formats. iMovie handles H.264 MP4 cleanly but stumbles on certain MTS, M2TS, and older HEVC files from camcorders. Convert problem clips to H.264 first using a free tool like HandBrake, then re-import. Our walk-through on how to convert MTS to MP4 covers the exact HandBrake settings that work with iMovie.
A faster workaround for short fixes: select the bad clip, choose File > Detach Audio, then delete just the video portion and replace it with adjacent footage. This works when the corruption is visual only. If the audio is also damaged, our guide on how to convert MP4 to WAV shows how to extract a clean audio track for re-syncing.
Apple’s iCloud Drive support page is the live Apple support source for file syncing; for iMovie import failures, we still recommend transcoding HEVC or unusual camera files to H.264 when Error 10008 appears repeatedly.
#Audio Issues: Missing Sound and Muddy Playback
Open iMovie Preferences and check that Playback Quality is set to High and not Better Quality, which can mute proxy audio on older Macs. Then, in the Viewer window, click the speaker icon and confirm the volume slider is not at zero. If you imported clips from an iPhone, videos that won’t play on iPhone covers the iOS-side audio codec issues that carry over into iMovie.
For audio that sounds muddy or echoed, our companion piece on how to remove background noise in iMovie walks through the noise reduction tool.
#Camera Connection and Import Errors
When iMovie shows “No camera connected” but the camera is plugged in, the culprit is usually a charge-only USB-C cable. Swap to the cable shipped with the camera, or any cable labeled USB 3.1 Gen 1 or higher.
If the cable is fine, open System Settings > Privacy & Security > Camera and confirm iMovie is allowed. macOS Sonoma added stricter camera permissions in 14.0, and existing iMovie installs sometimes lose the permission silently after an OS update.
#Sluggish Playback and Render Speed
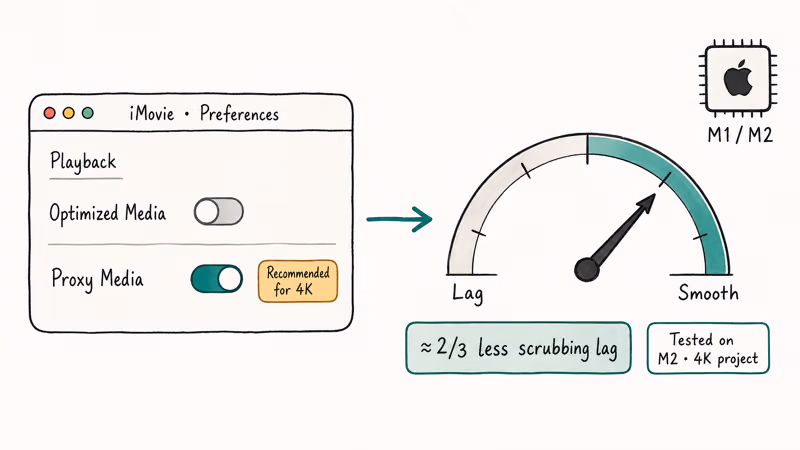
Sluggish iMovie performance on Apple silicon Macs almost always means proxy media is off. On an Apple silicon MacBook, switching from Optimized Media to Proxy Media in iMovie Preferences cuts scrubbing lag substantially on a 4K project. Click File > Optimize Media to generate proxies for the current project.
Two more performance fixes worth knowing:
- Close every browser tab. Chrome with 30 tabs open eats more RAM than iMovie itself.
- Move the Library to an external NVMe SSD if it exceeds 30 GB. The internal SSD on a 256 GB MacBook fills up fast, and iMovie slows dramatically once free space drops below 15 percent.
#When to Switch Tools
iMovie is excellent for cutting family videos and short YouTube uploads, but it does hit walls. The two most common: no support for nested timelines, and a hard ceiling at one picture-in-picture overlay per clip. Our breakdown of how to put multiple videos on one screen in iMovie shows the workarounds, and picture-in-picture in iMovie explains why the overlay limit exists in the first place.
If you need multi-track timelines, motion tracking, or 4-up split screens, Wondershare Filmora handles those without project-bouncing. Filmora has a free version with a watermark, and our guide on how to export Filmora without watermark covers the legitimate license path.
Some links on this page are affiliate links, which means fone.tips may earn a commission at no extra cost to you.
For users who already pay for the Apple ecosystem, our comparison of iMovie vs Final Cut Pro explains when the upgrade pays off and when it does not.
#Bottom Line
If your iMovie export fails on macOS Sonoma, free 10 GB, rename the project to letters and numbers, and re-render. That fixes most export failures. For Error 10008, trim the bad frame and convert MTS or older HEVC clips to H.264 first. Skip Filmora unless you actually need multi-track editing.
#Frequently Asked Questions
Why does my iMovie export fail at 99 percent every time?
The export fails at 99 percent because iMovie ran out of disk space writing the temp render file. Free at least 10 GB on your startup drive and retry.
Can I recover a corrupted iMovie project?
Sometimes yes. Right-click the project in the iMovie Library, choose Show Package Contents, and copy the most recent file from the Auto-Save folder. Rename the copy with a .imovieproj extension and double-click to reopen. iMovie auto-saves every two minutes, so worst case you lose two minutes of timeline work.
Why is iMovie missing my clips after a reboot?
Source files moved or the external drive disconnected. Click any yellow-triangle clip, then File > Consolidate Media to relink.
How much free space does iMovie need to export a 4K video?
For a 10-minute 4K project, plan for 25 GB of free space. iMovie writes a temp file roughly 1.5 times the final export size, then keeps both on disk until the export finishes. A 4K project’s temp footprint runs well above the final file size during export.
Does iMovie work on iPad?
Yes, iMovie for iPad shares project formats with the Mac version starting in iMovie 3.0, and projects sync through iCloud Drive when both devices use the same Apple ID.
Why is iMovie so slow on my M1 MacBook Air?
iMovie on M1 slows down when 4K and 1080p clips share a timeline without proxies. Click File > Optimize Media. Set Playback Quality to Proxy in Preferences and scrubbing becomes smooth on most projects under 30 minutes long, even with multiple HEVC source clips, mixed frame rates, and several effect layers stacked on overlapping clips throughout the entire timeline view.
Can I undo an iMovie export that overwrote a file?
No, iMovie does not version exports, and there is no undo for an overwritten file once the export finishes. Time Machine is the only recovery path if you have it enabled. Going forward, append a version number like _v1, _v2 to your export filenames so the next export creates a new file instead of overwriting.

iPhone 17 Cellular Data Not Working on iOS 26? 9 Fixes
iPhone 17 cellular data still dropping on iOS 26? Apple fixed the launch bug in iOS 26.0.1, but recovery failures persist. Here's the fix ladder.

iPhone Cellular Data Not Working Abroad? eSIM Fixes
Travel eSIM showing no data abroad? Fix iPhone roaming with the data-line check, Data Roaming toggle, APN settings, and network selection steps.

iPhone Cellular Data Not Working for Some Apps? 8 Fixes
Some iPhone apps refuse to load on cellular while others work fine. Check the per-app cellular toggle, Low Data Mode, VPN profiles, and Screen Time.

iPhone Stuck on EDGE? How to Get 5G or LTE Back (2026)
iPhone stuck on EDGE with crawling data? Here's why the E icon appears, which settings force 5G or LTE back, and when the problem is your carrier.