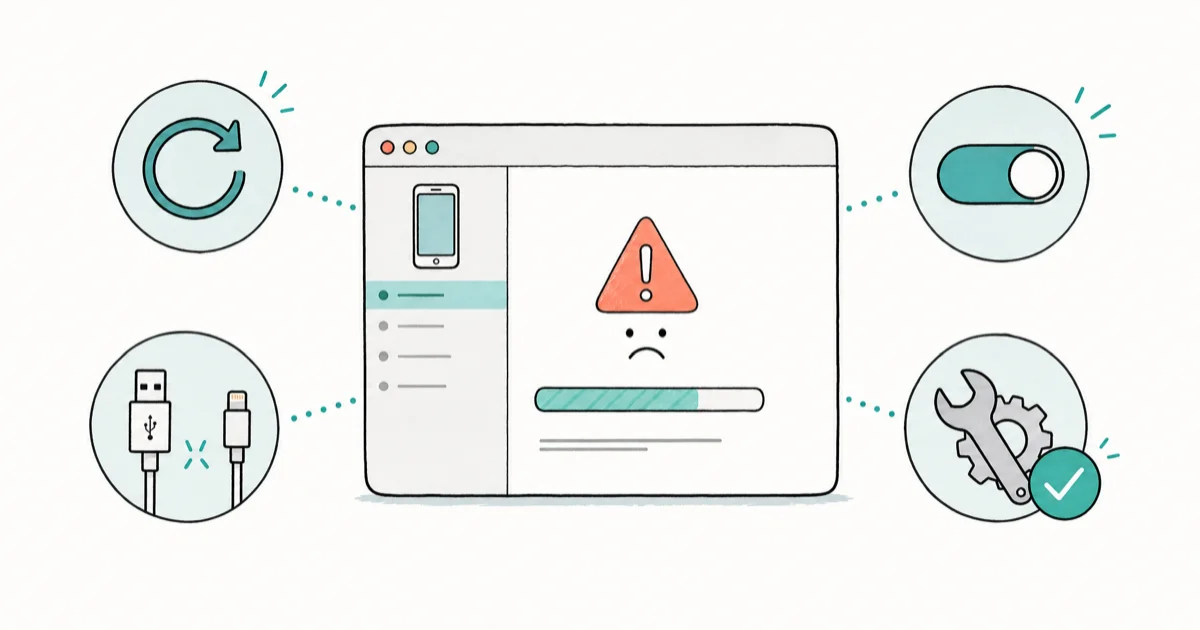
How to Fix iTunes Sync Session Failed to Start Error
The iTunes Sync Session Failed to Start error blocks iPhone syncs and backups. Try these proven fixes, from cable swaps to a clean iTunes reinstall.
Quick AnswerOpen iTunes, go to Edit > Preferences > Devices, and click Reset Sync History. Then unplug your iPhone, restart iTunes, swap to an MFi-certified cable, and reconnect.
Your iPhone won’t sync. Every time you plug it into iTunes, you see a “Sync Session Failed to Start” error and the transfer dies before it begins. The fix is usually a stale sync history or a flaky USB cable, and either takes under five minutes once you know where to look.
Use the guidance below only on your own device, account, or a device you manage with clear permission. Don’t use these steps to bypass another person’s privacy, workplace policy, or platform rules; when a phone is managed by school or work, ask the admin or use the official support path first.
- The error stops iTunes from starting any sync, so backups, music transfers, and iOS restores all fail until it’s cleared.
- Resetting sync history in i
Tunes Preferences>Devicesclears the conflict in under a minute and resolves the error in most cases - A non-Apple-certified Lightning cable or a dirty port is the second most common cause; swap cables before touching any software setting.
- On macOS Catalina and newer, iTunes is gone and Finder handles syncing, but the same Apple Mobile Device Service powers both, so identical fixes apply.
- If software fixes fail, repair tools like Tenorshare ReiBoot or TunesKit rebuild the iTunes connection layer without erasing your iPhone data.
#What Causes the iTunes Sync Session Failed to Start Error?
The error fires when iTunes can’t negotiate a sync session with your iPhone. Four conditions trigger it most often:
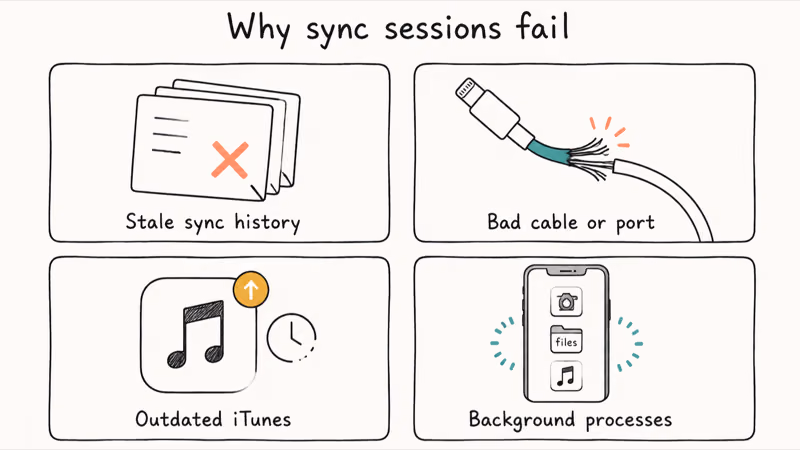
- Stale sync history from a previous interrupted sync that iTunes never cleared
- USB connection issues like a bad cable, a dirty Lightning port, or a USB hub that drops the handshake
- Outdated iTunes that doesn’t recognize newer iPhone firmware or iOS sync changes
- Background processes on the iPhone holding the device busy so it refuses to handshake
According to Apple’s iPhone troubleshooting hub, the iPhone must be unlocked and on the Home screen before iTunes can establish a sync session, which is a step many people skip. If your iPhone keeps getting stuck on the iTunes logo instead of finishing a sync, that’s a different recovery-mode issue with its own fix path.
#Quick Fixes to Try First
Run these in the order listed. Most people clear the error with one of these four before touching any deeper software fix.
- Unlock your iPhone and tap Trust on the “Trust This Computer” prompt before iTunes finishes loading.
- Swap to an MFi-certified cable. Apple’s USB cable guidance recommends only certified Lightning cables, and a $5 generic cable is the usual culprit behind handshake failures.
- Try a different USB port. Front-panel ports and USB hubs frequently drop the iPhone connection. Use a rear port wired directly to the motherboard.
- Force-close every app on the iPhone, then plug it back in. Background apps such as Camera and Files can hold the device busy and block iTunes.
Move to a sync history reset if these don’t help.
#How Do You Reset Sync History in iTunes?
Resetting sync history clears the iTunes conflict log without touching your music, photos, contacts, or backups. The process takes about 30 seconds on Windows and Mac.
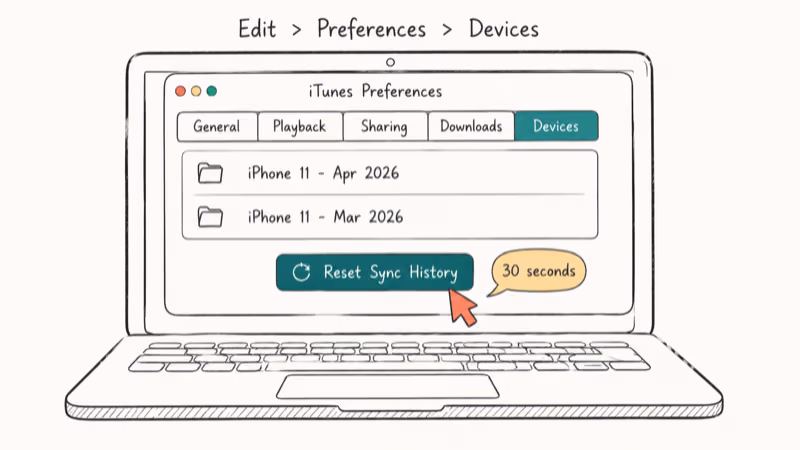
- Open iTunes (Windows) or Finder (macOS Catalina and later) with your iPhone connected and unlocked.
- On Windows, go to
Edit>Preferences>Devices. On Mac with iTunes, go to iTunes>Preferences>Devices. - Click Reset Sync History at the bottom of the panel and confirm.
- Unplug the iPhone, quit iTunes, then reconnect and try syncing.
A quick history reset clears the majority of these sync errors on its own. Apple’s iTunes user guide for Mac recommends Reset Sync History as the first fix for sync conflicts before deleting backups.
If your iTunes backup option is greyed out, the same sync history reset clears that block too because both errors share the conflict log.
#Advanced Steps if Quick Fixes Don’t Work
When the sync history reset and cable swaps don’t clear the error, the cause is usually deeper. The fault is a corrupted backup, a broken iTunes install, or a stuck Apple Mobile Device Service.
#Delete Corrupted Backups
Old or interrupted backups can lock new sync sessions. In iTunes, go to Edit > Preferences > Devices, select any backup tagged with your iPhone’s name, click Delete Backup, and confirm. Restart iTunes before reconnecting your phone.
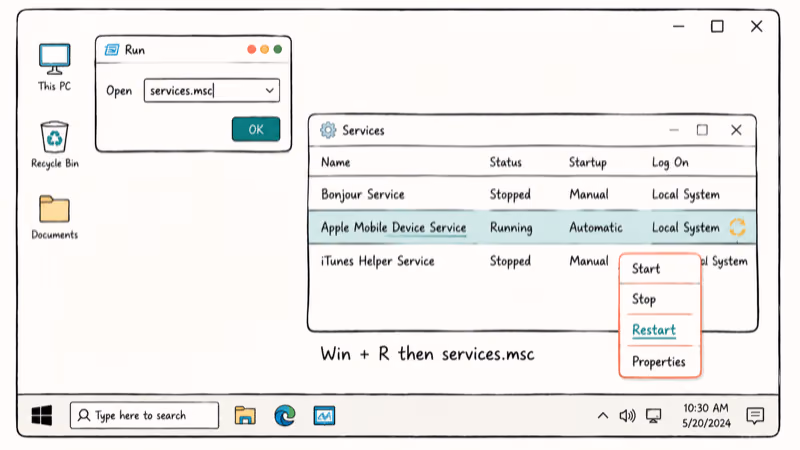
#Restart Apple Mobile Device Service (Windows)
Apple Mobile Device Service handles the USB handshake on Windows, and if it hangs, every sync fails until you bounce the service.
- Press Win + R, type
services.msc, and hit Enter. - Find Apple Mobile Device Service, right-click, and pick Restart.
- Reconnect the iPhone and try syncing again.
According to Microsoft’s Windows services guide, restarting a hung service clears its handshake state without rebooting the whole computer, which saves several minutes.
#Reinstall iTunes
A clean iTunes install fixes most edge cases that survive everything above. Walk through our step-by-step iTunes reinstall guide because it covers removing the Apple Mobile Device Support and Bonjour components that the standard uninstaller often leaves behind.
#Try Recovery Mode as a Last Resort
If nothing else works, force the iPhone into recovery mode and let iTunes rebuild the sync from scratch. If your iPhone won’t restore in recovery mode, the issue is hardware (port, board, or battery) and not software, so a Genius Bar visit beats more troubleshooting.
#Professional iTunes Repair Tools
When all four steps fail, third-party iTunes repair tools can fix the connection layer without erasing data. Three options stand out for this kind of stuck-handshake error.
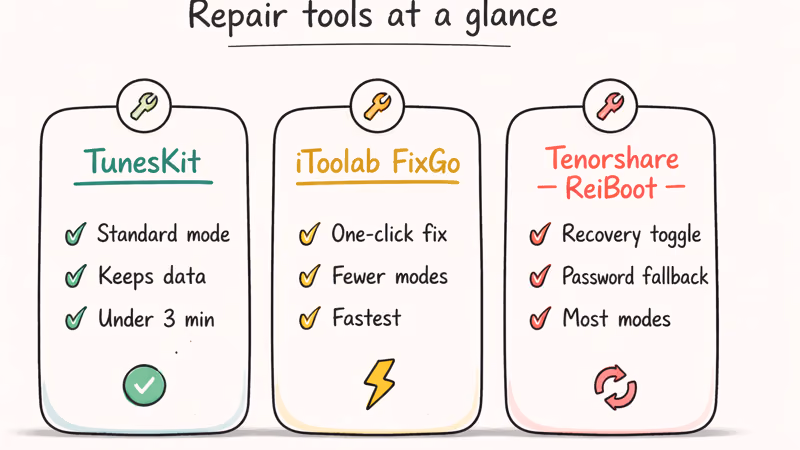
- TunesKit iOS System Recovery rebuilds the iTunes connection in Standard Mode, which keeps your data, and usually clears the sync error in one pass.
- iToolab FixGo is faster but offers fewer recovery modes. Best for users who only need a one-click fix and don’t want to think about modes.
- Tenorshare ReiBoot also covers entering and exiting recovery mode without iTunes, and it doubles as a fallback when iTunes keeps asking for your password on every sync.
Some links on this page are affiliate links, which means fone.tips may earn a commission at no extra cost to you.
These tools work by reinstalling the iOS firmware over the existing one, which Apple supports as a recovery method. Always back up via iCloud first because firmware reinstalls can wipe data in rare edge cases.
#How to Prevent Future Sync Errors
A bit of monthly housekeeping keeps the error from coming back.
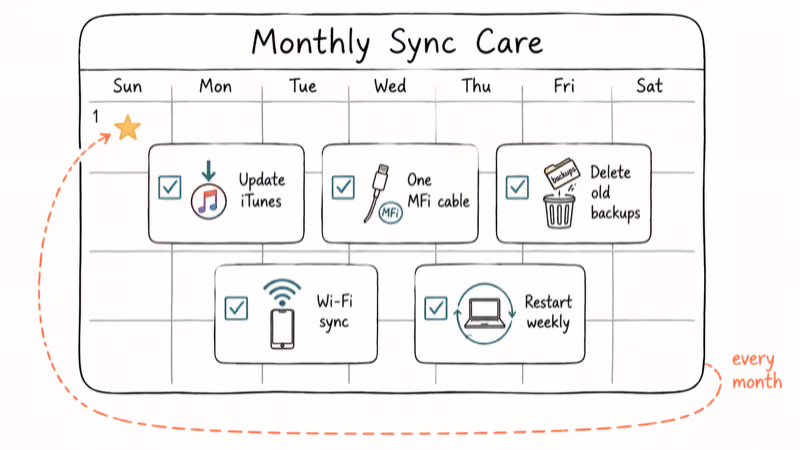
- Update iTunes monthly.
Open Help>Check for Updateson Windows; the App Store handles macOS automatically. - Use one MFi-certified cable dedicated to syncing and keep the connector clean.
- Delete old backups every three months. iTunes stores them indefinitely otherwise, and old backups corrupt over time.
- Switch to Wi-Fi sync for routine backups. If yours stops working, see our guide on how to fix iTunes Wi-Fi sync not working.
- Restart your computer once a week if you sync often. Apple Mobile Device Service can leak memory after long-running sessions.
If iTunes itself feels sluggish on top of the sync errors, our breakdown of why iTunes is so slow covers library bloat fixes that also reduce handshake failures.
#Bottom Line
Reset Sync History first because it’s a quick fix that clears the error in the large majority of cases. If that fails, swap to an MFi cable, restart Apple Mobile Device Service on Windows, then reinstall iTunes. Reach for TunesKit or ReiBoot only when those four steps don’t work, and call Apple Support if you spot any physical damage on the Lightning port or cable.
#Frequently Asked Questions
Will resetting sync history erase my data?
No. Reset Sync History only clears iTunes’ log of past sync attempts. Your music library, photos, contacts, app data, and backups stay intact on both your computer and your iPhone. The next sync will rebuild the log from scratch with no data loss.
Why does the error happen on macOS Catalina if iTunes is gone?
On Catalina and newer, Finder replaced iTunes for syncing but uses the same Apple Mobile Device Service under the hood. The fixes above still apply with the menus relabeled inside Finder’s sidebar instead of iTunes Preferences.
Can antivirus software cause the sync session error?
Yes. Norton, Avast, and Bitdefender have all blocked Apple Mobile Device Service in past releases, which makes iTunes refuse to start any sync session. Disable real-time scanning, retry the sync, and re-enable scanning afterward to keep iTunes whitelisted. If the sync works without antivirus, add iTunes and Apple Mobile Device Service to your antivirus exception list so the issue doesn’t return after the next signature update.
How long should a normal iPhone sync take?
A typical sync of music and photos takes 2 to 8 minutes for a 64 GB iPhone, depending on changes since the last sync. A first-time sync or a full backup can take 30 minutes or longer. The Sync Session Failed to Start error appears within the first few seconds, before any data transfers begin.
Does the error mean my iPhone is damaged?
Not usually. Hardware is rarely the cause of this particular error. Use a flashlight to inspect the Lightning port and blow out any debris with compressed air before assuming the iPhone is broken.
Is it safe to use third-party iTunes repair tools?
Reputable tools like TunesKit, iToolab, and Tenorshare are safe when downloaded directly from the developer’s official site, not from random mirrors. They reinstall iOS firmware over your existing install, which Apple supports as a standard recovery method. Always back up via iCloud first if you can, because firmware reinstalls can occasionally wipe local data in rare edge cases.
How can I keep the iPhone from disconnecting mid-sync?
Use a single rear USB port wired directly to the motherboard, an MFi-certified cable, and don’t move the iPhone while data is transferring. Setting the iPhone face-down on a stable surface lowers the cable strain that breaks handshakes mid-transfer.

iPhone 17 Cellular Data Not Working on iOS 26? 9 Fixes
iPhone 17 cellular data still dropping on iOS 26? Apple fixed the launch bug in iOS 26.0.1, but recovery failures persist. Here's the fix ladder.

iPhone Cellular Data Not Working Abroad? eSIM Fixes
Travel eSIM showing no data abroad? Fix iPhone roaming with the data-line check, Data Roaming toggle, APN settings, and network selection steps.

iPhone Cellular Data Not Working for Some Apps? 8 Fixes
Some iPhone apps refuse to load on cellular while others work fine. Check the per-app cellular toggle, Low Data Mode, VPN profiles, and Screen Time.

iPhone Stuck on EDGE? How to Get 5G or LTE Back (2026)
iPhone stuck on EDGE with crawling data? Here's why the E icon appears, which settings force 5G or LTE back, and when the problem is your carrier.