Switch Joy-Con Drift Fix: Free DIY Repair Guide (2026)
Fix Switch Joy-Con drift without buying a new controller. Recalibrate, contact-clean, then use Nintendo's free repair if drift returns. Full sequence.
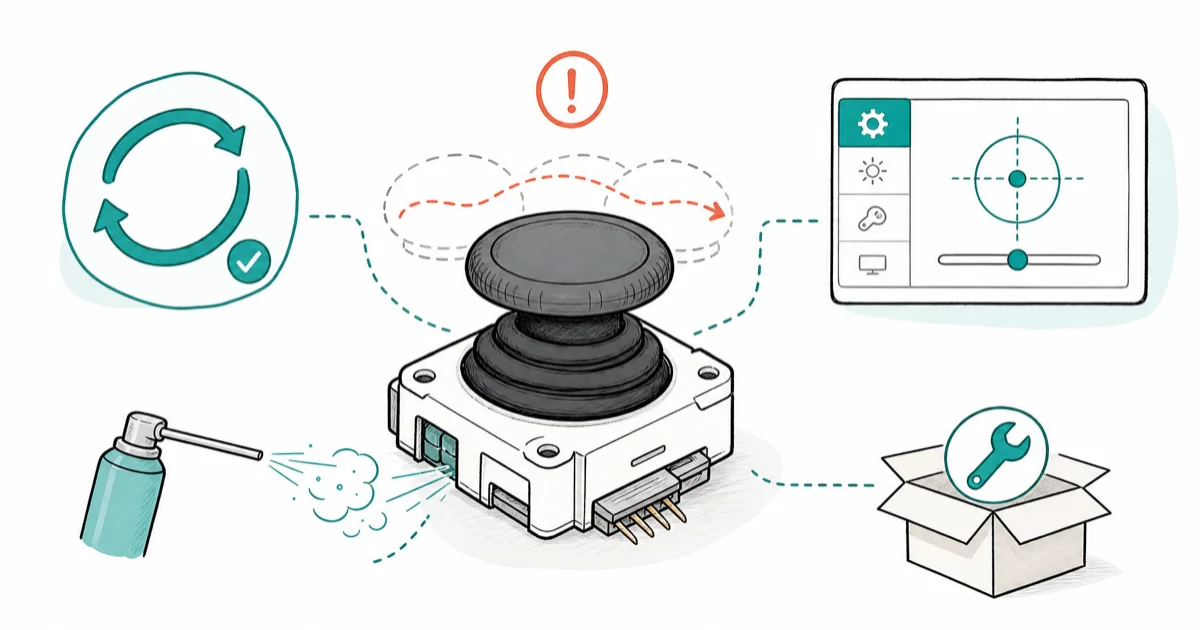
Quick AnswerRecalibrate the Joy-Con sticks under System Settings, then blast compressed air under the stick boot. If drift returns, send the Joy-Con to Nintendo for a free repair.
Your character walks left on its own in Breath of the Wild and the eShop cursor won’t sit still. That’s classic Switch Joy-Con drift. The fix doesn’t have to mean buying a new $80 pair.
The safest repair order is software first, cleaning second, Nintendo’s free repair third. That sequence avoids opening the Joy-Con shell unless every lower-risk fix fails.
- Recalibrate Joy-Con sticks under System Settings before anything else, especially when drift is recent or mild
- Compressed air plus a single drop of 99% isopropyl alcohol under the stick boot fixes most physical-wear drift
- Nintendo repairs Joy-Con drift for free worldwide, with no proof of purchase required and no warranty time limit
- Original Switch Joy-Cons use a potentiometer-based stick that wears down over time, which is why drift comes back
- Switch 2 Joy-Cons use a redesigned stick assembly, but the recalibration menu still works the same way
#What Causes Joy-Con Drift in the First Place
The original Switch Joy-Con stick is a potentiometer design. A carbon wiper inside the stick housing slides across a resistive track every time you move the stick, and the console reads the resulting voltage as a direction. Over months of use, dust gets under the rubber boot at the base of the stick and grinds against the carbon track, wearing tiny grooves into it.
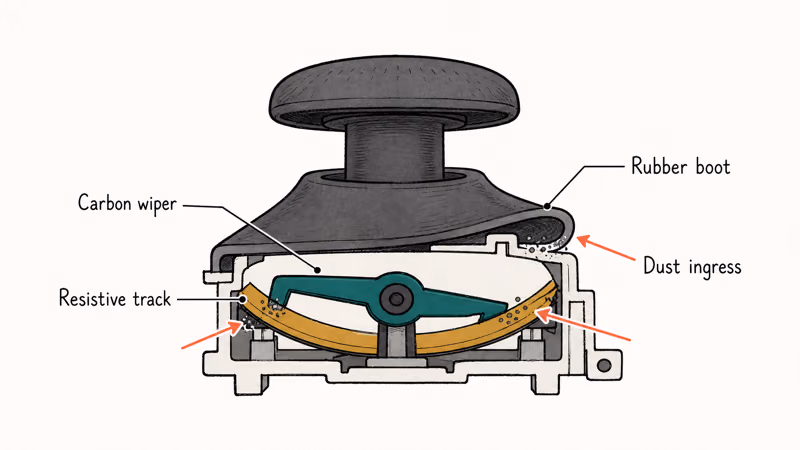
Once the track has grooves, the console reads voltage drift even when the stick is centered. That’s the phantom input you see in-game.
The drift starts gradually, often after 12 to 18 months of regular play. A few weeks of slight cursor pull, then a sudden flare-up. iFixit’s Joy-Con stick repair guide found that the 4 contact points on the carbon track sit essentially open to outside dust under the rubber boot. Even careful owners hit drift eventually, which is the headline trade-off of the original stick design.
#How to Recalibrate Joy-Con Sticks
Calibration is the fastest fix and it costs nothing. According to Nintendo’s official Joy-Con calibration guide, the menu path is short:
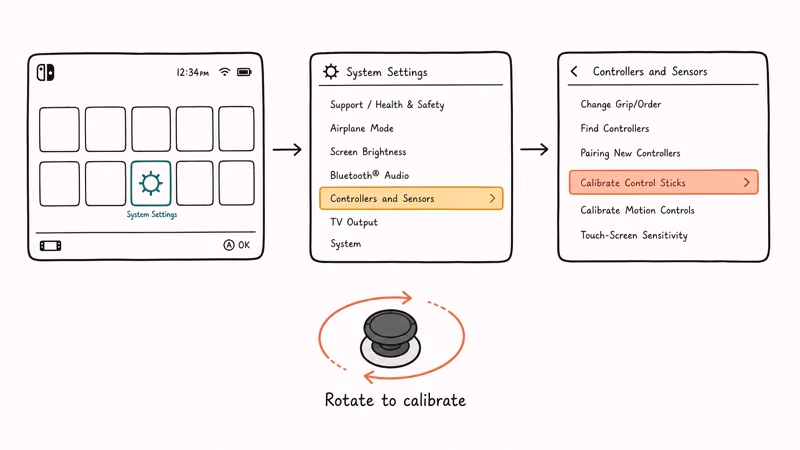
- Detach the Joy-Cons and hold them in your hands.
- From the home screen, go to System Settings → Controllers and Sensors → Calibrate Control Sticks.
- Press down on the drifting stick to select it. The console runs a quick test.
- Follow the on-screen prompt to rotate the stick in a full circle, then press the stick straight in to confirm.
Calibration is most useful when the stick’s center point has drifted but the contact surface is not badly worn. If calibration doesn’t hold during normal play, the wear is probably physical and the cleaning step below is the better next move.
So calibration is a triage tool, not a guaranteed repair. If drift comes back quickly, move to the cleaning step below.
#Compressed Air and Isopropyl Cleaning
Most YouTube guides reach for a screwdriver here. You don’t need one. The rubber boot at the base of the stick lifts gently with a fingernail, and the contact area underneath is reachable without opening the controller.

What you need:
- Compressed air (the cans sold for keyboard cleaning are fine)
- 99% isopropyl alcohol (the 70% kind has too much water)
- A toothpick or thin cotton swab
The sequence:
- Power off the console and remove the Joy-Con from the rail.
- Tilt the stick to one side. With your fingernail or a toothpick, lift the edge of the rubber boot at the base of the stick.
- Insert the compressed air straw under the boot and give it two short bursts. Rotate the stick a quarter turn and repeat. Cover all four sides.
- Put one drop of 99% isopropyl alcohol on the toothpick tip. Touch it under the boot edge so it wicks onto the contact surface.
- Rotate the stick in slow full circles for 30 seconds to spread the alcohol across the carbon track.
- Let it sit for two minutes to evaporate, then reattach the Joy-Con and re-run the calibration step from the section above.
Don’t drown the stick. Excess alcohol pools under the boot and can short the membrane underneath. One drop is enough.
This cleaning step targets dust and oxidation under the rubber boot. If the stick’s carbon track is already worn, cleaning may only help temporarily and Nintendo repair is the cleaner next step.
#Will Nintendo Fix Joy-Con Drift for Free?
Yes. Nintendo’s official Joy-Con repair page confirms that the company repairs Joy-Con drift for free, with no proof of purchase required and no warranty period limit on the drift-specific repair. This policy followed the 2019 class-action lawsuit settlement and has held since.
The process:
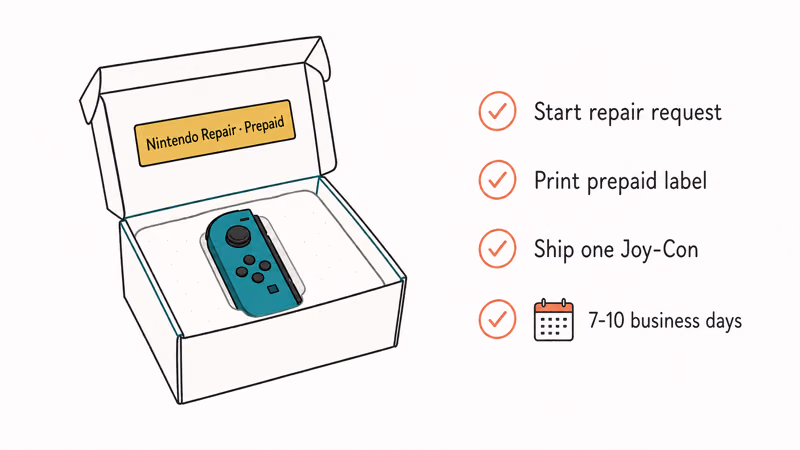
- Go to the Nintendo Support repair page and start a repair request.
- Select Joy-Con and choose “stick is not working correctly” as the issue. Don’t pick “physical damage”, that voids the free path.
- Print the prepaid shipping label Nintendo emails you.
- Ship the affected Joy-Con (you can keep the other one). Send the controller alone, no straps, no console.
- Turnaround is 7 to 10 business days in the US, longer in other regions.
You get either a repaired stick assembly or a swap unit. Either way you don’t pay a cent.
If your drift cleared with cleaning and you don’t want to ship anything, skip this step. But if drift came back within a week of the contact-clean treatment, or it never fully cleared, the free repair is the cleanest fix. It’s safer than potentiometer-kit DIY repair, which voids future Nintendo coverage if drift returns again.
#When Should You Stop and Ship It In?
Three signals say “stop, send to Nintendo”:
- Calibration runs cleanly but drift reappears the moment you start playing
- Cleaning fixed the drift for less than 48 hours
- The stick has visible physical damage, like a cracked dome or a stick that wobbles loosely in its socket
There are situations where the Joy-Con isn’t the problem, and shipping it to Nintendo wastes ten days. If your Joy-Con works fine docked but the console behaves oddly, the issue might be elsewhere. Our guide on a Switch dock not working covers dock-side electrical faults, and a Switch not connecting to TV breaks down HDMI handshake issues that masquerade as controller problems.
When the controller is actually the problem, Nintendo’s free repair is the path. Skip the $30 potentiometer kit from Amazon. You’ll open the controller, void any future Nintendo support, and spend an hour on what Nintendo does for free in ten days.
#Switch 2 Joy-Cons and Drift Risk
Probably less, but Nintendo has not confirmed Hall-effect sticks. Reports from outlets like Polygon’s Switch 2 hardware coverage noted that early teardowns of the Switch 2 Joy-Con show a redesigned potentiometer assembly with a tighter dust seal, not a non-contact magnetic design. The drift mechanism is the same in principle, just slowed down by better engineering.
The calibration menu lives in the same place on Switch 2: System Settings → Controllers and Sensors → Calibrate Control Sticks. If you hit drift on a Switch 2 Joy-Con, run that first.
Switch 2 launched in 2026, and units are still under their first-year warranty. If drift shows up, Nintendo covers it under the standard warranty path, no special drift-specific exception needed yet. Watch for the policy when Switch 2 hits its second year. If you’re still setting up the console, the Switch 2 setup hangs issue is a separate first-boot trap worth knowing about.
#Bottom Line
Calibrate, then clean, then ship to Nintendo. Don’t buy parts.
If your Joy-Con drift is recent and mild, the System Settings recalibration plus a 30-second compressed-air blast under the stick boot resolves it more often than people expect. That’s five minutes and zero dollars.
If drift comes back within a week, or it never fully cleared, use Nintendo’s free repair program. Ten business days, no charge, no warranty paperwork. That’s still cheaper than the $80 cost of a new official Joy-Con pair or even the $30 third-party potentiometer kits.
Replacement makes sense only if you want a different controller experience anyway. Our roundup of third-party Joy-Con alternatives covers options that trade some Nintendo features (NFC for Amiibo, wireless detach) for better ergonomics and turbo buttons. If you also game on PlayStation, the DualSense stick drift fix follows a similar sequence: software first, warranty second.
What you don’t do is shrug and spend $80 on a new pair. Nintendo has been clear since the lawsuit: drift is on them, the repair is free, and most cases never need to leave your house.
#Frequently Asked Questions
How do I fix Joy-Con drift without replacing it?
Start with the in-console calibration tool under System Settings, then lift the rubber boot at the base of the stick and clean under it with a single drop of 99% isopropyl alcohol on a toothpick. If drift returns quickly, ship the controller to Nintendo for a free repair instead of buying a new pair.
How do I recalibrate Joy-Con sticks?
Detach the Joy-Cons, go to System Settings, then Controllers and Sensors, then Calibrate Control Sticks. Select the drifting stick, rotate it in a full circle when prompted, and press it straight in to confirm. The whole process takes about 90 seconds, and the console rebuilds its center-point reference from the new motion data.
Does compressed air fix Joy-Con drift?
Often, yes, especially for recent drift.
Lift the rubber boot at the base of the drifting stick with a fingernail, insert the compressed-air straw under the boot edge, and give two short bursts on each side of the stick. Compressed air clears the dust that has settled on the carbon contact track. Pair it with a drop of isopropyl alcohol for stubborn cases.
Will Nintendo fix Joy-Con drift for free?
Yes. Nintendo runs a no-cost drift repair program worldwide with no proof of purchase required and no warranty time limit on the drift-specific repair.
You start the process on the Nintendo Support repair page, select Joy-Con as the device and “stick is not working correctly” as the issue, then ship the controller alone using Nintendo’s prepaid shipping label. Turnaround is 7 to 10 business days in the US, longer in Europe and other regions where the repair has to route through regional service centers.
Why does Joy-Con drift come back?
The original Joy-Con stick uses a carbon wiper that grinds against a resistive track every time you move the stick. Over time, dust and wear create grooves in the track that the console reads as phantom input.
Cleaning only addresses the dust. The grooves stay.
Do Switch 2 Joy-Cons drift too?
Early reports suggest less. Nintendo has not confirmed a Hall-effect sensor swap on Switch 2, so the underlying potentiometer wear pattern can still develop over years of play. The recalibration menu path is identical to the original Switch.
Is isopropyl alcohol safe for Joy-Con sticks?
99% isopropyl alcohol is safe in a single drop on a toothpick tip. The 70% concentration has too much water and can leave residue under the boot.
Don’t pour alcohol directly. Wick it under the boot edge with the toothpick. Excess liquid pools under the rubber and can short the membrane below.
Fortnite Stuck on the Loading Screen? Fix It in 2026
Fortnite stuck on the loading screen? Check server status, fix the Windows N Media Pack and DirectX 11 on PC, clear the console cache, and verify files.
Minecraft Keeps Crashing? Java and Bedrock Fixes (2026)
Minecraft keeps crashing on startup or mid-game? Update your GPU driver, remove mods on Java, and reinstall Gaming Services on Bedrock. Fixes for both.
Pokemon GO Not Loading? Fix the Loading Screen 2026
Pokemon GO not loading or stuck on the Pokeball? Check server status, fix automatic date and time, grant location permission, clear the cache, and update.
PS5 Controller Not Charging? 9 Fixes That Work (2026)
DualSense not charging? Swap the cable, use a rear port in Rest Mode, clean the USB-C port, and check power settings. 9 fixes for a dead PS5 controller.