Nintendo Switch Not Connecting to TV: 8 Fast Fixes (2026)
Fix your Nintendo Switch not connecting to TV with dock resets, HDMI cable checks, TV input fixes, dock firmware, adapter checks, and support steps.
Quick AnswerDisconnect every cable from the dock, unplug the AC adapter for 30 seconds, then reconnect the power cable first, the HDMI cable second, seat the Switch into the dock, and set your TV to the matching HDMI input.
Your Nintendo Switch not connecting to the TV almost always traces back to the dock, the HDMI cable, or the TV input. Start with the 30-second dock reset.
- The 30-second dock reset (unplug the AC adapter, wait 30 seconds, reconnect the power cable first, then the HDMI) is the first fix to try when the cause is a stuck HDMI handshake.
- A bad HDMI cable is the second most common failure point; swap in a different high-speed HDMI cable before you suspect the dock or console.
- Your TV input must match the exact HDMI port the dock plugs into; HDMI 2 with the dock in HDMI 3 shows nothing even when the console works fine.
- Lowering the resolution under
System Settings>TV Outputto 720p or 1080p often fixes handshake failures with older 4K and HDR TVs. - If TV mode still fails after every step, the dock’s internal USB-C charging port is the most common point of damage, and a third-party replacement dock from a brand like Hori or Genki costs roughly half the price of the official one.
#Why Won’t My Nintendo Switch Connect to the TV?
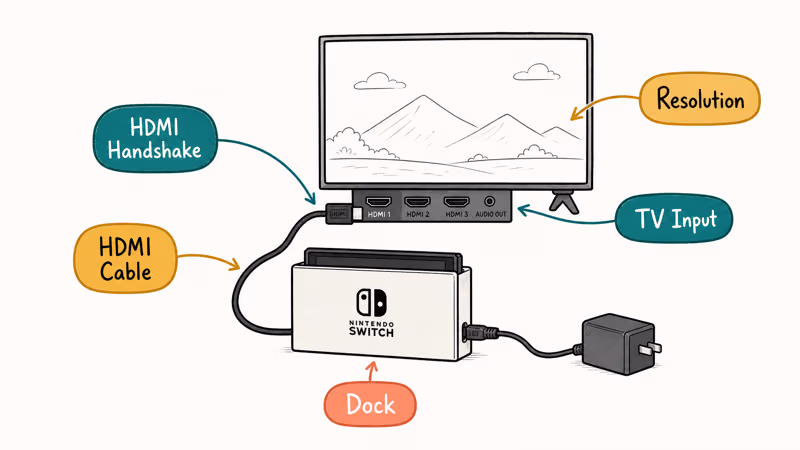
There are five common reasons a docked Switch shows a black screen: a stuck HDMI handshake, a damaged HDMI cable, the wrong TV input, a resolution the TV can’t negotiate, or a failing dock.
According to Nintendo’s support article on Switches that won’t display on TV, the troubleshooting order matters: reset the dock connections first, then test cables, then test ports. Skipping the reset and jumping to a factory reset wastes time and risks losing save data.
The dock itself is simple. It’s a passive USB-C-to-HDMI converter, so when TV mode fails the cause is usually external (cable, port, input setting) before it’s internal (the dock board itself). A bad cable, wrong input, or stuck handshake can look exactly like a dead dock from the couch. That’s why the low-effort fixes belong at the top of the list and factory reset belongs at the end.
#Start With the 30-Second Dock Reset
This is the first fix to try for black-screen-on-TV reports, and it takes about a minute to run. It works because the HDMI handshake between the dock and TV can get stuck, especially after a sleep cycle, a TV input switch, or after another HDMI device on the same TV (a streaming stick or game console) handed off the signal poorly.
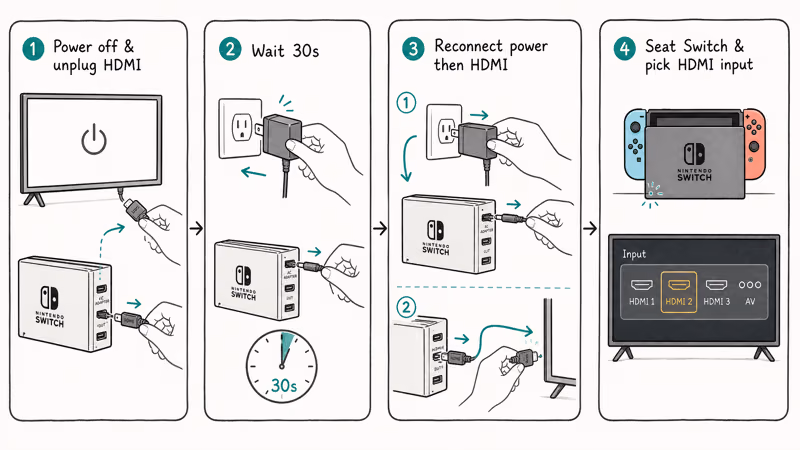
- Power off your TV.
- Unplug the HDMI cable from both the dock and the TV.
- Unplug the AC adapter (the official Nintendo charger) from both the wall outlet and the back of the dock.
- Leave everything disconnected for at least 30 seconds. Don’t shortcut this; the dock’s capacitors need that time to drain.
- Plug the AC adapter into the wall first, then into the dock’s top-right port (labeled AC Adapter).
- Plug the HDMI cable into the dock’s middle port, then into your TV.
- Open the dock’s back cover and seat the Switch with the screen facing you. The dock’s green LED should light within a second.
- Power on the TV and select the matching HDMI input.
If the green LED lights but no picture appears, cycle the TV input once.
#Test the HDMI Cable, Port, and TV Input
Cable next. HDMI cables fail silently. They keep the dock’s LED lit but drop video without warning, especially after years of being repeatedly bent at the connector during dock-to-portable transitions.
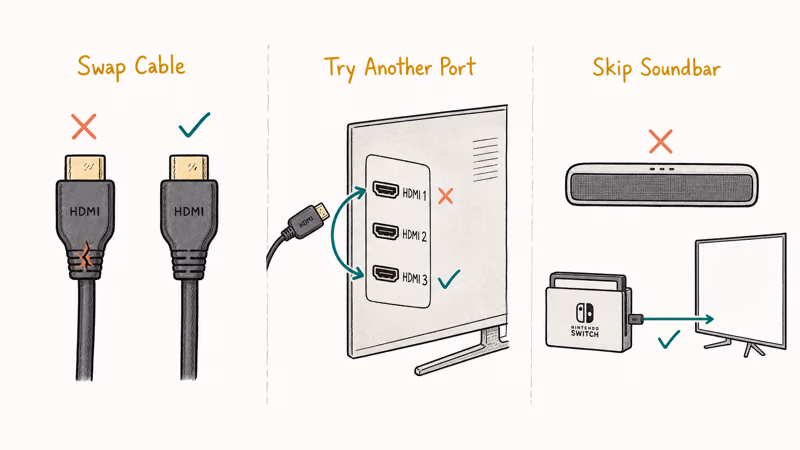
- Swap the HDMI cable with a known-good high-speed HDMI cable (any cable rated for 1080p at 60Hz works for the v1 Switch; Switch OLED docks pass through 4K only when the TV negotiates it).
- Try a different HDMI port on the TV. A single loose or worn port can fail while the other ports still lock the cable in place.
- Skip any AV receiver, soundbar, or HDMI switcher. Connect the dock straight to the TV. Many “Switch won’t connect” reports on r/NintendoSwitch trace back to a soundbar that doesn’t pass the Switch’s HDMI signal cleanly.
- Check the TV input label. Some TVs auto-name HDMI inputs when they detect a device, but if the dock disconnected before the TV finished naming, the input may show “HDMI 2” while the dock is in “HDMI 3.”
Already ruled out the cable on another device? The TV’s HDMI port itself may be the problem. Our HDMI port not working guide covers diagnosing TV-side HDMI failures step by step.
#Adjust TV Output Settings on the Switch
Some TVs refuse the dock’s signal at 1080p. This is most common on older 4K HDR sets and a handful of HDMI-CEC-enabled AV receivers that struggle to negotiate the handshake at default settings. The fix is to drop the resolution and let the TV lock at a lower mode first.
- Undock the Switch.
- From the home screen, open System Settings.
- Scroll to TV Output.
- Tap TV Resolution and select 720p (or 480p if 720p still fails).
- Re-dock the Switch and check the TV.
If the picture appears at the lower resolution, raise it back to Automatic and test once more. Many TVs negotiate the signal correctly the second time after they’ve already locked at a lower resolution.
While you’re in TV Output, also check:
- TV Sound: set to Stereo if your TV doesn’t support 5.1 surround over HDMI from the dock.
- RGB Range: leave on Automatic unless you’ve manually changed it; a wrong RGB Range setting won’t kill the picture but can wash out colors.
- Match TV Power State: turn this off temporarily; some HDMI-CEC bugs cause the TV to refuse the Switch signal.
#Update System Software and Dock Firmware
Nintendo’s system update history confirms that several past firmware versions shipped fixes for TV output bugs, particularly around 4K HDR negotiation. Running an outdated system version is a real source of TV-mode failures.
To update the Switch system:
- Connect the Switch to Wi-Fi.
- Open
System Settings>System>System Update. - Wait for the download and install. The whole process takes about 5 minutes on a fiber connection, longer on slow Wi-Fi.
If you have a dock with a LAN port (the Switch OLED dock and some third-party docks), the dock itself has firmware that can update separately:
- Plug an Ethernet cable into the dock’s LAN port.
- Re-dock the Switch.
- Go to
System Settings>TV Output>Update Dock.
The original 2017 v1 dock has no LAN port and no firmware update option.
#Is Your Dock Broken or Just the Power Adapter?
This is the question that decides whether you need a new dock or a new charger. Both fail in similar ways: no green LED, no TV output, possibly no charging.
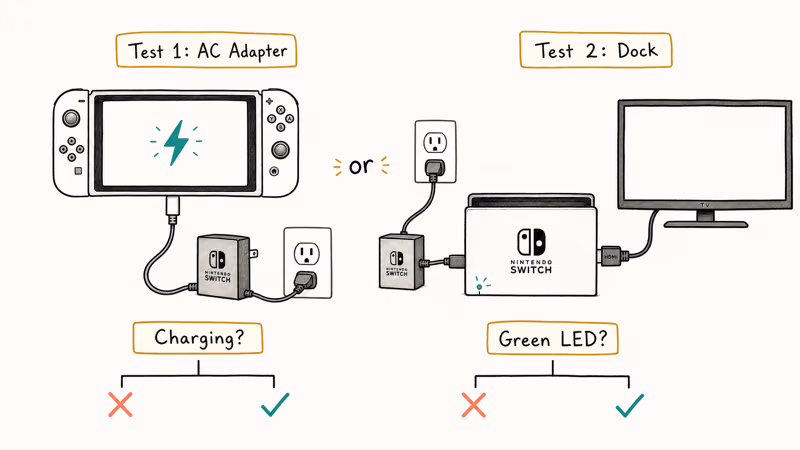
Test the AC adapter first because it’s the less expensive of the two parts to replace:
- Use the official AC adapter to charge the Switch directly through the console’s USB-C port (without the dock). If the Switch charges normally and shows the lightning bolt, the adapter is fine.
- If the Switch doesn’t charge or shows a slow-charge symbol, the adapter is failing. Replace it with another official Nintendo adapter (third-party adapters have caused dock damage on Switch v1 in well-documented cases).
Test the dock next:
- Plug the official AC adapter into the dock and the dock into a known-good HDMI cable and TV.
- Watch for the green LED on the dock front. No LED means the dock isn’t getting power.
- If the LED is on but there’s no picture, swap the HDMI cable one more time before declaring the dock dead.
If the dock is the problem, our Nintendo Switch dock not working guide walks through the dock-specific tests and replacement options.
#When to Replace the Dock or Call Nintendo Support
Replace the dock yourself when: the green LED never lights, the dock charges the Switch but produces no video, or the USB-C connector inside the dock visibly bent. Third-party docks from established brands (Hori, Genki, Skull & Co) work for most users at roughly half the price of the official replacement, but stick with brands that explicitly support the latest Switch system version.
Call Nintendo Support when: the Switch boots but won’t charge from any AC adapter, the green LED on the dock flickers irregularly, or the console makes a clicking sound when seated. Nintendo’s Set Up a Repair page walks through the repair request flow and gives shipping instructions for the dock and console.
A few signs the console itself (not the dock) is the problem:
- The Switch screen shows artifacts even in handheld mode.
- The console’s USB-C port has visible debris, lint, or bent pins.
- The Switch reboots randomly when seated in a known-good dock.
If parental controls were recently changed on your own Switch console, double-check that no restrictions were placed on TV mode access. The parental control system is designed for parents managing a minor child’s play time, so the menu only unlocks with the PIN registered to the account that owns the device. Our Nintendo Switch parental controls guide covers the exact menu path.
#Bottom Line
Run the 30-second dock reset first. If the picture stays black, swap the HDMI cable, then the TV input, then drop the TV resolution to 720p under System Settings > TV Output. If none of those work and the dock’s green LED never lights, replace the AC adapter before the dock, since adapters fail more often and cost less. Call Nintendo Support only when the console won’t charge from any adapter or you see physical damage to the USB-C port.
While the dock is out of action, your Switch still works in handheld mode. That’s a good time to revisit your library or pick up something new from our Nintendo Switch games for girls list or best RPGs on Switch.
#Frequently Asked Questions
Why won’t my Nintendo Switch display on the TV?
The most common causes are a stuck HDMI handshake (fixed by the 30-second dock reset), a bad HDMI cable, the wrong TV input, or a resolution the TV can’t negotiate at default settings. Work through them in that order. If none work, the dock’s internal USB-C connector is usually the next failure point and is worth swapping before you suspect the console itself or a deeper firmware fault.
Can I use any HDMI cable with my Switch dock?
Any high-speed HDMI cable rated for 1080p at 60Hz works.
My Switch works in handheld mode but not on TV. What’s wrong?
This rules out the console; the failure is in the dock, cable, or TV input. Run the dock reset, then swap the HDMI cable.
How do I update my Nintendo Switch dock firmware?
Only docks with a built-in LAN port have updatable firmware. To update, plug an Ethernet cable into the dock’s LAN port, re-dock the Switch, and go to System Settings > TV Output > Update Dock. The original 2017 v1 dock has no LAN port and no update option. Dock firmware updates ship alongside major Switch system firmware releases.
Can a faulty AC adapter stop the Switch from connecting to the TV?
Yes. According to public Nintendo Switch hardware specs, the dock pulls 39 watts from the official AC adapter, and a failing adapter can light the dock’s green LED while still failing to power the HDMI conversion circuit, producing a black screen on the TV. See the Nintendo Switch Wikipedia entry for the full hardware reference and the AC adapter’s 15-volt 2.6-amp specification.
My Switch keeps disconnecting from the TV at random. How do I fix it?
Reseat the Switch and confirm the green LED stays solid. If disconnects continue, swap the HDMI cable, then turn off “Match TV Power State” under System Settings > TV Output. If it still happens, the dock’s internal USB-C connector is worn.
Are third-party Switch docks safe to use?
Third-party docks from established brands (Hori, Genki, Skull & Co) are safer than unbranded docks, which have a documented history of damaging the Switch USB-C controller. Stick with brands that publish a confirmed-supported Switch system version list. Avoid any dock that pulls power from a non-Nintendo charger.
How can I tell if my dock is broken or just the cable?
Plug the official AC adapter into the dock alone (no Switch seated) and look for the green LED. If the LED is on, the dock has power. Connect a known-good HDMI cable to a known-good TV input. If there’s still no signal when you seat the Switch, the dock’s HDMI conversion has failed.

Bluetooth Not Working on Snapdragon X? Fixes for 2026
Bluetooth not working on your Snapdragon X Copilot+ PC? Generic audio, mice, and keyboards work, but vendor apps often lack an ARM build. Fixes inside.

Docker Desktop and WSL2 Not Working on Snapdragon X? Fix It
WSL2 runs fine on Snapdragon X, but Docker Desktop ARM is Early Access and throws WSL errors. Use WSL2 plus native ARM64 Ubuntu and Docker Engine.

Does iTunes Work on Snapdragon X? ARM Windows 11 Guide
Yes, iTunes runs on Snapdragon X laptops through Prism emulation, but the Apple Devices app is the smoother route. Here is what to install on ARM.

Does OBS Studio Work on Snapdragon X? ARM64 Build Guide
Yes, OBS Studio has an experimental ARM64 build since version 31.1, but x64 plugins won't load and hardware encoding is missing. Here is what works.