Stardew Valley Sprinkler Layout: Tiers and Grid Setup
Build the best Stardew Valley sprinkler layout with our tier-by-tier guide to Basic, Quality, and Iridium grids plus optimal farm placement.
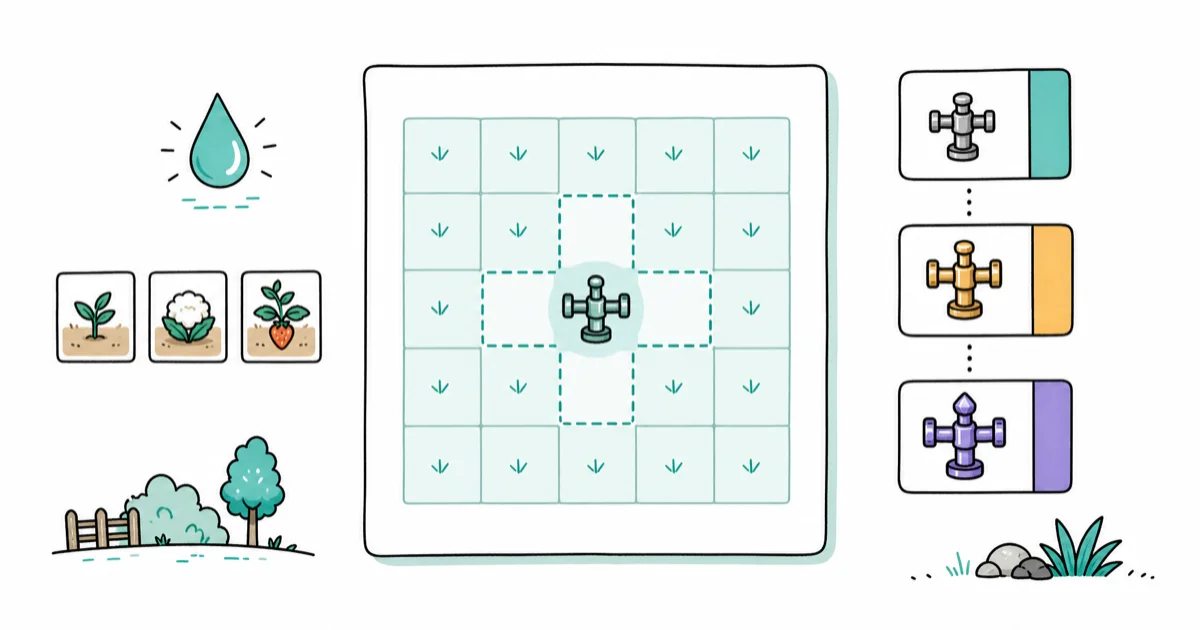
Quick AnswerThe Iridium Sprinkler is the best tier, watering 24 tiles in a 5x5 area. Place them on a 4-tile grid so every sprinkler's edge meets the next, leaving zero dry crops.
A solid sprinkler grid is the difference between watering twelve plants by hand and shipping hundreds of crops a day on autopilot, and the wrong tier choice in Year 1 can stall your farm for an entire season. This guide breaks down every sprinkler tier on the Standard Farm, the harvest math behind each layout, and which patterns actually save energy versus just looking pretty in screenshots.
Here are the layouts that actually work.
- The Iridium Sprinkler covers 24 tiles in a 5x5 area, which is 6 times the range of a Basic Sprinkler and the only tier worth scaling past Year 2.
- Quality Sprinklers water 8 tiles in a 3x3 grid for 1 gold bar plus quartz and refined quartz, and they’re the realistic backbone of Year 1 farming.
- Basic Sprinklers waste copper bars you need for upgraded watering cans, silos, and the keg, so most experienced farmers skip them entirely.
- Krobus sells 1 Iridium Sprinkler every Friday in the Sewers for 10,000g, which beats farming Skull Cavern if you are short on iridium ore.
- Lightning rods around the farm produce battery packs during storms, and battery packs are the gating ingredient for crafting Iridium Sprinklers without grinding the Solar Panel route.
#Sprinkler Tiers and Why Basic Wastes Copper
Most new farmers craft a Basic Sprinkler the moment they hit Farming Level 2. On a fresh Standard Farm save, that turns out to be one of the worst uses of early copper.
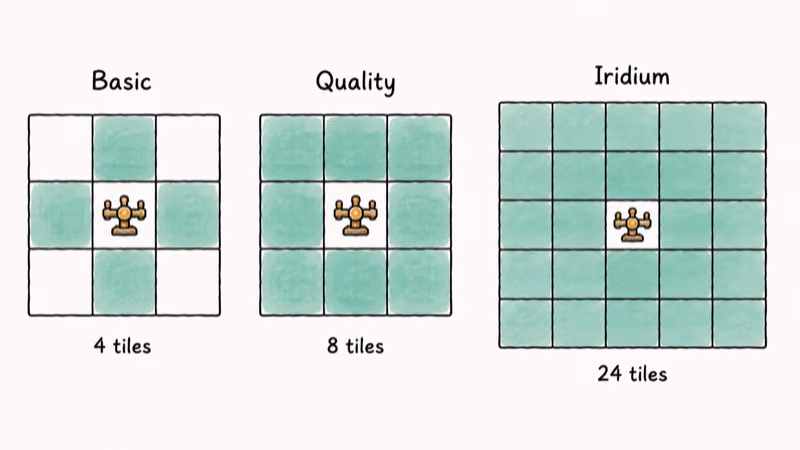
A Basic Sprinkler waters only the four cardinal tiles around it. The diagonals stay dry, which forces you into awkward gap-watering with the can or into wasted plot space.
Skip it.
Copper bars are scarce in Spring of Year 1. You need them for the Copper Watering Can, the Copper Hoe, the Copper Pickaxe, and the silo, and burning a bar on a 4-tile sprinkler stalls every other upgrade in the early game.
The smarter Year 1 path is to push through Foraging and Mining, hit Farming Level 6, and craft Quality Sprinklers directly from the iron and gold bars you already collect on Floor 40-79 of the Mountain Mine. According to the Stardew Valley Wiki, each Quality Sprinkler waters 8 surrounding tiles for 1 iron bar, 1 gold bar, and 1 refined quartz, which is a far better ratio than the Basic recipe.
The Quality-first path scales better than the Basic route. It ships more crops by the end of the first Summer and frees up copper bars for tool upgrades instead of locking them into low-coverage sprinklers.
If you’ve already crafted a stack of basics, don’t destroy them. Drop them on the early Spring planting square, then sell them back to Pierre once Quality Sprinklers go online.
#How Does the Iridium Sprinkler Layout Cover 24 Tiles?
The Iridium Sprinkler is the highest tier in the game and the only sprinkler worth scaling indefinitely.
According to the Stardew Valley Wiki, each Iridium Sprinkler waters 24 tiles in a 5x5 area centered on the device, leaving the sprinkler tile itself unwatered. So you can plant 24 crops per unit.
The clean grid pattern is the trick most farmers miss.
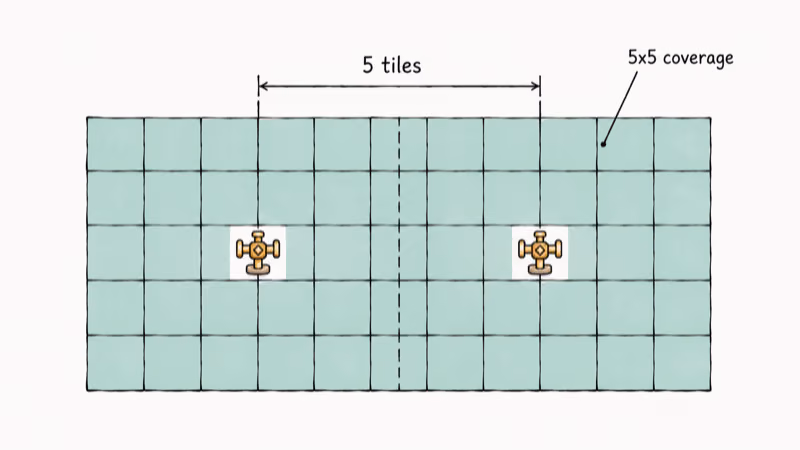
Place an Iridium Sprinkler. Count 5 tiles to the right and drop the next sprinkler. The two 5x5 zones tile perfectly with no overlap and no gaps. Repeat the pattern across rows by spacing 5 tiles vertically as well.
For a Standard Farm, that math gives you about 78 sprinklers across the main planting plot, watering more than 1,800 tiles in seconds.
Pressure Nozzle attachments, added in 1.4, push an Iridium Sprinkler from a 5x5 to a 7x7 footprint. Each nozzle is a one-time upgrade per sprinkler and is purchased from Krobus’s Sewer shop, which is the same place you can reach the sewers and find the rest of his rotating stock.
Pair them with Deluxe Speed-Gro for two harvests per season, one of the most profitable crops loops in the game.
#Quality Sprinkler Setup for Years 1 and 2
Most farms run on Quality Sprinklers for the first 40-60 in-game hours, so the layout matters more than the tier upgrade timing, and a smart Year 1 grid carries you through Year 2 without a single redesign or tear-out cost.
The wiki confirms that a Quality Sprinkler waters 8 tiles in a 3x3 grid, leaving the center sprinkler unwatered. So you plant 8 crops per device.
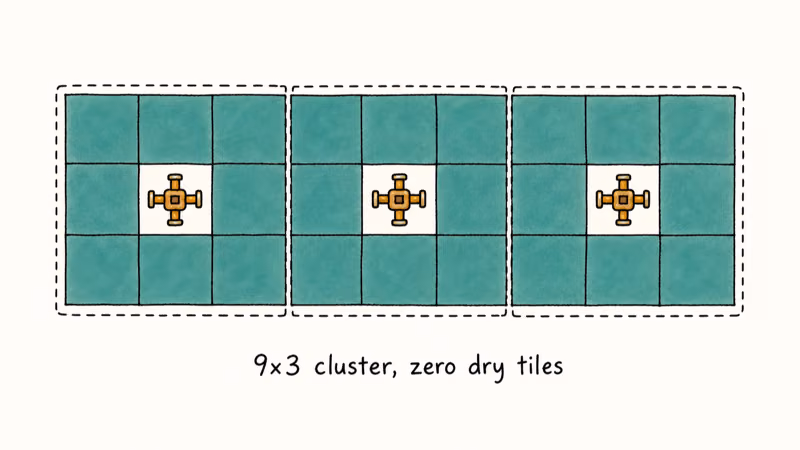
Lay them out in offset rows of three with a single empty column between, like a checkerboard rotated 45 degrees.
A 3x3 cluster of three sprinklers covers a 9x3 strip with zero dry tiles. Compared with the more common straight-line approach, the cluster pattern fits more crops into the same plot space across a 30-tile-wide block.
Stack four clusters together and you get a 9x9 super-block. That fits cleanly along the southern fence of the Standard Farm and leaves room for a small artisan shed.
When you upgrade to iridium, don’t tear out the old grid. Drop a single Iridium Sprinkler in the dead center of each Quality cluster. The 5x5 iridium footprint absorbs four Quality footprints, and the leftover Quality units can be sold back at 450g each or repurposed for the greenhouse layout.
#How Do You Get Iridium Ore and Battery Packs Quickly?
Iridium and battery packs are the two materials that gate the Iridium Sprinkler recipe.
Iridium ore drops from Skull Cavern monsters, iridium nodes, and rare meteorites. To open Skull Cavern you must complete the Vault bundles in the Community Center, which costs 42,500g across the four packages.
Stack the Miner profession at Farming Level 5, then take Blacksmith at Level 10. The Miner profession gives a flat +1 ore drop from every node, which adds up fast on a deep Skull Cavern run and meaningfully raises your ore-per-trip count for the same time spent. The breakdown of the choice between Miner profession and Geologist covers the long-term tradeoffs.
Bring at least 30 bombs, 20 staircases, and a Crystal Infinity Sword for runs past Floor 50. Without staircases your stamina collapses by Floor 25.
Battery packs come from lightning rods during storm days, the Solar Panel building, or fish ponds stocked with stingrays. Lightning rods are the cheapest source. One rod plus one storm equals one battery pack with no ongoing cost. Our battery pack guide covers placement and the conversion math in detail.
A Krobus run is the lazy alternative.
He sells 1 Iridium Sprinkler every Friday for 10,000g, capped at one per week. If you’re sitting on 200,000g+ in late Year 2 and just want to skip the grind, hit Krobus every Friday until you’ve stocked a 30-unit stack.
#Layout Strategy by Farm Type and Season
Layout decisions change with farm type because the available square footage and obstacle density shift dramatically across the seven map options.
The Standard Farm has the most open plot land and works best with one giant Iridium grid in the south. The Forest Farm trades 240 plantable tiles for foraging spots, so the cleanest split is to dedicate the eastern strip to iridium and leave the western edge for forageables.
Riverland and Hill-Top Farms are awkward.
On Riverland, run thin two-tile-wide Iridium ribbons along the southern path. Each ribbon hosts roughly 6 sprinklers and waters 144 tiles, which is enough for a focused starfruit run. The Hill-Top quarry blocks larger grids but pairs well with Quality clusters in the southwest corner.
The Four Corners Farm is built for cooperative play, but solo players can still treat the southwest corner as a primary Iridium grid and turn the northeast into a Junimo Hut zone for hands-off crop collection.
Greenhouse and Ginger Island Farm follow different rules.
The greenhouse fits exactly 116 plantable tiles, and 4 Iridium Sprinklers plus Pressure Nozzles cover 196 tiles, which means one upgraded sprinkler block waters the entire structure. The greenhouse pairs naturally with the best crops for a greenhouse for year-round ancient fruit, starfruit, and pineapple.
Wikipedia states that Stardew Valley launched on February 26, 2016, and the game has shipped multiple expansions since then. Update 1.6 in 2024 added new sprinkler-related crafts and Pressure Nozzle changes, so always cross-check your layout against the patch notes before committing 50+ Iridium Sprinklers to the ground.
#Pressure Nozzles and Junimo Huts: Sprinkler Multipliers
Two late-game upgrades change the math on every layout above and most players underestimate them.
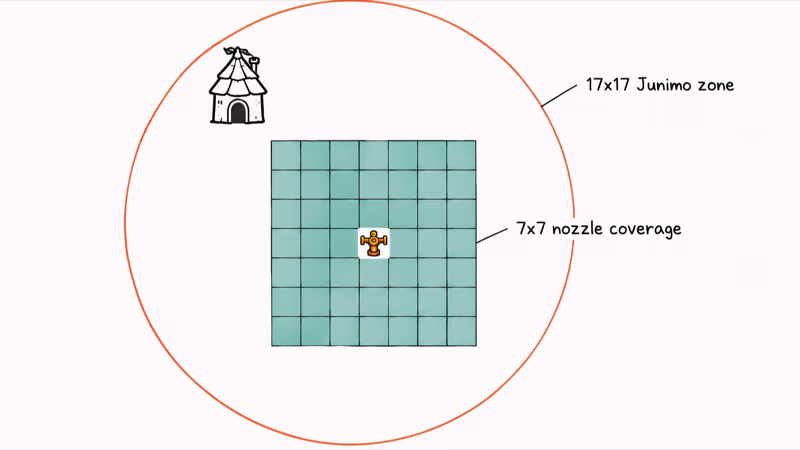
Pressure Nozzles are sold by Krobus for 100g each. Slot one onto an Iridium Sprinkler and the coverage jumps from 24 tiles to 48 tiles in a 7x7 footprint, with the same 5-tile spacing rule still applying because the new tiles spill outward. The upgrade cost is trivial against the savings: a fully nozzled iridium grid cuts your sprinkler count by roughly half on dense plots and pays back the 100g cost in a single starfruit harvest.
Junimo Huts add the second multiplier. Each hut auto-collects ready crops in a 17x17 zone around itself, which means a single hut can clear a 9x9 iridium block plus the surrounding rows.
Drop one hut per cluster of four iridium sprinklers and you’ve effectively automated planting and harvesting at the same time.
The cost is steep at 20,000g and 200 stone per hut, but the time savings compound across hundreds of in-game days, and the auto-collection radius removes the daily walking that wears down your watering can routine in late game.
If you’re still in late Year 1 with limited gold, prioritize Pressure Nozzles first because the 100g unit cost is trivial compared to a hut.
#Bottom Line
Skip Basic Sprinklers entirely and run Quality Sprinklers from early Spring of Year 1. The day Skull Cavern opens, switch to Iridium grids with 5-tile spacing and add Pressure Nozzles on every unit. Use Krobus’s Friday shop to fill gaps without grinding Floor 100+. Lay 30 Quality Sprinklers in a checkerboard before Day 14 of Spring and you’ll out-harvest the alternatives by week three.
#Frequently Asked Questions
How many crops can a single Iridium Sprinkler water?
A single Iridium Sprinkler waters 24 tiles in the 5x5 area centered on it, leaving the sprinkler tile itself unplantable.
Can I use Quality Sprinklers for large-scale farming?
Yes. Quality Sprinklers are perfectly fine through Year 2, especially for crops with long growth cycles like ancient fruit. Once your save crosses into Skull Cavern territory, the math tips toward iridium because each Iridium Sprinkler replaces 3-4 Quality units. Most experienced farmers run a hybrid layout for 10-20 in-game days during the transition.
What is the best way to place sprinklers on a Standard Farm?
Run one large Iridium grid in the south plot with 5-tile spacing both horizontally and vertically. Reserve the northwest for kegs, the northeast for animal barns, and leave a 2-tile path between sprinkler blocks so you can walk through during planting.
Do I need different sprinkler layouts for each season?
No, but the crop choice changes. Iridium Sprinklers water any tile regardless of crop. Swap your seeds between Spring strawberries, Summer starfruit, and Fall pumpkins without moving a single sprinkler.
How do I expand my sprinkler system as my farm grows?
Lay down a flexible base grid first. Add new Iridium units in 5-tile increments along the edges of the existing zone. Pressure Nozzles convert each unit from a 5x5 to a 7x7 area, which is the cheapest way to scale without crafting more sprinklers.
Are Pressure Nozzles worth it for every sprinkler?
For Iridium Sprinklers, yes. Each nozzle costs 100g at Krobus’s shop and turns a 24-tile coverage into 48 tiles. For Quality Sprinklers the math is weaker because the 3x3 only grows to 5x5, but it still cuts your sprinkler count in half on dense plots.

Fortnite Stuck on the Loading Screen? Fix It in 2026
Fortnite stuck on the loading screen? Check server status, fix the Windows N Media Pack and DirectX 11 on PC, clear the console cache, and verify files.
Minecraft Keeps Crashing? Java and Bedrock Fixes (2026)
Minecraft keeps crashing on startup or mid-game? Update your GPU driver, remove mods on Java, and reinstall Gaming Services on Bedrock. Fixes for both.

Pokemon GO Not Loading? Fix the Loading Screen 2026
Pokemon GO not loading or stuck on the Pokeball? Check server status, fix automatic date and time, grant location permission, clear the cache, and update.
PS5 Controller Not Charging? 9 Fixes That Work (2026)
DualSense not charging? Swap the cable, use a rear port in Rest Mode, clean the USB-C port, and check power settings. 9 fixes for a dead PS5 controller.