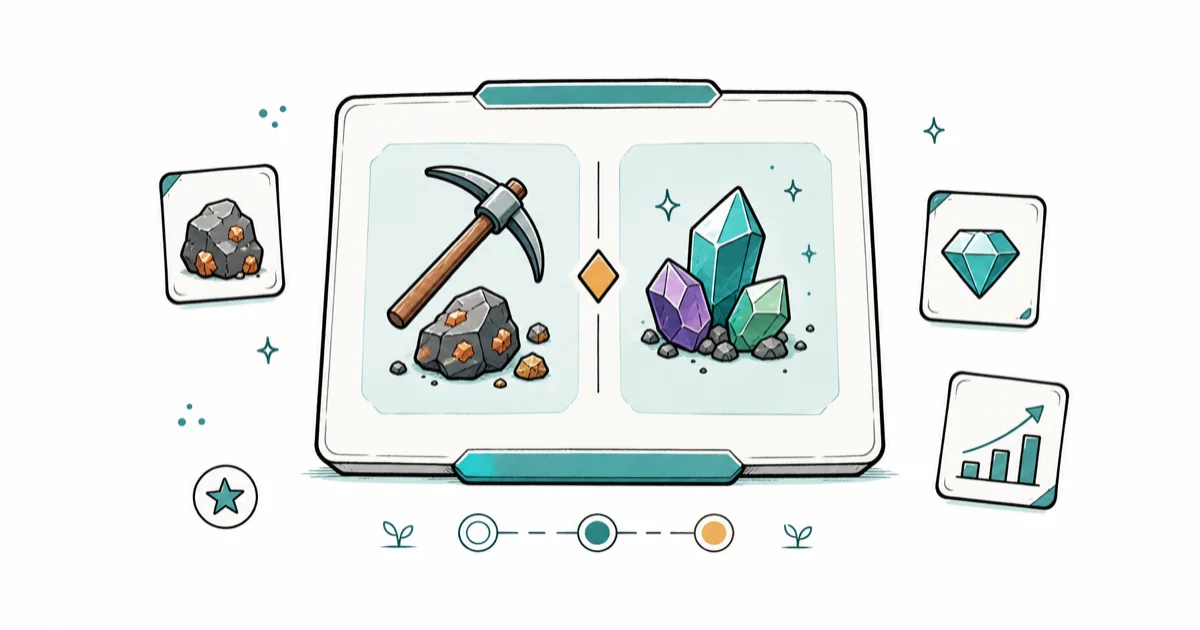
Stardew Miner or Geologist: Which Profession Is Better?
Compare Miner vs Geologist in Stardew Valley to choose the level 5 mining profession that fits your playstyle and leads to the best level 10 perk.
Quick AnswerGeologist is the better long-term choice for most players because it leads to Gemologist at level 10, raising gem sell prices by 30% and giving a 50% chance for gems to spawn in pairs. Pick Miner only if you want faster ore for early-game tool upgrades.
The Stardew Miner or Geologist choice arrives at mining level 5 and shapes how the rest of your save plays out. Miner gives you +1 ore from every ore vein you break. Geologist gives gems a 50% chance to drop in pairs. They sound similar on paper, but the level 10 forks they lead into pull your save in very different directions.
The practical tradeoff is simple: Geologist scales better past spring; Miner only pays off if you live in the mines during your first season.
- Geologist wins long term for most players because Gemologist (+30% gem value) compounds with the doubled gem-pair chance every floor of the mines.
- Miner gives +1 ore per vein, so a copper vein drops 2 ore instead of 1, which speeds up the Iron Pickaxe and Steel Pickaxe upgrades by roughly a week of in-game grinding.
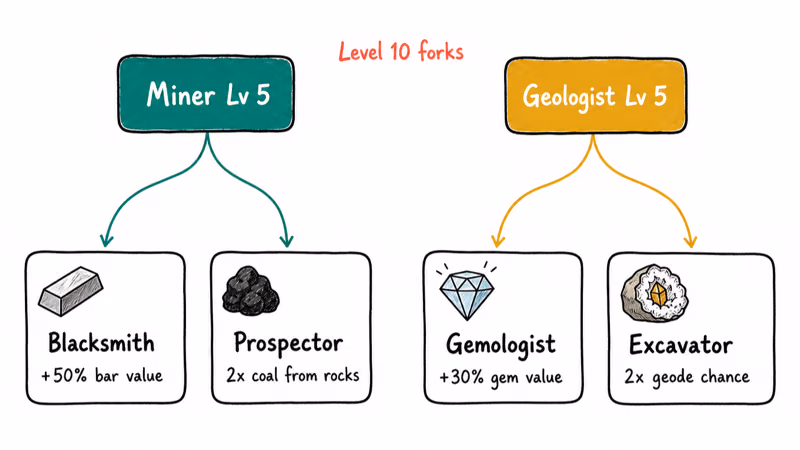
- At level 10 Miner forks into Blacksmith (metal bars sell for +50%) or Prospector (double chance to find coal from rocks).
- At level 10 Geologist forks into Gemologist (gems sell for +30%) or Excavator (geodes are twice as likely to drop from rocks).
- You can swap between Miner and Geologist any time at the Statue of Uncertainty in the Sewers for 10,000g, which makes the level 5 pick fully reversible.
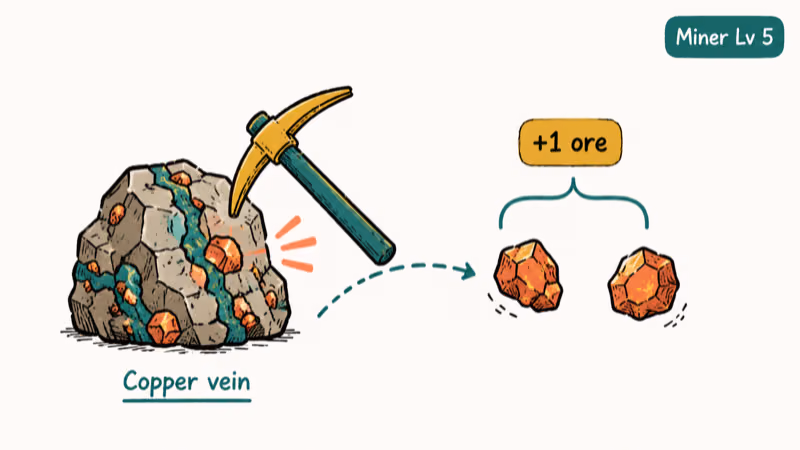
#What the Miner profession does at level 5
Miner adds +1 ore to every ore node you break. Copper veins drop 2 ore. Iron drops 2. Gold and iridium nodes drop 2 each.
The Stardew Valley Wikipedia entry confirms that the game launched in 2016 with these mining mechanics built in. The bonus has applied to every standard ore vein since version 1.0, from the regular mines down to the Skull Cavern.
The bonus matters most during the first two pickaxe upgrades. The copper pickaxe needs 5 copper bars (25 copper ore plus 5 coal), and Miner reduces the ore runs needed for that cost early in Year 1.
Iridium is the bottleneck either way. Iridium nodes are rare enough that +1 ore per node doesn’t redefine Skull Cavern routing, while the level 10 Prospector fork can matter more if coal is your limiter.
If you plan to rush Skull Cavern, Miner pays off. If you want a balanced most profitable crops playthrough that leans on greenhouse income, the extra ore is nice but not save-defining.
#What Geologist gives you at level 5
Geologist gives every gem you mine a 50% chance to spawn in pairs.
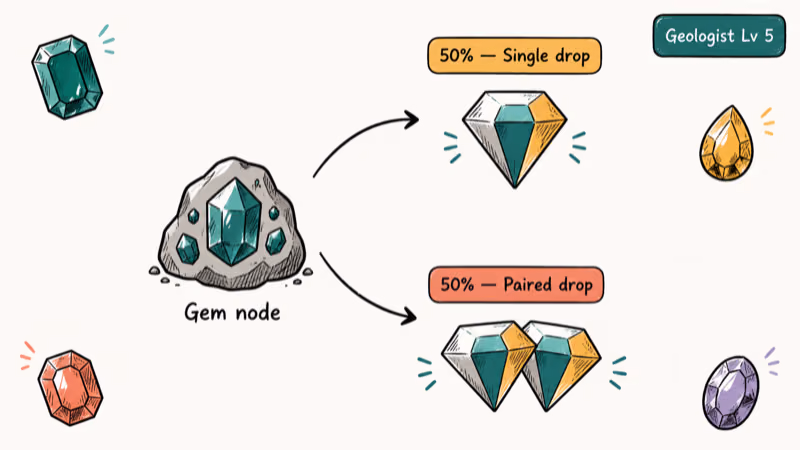
The bonus applies to diamonds, emeralds, rubies, jades, aquamarines, amethysts, and topazes from any mining node, including the rare gem nodes in the lower levels of the regular mines. Pairs are the part players underestimate.
Geologist’s pair-spawn bonus pads gem haul over repeated mining loops compared with Miner.
The income side compounds once you reach level 10 and pick Gemologist. Diamonds jump from 750g to 975g. Rubies and emeralds both go from 250g to 325g.
Build a Crystalarium farm (the recipe arrives at mining level 9) and the +30% bonus applies to every duplicated gem. A single Crystalarium running diamonds 24/7 nets roughly 6,825g per cycle instead of 5,250g. That difference funds barn and coop upgrades faster than the ore bonus does, especially if you’re running a Stardew Valley chicken coop for early animal income.
#Comparing the level 10 forks
The level 5 choice is the gateway. Level 10 is where each profession really diverges.
| Level 10 fork | Effect | Best for | When it shines |
|---|---|---|---|
| Blacksmith (Miner branch) | Metal bars sell for +50% | Selling raw bars on your shipping bin run | Late Year 1, once you have Furnaces stockpiled |
| Prospector (Miner branch) | Double chance to find coal from rocks | Long Skull Cavern runs and bomb crafting | Year 2+ Skull Cavern speedruns |
| Gemologist (Geologist branch) | Gems sell for +30% | Crystalarium farms, gift income, Community Center bundles | Anytime after level 10 |
| Excavator (Geologist branch) | Geodes drop from rocks at 2x rate | Filling the Museum, gift artifacts | Year 1 Museum completion runs |
Most players who pick Miner pair it with Prospector because coal is a constant bottleneck for kegs, bombs, and Crystalariums. Blacksmith is mathematically strong for raw bar sales, but most players use bars for crafting rather than selling, so the +50% multiplier rarely fires.
On the Geologist side, Gemologist is the income-focused pick and the one we’d recommend for any player who plans to reach Year 3 or beyond.
According to community discussion on the r/StardewValley subreddit, running Gemologist with 20 diamond Crystalariums is the most reliable late-game gold engine in the game outside of ancient fruit wine. That late-game scaling is the reason Geologist usually beats Miner once Crystalariums are online.
#Stardew Miner or Geologist: Which fits your playstyle?
Pick Miner if any of these are true for you:
- You want to upgrade pickaxes and weapons fast and you don’t mind grinding floors 1 to 80 of the regular mines for a couple of in-game weeks.
- You’re planning a Skull Cavern speedrun and you’ll burn through coal for staircases and bombs.
- You’re playing in multiplayer and your co-op partner already chose Geologist, so you can split coverage between ore and gems.
- You enjoy the loop of swinging at veins more than you enjoy managing a Crystalarium farm.
Pick Geologist if these match better:
- You want a steady, scaling income stream you can rely on past Year 1.
- You’re chasing the Community Center bundles that need geodes, refined quartz, or specific gems.
- You’re a completionist who wants the Museum filled by mid-Year 2.
- You’re building toward a Crystalarium-heavy late game where every gem drop and every Crystalarium output gets the +30% multiplier.
Multiplayer saves benefit from one player on each branch.
One farmer pulls extra ore for tool and sprinkler crafting, and the other floods the shipping bin with paired, +30% gems. Solo players who can only run one branch should default to Geologist unless they specifically need ore volume in the first 20 in-game days.
The Stardew Miner or Geologist debate isn’t really about which is mathematically optimal across every save. It’s about which tradeoff fits your week-to-week rhythm. Geologist quietly outperforms Miner once Crystalariums come online around mining level 9.
#Common mining mistakes to avoid
A few patterns trip up players regardless of which branch they pick:
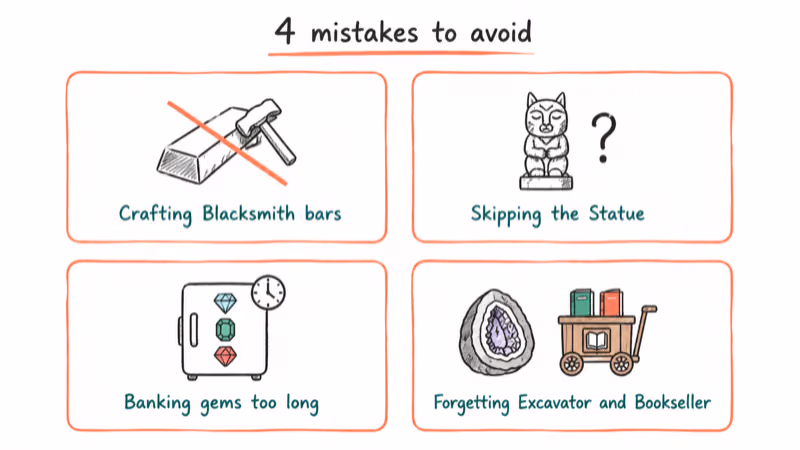
- Picking Blacksmith and then crafting instead of selling. The +50% bar bonus only fires when you put bars in the shipping bin. If you melt them down for a Crystalarium or a Quality Sprinkler, you get no profession bonus. Players who plan a crafting-heavy save should take Prospector instead.
- Skipping the Statue of Uncertainty. Many players don’t realize the level 5 pick is reversible. The 10,000g fee feels steep on day 30, but it’s recoverable in a single keg cycle by Year 2.
- Letting gems pile up before Gemologist activates. The +30% sell bonus applies at the moment of sale, not the moment of mining, so banking gems in your fridge until level 10 is the right play if you’re days away from the milestone.
- Forgetting Excavator’s geode bonus stacks with the Bookseller. Excavator doubles the chance for rocks to drop geodes, which means more raw geodes for Clint’s geode-cracking service.
The Stardew Valley Wiki found that pickaxe upgrades cost 5 copper bars, 5 iron bars, and 5 gold bars in sequence, so Miner’s ore boost saves roughly 15 ore total across the upgrade chain. That’s meaningful in spring but trivial by fall.
A useful follow-up read once you’ve upgraded your tools: the best farming games roundup covers other titles in the same genre if you want a Stardew-style break.
#Can you switch between Miner and Geologist later?
Yes. The Statue of Uncertainty in the Sewers lets you reset any profession choice for 10,000g.
Pay the statue at night and the next morning the game prompts you to re-pick. You can re-pick at level 5 and again at level 10 for the same flat fee per skill category.
You’ll need to access the Sewers in Stardew Valley first, which means donating 60 items to the Museum to get the Rusty Key from Gunther. After that, the Statue is in the back room next to Krobus’ shop. Bring the 10,000g in your inventory, interact with the Statue, sleep, and pick the new profession.
This reset matters more than it sounds.
Early-game players often pick Miner for the ore boost, then switch to Geologist after they’re done upgrading their pickaxe to gold, then ride Gemologist plus Crystalariums for the rest of the save. The 10,000g cost is recoverable in roughly two diamond Crystalarium cycles with Gemologist active, so the swap usually pays for itself by the next harvest week.
If you’ve never visited the Sewers, the Sunfish in Stardew Valley guide covers Pelican Town’s overlooked locations including the Sewers and the manhole entrance near JojaMart.
#Bottom Line
Geologist is the better default for most Stardew Valley players, especially anyone aiming at a Year 2+ save with a Crystalarium farm or a complete Museum collection. The 50% gem-pair chance compounds with the +30% Gemologist multiplier and turns mining into a reliable second income stream alongside whatever your main farm setup looks like.
Pick Miner specifically if you’re rushing tool upgrades or Skull Cavern progress in Year 1 and you don’t mind giving up the gem income. The +1 ore per vein is real, and Prospector at level 10 keeps coal from bottlenecking your kegs and bombs. After your first iridium pickaxe is done, swap to Geologist at the Statue of Uncertainty for 10,000g and never look back.
The official Stardew Valley site has the most current platform and update notes if you’re checking for new content.
#Frequently Asked Questions
Can you change profession in Stardew Valley after picking?
Yes. The Statue of Uncertainty in the Sewers resets any profession choice for 10,000g. Pay at night, sleep, then pick again in the morning. You can do this as many times as you want, so the level 5 pick is fully reversible.
Does Miner work in Skull Cavern?
Yes. The +1 ore bonus applies to every ore vein in Skull Cavern, including iridium.
Is Geologist or Excavator better for Museum completion?
Excavator. It doubles geode drops, and geodes are the main source of artifact donations.
How fast does the Miner pickaxe bonus pay off?
Miner pays off as soon as copper and iron upgrades matter. Every copper vein drops 2 ore instead of 1, so the first two pickaxe upgrades need fewer mining runs. The bonus matters less for iridium because iridium nodes are scarce.
Does Gemologist work with the Crystalarium?
Yes, and this is why Gemologist is the long-term pick. Crystalariums duplicate any gem you place inside, and Gemologist’s +30% sell bonus applies to the duplicates. A single diamond Crystalarium nets roughly 6,825g per cycle with Gemologist active, against 5,250g without. Twelve diamond Crystalariums under Gemologist net roughly 81,900g per cycle, compared with 63,000g without the profession.
Can both players in multiplayer pick different mining professions?
Yes. Each farmer has independent skills, so one can run Miner/Prospector while the other runs Geologist/Gemologist for split coverage.
Fortnite Stuck on the Loading Screen? Fix It in 2026
Fortnite stuck on the loading screen? Check server status, fix the Windows N Media Pack and DirectX 11 on PC, clear the console cache, and verify files.
Minecraft Keeps Crashing? Java and Bedrock Fixes (2026)
Minecraft keeps crashing on startup or mid-game? Update your GPU driver, remove mods on Java, and reinstall Gaming Services on Bedrock. Fixes for both.
Pokemon GO Not Loading? Fix the Loading Screen 2026
Pokemon GO not loading or stuck on the Pokeball? Check server status, fix automatic date and time, grant location permission, clear the cache, and update.
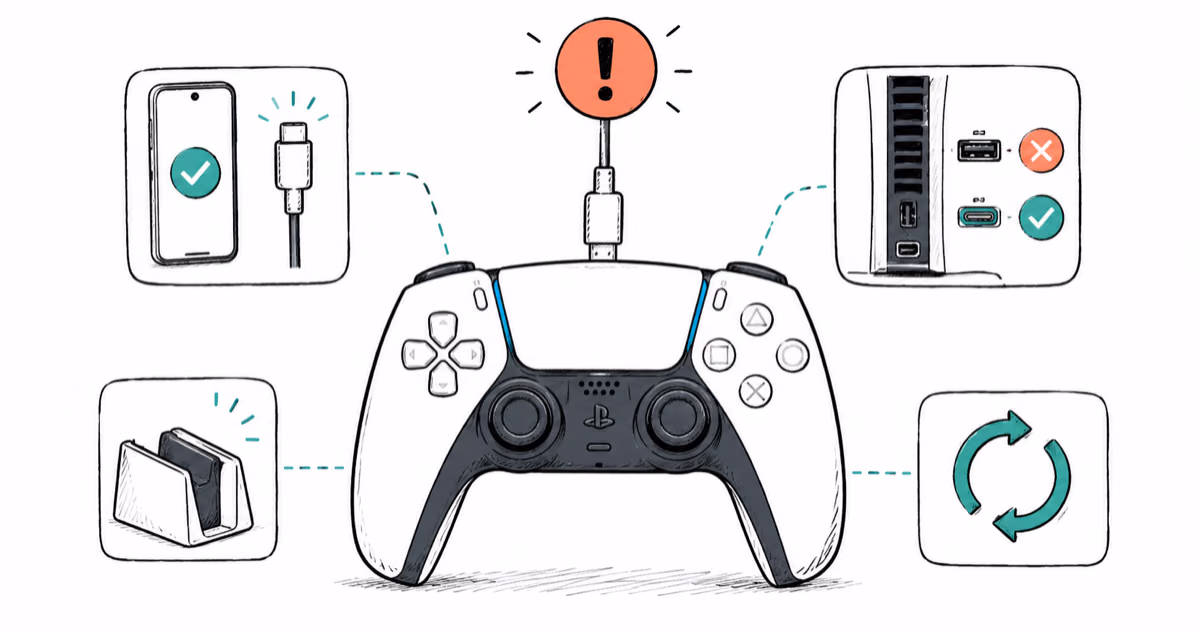
PS5 Controller Not Charging? 9 Fixes That Work (2026)
DualSense not charging? Swap the cable, use a rear port in Rest Mode, clean the USB-C port, and check power settings. 9 fixes for a dead PS5 controller.