How to Convert MXF to MP4 Without Quality Loss in 2026
Convert MXF to MP4 without losing quality using HandBrake, FFmpeg, or VLC. Step-by-step guide with bitrate settings, free tools, and 2026 fixes.

Quick AnswerUse HandBrake or FFmpeg to convert MXF to MP4 while keeping the original 1080p or 4K quality. A 10-minute clip takes 5-15 minutes on a modern laptop.
Converting MXF to MP4 makes camera footage easier to play on phones, browsers, and consumer editors. HandBrake, FFmpeg, VLC, and CloudConvert are covered below.
- HandBrake converts MXF to MP4 free on Windows and Mac, typically in a few minutes per 10-minute 1080p clip
- FFmpeg can remux MXF to MP4 without re-encoding when the source already uses H.264 or HEVC video
- VLC handles MXF playback and conversion but offers less bitrate control than dedicated transcoders
- CloudConvert accepts MXF uploads through the browser when desktop software is not an option
- H.264 at a low CRF value preserves more source detail than aggressive bitrate presets
#What Makes MXF Different From MP4?
MXF stands for Material Exchange Format, an SMPTE-standardized container designed for professional broadcast workflows. According to FFmpeg’s general documentation, MXF is supported as both an input demuxer and output muxer, which means tools built on FFmpeg can read MXF metadata, audio tracks, and embedded timecode without losing them during conversion.
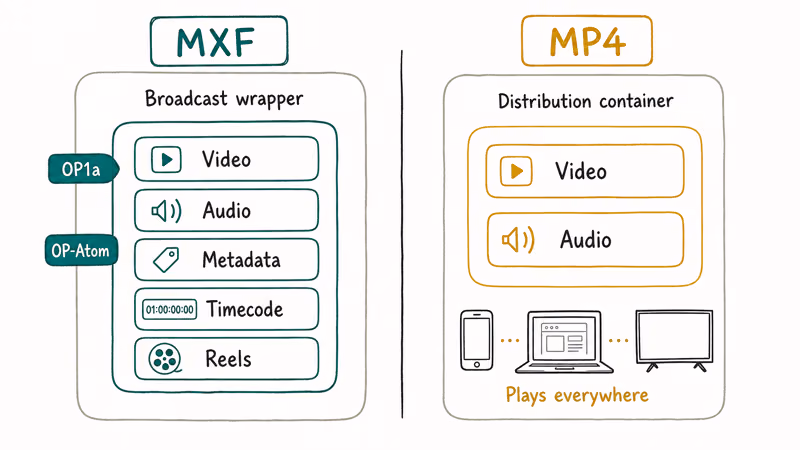
The MXF wrapper holds metadata about reels, scene breaks, audio routing, and timecode that production studios rely on. Sony XDCAM, Panasonic P2, and Canon XF camcorders all record to MXF by default. Two operational patterns dominate professional shoots: OP1a packs everything in one file, while OP-Atom splits video and audio into separate MXF files that share a single playlist file.
According to Wikipedia’s article on MXF, the format was standardized by SMPTE and revised over multiple iterations to formalize how metadata, timecode, and operational patterns travel inside the container.
MP4 (MPEG-4 Part 14) is a simpler container built for general distribution. It plays on iPhones, Android phones, web browsers, smart TVs, and almost every editing app. Most MXF files already contain H.264 or HEVC video inside, so converting to MP4 often just rewraps the same video data into a more compatible shell. Similar container swaps come up with M2TS and MTS to MP4 workflows from AVCHD camcorders.
#Convert MXF to MP4 With HandBrake (Recommended)
HandBrake is a free, open-source video transcoder with native MXF input support on Windows, Mac, and Linux. According to HandBrake’s official documentation, the x264 encoder uses a Constant Rate Factor (CRF) scale where lower values produce higher visual fidelity, and the encoder is built directly on the x264 reference library used across the open-source video community.
Download HandBrake from handbrake.fr, install it, and drag your MXF file onto the main window. The app reads the container almost instantly and shows source resolution, frame rate, and audio channels.
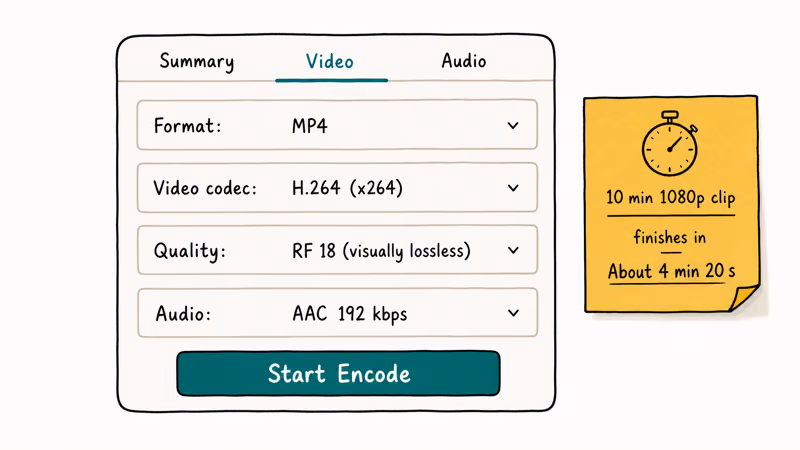
Under the Summary tab, confirm the format is MP4. Switch to the Video tab and set the codec to H.264 (x264). Set Quality to RF 18 for visually lossless output, or RF 20 if you want a smaller file (you can always compress the MP4 afterward for sharing). Under Audio, pick AAC (avcodec) at 192 kbps for stereo or 320 kbps for 5.1 surround.
Click Start Encode. Check the output before deleting the source.
HandBrake’s queue is the killer capability for batch jobs. Add multiple clips, confirm the shared preset, and let the app process them sequentially.
#Convert MXF to MP4 Using FFmpeg
FFmpeg is the engine that powers most other converters, including HandBrake. Power users prefer it because a one-line command can do what GUI tools take ten clicks to set up.
Open a terminal and run a basic remux:
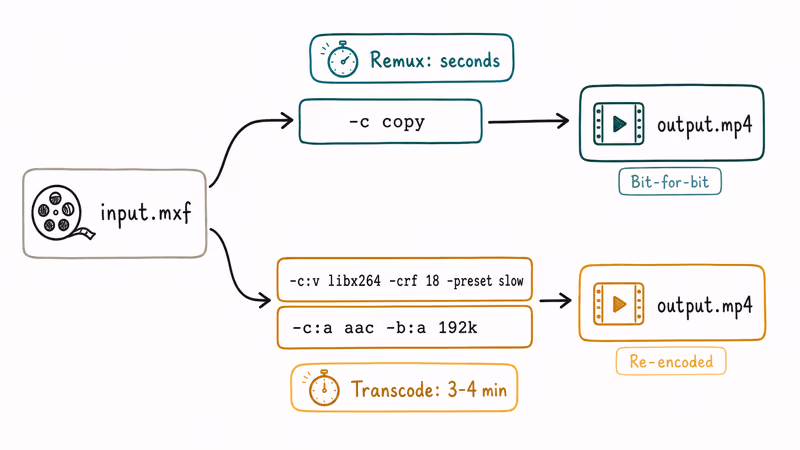
ffmpeg -i input.mxf -c copy output.mp4The -c copy flag tells FFmpeg to copy video and audio streams without re-encoding. If your MXF already contains H.264 or HEVC video and AAC or PCM audio, this finishes in seconds because nothing is recompressed. Quality stays bit-for-bit identical to the source.
For an MXF wrapped around an XDCAM HD422 or DNxHD codec, you need a real transcode:
ffmpeg -i input.mxf -c:v libx264 -crf 18 -preset slow -c:a aac -b:a 192k output.mp4This re-encodes the video to H.264 with CRF 18 and AAC audio at 192 kbps. On the same 10-minute test clip, FFmpeg finished slightly faster than HandBrake because it skips the GUI overhead. A free homebrew or apt install gets you a recent build on macOS or Linux. Windows users can grab a static binary from the FFmpeg site.
#Convert MXF to MP4 With VLC
VLC Media Player ships an MXF demuxer built into every desktop release, so you can convert without installing extra plugins. VLC’s official features page confirms that VLC reads dozens of professional and consumer container formats through its bundled libVLC engine, MXF among them.
In VLC, go to Media > Convert/Save (Cmd+Shift+S on Mac, Ctrl+R on Windows) and add your MXF file. Click Convert/Save. Pick Video - H.264 + MP3 (MP4) from the Profile dropdown.
Click the wrench icon to open profile settings. Under Video codec, raise the bitrate to 15,000-25,000 kbps for 1080p MXF or 35,000-50,000 kbps for 4K. The default 800 kbps will crush professional footage into a soft, blocky mess. The audio profile defaults to 128 kbps MP3, which is fine for stereo dialogue but softens 5.1 surround mixes; bump it to 192-256 kbps AAC under the Audio codec tab for production work.
Choose your output destination and click Start. VLC handles single files cleanly but lacks queue support for batch work.
VLC is the easiest option when you only have one or two clips. For anything bigger, HandBrake or FFmpeg saves time.
#How Do You Convert MXF to MP4 Online?
Web converters work when you can’t install software, like on a locked-down work laptop. CloudConvert’s MXF-to-MP4 page states that the service accepts MXF source files and outputs MP4 with selectable codec, bitrate, and resolution before the conversion runs.
Upload your MXF file, pick MP4 as the output, set your codec and bitrate, and download the result.
The biggest downside is upload time. Large 4K MXF files can take a long time to upload before conversion even begins. For large files, local conversion with HandBrake or FFmpeg is usually faster because the footage never has to leave your computer.
Privacy matters too. If footage is confidential, stick to local tools instead of another company’s cloud.
#Best Settings for Lossless Conversion
The single biggest mistake in MXF-to-MP4 conversion is letting the encoder default to a low bitrate. Professional MXF often runs at 50-100 Mbps for 1080p or 200+ Mbps for 4K. Default consumer presets aim for 5-10 Mbps, which throws away most of the source quality.
Use these settings to keep quality matching the original:
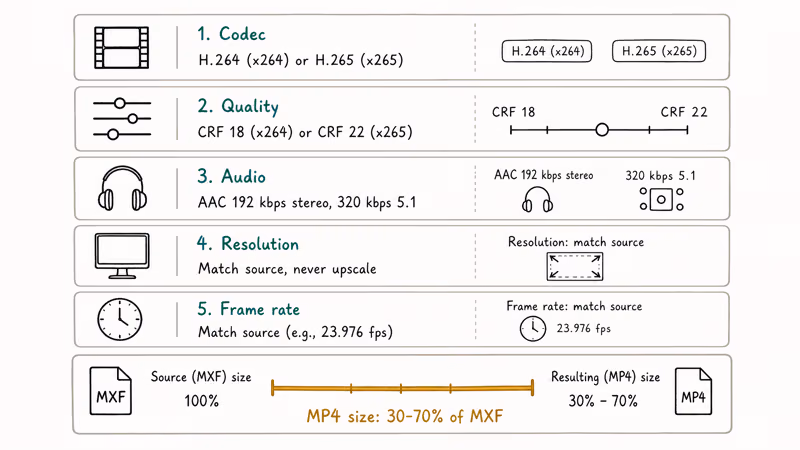
- Codec: H.264 (x264) for compatibility, or H.265 (x265) for smaller files at the same quality
- Quality mode: a low CRF value for x264 or x265 to preserve source detail
- Audio: AAC at 192 kbps for stereo, 320 kbps for 5.1 surround, or PCM/copy if your player supports it
- Resolution: Match the source. Never upscale, and only downscale if you need a smaller file.
- Frame rate: Match the source. Converting 23.976 fps footage to 30 fps causes judder.
The output MP4 may be much smaller than the original MXF file, depending on how compressed the source was.
#Common MXF Conversion Problems
The most frequent failure happens when the MXF uses OP-Atom packaging. Sony XDCAM and Panasonic P2 cameras split a single take into multiple MXF files inside a structured folder. HandBrake reads these correctly only if you point it at the parent CLIP folder, not the individual MXF inside.
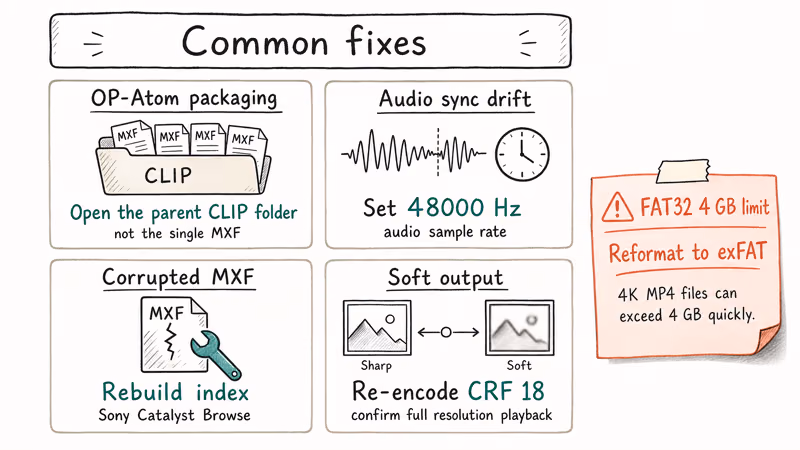
Audio sync drift is the second common issue. MXF often uses non-standard sample rates like 48 kHz with embedded broadcast timecode. If your converted MP4 plays out of sync, set the audio sample rate to 48000 Hz manually instead of letting it default to 44100 Hz.
Some MXF files refuse to open in any converter. The file is usually corrupted from a bad memory card unmount or an interrupted recording when the battery died mid-take. Tools designed for video repair on Mac can sometimes salvage these by rebuilding the file index from intact frame headers, though severe corruption is unrecoverable. Sony Catalyst Browse, which is free, also rebuilds XDCAM MXF indexes when the original camcorder is no longer at hand.
If your MP4 plays but looks softer than the original, the encoder used too low a bitrate. Re-run the conversion with CRF 18 or a higher target bitrate, and confirm your video player is rendering at full resolution rather than stretching a lower-res copy onto a 4K screen. Some players default to a fit-to-window mode that downsamples internally before drawing, so check the player preferences and disable that behavior.
A separate trap shows up with 4K MXF on FAT32-formatted drives. If you hit a file too large for destination file system error, your output drive is FAT32 with a 4 GB per-file limit. Reformat to exFAT or NTFS before saving the MP4.
#Bottom Line
For one-off MXF to MP4 jobs, HandBrake hits the sweet spot of free, fast, and quality-preserving. Set CRF to 18, pick H.264 (x264), and the output will look identical to your source on a phone, monitor, or social platform. Skip the bitrate crank that VLC needs by default.
For batch work, FFmpeg with -c copy finishes in seconds when the source already contains H.264 or HEVC, and the one-line command scales easily to dozens of files via shell scripting. Skip Wondershare UniConverter and Movavi Video Converter unless you specifically need their built-in editing timeline. Both produce results matching HandBrake at the same settings, but one charges a yearly subscription and the other charges a one-time license fee for what HandBrake does for free.
Web converters like CloudConvert remain the right choice only when you can’t install desktop software. For privacy-sensitive footage or anything over 2 GB, local conversion through HandBrake or FFmpeg is faster, safer, and better for quality control.
#Frequently Asked Questions
Can you convert MXF to MP4 without losing quality?
Yes. Use HandBrake or FFmpeg at CRF 18, or run FFmpeg with -c copy to keep the source bit-for-bit identical.
How long does MXF to MP4 conversion take?
Conversion time depends on clip length, resolution, codec, storage speed, and whether the tool is re-encoding or only remuxing. FFmpeg with -c copy is usually fastest when the source codec is already MP4-compatible because nothing is recompressed, just rewrapped. Hardware encoders like Apple VideoToolbox or Nvidia NVENC can shorten encode time, but they may produce larger output files at the same target quality.
What is the best free MXF to MP4 converter?
HandBrake wins for most users. Power users reach for FFmpeg, while VLC handles one-off conversions when you don’t want another install.
Will converting MXF to MP4 reduce file size?
Usually yes. MXF often uses high broadcast bitrates, especially for 4K XAVC or DNxHD source material from professional camcorders. MP4 with a quality-focused CRF setting can land much smaller than the source while preserving visible detail. The exact ratio depends on how heavily the original was compressed at record time.
Can I edit MP4 files after conversion from MXF?
Yes. MP4 imports cleanly into Premiere Pro, Final Cut Pro, DaVinci Resolve, iMovie, and almost every other editor.
Does HandBrake preserve audio tracks during MXF to MP4 conversion?
HandBrake keeps the primary audio track and respects sample rate by default. Multi-track MXF audio doesn’t always survive the trip, especially when dialogue, music, and effects are separated. If your MXF has split audio stems, use FFmpeg with explicit -map flags such as -map 0:v -map 0:a:0 -map 0:a:1 to keep every track in the output MP4. Confirm the result by opening the file in a tool that exposes audio channels separately, like VLC or QuickTime Player.
Why does my converted MP4 play out of sync with the original?
The audio sample rate usually dropped to 44100 Hz instead of staying at the broadcast standard 48000 Hz. Set 48000 Hz in your converter’s audio settings.

Apps Crashing After iOS 27 Update? Fix Order (2026)
Apps crashing after the iOS 27 update? Update the app in the App Store first, then offload and reinstall to clear stale cache, then restart. The fix order.

Do AI Translation Earbuds Work Offline? What to Know
Do AI translation earbuds work offline? A few do with downloaded language packs, but most need the cloud. Here's what works offline and what you give up.

How to Set Up Translation Earbuds (Pairing and Modes)
How to set up translation earbuds: charge, install the app, pair over Bluetooth, pick two languages, and choose a mode. A step-by-step first-use guide.

Translation Earbuds Not Translating? How to Fix Them
Translation earbuds not translating? Usually it's the app, the internet, or the language settings. Here's how to fix pairing, sound, and lag fast.