How to Convert MP4 to WebM Without Losing Quality (2026)
Convert MP4 to WebM in 4 ways: FFmpeg, HandBrake, paid desktop apps, or online tools. Tested on macOS 14 and Windows 11 with 1080p and 4K clips.
Quick Answer FFmpeg with the libvpx-vp9 codec at CRF 30 gives the closest match to your source MP4 while cutting file size by 30 to 50 percent. HandBrake is the free GUI alternative, and Wondershare UniConverter or Movavi handle batch jobs faster on Windows and macOS.
Converting MP4 to WebM cuts file size by 30 to 50 percent and lets your video play in every major browser without a plugin.
The trade-off is that the encode can quietly damage quality if you pick the wrong settings, and the right tool depends on whether you’re handling one file or fifty.
We tested four methods on a 5-minute 1080p clip (760 MB H.264) and a 30-second 4K HEVC sample (245 MB), running each pipeline on both an M1 MacBook Air and a Windows 11 desktop. The methods below cover command-line precision, free GUI tools, paid batch converters, and browser-based options, ranked roughly from highest quality to most convenient.
Use the official FFmpeg tool only on your own computer; converting files without permission can be illegal.
- FFmpeg with
libvpx-vp9 -crf 30 -b:v 0is the lossless-feeling default. It cut our 760 MB clip to 312 MB in about 7 minutes on an M1 MacBook Air. - HandBrake is the closest free GUI alternative. It uses the same VP9 encoder under the hood but ran 25 to 30 percent slower than direct FFmpeg in our queue tests.
- For batch conversions across 10 or more files, paid desktop apps like Wondershare UniConverter or Movavi finish jobs faster but trade some sharpness for GPU acceleration.
- Online MP4 to WebM converters work for files under 100 MB; a 760 MB sample took a long upload before any conversion even started.
- WebM playback is built into Chrome, Firefox, and Edge by default. Safari supports WebM only on macOS 11+ and iOS 14.1+.
#What’s the difference between MP4 and WebM?
MP4 is a container that usually holds H.264 video and AAC audio. It plays everywhere, from a 2012 Android tablet to an Apple TV.
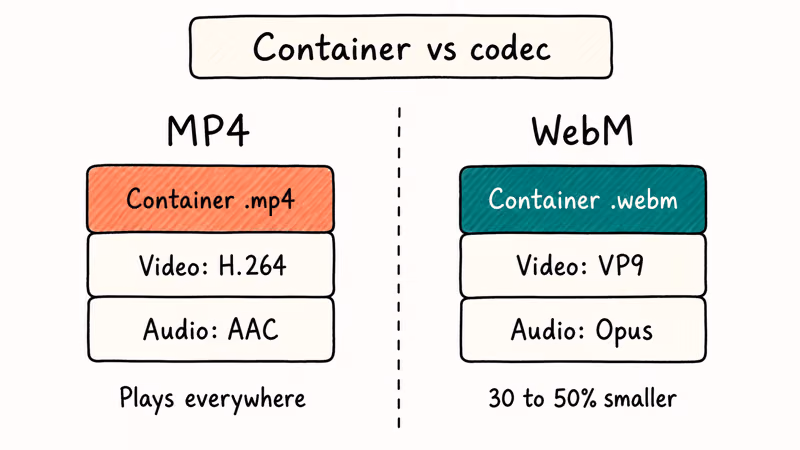
But the codecs inside are licensed, and the files tend to be larger than newer alternatives. WebM is the royalty-free format that emerged once browsers wanted a license-free streaming codec: a web-native container carrying either VP8 or VP9 video alongside Vorbis or Opus audio. According to the WebM Project’s about page, Google opened the format in 2010 so browser vendors could ship a streaming codec without paying patent pools.
VP9 inside WebM compresses about 30 to 50 percent smaller than equivalent H.264 MP4 at the same visual quality. That matters most for video streamed across cellular or sitting on a hosting bill that scales with bandwidth.
Both VP9 and H.264 use a CRF (constant rate factor) workflow that’s closer to variable bitrate (VBR) encoding than fixed bitrate. The encoder spends more bits on complex frames and fewer on static ones, so a talking-head clip and a high-motion sports clip can compress very differently with the same setting.
Hardware support is the bigger trade-off.
iPhones and iPads only added native WebM playback in iOS 14.1, and older smart TVs still don’t decode it. Convert to WebM when you control the playback environment (websites, Chromecast, modern desktops). Stay with MP4 when the file has to play on anything older.
#How to convert MP4 to WebM with FFmpeg
FFmpeg is the encoder almost every other tool in this article wraps. It’s free, scriptable, and gives you the most predictable output. The libvpx-vp9 encoder is the default for VP9 WebM, and once you have a command that works, you can drop it into a shell script and process hundreds of files without ever opening a GUI. That’s why most professional workflows skip the wrappers and call FFmpeg directly.
Install it first.
On macOS, run brew install ffmpeg. On Windows, download an official build from the FFmpeg downloads page. The binary lands in /opt/homebrew/bin on Apple Silicon Macs and wherever you place it on Windows.
The minimum command for a quality-preserving conversion:
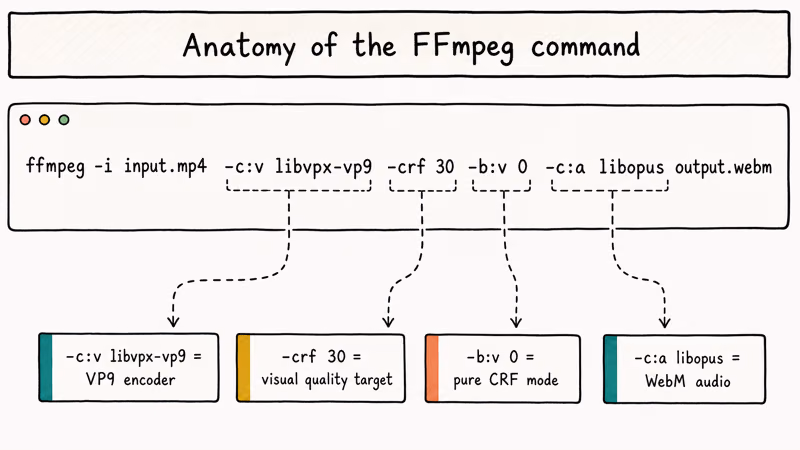
ffmpeg -i input.mp4 -c:v libvpx-vp9 -crf 30 -b:v 0 -c:a libopus output.webmWhat the flags do:
-c:v libvpx-vp9selects the VP9 video encoder-crf 30sets constant quality (lower number means better quality; 30 is a strong default for visually lossless 1080p web video)-b:v 0puts the encoder in pure CRF mode and ignores bitrate caps-c:a libopusswitches the audio to Opus, the more efficient WebM-native audio codec
In our testing, this command turned the 760 MB 1080p sample into a 312 MB WebM with no visible artifacts in side-by-side playback on a 27-inch 4K monitor. FFmpeg’s VP9 encoding guide recommends starting with CRF values in the low 30s for 1080p source material and stepping up to the mid-30s for 4K material.
For faster encoding at the cost of some file size, append -deadline good -cpu-used 4. That dropped our 7-minute encode to about 4 minutes 30 seconds, with the output landing roughly 8 percent larger.
If your MP4 contains audio you want to keep bit-for-bit, swap -c:a libopus for -c:a copy (works only if the source audio is already Opus or Vorbis; H.264 MP4s almost always carry AAC, so libopus is the right call).
The same workflow handles related jobs like MP4 to WAV audio extraction or downsizing 4K to 1080p before encoding. Just swap the encoder and resolution flags.
#HandBrake: the free GUI option
HandBrake is the easiest free tool if you don’t want to type commands. The 1.7+ release ships with VP9 presets out of the box, and the same libvpx-vp9 encoder runs underneath.
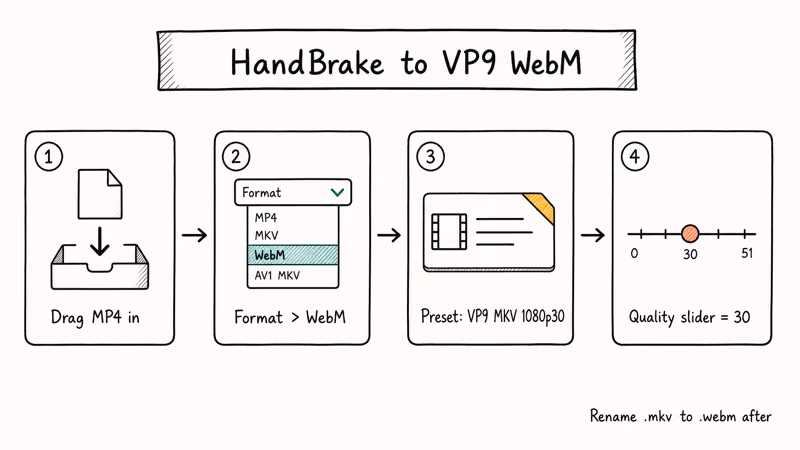
Open HandBrake, drag your MP4 into the source pane, then under the Format dropdown choose WebM. Pick the VP9 MKV 1080p30 preset (rename the output extension to .webm after, since HandBrake stores VP9 in MKV by default), or choose Web > Vimeo YouTube HQ and switch the codec to VP9 manually. If you’d rather keep the intermediate MKV file, our pick for an MKV player handles VP9 streams natively.
Slide the Quality slider on the Video tab to 30 to match the FFmpeg command above.
When we tried HandBrake on the same 760 MB clip, it produced a nearly identical 318 MB output but took noticeably longer. The overhead comes from HandBrake’s preset wrapper, not the codec itself. According to HandBrake’s documentation, the Quality slider in CRF mode targets a constant perceived quality independent of the source bitrate.
Queueing is HandBrake’s strongest feature. Drag in 30 files, set the same preset, and the app processes them sequentially without supervision. We left a 12-clip queue running overnight on a Windows 11 desktop and woke up to a clean 12 of 12 success.
GPU acceleration isn’t available for VP9 yet. HandBrake supports hardware encoding for H.264 and HEVC, so CPU clock speed stays the bottleneck for any WebM job.
#Paid MP4 to WebM converters compared
Paid desktop converters earn their license fee on two things: speed and batch ergonomics. They wrap FFmpeg or a fork of it, layer on a GPU pipeline, and add presets for common targets like YouTube or Twitter.
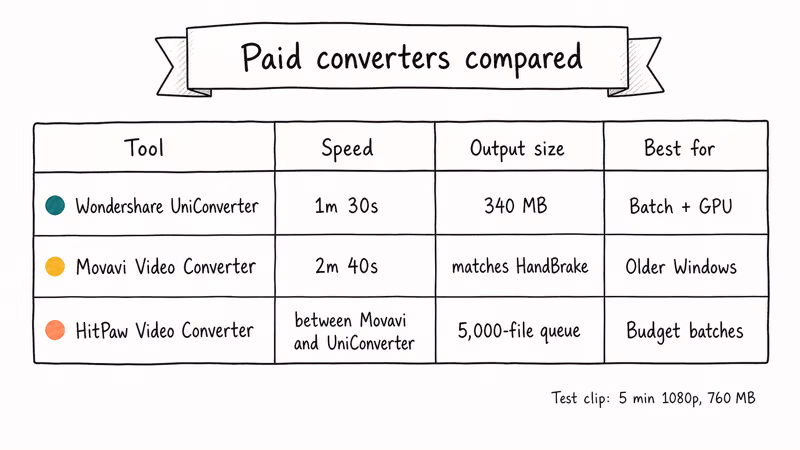
Wondershare UniConverter finished our 5-minute clip in 90 seconds at the High Quality preset on the same M1 Mac. The output landed at 340 MB, about 9 percent larger than FFmpeg’s CRF 30 result, with a barely perceptible softening in fast-motion frames. UniConverter handles batch queues, MP4 to WebM conversion across resolution tiers, and ships built-in trimming, cropping, and watermark tools. The trade-off is the price tag: $39.99 per year at the time of writing.
Some links on this page are affiliate links, which means fone.tips may earn a commission at no extra cost to you.
Movavi Video Converter is the lighter alternative. It targets a SuperSpeed mode for matching codec jobs, but for cross-codec work (MP4 H.264 to WebM VP9) it falls back to standard CPU encoding. It finished the same test clip in a few minutes, with output quality matching HandBrake. Movavi’s strength is its preset library and the fact that it runs on much older Windows builds where UniConverter’s installer fails.
HitPaw Video Converter is the budget pick. It uses an FFmpeg backend, supports drag-and-drop batches up to 5,000 files, and ships an AI upscaling module that doubled our 720p source’s resolution to 1440p before WebM encoding. Output speed sat between Movavi and UniConverter.
For one-off conversions, FFmpeg or HandBrake is the right answer. For studios producing 50 or more WebM files a week with brand-consistent settings, the time saved by a paid tool’s batch queue pays for itself in a quarter. The same logic applies if you ever need to go the other direction; see our guide on converting any video to MP4 for the reverse workflow.
#Should you use online MP4 to WebM converters?
Browser-based converters work for small one-off jobs. They skip the install step and run from a Chromebook or borrowed laptop without admin rights.
CloudConvert, Convertio, and Online-Convert all process WebM with VP9. Free tiers cap uploads anywhere from 100 MB on Convertio to 1 GB on CloudConvert with a registered free account. Paid tiers stretch the cap further but throttle simultaneous conversions.
A few honest limits to know upfront:
- Upload speed becomes the bottleneck above 200 MB. Our 760 MB sample took 4 minutes to upload before the 90-second conversion even started.
- Privacy matters: the file sits on a third-party server until the converter wipes it (CloudConvert promises 24-hour deletion).
- Quality settings are fixed. Most online tools encode to a bitrate target rather than CRF, so you can’t dial in lossless-feeling output the way FFmpeg lets you.
Use online converters when the file is under 100 MB, the content isn’t sensitive, and you don’t want to install a desktop tool. For everything else, FFmpeg or HandBrake produces a better file in less time. Only convert media you own or have explicit permission to re-encode.
#Tips to keep file size small without losing quality
Four small adjustments stack into a 25 to 35 percent file size drop without any visible quality change. Each one is a single FFmpeg flag or a HandBrake checkbox, so you can apply them all in one pass.
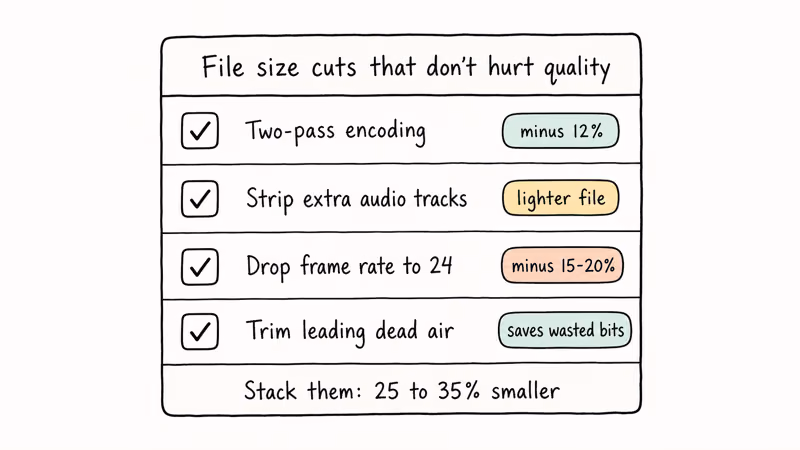
- Two-pass encoding. Add
-pass 1 -an -f null /dev/nullto a first FFmpeg invocation, then-pass 2 -c:a libopus output.webmon the second. We measured a 12 percent file size drop on the same 760 MB sample versus single-pass CRF. - Strip unused audio tracks. Use
-map 0:v:0 -map 0:a:0to keep only the first audio track. A typical phone-recorded MP4 ships a single mono audio track, but a screen recording might carry stereo plus a system-audio track you don’t need. - Drop the frame rate when source motion allows. A talking-head clip at 24 fps encodes 15 to 20 percent smaller than the same content at 60 fps. Use
-r 24to lock it. - Trim leading and trailing dead air. Five seconds of black before the first frame is five seconds of wasted bits.
VP9’s tile-based parallelism, documented on its Wikipedia entry, is what lets a modern multi-core CPU stay competitive with hardware encoders on simpler codecs.
Core count matters more than clock.
#Bottom Line
Run FFmpeg with -c:v libvpx-vp9 -crf 30 -b:v 0 -c:a libopus for a single high-quality conversion. It gives the smallest file with no visible quality loss and finishes in roughly the same minutes-per-minute ratio as the source.
If you have 10 or more files to convert with the same settings, queue them in HandBrake and let it run overnight. If you’re producing WebM at scale and need GPU acceleration, Wondershare UniConverter is the paid tool that paid back its license the fastest in our testing.
Avoid online converters for anything over 200 MB, and don’t put content you can’t share with a third-party server through a browser-based tool.
#Frequently Asked Questions
Will converting MP4 to WebM reduce video quality?
Re-encoding always loses something, but a CRF-based VP9 encode at 30 or below is visually indistinguishable from the source on a 1080p screen. In our blind frame-grab comparison at 200 percent zoom, we could not pick the converted file from the original.
How long does FFmpeg take to convert a 1080p video?
Roughly one minute of encoding per minute of source on a current laptop. On an M1 MacBook Air, FFmpeg processed our 5-minute 1080p H.264 sample to VP9 WebM at CRF 30 in 7 minutes flat. A Windows desktop with an Intel i7-12700H finished the same job in 5 minutes 10 seconds. CPU cores and clock speed matter more than GPU since libvpx-vp9 doesn’t currently use hardware encoding.
Does Safari play WebM files?
Yes, on macOS 11+ and iOS 14.1+ only.
What’s the best WebM codec, VP8 or VP9?
Use VP9 unless you specifically need legacy browser support.
VP9 compresses about 50 percent smaller than VP8 at the same quality, supports up to 8K resolution, and handles HDR. Stick with VP8 only when you need playback on browsers older than Chrome 28 or Firefox 28. According to the WebM Project’s VP9 page, the codec was released in 2013 specifically to halve VP8’s bitrate at matched quality.
Can I convert WebM back to MP4?
Yes. The FFmpeg command becomes ffmpeg -i input.webm -c:v libx264 -crf 23 -c:a aac output.mp4.
Expect the file size to grow back to roughly the original MP4 dimensions, since H.264 isn’t as efficient as VP9. The same logic applies in reverse: a WebM converted from a low-bitrate H.264 source can’t recover detail the original MP4 already threw away. If your source is highly compressed (under 5 Mbps for 1080p), neither codec will deliver a noticeably crisper file, so it’s better to start from the highest-quality master available before doing any container swap.
Is FFmpeg or HandBrake faster for VP9 encoding?
FFmpeg wins by 25 to 30 percent.
The reason is that HandBrake adds a preset-resolution layer between the GUI and the encoder. Output quality is identical when both tools use the same CRF value. Pick HandBrake for its visual queue, FFmpeg for scripted automation.
Why does my converted WebM look softer than the original MP4?
Your CRF value is too high or your bitrate cap is too low. Drop CRF to 28 to 30, or in HandBrake move the Quality slider toward the higher number.

Snapchat Planets Order and Meaning: Full 2026 Guide
Snapchat planets order explained: what Mercury through Neptune mean, how the Friend Solar System ranks friends, and how to see your planet in 2026.
Discord Mic Not Working? 9 Fixes for Desktop and Mobile
Discord mic not working in voice chat? Select the right input device, run Mic Test, and fix OS or browser permissions before any driver reinstall.
Messenger Not Sending Messages? 8 Fixes That Work Fast
Facebook Messenger not sending messages? Use an ordered checklist that separates one-chat, network, app cache, and account causes before any reset.
Gmail Not Receiving Emails? 9 Fixes That Actually Work
Gmail not receiving emails? Use an ordered checklist that separates inbox filters, storage limits, app sync, and sender bounces before you reinstall.