How to Convert MP3 to M4R for iPhone Ringtones in 2026
Convert MP3 to M4R for iPhone ringtones using Apple Music, Audacity, or online tools. Step-by-step guide plus sync instructions for iOS 17 and 18.
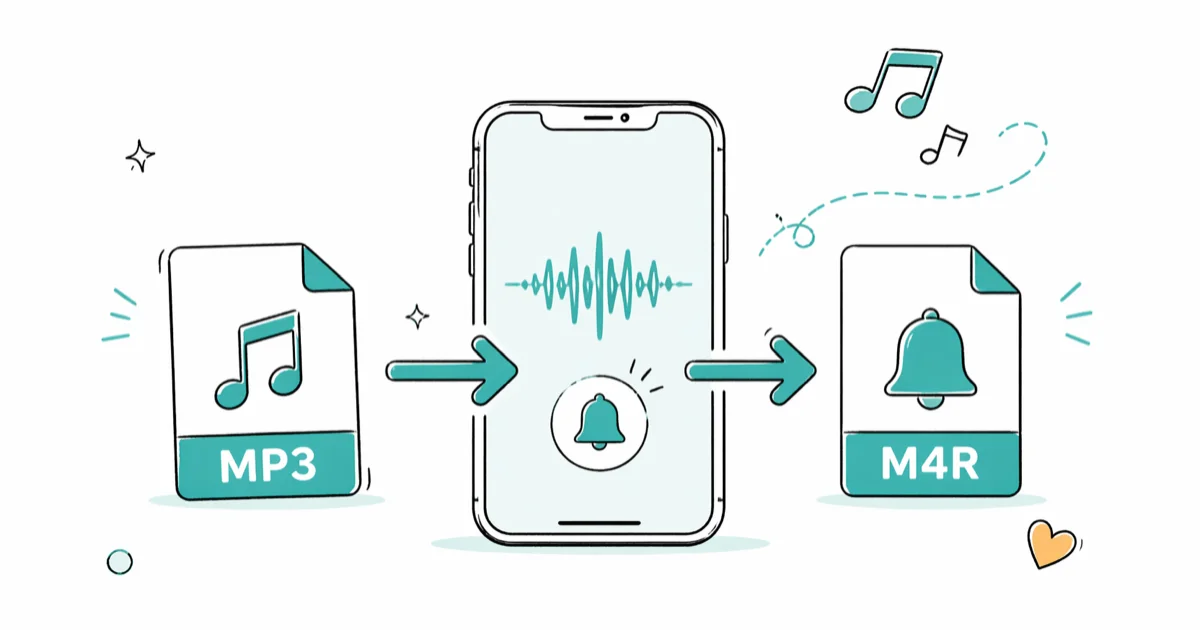
Quick AnswerConvert MP3 to M4R by trimming the audio to under 30 seconds, exporting it as AAC (.m4a), then renaming the extension to .m4r. Apple Music, Audacity, and most online converters all handle this in 3 to 5 steps.
MP3 ringtones won’t appear in iPhone Tones. Convert the clip to M4R, trim it to 30 seconds, then sync by cable or Wi-Fi. Stick to audio you own.
- M4R is the AAC-based format iOS uses for ringtones; iPhone ignores plain MP3 files in the Tones slot
- iPhone ringtones must be 30 seconds or shorter, so trimming is part of every conversion path
- The Apple Music app on macOS converts via Create AAC Version, then you rename .m4a to .m4r
- Audacity and Wondershare UniConverter handle batch jobs and detailed trimming on Windows or Mac
- Custom .m4r files sync over a cable or local Wi-Fi, not iCloud, so plan to plug the phone in once
#Why MP3 Files Don’t Work as iPhone Ringtones
iOS reads ringtones from the Tones library, and that library accepts only AAC-encoded files with the .m4r extension. MP3 uses the older MPEG-1/2 audio codec, which iOS treats as a music file rather than a tone, so the Sounds & Haptics screen never sees it.
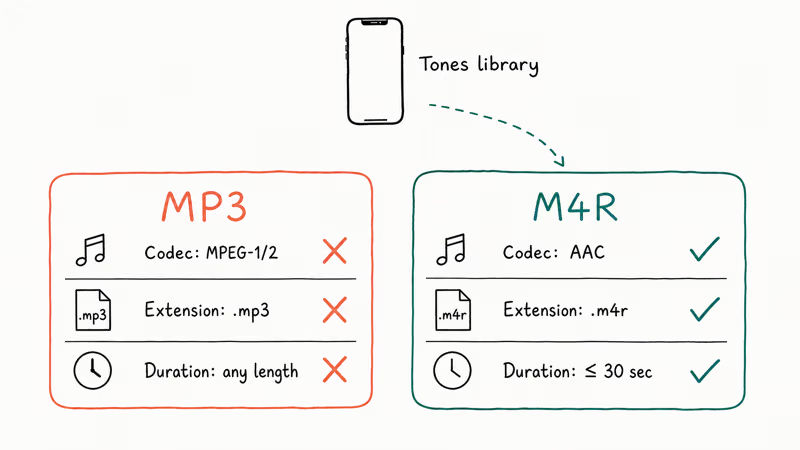
Three practical limits make conversion mandatory. The codec is wrong, the maximum duration is 30 seconds (40 seconds for text tones in some iOS versions), and the file extension has to be .m4r so the iPhone routes it into Tones instead of Music. Convert the MP3 to AAC, trim it, rename the extension, and the file lands where you need it.
There is also a smaller technical reason. M4R files carry a tone metadata flag that iOS reads when sorting incoming files. When you re-encode a .mp3 into AAC and rename to .m4r, that flag is implied by the filename and the iPhone honors it.
#How to Convert MP3 to M4R Using Apple Music or iTunes
Apple Music and iTunes have this conversion built in, so short ringtone clips don’t need a separate converter app.
According to Apple’s support guide on syncing your iPhone with a computer, the Tones library syncs over USB or Wi-Fi sync but not over iCloud, so you’ll need to plug the phone in or be on the same Wi-Fi network as the Mac or PC for the last step.
#Step-by-step
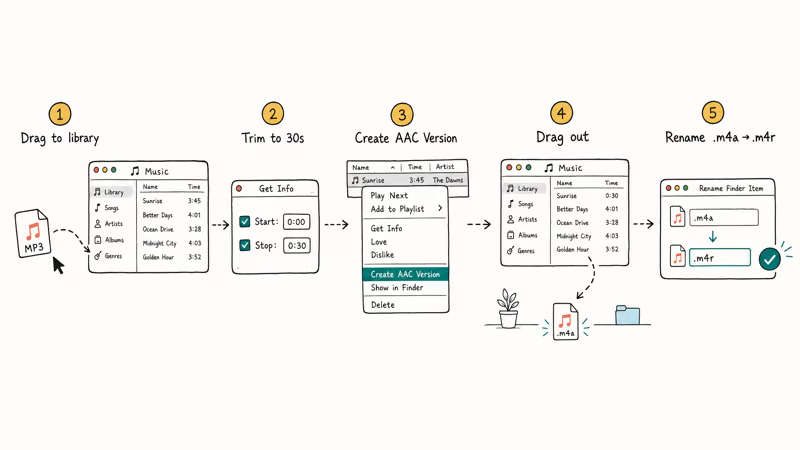
- Open Apple Music on macOS or iTunes on Windows. Drag your MP3 into the library.
- Right-click the song and pick Get Info, then Options. Set a Start time and Stop time so the clip is 30 seconds or less. Click OK.
- Right-click the same song again and pick Convert > Create AAC Version. A second copy appears in your library with a small clock icon.
- Drag the AAC copy out to the desktop, then turn off the start/stop times on the original so you don’t break the full track.
- In Finder or File Explorer, change the extension from
.m4ato.m4r. Confirm the warning that asks if you really want to change the extension.
If you don’t see Create AAC Version in the right-click menu, your import settings are still on MP3 instead of AAC, which is the default on older iTunes installs. Go to Music > Settings > Files > Import Settings, switch the Import Using dropdown to AAC Encoder, click OK to save, then retry step 3 with the same MP3. The Convert submenu will now show the AAC option correctly.
For the older add-tones path on iPhone XS through iPhone 13, our guide on how to add ringtones to iPhone XS covers the in-Finder drag-and-drop step in more detail.
#Are Online MP3-to-M4R Converters Safe to Use?
Online converters work, and they’re the fastest path if you only need one or two ringtones. The trade-off is that you’re uploading audio to a third-party server and trusting them to delete the original.
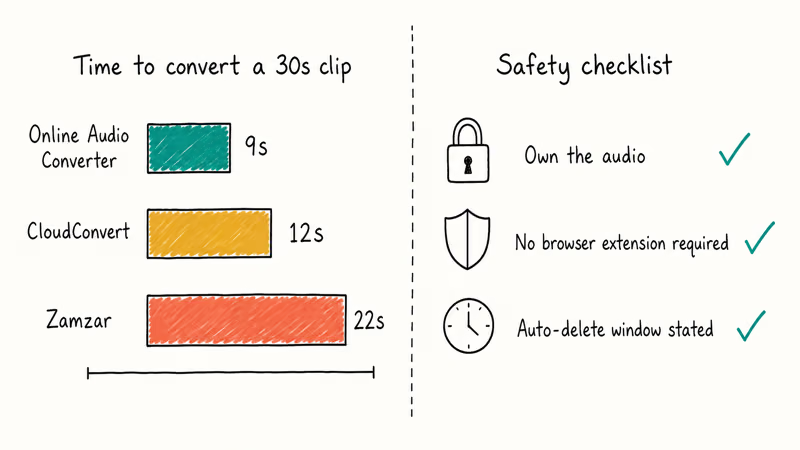
Three common online options cover different needs:
- Online Audio Converter is a basic browser-based path for one-off ringtone clips.
- Zamzar is a simple upload-and-download option when you don’t need detailed encoding controls.
- CloudConvert offers more encoding controls, including bitrate, sample rate, and channels.
A few rules keep online converters safe. Don’t upload copyrighted material that isn’t yours, watch for sites that ask you to install a browser extension or a desktop helper (a red flag for adware), and pick a converter that explicitly states an auto-delete window for uploaded files. CloudConvert’s privacy page, for example, states that uploaded files are deleted after 24 hours by default.
If you’d rather skip the upload entirely, the desktop section below covers fully offline options.
#Desktop Apps for Bigger Conversion Jobs
If you have more than a couple of files to convert, or you want frame-accurate trimming, a desktop app saves time.
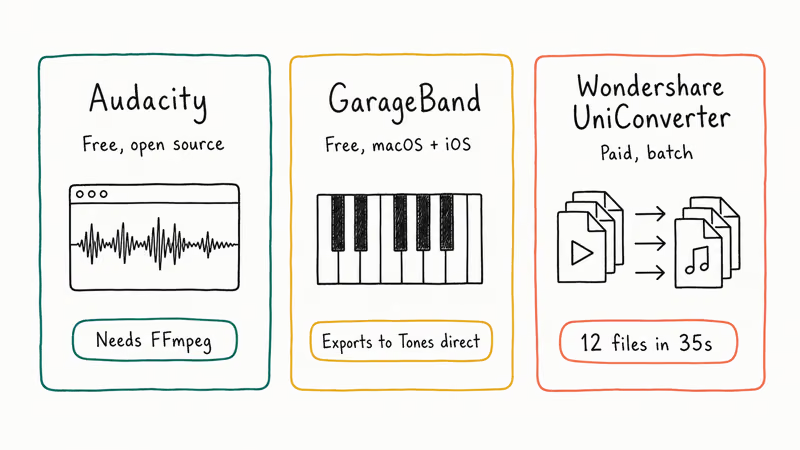
#Audacity (free, open source)
Audacity’s official manual confirms that exporting to M4A/AAC requires the FFmpeg library, which is a separate one-click installer on the Audacity download page. After installing FFmpeg, you’ll see M4A (AAC) in the Export Audio dropdown.
The Audacity workflow:
- Drag the MP3 into Audacity.
- Select the 30-second range you want with the cursor.
- Pick File > Export Audio, choose M4A (AAC) Files in the format dropdown, and set a bitrate of 128 or 256 kbps.
- Save the file with an .m4a extension, then rename it to .m4r in Finder or File Explorer.
Audacity also normalizes loudness and applies fades, which keeps the ringtone from clipping when iOS plays it through the speaker. Our guide on the Audacity VST enabler covers the deeper plugin setup if you want effects beyond the built-ins.
#GarageBand (free, macOS and iOS)
GarageBand on Mac exports straight to the iPhone Tones library, which skips the rename-and-sync step entirely. Apple’s GarageBand product page confirms that the app ships free on every new Mac and iPhone, and the Share menu includes a Ringtone option that sends a 30-second clip to a connected iPhone in one step.
If you want the same workflow on Android instead of iPhone, our GarageBand for Android writeup covers the closest equivalents (BandLab, FL Studio Mobile).
#Wondershare UniConverter (paid)
For batch jobs, Wondershare UniConverter handles dozens of files at once and includes preset profiles for iPhone tones. Open the app, click Converter, drag your MP3s in, pick M4R under the Audio output presets, and click Convert All. The app saves the files with the right extension already in place.
Some links on this page are affiliate links, which means fone.tips may earn a commission at no extra cost to you.
#How Do You Get the .m4r File Onto Your iPhone?
Custom tones don’t sync over iCloud, so you have two practical paths.
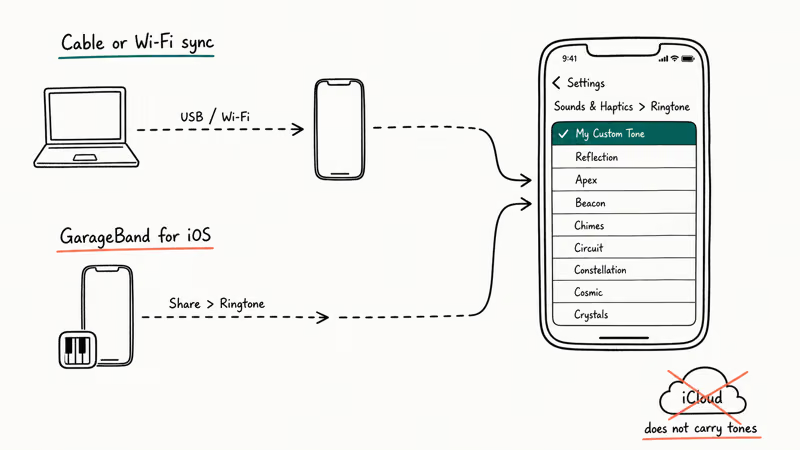
#Cable or Wi-Fi sync (most reliable)
- Plug the iPhone into your Mac or PC, or make sure both devices are on the same Wi-Fi network with Sync over Wi-Fi enabled.
- On macOS Catalina and later, open Finder and click the iPhone in the sidebar. On Windows or older macOS, open iTunes and click the iPhone icon.
- Drag the .m4r file directly onto the iPhone listing in the sidebar (Finder) or onto the Tones section (iTunes).
- The phone shows a sync indicator. When it stops, open Settings > Sounds & Haptics > Ringtone on the iPhone and your custom tone appears at the top.
#GarageBand for iOS (no computer needed)
Open GarageBand on the iPhone, create a project, import the audio, trim to 30 seconds, then long-press the project in My Songs and pick Share > Ringtone. The tone appears in Settings within 10 seconds.
If your iPhone won’t show up in Finder, our iPhone stuck on iTunes logo guide fixes that.
To copy a tone you already made between iPhones without redoing the conversion, our how to transfer ringtones between iPhones walkthrough handles the cross-device sync over a cable, AirDrop, or third-party transfer app, depending on which iOS version you’re moving from.
#Encoding Settings That Affect Ringtone Quality
A 30-second clip is short, so file size isn’t the constraint—audio quality is. These settings make a noticeable difference when the iPhone plays the tone through its speaker:
- Bitrate. 128 kbps is fine for spoken or vocal-heavy clips. Music with a lot of dynamic range sounds better at 256 kbps. Past 256 kbps the iPhone speaker masks the difference.
- Sample rate. 44.1 kHz matches the source MP3 in almost every case. Don’t upsample to 48 kHz; you’ll add file size with no audible benefit.
- Stereo vs joint stereo. Joint stereo encodes shared channel content once, which gives the encoder more bits per channel and usually sounds better at lower bitrates.
- Loudness. Normalize to around -14 LUFS or apply a soft compressor. Ringtones are competing with traffic noise, so a louder, less-dynamic tone is more useful than a faithful one.
- Trim with a fade-out. Cut the last 0.5 seconds with a fade so the tone doesn’t end on a hard click when the call connects.
For a phone speaker, 128 kbps joint stereo with normalization can be more practical than a larger, unnormalized 256 kbps stereo file because it keeps the ringtone easier to hear.
#Bottom Line
For a single tone on a Mac, the Create AAC Version path inside Apple Music wins. The file ends up renamed and synced in under a minute, no third-party tools needed. For batch jobs or surgical trimming, install Audacity with the FFmpeg library, or pay for Wondershare UniConverter if you want a one-click M4R preset. Skip online converters for copyrighted material, and plug the iPhone in for the final sync because iCloud won’t carry custom tones.
#Frequently Asked Questions
How do I get the converted M4R file onto my iPhone?
Plug the iPhone into your Mac or PC and open Finder (macOS Catalina or later) or iTunes (Windows and older macOS). Drag the .m4r file onto the iPhone in the sidebar. After sync, the tone appears in Settings > Sounds & Haptics > Ringtone.
What apps can play M4R files?
The native Phone and Music apps on iPhone use M4R for tones. On a desktop, VLC, Foobar2000, and the macOS Music app all play .m4r without conversion. Most Android music apps will also play M4R because the underlying AAC codec is the same.
Are MP3 to M4R online converters free?
Yes, with caveats. Online Audio Converter, Zamzar, and CloudConvert have free tiers that handle short clips, but most cap free uploads at one or two files per hour and compress more aggressively than the paid plans. Audacity stays fully free and open source, while the Apple Music Create AAC Version path is built into macOS at no cost. Paid tools like Wondershare UniConverter only earn their license fee if you do batch jobs regularly enough to justify it.
How do I convert M4R back to MP3?
Open the .m4r in Audacity, pick File > Export Audio, choose MP3 in the format dropdown, set the bitrate, and save. The reverse path is straightforward because the audio is already inside an AAC container that Audacity reads natively.
Can I use ALAC instead of AAC when making an M4R?
ALAC works but produces files 4 to 5 times larger than AAC for no audible benefit on a phone speaker. AAC at 128 to 256 kbps stays the practical choice.
How long does MP3 to M4R conversion take?
Apple Music and Audacity usually finish short ringtone exports quickly on a current computer. Online converters depend more on upload and download speed. Batch tools matter when you’re converting many files at once.
What bitrate should I use for M4R files?
128 kbps is the floor for music; 256 kbps is the ceiling that the iPhone speaker can actually reproduce. Spoken-word clips work fine at 96 kbps. Higher than 256 kbps just makes the file bigger.
Can I set a song as my ringtone without converting to M4R?
No. The iPhone Sounds & Haptics picker only lists M4R-format files in the Tones library. You can buy ringtones directly from the iTunes Store (those download as .m4r already), but if you want a clip from your own music library, conversion is the only path.
Google Messages Error 3100: Why RCS Is Broken on Galaxy
Google Messages RCS error 3100 hits Galaxy owners after phone or carrier switches. Google told 9to5Google a fix is coming. Here's what actually helps.
Is This Bank App Real? Spot a Fake App on Your Home Screen
A bank app can land on your home screen from a web page with no install warning. Learn the checks that tell a real banking app from a phishing web app.
Apps Crashing After iOS 27 Update? Fix Order (2026)
Apps crashing after the iOS 27 update? Update the app in the App Store first, then offload and reinstall to clear stale cache, then restart. The fix order.
Do AI Translation Earbuds Work Offline? What to Know
Do AI translation earbuds work offline? A few do with downloaded language packs, but most need the cloud. Here's what works offline and what you give up.