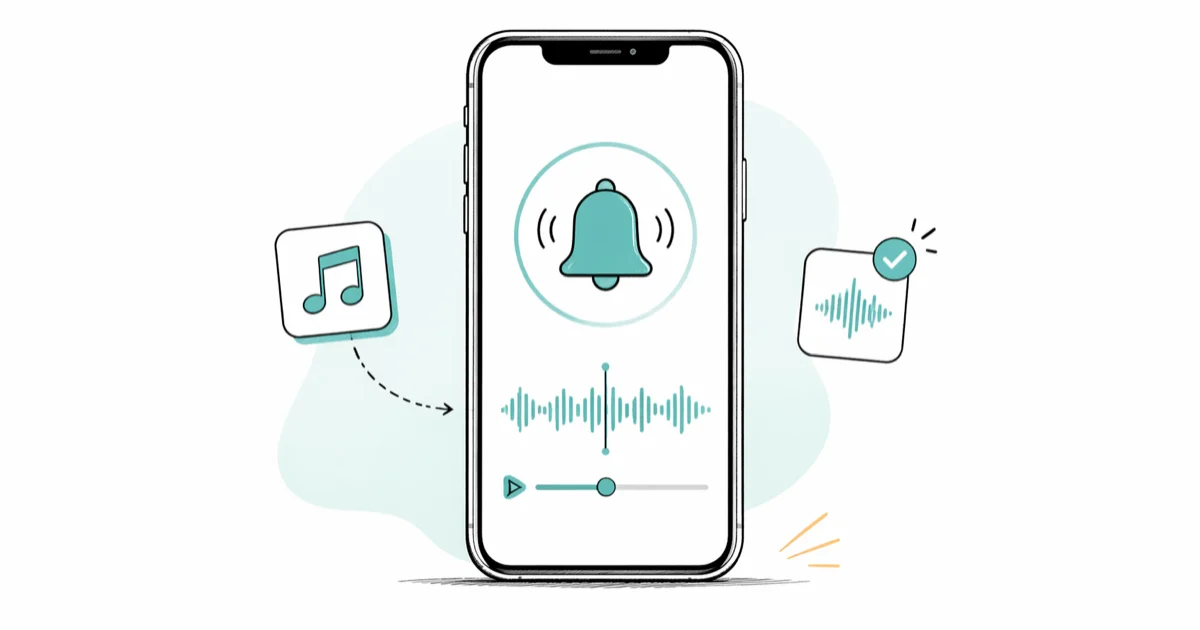
How to Add Ringtones to iPhone: 4 Methods That Work
Add ringtones to iPhone XS, 14, or 15 in four ways: Tone Store, GarageBand, Finder sync, or iTunes for Windows. Each method works step-by-step on iOS 17.
Quick AnswerBuy ringtones from the Tone Store under Settings > Sounds & Haptics > Ringtone > Tone Store. To use your own audio, make a 30-second .m4r file in GarageBand on the iPhone, or sync one from a computer via Finder on macOS Catalina and later or iTunes on Windows.
Adding ringtones to iPhone comes down to four working paths in 2026: the Tone Store, GarageBand on the device, Finder sync on Mac, or iTunes sync on Windows. The Tone Store needs no computer and no audio editing. The other three give you full control over songs you already own.
- The Tone Store is the only ringtone path that needs no computer or audio editing; purchases sync to every Apple ID device.
- iPhone ringtones must be in the .m4r format and 30 seconds or shorter to appear under
Settings>Sounds & Haptics>Ringtone. - GarageBand on iPhone is free and exports custom tones directly to the system tone library, with no further sync step.
- iTunes for Windows still syncs custom tones to iPhone in 2026; macOS Catalina 10.15 and later use Finder drag-and-drop instead.
- Per-contact ringtones live under Contacts > the name >
Edit>Ringtone, and override the default once the tone is on the device.
#What Format Do iPhone Ringtones Use?
iPhone ringtones use the .m4r format and must be 30 seconds or shorter. Anything longer doesn’t appear in the Sounds & Haptics list, even after it syncs to the device.
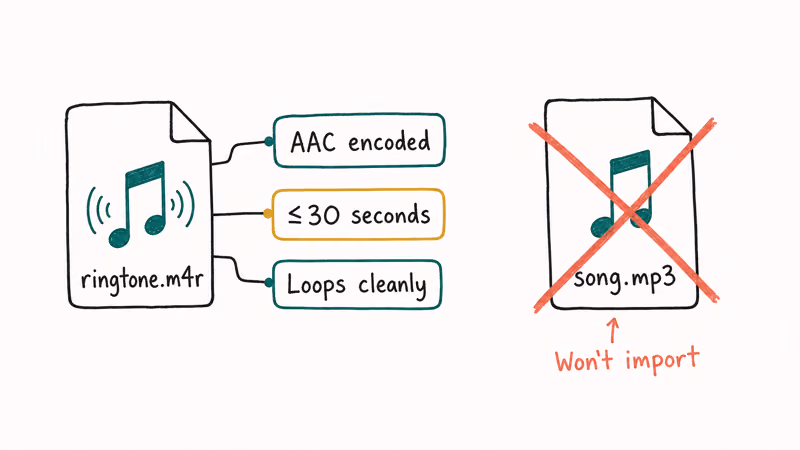
The .m4r file is a renamed AAC audio container. It’s technically the same audio data as a 30-second .m4a with the extension swapped.
If you start with an MP3, WAV, or FLAC file, you’ll trim it to 30 seconds first, then export as AAC, then change the extension to .m4r. GarageBand handles all three steps in one export. iTunes for Windows trims and converts each song individually if you edit the Start and Stop times under Get Info. Third-party converters work too, but you don’t need them for either workflow on a single tone.
The format is the gatekeeper.
According to Apple’s iTunes content sync guide, purchased and custom ringtones sync to iPhone in the same Tones section in both macOS Finder and iTunes for Windows, with the same 30-second cap applied at sync time.
#How to Buy Ringtones From the Tone Store
This is the fastest method. It needs no cable, no computer, and no audio editing. Tones purchased here sync to every device on your Apple ID: iPhone, iPad, Apple Watch, and any future iPhone you set up.
- Open Settings on your iPhone.
- Tap Sounds & Haptics.
- Tap Ringtone.
- Tap Tone Store at the top of the screen.
- Browse the categories or search by song or artist.
- Tap the price next to a tone, then tap Buy Tone and confirm with Face ID, Touch ID, or your Apple ID password.
Most purchases download quickly.
Tone Store purchases usually appear in the Ringtone list shortly after confirmation and can sync to other devices on the same Apple ID when the tone remains available.
Re-downloads are free.
If you’ve bought tones before on another iPhone, scroll to the bottom of the Ringtone screen and tap Download All Purchased Tones. According to Apple’s iTunes Store purchase help page, tone purchases stay tied to the Apple ID and remain re-downloadable as long as the original tone is still on the store.
#How to Make a Custom Ringtone With GarageBand on iPhone
GarageBand is free in the App Store and is the cleanest no-computer path for turning a song you own into a ringtone. The whole process takes about 3 minutes once you have the audio file on your phone. If you’re on Android instead, see our guide on making a YouTube song into an Android ringtone; the workflow there is different and uses a separate app.
#Step 1: Get the source audio onto your iPhone
Save the audio file to Files (iCloud Drive, On My iPhone, Dropbox, or Google Drive). You can also import directly from the iPhone’s Music library if the song was downloaded from Apple Music or purchased through the iTunes Store.
#Step 2: Open GarageBand and start an Audio Recorder track
Open GarageBand and tap the plus icon.
Swipe to Audio Recorder, then tap the icon that looks like three horizontal bars to switch into the multi-track timeline view.
#Step 3: Import the audio file
Tap the Loops icon, the loop shape in the top-right toolbar.
Switch to the Files tab, tap “Browse items from the Files app,” pick your audio, then drag the file into a track in the timeline.
#Step 4: Trim to 30 seconds
Double-tap the audio region in the timeline and pick Trim, or drag the edges of the region inward. The total length of the project must be 30 seconds or shorter. The yellow ruler at the top of the screen shows the current project length.
Watch that ruler closely.
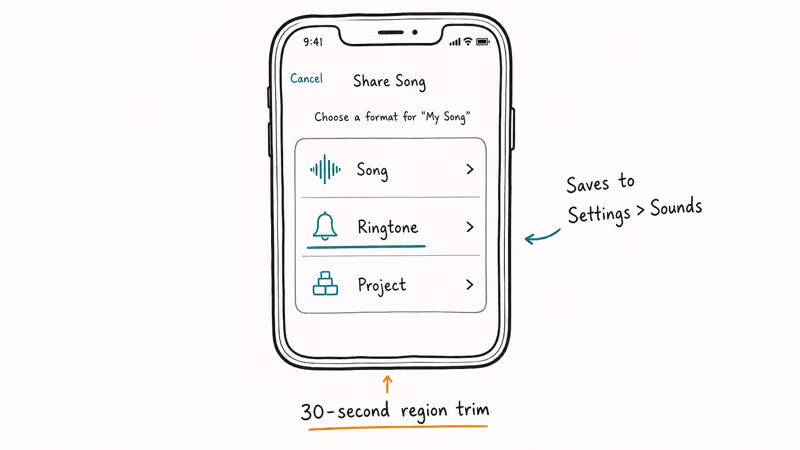
#Step 5: Export as a ringtone
Tap the down-arrow icon in the top-left and pick My Songs. Long-press your new project, tap Share, and pick Ringtone. Name the tone and tap Export. After GarageBand finishes processing, tap “Use sound as…” and choose Standard Ringtone, Standard Text Tone, or Assign to Contact.
Apple’s GarageBand for iPhone User Guide confirms that ringtones must be 30 seconds or shorter and that the Share menu’s Ringtone option exports directly to the iPhone’s tone library, with no further Finder or iTunes sync needed.
#How to Sync Custom Ringtones Using Finder on macOS Catalina or Later
Apple removed iTunes from macOS in Catalina 10.15. Sync responsibilities split between Finder, the Music app, and Apple TV. Ringtones now sync through Finder.
- Make sure your custom .m4r file is on your Mac. If you only have an .m4a, change the extension: select the file, press Return, edit the extension, and confirm at the prompt.
- Connect your iPhone to the Mac with a USB-C or Lightning cable.
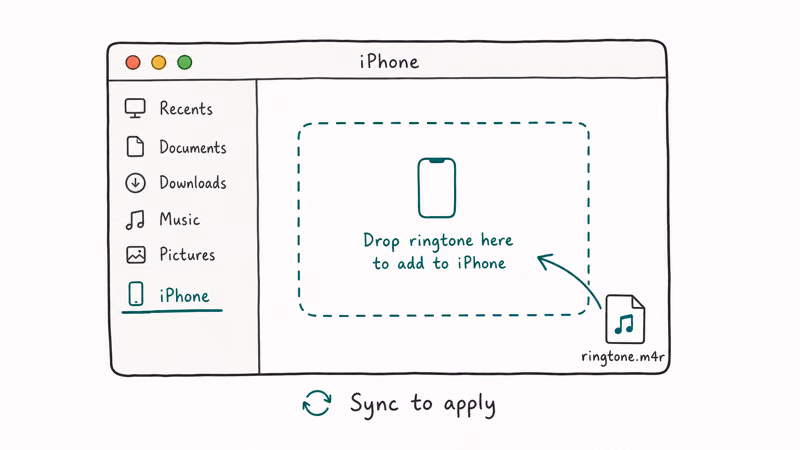
- Open a Finder window. Your iPhone appears in the sidebar under Locations.
- Click your iPhone in the sidebar.
- Drag the .m4r file from a Finder window or your desktop directly into the iPhone pane. Finder copies it to the device’s tone library.
After Finder copies the .m4r file, check Settings > Sounds & Haptics > Ringtone on the iPhone. The first time you drag a tone to a new Mac, macOS prompts you to trust the device. Tap Trust on the iPhone and enter the passcode to allow the sync.
That single trust prompt is the gate.
If you don’t see the iPhone in Finder at all, the cable is the usual culprit.
Check that it’s a data cable, not charge-only. Then verify you tapped Trust.
#How to Sync Custom Ringtones Using iTunes on Windows
iTunes for Windows still exists in 2026 and still handles custom tone sync. Apple maintains the Windows build separately from macOS, so the older drag-to-Tones workflow is still active.
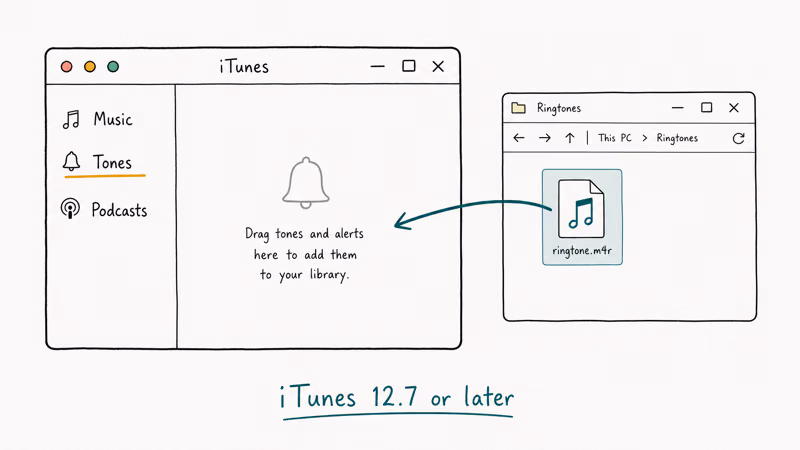
#Step 1: Get iTunes ready
Install iTunes from the Microsoft Store or from apple.com/itunes. Open it and let it update if prompted. Connect your iPhone with a USB cable and tap Trust on the iPhone if asked.
The Microsoft Store version updates itself.
#Step 2: Drag the .m4r file in
Click the small iPhone icon under the playback controls to open the device pane, then pick Tones in the left sidebar. Drag your .m4r file into the Tones list. iTunes copies the file to the device.
#Step 3: Verify on the iPhone
Open Settings > Sounds & Haptics > Ringtone and scroll to the top. Custom tones appear above the built-in Apple ones, in alphabetical order.
After iTunes copies the .m4r file, check the Ringtone list on the iPhone before repeating the sync. If iTunes won’t open on your PC, see our iTunes won’t open on Windows 10 fix before retrying the sync.
#How to Assign a Different Ringtone to a Specific Contact
Once a tone is on the iPhone via any of the four methods above, you can route it to one person or use it as the default for everyone.
Per-contact routing only takes a few taps.
- Open the Contacts app or the Phone app.
- Tap the contact you want to change.
- Tap Edit in the top-right.
- Scroll down and tap Ringtone.
- Pick the tone you want from the list.
- Tap Done.
That’s it. The contact’s incoming calls now play that tone instead of the default. This also works for text tones, just tap Text Tone instead of Ringtone in step four.
Per-contact tones follow Focus rules: they play when the caller is on the allow list and stay filtered when the caller isn’t.
#Why Doesn’t My Custom Ringtone Show Up Under Settings?
Three reasons cover most cases:
- The file is longer than 30 seconds. iOS silently hides tones that exceed the limit. Re-trim the file in GarageBand or on the source computer, then re-sync.
- The file is .m4a instead of .m4r. Same audio, but iOS needs the .m4r extension to recognize the file as a tone. Renaming the extension is enough; no re-encoding required.
- The device wasn’t trusted. If you connected to a new computer and skipped the Trust prompt, the sync didn’t complete. Disconnect, reconnect, and tap Trust on the iPhone.
If you’ve checked all three and still don’t see the tone, restart the iPhone.
A reboot can refresh the Sounds & Haptics list and make recently synced files appear. The same trust state also controls iTunes auto-open behavior. If iTunes keeps launching every time you plug the device in, our guide on stopping iTunes from opening when iPhone is connected walks through the same setting from the other side.
#Bottom Line
Buy from the Tone Store if you want a ringtone today and don’t care about the exact song. It’s the fastest path and syncs to every Apple ID device, no cable needed. For a specific song you already own, use GarageBand on the iPhone, the only method that needs no computer. Keep Finder (Mac) or iTunes (Windows) for batch-syncing pre-edited .m4r libraries.
#Frequently Asked Questions
Can you set any audio file as an iPhone ringtone?
Yes, as long as it’s 30 seconds or shorter and ends with the .m4r extension.
iOS reads AAC audio in an .m4r container, which is the same as a 30-second .m4a renamed. MP3, WAV, and FLAC files need conversion to AAC first; GarageBand and iTunes handle that step automatically when you save or sync the file to the iPhone.
Why does my custom ringtone disappear after I sync?
Two common reasons: the file went over 30 seconds, or the .m4r extension reverted to .m4a after editing. iOS hides tones that exceed the length limit and ignores files without the .m4r extension. Trim again in GarageBand and confirm the extension before retrying the sync.
Do GarageBand ringtones count against your iCloud storage?
No. Ringtones export to the device tone library, not to iCloud Drive.
The original GarageBand project file stays in My Songs and only syncs to iCloud if you have GarageBand iCloud sync turned on. The exported .m4r ringtone itself lives in the on-device tone system and doesn’t touch iCloud quota at all, no matter how many ringtones you create.
Is iTunes still the way to add ringtones on a Mac?
No. iTunes was removed from macOS in Catalina 10.15 (2019) and split into Finder, Music, and Apple TV. To sync custom tones on a Mac, connect your iPhone, open Finder, click the iPhone in the sidebar, and drag the .m4r file into the iPhone pane. The Music app on Mac does not handle ringtone sync, and iTunes still works on Windows.
Can you transfer purchased ringtones to a new iPhone?
Yes, Tone Store purchases tied to your Apple ID come along with iCloud restore or Quick Start setup. If they don’t appear, tap Download All Purchased Tones at the bottom of Settings > Sounds & Haptics > Ringtone. Custom tones from Finder or iTunes don’t move automatically, so re-sync them from the computer where the original .m4r files live. See our transferring ringtones from iPhone to iPhone guide for the full process.
How long can an iPhone ringtone be?
Thirty seconds maximum, for both ringtones and text tones.
Anything over that limit will still sync to the iPhone but won’t appear in the Sounds & Haptics list. The hard cap has been the same since iOS 7 and applies to purchased, GarageBand-exported, and computer-synced tones.
Is GarageBand available on Android?
No, GarageBand is an Apple app and only runs on iPhone, iPad, and Mac. For the Android equivalents and what they can do for ringtone creation, see our roundup of GarageBand alternatives for Android.

iPhone 17 Cellular Data Not Working on iOS 26? 9 Fixes
iPhone 17 cellular data still dropping on iOS 26? Apple fixed the launch bug in iOS 26.0.1, but recovery failures persist. Here's the fix ladder.

iPhone Cellular Data Not Working Abroad? eSIM Fixes
Travel eSIM showing no data abroad? Fix iPhone roaming with the data-line check, Data Roaming toggle, APN settings, and network selection steps.

iPhone Cellular Data Not Working for Some Apps? 8 Fixes
Some iPhone apps refuse to load on cellular while others work fine. Check the per-app cellular toggle, Low Data Mode, VPN profiles, and Screen Time.

iPhone Stuck on EDGE? How to Get 5G or LTE Back (2026)
iPhone stuck on EDGE with crawling data? Here's why the E icon appears, which settings force 5G or LTE back, and when the problem is your carrier.