Mac Camera Not Working? 10 Fixes That Actually Work
Fix your Mac camera not working with 10 proven methods. Covers permissions, Terminal reset, SMC, Safe Mode, and hardware checks for macOS Sequoia.
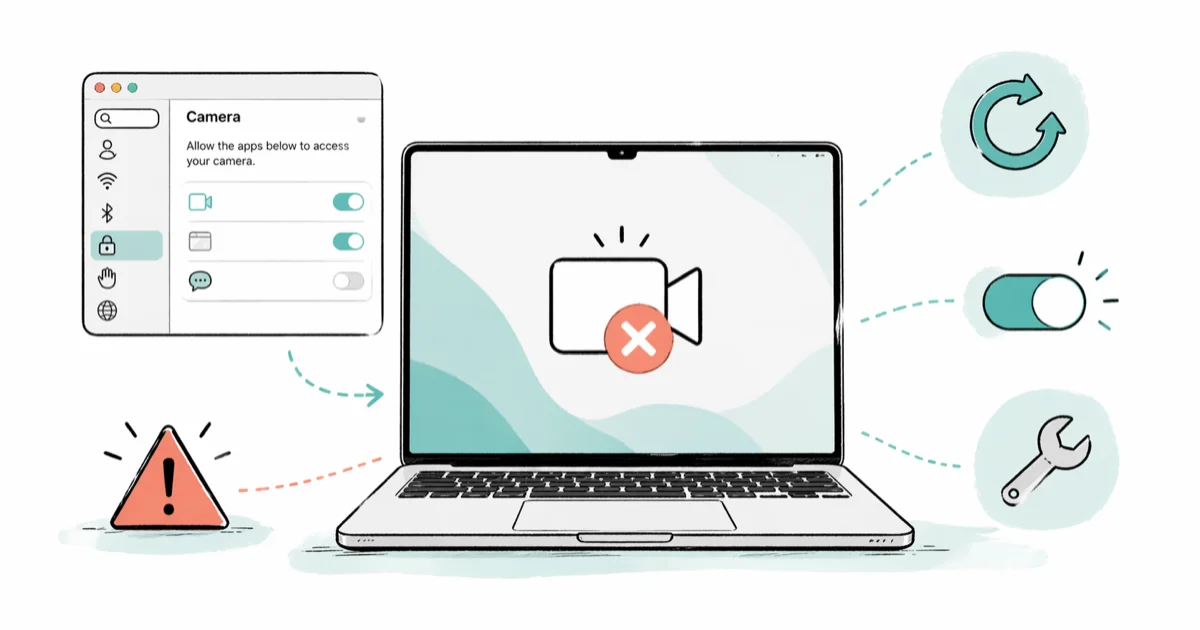
Quick AnswerOpen System Settings, choose Privacy and Security, then Camera, and confirm your app is toggled on. If the toggle is already on, run "sudo killall VDCAssistant" in Terminal and reopen the app.
Your Mac camera shows a black screen and your call starts in five minutes. Most Mac camera failures are software. The fixes below run from safest to “Genius Bar” and cover both Apple Silicon and Intel Macs.
- Camera permissions in System Settings are the most common cause of Mac camera failures, and the fix takes under a minute
- The Terminal command “sudo killall VDCAssistant” resets a stuck camera process without a restart
- Apple Silicon Macs (M1, M2, M3, M4) don’t have an SMC, so a regular restart replaces the old SMC reset
- Only one app can use the Mac camera at a time, so a background app silently blocks the next one
- Run Apple Diagnostics before paying for a hardware repair, since codes starting with “VDC” or “NDC” are the only solid evidence of camera damage
#Why Is Your Mac Camera Not Working?
The Mac’s built-in camera has no physical on-off switch and no driver to install. macOS turns the sensor on automatically when an app requests access, then routes that stream to the requesting app. A camera failure almost always points to one of four causes: a revoked permission, a stuck system process, a background app holding the camera, or, rarely, a hardware fault inside the lid.
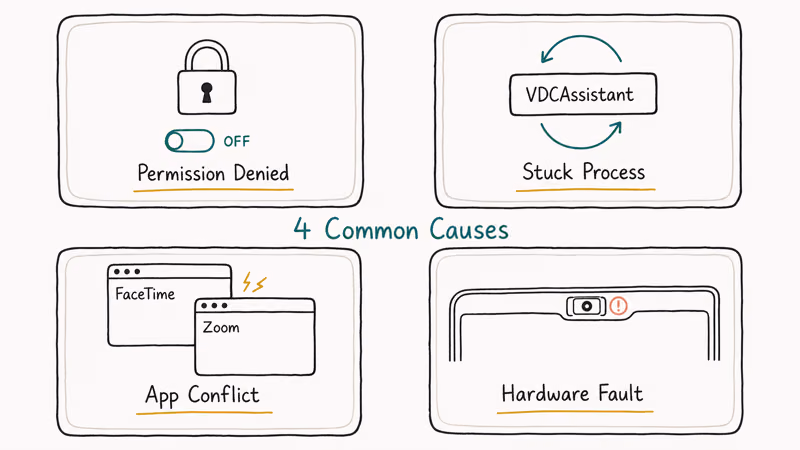
Permission denied. macOS requires explicit per-app permission for camera access. If you tapped “Don’t Allow” the first time an app asked, that app stays blocked until you flip the switch yourself. A major macOS upgrade can also reset privacy preferences and silently un-grant access you previously gave.
Permission issues are the cheapest to fix and the most common.
Camera process stuck. A background process called VDCAssistant manages the camera hardware. It hangs sometimes after an app crash, a sleep cycle, or a macOS update, and it locks the camera in an unusable state until you restart it.
Another app holding the camera. macOS lets only one app use the camera at a time. If FaceTime is running in the background, Zoom can’t grab the camera, and macOS doesn’t always show a clear error message when this resource conflict happens. Streaming software, screen recorders, and virtual webcam tools (mmhmm, OBS, Snap Camera) are the usual offenders, since some of them silently re-acquire the camera even when their main window is closed.
Hardware failure. Rare, but real. A damaged sensor or pinched ribbon cable kills the camera.
Save your work first.
Every fix below assumes you’re troubleshooting your own Mac or a computer you own — admin password, no MDM lockout, no warranty already voided. Nothing here erases user files, but several fixes involve a restart, and you don’t want to lose an unsaved draft halfway through Fix 6.
#Fix 1: Check Camera Permissions
This is the cheapest fix.
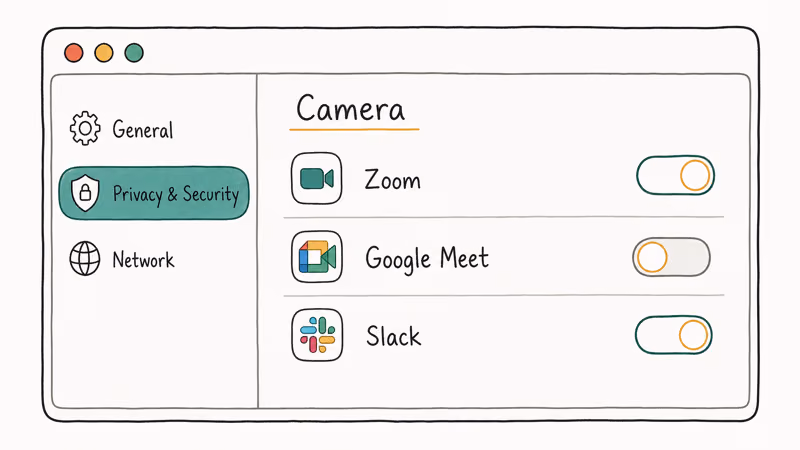
macOS Sequoia changed the setting location, so use the path that matches your version. The toggle is per-app, so finding “Camera” in System Settings is only step one — you also need to confirm the specific app you want to use is listed and switched on.
macOS Sequoia (15.0 and later): Open System Settings from the Apple menu, click Privacy & Security in the sidebar, then Camera. Find your app in the list and toggle it on.
macOS Sonoma and earlier: Go to System Preferences, then Security & Privacy, then the Privacy tab. Click Camera in the left sidebar and check the box next to your app. On macOS Catalina and Big Sur, click the padlock at the bottom left and authenticate before you can change anything.
According to Apple’s support documentation on camera permissions, an app that doesn’t appear in the list hasn’t yet asked macOS for camera access. Open the app once and trigger a video preview, then return to the Camera pane and the app should appear with a toggle next to it.
Already toggled on? Toggle it off, wait five seconds, and turn it back on.
This re-toggle clears a stuck permission state without a restart, which is why it’s worth trying even when the switch already looks enabled.
#Fix 2: Kill the VDCAssistant Process
VDCAssistant is the macOS process that brokers camera hardware access. When it hangs, every camera app sees a black screen. This Terminal command kills the process so macOS spawns a clean copy.
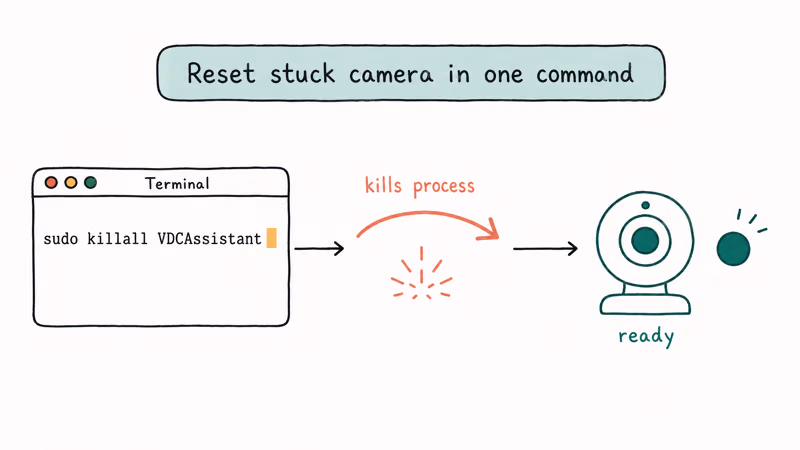
Open Terminal from Applications > Utilities and run:
sudo killall VDCAssistantEnter your admin password and reopen your camera app. The VDCAssistant kill resolves the large majority of stuck-camera incidents, with only the occasional case needing a full reboot, because it forces macOS to spawn a clean copy of the process that brokers camera access. If you also see FaceTime camera issues, the same fix applies.
If that command doesn’t help, run:
sudo killall AppleCameraAssistantA “No matching processes were found” message just means the process was not running. Nothing is broken.
#Fix 3: Quit All Camera-Using Apps
Press Command + Option + Escape to open Force Quit. Force quit FaceTime, Zoom, Google Meet, Microsoft Teams, Skype, OBS, Loom, and any screen recorder you have open. Then open one camera app and confirm it works before you launch a second one.
You can also list every process holding the camera by running this in Terminal:
lsof | grep "AppleCamera"The output gives you the PID of any process that has the camera locked. Kill it with kill <pid> if you don’t want to log out.
#Fix 4: Restart Your Mac
The slowest fix to read about, the fastest one to try. Click the Apple menu and select Restart.
On Apple Silicon Macs (M1, M2, M3, M4), a regular restart is the modern equivalent of an SMC reset. Apple removed the standalone SMC chip from these models, so a clean reboot handles the same low-level resets that an SMC reset used to do on older MacBooks. If your camera also failed after a sleep cycle, restarting almost always clears it.
#Does Updating macOS Fix Camera Problems?
Apple ships camera-related fixes in point releases more often than the headlines suggest. If you are on an older 15.x or 14.x release, updating alone can solve the issue.
Open System Settings, select General, then Software Update, and install whatever Apple offers. According to Apple’s macOS release notes, recent point releases have included camera and FaceTime stability fixes for both Apple Silicon and Intel models. The release notes are the authoritative record, so check yours before you assume your bug is unique.
A macOS update can also clear adjacent issues like a flickering MacBook screen caused by graphics driver bugs.
#Fix 6: Reset SMC and NVRAM (Intel Macs Only)
Skip this section if you have an M1, M2, M3, or M4 Mac. The SMC reset only applies to Intel models.
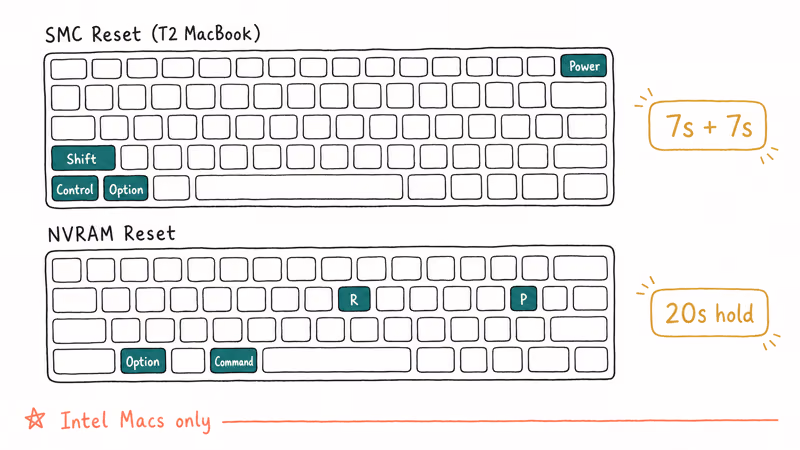
Back up your Mac with Time Machine before either reset. Neither procedure should erase data, but NVRAM stores some user-tweaked settings (display resolution, startup disk, time zone) and you may need to reapply them.
Reset SMC on a T2-equipped MacBook: Shut down. Press and hold Control + Option + Shift on the left side of the keyboard for seven seconds. Keep holding those keys and add the power button for another seven seconds. Release everything, wait five seconds, then power on.
Reset NVRAM: Shut down. Press the power button, then immediately press and hold Command + Option + P + R for about 20 seconds. Release and let the Mac boot.
The SMC controls hardware-level settings including camera power delivery, while NVRAM stores display, audio, and startup parameters. Apple’s SMC reset guide confirms that the 7-second hold cycle resets stuck configurations that can stop the camera from initializing on Intel Macs after a macOS update or an unexpected shutdown.
#Fix 7: Test in a New User Account
A corrupt preference file in your user account can block the camera for one app while the hardware works fine for every other account on the same machine. Creating a temporary user is a non-destructive way to confirm.
Go to System Settings, select Users & Groups, and create a temporary Standard account named something like cameratest. Log out of your main account and into the new one. Open Photo Booth.
If the camera works in the new account, the hardware is fine and a preference file in your main account is the cause. Log back into your main account and open Finder. Press Command + Shift + G and go to ~/Library/Preferences/. Move app-specific files like com.apple.FaceTime.plist or us.zoom.xos.plist to the Trash, then relaunch the app.
Don’t bulk-delete preference files. Move only the ones tied to the broken app, since other plist files store unrelated settings (Dock layout, Finder window state) you don’t want to lose.
#Fix 8: Boot Into Safe Mode
Safe Mode boots macOS without third-party kernel extensions, login items, and most font and system caches. It also runs a basic disk check on the startup volume before letting you log in. If the camera works in Safe Mode but fails in your normal session, the culprit is software you installed yourself.
Apple Silicon Macs: Shut down, then press and hold the power button until you see “Loading startup options.” Select your startup disk, hold Shift, and click “Continue in Safe Mode.”
Intel Macs: Shut down. Turn the Mac on, and immediately press and hold the Shift key. Keep holding it until the login window appears, which typically takes 30 to 60 seconds longer than a normal boot because Safe Mode runs an extra disk check and skips kernel-extension caches.
Open Photo Booth in Safe Mode. If the camera works, a third-party app installed in your normal session is the conflict. The usual suspects are antivirus software with kernel extensions, virtual webcam tools (mmhmm, Snap Camera, OBS Virtual Camera), and screen recorders that ship system extensions. Remove anything you installed in the last month, restart normally, and retest.
#Fix 9: Use an External Webcam
Need a working camera right now? Plug in a USB or USB-C webcam. Most Logitech, Razer, and Anker webcams are class-compliant and need no drivers on macOS.
Connect, open your video app, and select the external camera in the app’s video settings. This doubles as a hardware test. If the external webcam works and the built-in one still fails after the software fixes above, the issue is hardware. If you are also seeing a black screen on your MacBook Pro, the camera and display ribbon cables share a route through the lid hinge, so a recurring lid-related fault can affect both at once.
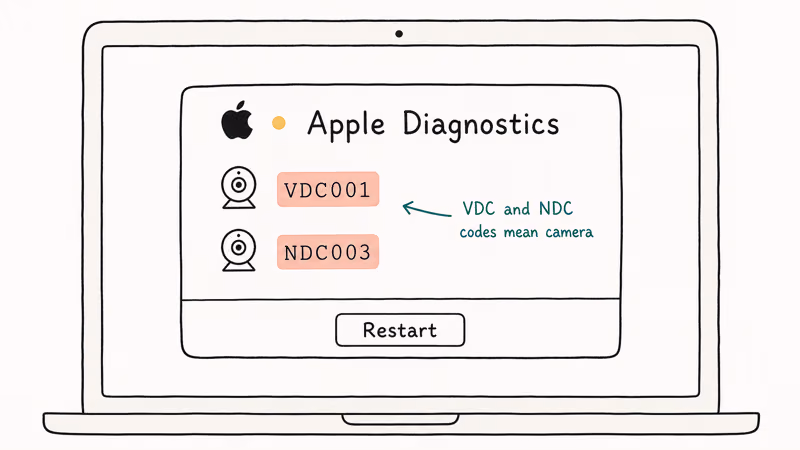
#Fix 10: Run Apple Diagnostics
When every software fix has failed, run Apple Diagnostics before you spend money on a repair. The tool checks the camera module, sensors, and supporting hardware and gives you a reference code that an Apple technician can read.
Apple Silicon Macs: Shut down. Press and hold the power button until “Loading startup options” appears, then press Command + D.
Intel Macs: Shut down completely, then disconnect every external accessory except a wired keyboard and mouse (printers, hubs, dongles, and external displays can throw false negatives). Turn the Mac back on and immediately hold the D key until a language picker screen appears, then release. Apple Diagnostics loads from a recovery partition and runs without a network connection.
The scan takes two to five minutes. Camera-related reference codes start with “VDC” or “NDC.” Write them down before the screen clears. According to Apple’s repair documentation, camera repairs under standard warranty or AppleCare+ are typically covered at no cost, and out-of-warranty MacBook camera replacements involve the entire display assembly because the camera is bonded to the display in modern MacBooks. Capture any codes related to battery health too, since power-delivery faults can show up as camera initialization failures.
#When to Contact Apple Support
Stop the DIY troubleshooting and contact Apple Support when any of these is true:
- Apple Diagnostics returns a VDC- or NDC- prefixed reference code
- The built-in camera fails in Safe Mode, in a fresh user account, and with every camera app
- An external webcam works on the same Mac, but the built-in camera shows a black screen across reboots and macOS reinstalls
- The Mac is under standard warranty or AppleCare+ and the camera failed without obvious physical damage
The MacBook lid is one of the most repair-hostile parts of the machine. Camera modules are bonded to the display, ribbon cables are pinched between hinge and antenna assemblies, and third-party “lid replacement” kits regularly damage the antenna or microphone array. If you have any coverage left, let Apple or an Apple Authorized Service Provider handle the repair. Don’t pry open the lid yourself, and don’t order a generic replacement camera module from a marketplace listing.
If you are out of warranty and the cost estimate is high, an external webcam is a fine long-term workaround. A $40 Logitech C270 outlasts most MacBooks and beats a $400 lid replacement on any cost-per-call math.
#Bottom Line
Start with the camera permission toggle and sudo killall VDCAssistant. Those two fixes take under a minute combined and clear most Mac camera failures.
If the camera still fails after a restart, Safe Mode, and a fresh user account, run Apple Diagnostics. Bring the reference code to Apple Support before authorizing any paid repair, since a MacBook camera replacement means swapping the entire display assembly.
Mac Tips & Tricks
#Frequently Asked Questions
Why does my Mac camera show a green light but no picture?
The green light means the hardware is powered and an app has requested access. A green light with a black image almost always means VDCAssistant is stuck. Run sudo killall VDCAssistant in Terminal, reopen the app, and the picture should return. If the light stays on with no image after the kill, restart the Mac.
Can you use your iPhone as a Mac webcam?
Yes. Apple’s Continuity Camera turns the iPhone into a wireless webcam. You need iOS 16 or later on the iPhone and macOS Ventura or later on the Mac, both signed into the same Apple ID with Bluetooth and Wi-Fi on. Image quality is noticeably better than the built-in MacBook camera because the iPhone uses a much larger rear-camera sensor.
Why does my Mac camera work in Photo Booth but not in Zoom?
Photo Booth has automatic camera access as a built-in Apple app. Third-party apps need explicit permission. Toggle Zoom on under Privacy & Security > Camera, then relaunch.
Does the Mac camera work in Windows via Boot Camp?
On Intel Macs, yes, with Boot Camp drivers installed during setup. Apple Silicon Macs can’t run Boot Camp at all, but Parallels Desktop and VMware Fusion both pass the Mac camera through to a Windows virtual machine.
How do I know if my Mac camera hardware is actually broken?
Run Apple Diagnostics at startup and look for a VDC- or NDC-prefixed reference code. You can also narrow it down without diagnostics: test in Safe Mode, test in a fresh user account, and test with an external webcam. If the built-in camera fails in every scenario and no Apple support article matches your symptoms, contact Apple Support before you authorize a paid repair.
Why does my Mac camera freeze during video calls?
Bandwidth or thermal throttling, not the camera itself. Close extra browser tabs and apps, confirm your upload speed is at least 3 Mbps for HD video, and let the Mac cool down if the bottom of the case is hot.
Can Screen Time settings block the Mac camera?
Yes. Screen Time has a Content & Privacy Restrictions option that can disable the camera at the system level. Go to System Settings, choose Screen Time, then Content & Privacy Restrictions, then App Restrictions, and confirm Camera is set to Allow. This matters most on Macs managed by schools or workplaces that use MDM profiles to enforce restrictions, because the org can lock the toggle on your end.
macOS 27 Golden Gate: Release Date and Compatible Macs
macOS 27 Golden Gate was announced at WWDC 2026. Here is the release date, the Apple Silicon-only compatible Mac list, and every confirmed new feature.
How to Copy and Paste on a Mac: Shortcuts and Fixes
Copy and paste on a Mac with Command-C and Command-V. Learn the cut shortcut, paste without formatting, Universal Clipboard, and fixes when it breaks.
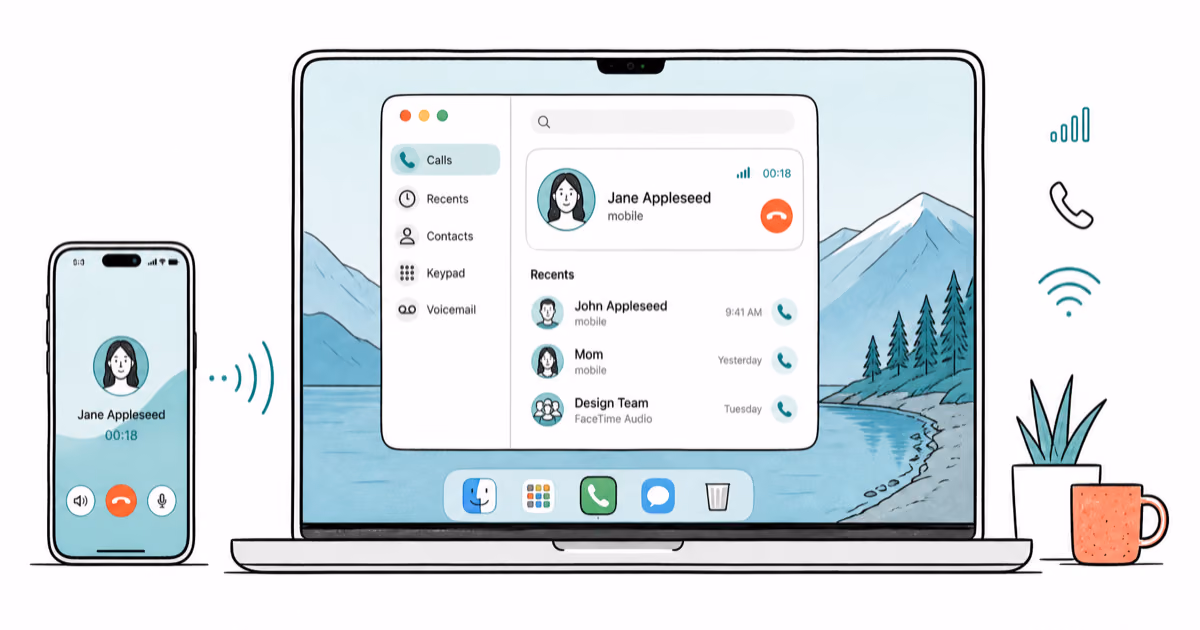
How to Use the Phone App on Mac: macOS Tahoe Setup Guide
Set up the Phone app on macOS Tahoe to relay iPhone cellular calls. Covers requirements, FaceTime setup, Call Screening, and common firewall fixes.
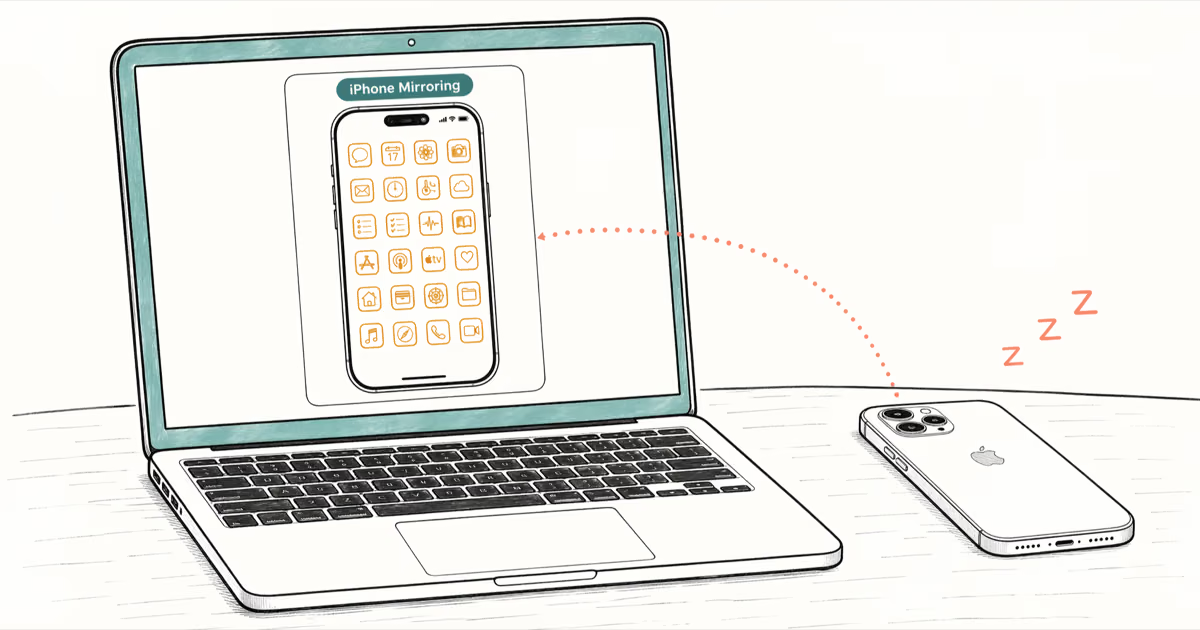
How to Use iPhone Mirroring on Mac: Full 2026 Setup Guide
Set up iPhone Mirroring on macOS Sequoia with iOS 18. Covers hardware requirements, the six common error messages, EU limits, and a shared-Mac privacy fix.