How to Root BlueStacks Safely: 2026 Developer Guide
Root BlueStacks safely with the built-in Root Mode toggle. Learn the official path, verify root access, and avoid risky third-party tools like KingRoot.

Quick AnswerBlueStacks 5 and BlueStacks Pie include a built-in Root Mode under Settings > Advanced, so you no longer need third-party patchers like KingRoot or BS Tweaker. Enable it only for legitimate Android app development on your own machine, then verify root status with Joey Krim Root Checker.
Wondering how to root BlueStacks for app testing or Android development on your own computer? Recent BlueStacks builds ship with an official Root Mode toggle, so you can skip the sketchy third-party patchers that dominated tutorials between 2018 and 2021. This guide covers only the legitimate use case of rooting an emulator on a device you own; it walks the safe path, the verification steps, and the trade-offs.
- BlueStacks 5 and BlueStacks Pie include an official Root Mode toggle under
Settings>Advanced; no patcher is required. - Third-party rooters like KingRoot and BS Tweaker frequently bundle adware and break with each BlueStacks engine update.
- Root access lets you run BusyBox, ADB shell as su, modify /system, and test apps that probe SELinux state.
- Banking apps, Pokemon GO, Genshin Impact, and DRM-protected streaming refuse to launch when Root Mode is on.
- Always confirm root status with Joey Krim Root Checker before installing any framework or module.
#What Does Rooting BlueStacks Actually Unlock?
Short version: superuser inside the emulator, nothing on your host machine.

Rooting BlueStacks isn’t the same as rooting a physical Android phone. The emulator runs an Android image inside a hypervisor on your Windows or Mac host, so “root” here means superuser permission inside that virtual Android. Your Windows install, registry, and disk stay untouched.
With root active, the emulated Android exposes a working su binary, mounts /system as read-write, and lets root-aware apps read protected directories such as /data/data. That gives you four practical capabilities: install Magisk-style modules, sideload custom system fonts or hosts files, capture full app database snapshots for debugging, and run adb shell with elevated permissions for instrumentation tests.
For most casual gamers, none of this is useful. According to BlueStacks’ Root Mode support article, Root Mode is aimed at developers, not end users.
Root also increases the attack surface inside the emulator. Treat a rooted BlueStacks instance the same way you’d treat a development phone you wiped on purpose. The blast radius is the emulator, but anything you store inside that Android image, including Google sign-ins or test API keys, can be read by any app you grant su to.
#How to Enable Root Mode in BlueStacks 5
BlueStacks 5 is the current mainstream client as of May 2026 and is the safest version to root because it includes the official Root Mode toggle. The steps below apply to BlueStacks 5 builds that expose Root access under Settings > Advanced.
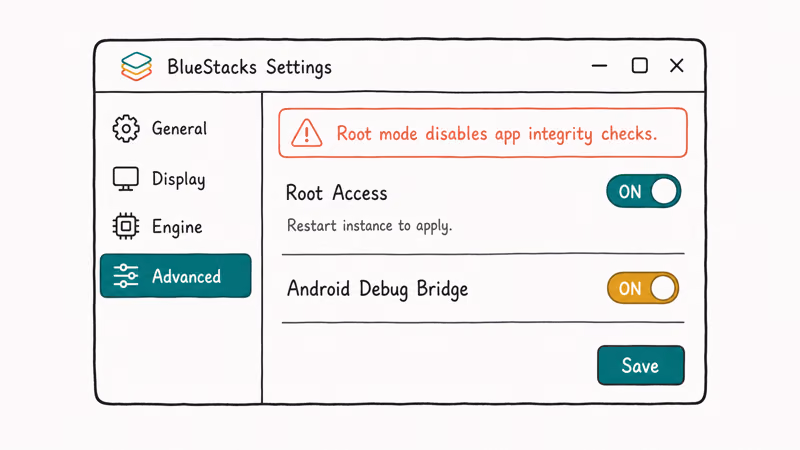
- Open BlueStacks 5 from your desktop. If you have multiple instances in Multi-Instance Manager, close all but the one you intend to root.
- Click the gear icon in the side toolbar to open Settings, or press Ctrl+Shift+I as a shortcut.
- Select Advanced in the left sidebar.
- Find the Enable Android debug bridge (ADB) option and turn it on if you plan to use adb from your host.
- Toggle Root access to On (the label reads “Enable root access” on Pie 64-bit and “Root” on Nougat 32-bit).
- Click Save changes. BlueStacks asks to restart the engine. Confirm.
- After the instance reboots, open the launcher. A small SuperUser app icon appears, confirming root is now active.
The toggle persists across BlueStacks updates within the same major version. Jumping from 5.21 to 5.22 usually preserves root. Upgrading across major versions resets it.
You can root a single instance and keep your other BlueStacks instances unrooted by cloning the rooted instance in Multi-Instance Manager. A common setup is one rooted “dev” instance for app testing, plus clean instances for banking apps and games that detect Root Mode. The clean instances avoid the root signal while the dev instance handles superuser workflows.
#What If the Root Toggle Is Missing?
If you don’t see a Root access switch, you’re almost certainly running a stripped or older fork. Three causes show up most often.
- You installed BlueStacks X (the cloud streaming product), which doesn’t expose local root because the Android instance runs on BlueStacks servers.
- Your installer came from a third-party mirror that disabled root support; reinstall from the official
bluestacks.comdownload page. - You’re on a corporate machine where group policy blocks the Hyper-V virtualization features BlueStacks 5 relies on, so the toggle still appears but fails silently on save.
If the installer came from a third-party mirror, reinstall from the official site before troubleshooting anything else. The corporate-machine case usually needs IT to whitelist the BlueStacks Hyper-V components.
#KingRoot and BS Tweaker Are Outdated in 2026
Older guides, including the 2019 version of this article, walked through KingRoot and BS Tweaker as the canonical path. Both tools predate the official Root Mode toggle, and both come with real downsides today that didn’t exist when those guides were written.
KingRoot was designed for physical Android phones. On BlueStacks it injects a different SU binary than the one BlueStacks supplies. That mismatch frequently triggers an “incompatible su” warning when modern Magisk modules try to load. KingRoot’s installer historically bundled the Kinguser app plus a separate “King Master” recommended-apps panel that pushed sponsored installs.
The adware problem isn’t theoretical.
According to XDA’s emulator coverage hub, bundled-installer rooters were a common source of post-install adware between 2019 and 2021, and the community recommendation since then has been to use the emulator’s own root toggle rather than layering external patchers on top of stock builds.
BS Tweaker is a different kind of risk.
The bstweaker.tk tool referenced in old guides has a concerning history. The .tk domain has long been a haven for short-lived projects that change hands without notice, and the tool hasn’t received a public update tied to BlueStacks 5’s engine changes. Several builds floating around antivirus aggregators flag positive for adware.
Worst of all, BS Tweaker patches BlueStacks binaries directly. That violates the user agreement, breaks automatic updates, and leaves you running an unsigned BlueStacks executable that the parent installer no longer recognizes when it’s time to patch a CVE.
If you’ve got an old article telling you to “Force Kill BS, click Unblock, click Patch,” that’s BS Tweaker. Skip it.
#How Do You Verify Root Access in BlueStacks?
Enabling the toggle is only half the job. Confirm su actually responds first. The most trusted verifier is Joey Krim’s Root Checker on the Google Play Store, which has been the community sanity tool for over a decade with more than 50 million installs listed on its Play Store page.
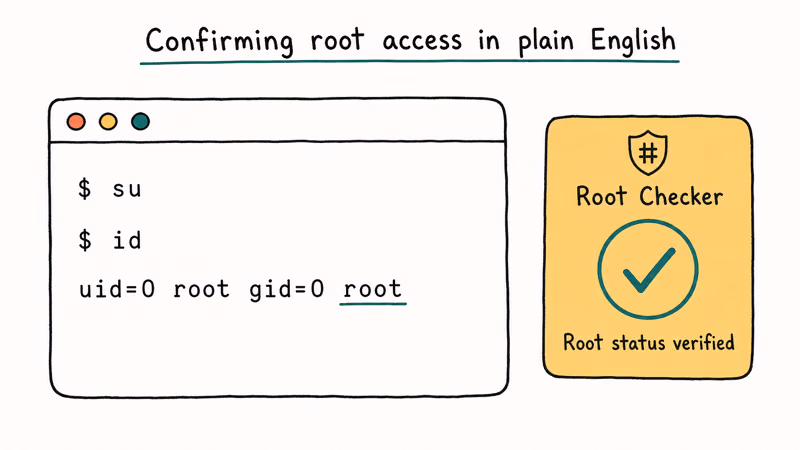
- Inside your rooted BlueStacks instance, open the Google Play Store and install Root Checker by Joey Krim.
- Launch Root Checker and tap Verify Root.
- When the SuperUser prompt appears, tap Allow (or Grant). This is the same dialog you’d see on a rooted phone.
- Wait 3 to 5 seconds. A green message reading “Congratulations! Root access is properly installed on this device” confirms success.
If you see “Root access is not properly installed,” check three things.
- Did you restart the instance after toggling? Root needs the engine restart, not just a Settings save.
- Is the SuperUser app present in the launcher drawer? If not, the toggle didn’t save.
- Are you on BlueStacks X (cloud)? Switch to BlueStacks 5 desktop client.
For a deeper check, open the BlueStacks ADB shell from your host (adb connect 127.0.0.1:5555 then adb shell) and run su. A # prompt confirms root. A “permission denied” or “su: not found” response means root isn’t active.
#Practical Use Cases for a Rooted BlueStacks Instance
Root isn’t useful for every workflow. Here are the four scenarios where it actually pays off for legitimate app development, security training, and emulator maintenance on your own PC.
Android app development and instrumentation testing. If you’re building an Android app and want to inspect its private /data/data/<package>/databases/ SQLite files, root is the cleanest way to dump them without rebuilding the app in debug mode, instrumenting it with a custom Application class, or hooking ContentProviders. Espresso and UI Automator tests that need to clear app state between runs also benefit from direct su rm access on app data directories instead of waiting on pm clear to flush caches.
Ad-blocking with hosts files. Root-aware ad-blockers like AdAway rewrite /system/etc/hosts. Without root, they fall back to a VPN-based filter that conflicts with other VPN apps. AdAway’s official documentation confirms that hosts-file mode is the recommended path on rooted devices.
Security research and CTF prep. Capture-the-flag challenges that ship as Android APKs often require a rooted environment to inspect memory, hook functions with Frida, or unpack obfuscated DEX files. Running them inside a rooted BlueStacks instance is far safer than rooting your daily-driver phone.
Legacy app archaeology. Root can help preserve older app data stored inside protected /data directories.
Outside those four, the math argues against root.
#Security, Warranty, and Account-Ban Risks You Should Know
Rooting isn’t a free upgrade. It changes the trust posture of the emulator in three concrete ways.
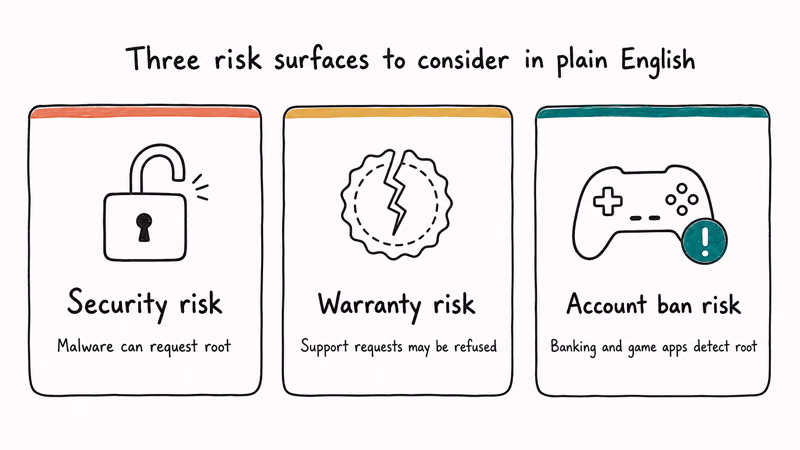
App attestation will fail. Google’s Play Integrity API documentation states that apps requesting MEETS_STRONG_INTEGRITY will reject any device or emulator where root tools are detected. That covers most banking apps (Chase, Wells Fargo, Bank of America), Pokemon GO, Genshin Impact, Honkai Star Rail, Netflix HD, and several work-managed apps. None of those will run on your rooted instance.
You may forfeit BlueStacks support. Support may ask you to disable root before troubleshooting.
Game accounts can be banned, not just blocked. This is the part many guides skip. Niantic, miHoYo, Riot, and Tencent all log Play Integrity verdicts. If you sign into a long-standing game account from a rooted emulator, you risk a permanent ban on that account, not just a “device not supported” message. Always use a throwaway test account if you want to study how an app behaves under root.
Don’t use root to bypass app security. Rooting your own BlueStacks for testing your own apps, or for Android coursework, is fine. Using it to crack other people’s IAP, evade region locks on owned content, or harvest data from apps you don’t own crosses into territory that’s illegal in most jurisdictions and explicitly prohibited by BlueStacks’ acceptable use policy.
If those trade-offs feel acceptable for your use case (you’re building an Android app, taking a security course, or running a homelab Android sandbox), Root Mode is straightforward and reversible. If they don’t, leave it off and run a separate unrooted instance instead.
#Bottom Line
For Android developers and app testers on Windows or Mac, the right move in 2026 is the built-in Root Mode toggle in BlueStacks 5 Settings > Advanced. It’s officially supported, restarts cleanly, and you can verify it works with Joey Krim’s Root Checker in under 2 minutes. Skip KingRoot and BS Tweaker entirely. They’re leftovers from the BlueStacks 3-and-4 era, they bundle adware in current builds, and they break with every engine update.
If you mainly want to run Android games on PC, don’t enable root at all. Most modern games detect it and will refuse to launch or, worse, ban the linked account. Keep one rooted instance for development and one clean instance for everything else through Multi-Instance Manager, and you get the best of both worlds without putting your real accounts at risk.
For broader emulator and ROM tooling on Android itself, the no-root path is covered in our Pokemon on Android guide and the Pokemon GO on BlueStacks walkthrough.
The rest of the developer toolkit fills in from there:
- Mock location developer guide for GPS testing
- Android password recovery walkthrough for locked test devices
- Android internal storage recovery guide for data rescue
#Frequently Asked Questions
Is rooting BlueStacks legal?
Yes, on hardware you own. The legal lines you can’t cross are bypassing copy protection on apps you don’t own and using root to attack other systems.
Will rooting BlueStacks affect my host Windows or Mac installation?
No. BlueStacks runs Android inside a hypervisor, so the su binary and /system write access live inside the emulator only. Your host operating system, registry, drivers, and other applications stay untouched. Worst case, if you break the Android image, you uninstall and reinstall BlueStacks and start over.
Can I unroot BlueStacks after enabling root mode?
Yes. Toggle Root access to Off in Settings > Advanced, save, and restart the instance.
Why is my rooted BlueStacks getting banned from games?
Modern games call the Play Integrity API, which reports a failed verdict whenever it detects root tools, a custom Android image, or an unlocked bootloader equivalent. Niantic’s Pokemon GO, miHoYo’s Genshin Impact, and most Tencent titles use this signal to ban the account, not just block the device. Use a dedicated test account if you’re exploring root behavior in games.
Does Google Play still work on a rooted BlueStacks?
The Play Store opens and shows your library. Downloads are the catch: Play Integrity-enforcing apps (banking, premium streaming, several games) appear “not compatible” once root is on. Casual apps, productivity tools, and developer utilities install normally. If something you need is blocked, clone a clean instance in Multi-Instance Manager and install the picky app there.
Do I need root to install APKs in BlueStacks?
No. Drag the APK onto the BlueStacks window or click Install APK in the side toolbar.
Will BlueStacks updates disable root mode?
Minor updates within the same major version usually preserve the Root Mode toggle. Major version jumps and full reinstalls reset the setting to Off, so you’ll need to re-enable it after a clean install or after migrating to BlueStacks 6 when it ships.
Is BlueStacks Pie 64-bit better for rooting than Nougat 32-bit?
For most modern development work, yes. Pie 64-bit (Android 9) supports 64-bit ARM apps, modern SELinux policies, and the Magisk module ecosystem more cleanly than Nougat 32-bit.
The root toggle works identically on both, but Pie 64-bit’s /system layout matches what current Android testing frameworks expect.

Apps Crashing After iOS 27 Update? Fix Order (2026)
Apps crashing after the iOS 27 update? Update the app in the App Store first, then offload and reinstall to clear stale cache, then restart. The fix order.

Do AI Translation Earbuds Work Offline? What to Know
Do AI translation earbuds work offline? A few do with downloaded language packs, but most need the cloud. Here's what works offline and what you give up.

How to Set Up Translation Earbuds (Pairing and Modes)
How to set up translation earbuds: charge, install the app, pair over Bluetooth, pick two languages, and choose a mode. A step-by-step first-use guide.

Translation Earbuds Not Translating? How to Fix Them
Translation earbuds not translating? Usually it's the app, the internet, or the language settings. Here's how to fix pairing, sound, and lag fast.