How to Overlay Videos: Picture-in-Picture Guide for 2026
Learn how to overlay videos in iMovie, Filmora, DaVinci Resolve, and CapCut. Picture-in-picture steps for Mac, Windows, and iPhone editors in 2026.

Quick AnswerTo overlay videos, drop a second clip on top of your main clip in your editor timeline, then switch the upper clip to Picture-in-Picture so it floats over the base video. iMovie, Filmora, DaVinci Resolve, and CapCut all expose this control in their overlay or compositing panel.
Learning how to overlay videos comes down to one habit: stack a second clip above your main clip and switch it to picture-in-picture. This guide shows the fastest path in Filmora, DaVinci Resolve, iMovie, and CapCut.
- Every overlay starts the same way: drop the second clip on a track above your main video, then pick Picture-in-Picture from the overlay settings
- Filmora supports up to 100 video tracks, so you can stack a webcam feed, a logo, and B-roll in one timeline
- DaVinci Resolve 19 keeps overlay editing free in the Edit page using Transform controls in the Inspector
- iMovie on iPhone and iPad limits you to one picture-in-picture layer per clip, while Mac iMovie allows multiple stacked overlays
- A subtle overlay usually sits at 30 to 50 percent opacity, while logos and webcam feeds tend to look balanced at 25 percent of the frame width
#What Does Overlaying a Video Actually Mean?
Overlaying means placing one video clip on top of another so both play at the same time, with the upper clip taking only part of the frame. The classic example is a streamer’s webcam in the corner of gameplay footage. Reaction videos, software tutorials, and split-screen interviews all use the same trick.
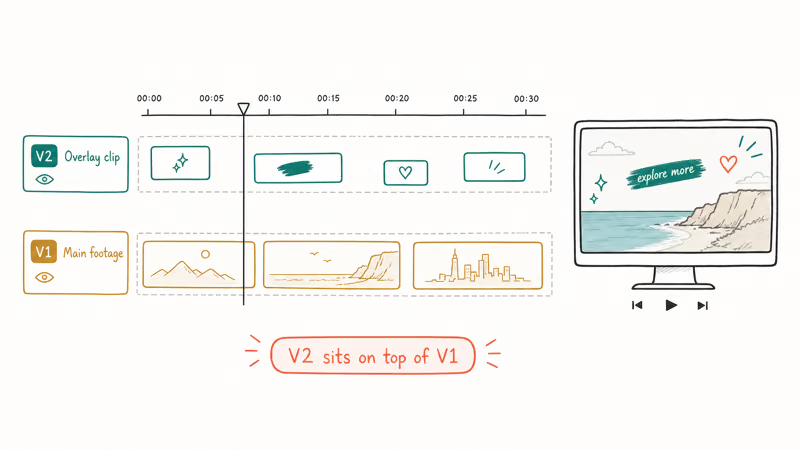
Editors call this picture-in-picture, or PiP for short. The base clip sits on the main track and the overlay sits on a higher track. You then resize the overlay, slide it into a corner, and let the rest of the frame show the base video underneath. Some editors also offer side-by-side or split-screen layouts that work the same way mechanically.
The technique is straightforward in any modern editor. The differences come down to where each app hides the picture-in-picture toggle and how much control you get over masks, opacity, and motion.
#How to Overlay Videos in Filmora
Filmora has the friendliest overlay workflow for beginners. The timeline supports stacked tracks by default, and the Picture-in-Picture switch lives one click away.
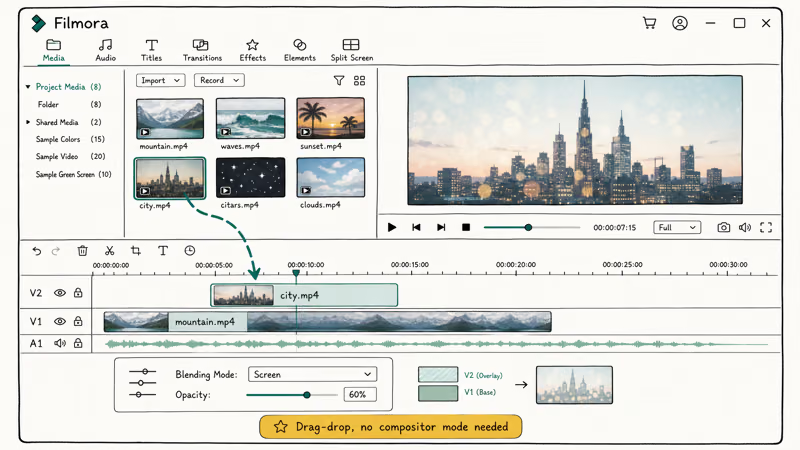
- Open Filmora and create a new 16 project.
- Drag your base clip onto Video Track 1.
- Drag the overlay clip onto Video Track 2, directly above the base.
- Double-click the overlay clip. The Inspector opens on the right.
- Under Basic, adjust Scale, Position, and Opacity until the overlay sits where you want it.
- To round the corners or apply a shape, open the Mask tab and choose a preset.
- Export with the Export button, then pick MP4 H.264 at the same resolution as your base clip.
A 1080p overlay sized to 25 percent of the frame adds little overhead and renders at roughly the same speed as the base clip alone. According to Wondershare’s Filmora help center, the editor supports up to 100 video tracks, which is more than enough for layered tutorials or multi-camera vlogs. If your export still carries a watermark, the Filmora watermark removal guide covers every legitimate fix.
#Add Motion to a Filmora Overlay
Filmora’s Animation panel turns a static overlay into a moving element. Click the overlay, open the Animation tab, and double-click a preset like Slide In Left or Zoom In. Keyframes appear on the timeline automatically.
You can drag those keyframes to retime the move or right-click to delete one. A common use is a webcam intro that slides in during the first three seconds, then parks in the bottom-right corner for the rest of the clip.
#How to Overlay Videos in DaVinci Resolve
DaVinci Resolve is the strongest free option for compositing. The Edit page handles basic overlays, and the Fusion page handles anything advanced.
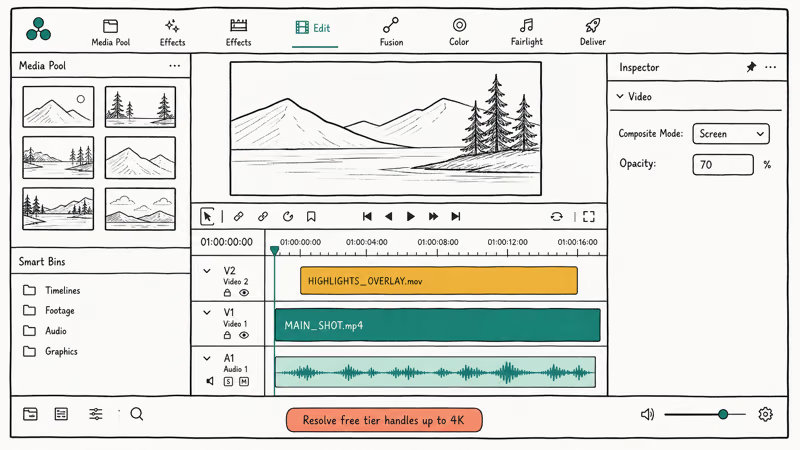
- Open Resolve and import your clips into the Media Pool.
- Drag your base clip to Video 1 on the timeline.
- Drag your overlay clip to Video 2, lined up where you want it to appear.
- Click the overlay clip, then open the Inspector and find the Transform section.
- Set Zoom X and Y to 0.25 for a quarter-frame overlay.
- Adjust Position X and Position Y to slide the overlay into a corner.
- Drop the Opacity slider if you want the base video to show through.
- Export from the Deliver page using the YouTube 1080p preset or your own settings.
Blackmagic’s official DaVinci Resolve page confirms that the free version handles up to 4K 60fps timelines with the same overlay tools the paid Studio version uses. On a typical 16 GB laptop, an 8 minute timeline with three stacked overlays plays back smoothly at half resolution preview. If you also need to slow your overlay down, the DaVinci Resolve speed-up guide covers retiming.
#Keyframe a Resolve Overlay for Movement
Pop open the Inspector and click the small diamond next to Position X or Position Y. That sets a keyframe. Move the playhead, change the value, and Resolve adds a second keyframe automatically.
The overlay now slides between the two points across that time range. You can do the same for Zoom and Opacity, and right-click any keyframe to delete it or change its interpolation.
#How to Overlay Videos in iMovie on Mac and iPhone
iMovie ships free with every Mac, iPhone, and iPad. The trade-off is that you only get one overlay layer per clip.
On Mac, drop your overlay clip on top of the base clip in the timeline. Click the Video Overlay Settings button above the viewer and choose Picture in Picture. Drag the green corners in the viewer to resize, then drag the center to reposition. According to Apple’s iMovie support guide, the same panel also offers Side by Side, Cutaway, and Green Screen modes.
On iPhone or iPad, tap the plus icon, pick your overlay clip, and tap the three dots. Choose Picture in Picture from the popup, then drag the floating clip in the preview to position it. The mobile version is more limited than Mac, but it works for quick edits.
For a deeper walkthrough, the iMovie picture-in-picture guide covers both flows in detail. If you want a split-screen layout instead of true PiP, see how to put multiple videos on one screen in iMovie.
#How to Overlay Videos in CapCut
CapCut runs free on phones, tablets, and now Windows and Mac desktops, which makes it the simplest mobile option.
- Open a new project and import both clips.
- Tap the base clip on the timeline.
- Tap Overlay at the bottom toolbar, then Add Overlay, and pick your second clip.
- The overlay appears as a floating layer. Pinch to resize and drag to reposition.
- Tap Animation to apply a slide-in or zoom-in preset.
- Tap Opacity to dim the overlay if needed.
- Tap the export arrow in the top-right and choose 1080p 30fps for the smallest file size.
CapCut’s mobile app lets you stack multiple overlays on top of the base clip, which iMovie iOS does not allow. The desktop version follows the same overlay panel. If you want the CapCut desktop app, the CapCut for PC guide covers the official download and setup.
#Which Overlay Effects Look Best for Your Style?
A clean overlay does one of two things: it adds information without covering the main subject, or it sets a mood without distracting from the story. The most useful effects fall into three buckets.
Functional overlays carry information. A webcam feed in the corner, a logo bug in the lower-right, a chyron with your name, or a countdown timer for a sale all fall here. Keep these around 20 to 25 percent of the frame width. Reach for them when you’re making tutorials, gameplay videos, or product reviews.
Mood overlays change the feel of the base clip. Film grain at 30 to 40 percent opacity adds texture, a subtle light leak warms up a flat clip, and VHS distortion sells a retro look. Smoke or particle layers make the frame feel cinematic. These belong in music videos, travel reels, and wedding edits.
Animated overlays add motion graphics. Lower thirds slide in to introduce a speaker, glitch transitions cut between scenes, and confetti or sparkle layers celebrate a moment. Use these sparingly because they age fast.
Adobe’s Premiere Pro overlay tutorials recommend keeping mood overlays under 50 percent opacity so the base clip stays readable. That ceiling holds up well in practice. Anything denser starts to look like a filter pile and competes with the story.
#Mistakes That Ruin a Good Overlay
The same problems keep showing up in amateur overlay edits.
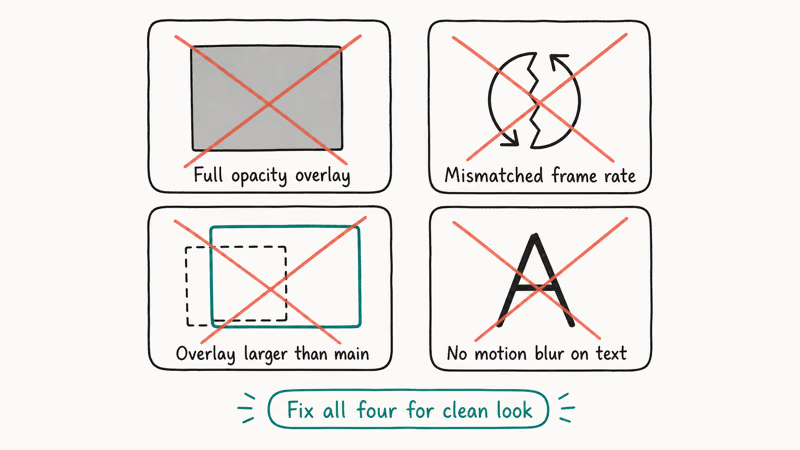
- The overlay covers a face or a key action on the base clip. Always check the base layer before you commit a position.
- The overlay is too big. Webcam feeds at 40 percent of the frame eat up real estate that should belong to the gameplay or screen capture.
- The overlay is too bright. A 100 percent opacity light leak burns out the base clip. Drop it to 30 to 40 percent and watch the change.
- The overlay drifts off-brand. A grunge texture on a corporate explainer feels wrong. Match the effect to the genre.
- The overlay has no audio plan. If your overlay is a video with sound, mute it or duck its audio so the base track stays the lead.
Fixing these four habits gets the look right faster than buying more overlay packs. If you’re hunting for a free editor without watermarks first, the free video editing software roundup compares the strongest free options.
#Bottom Line
Start with Filmora on Windows and DaVinci Resolve if you want the strongest free editor on either platform. iMovie is the right pick when you already own a Mac and need one overlay layer for a quick edit, while CapCut wins on mobile. The workflow is the same in all four: second clip on a higher track, switch to Picture-in-Picture, resize, then export. Keep mood overlays under 50 percent opacity.
#Frequently Asked Questions
Can you overlay videos for free?
Yes. DaVinci Resolve, iMovie, and CapCut all let you overlay videos for free with no watermark, while Filmora watermarks every export until you buy a license.
How many video overlays can you stack at once?
It depends on the editor and your hardware. iMovie on iPhone caps you at one overlay per clip, while Filmora has the highest documented limit at 100 video tracks. DaVinci Resolve and CapCut sit in between, with practical ceilings set by your computer’s RAM rather than a hard software cap. A midrange laptop can usually stay responsive with six stacked 1080p overlays.
Why does my overlay look pixelated after export?
Resolution mismatch is the usual cause. If your overlay is 720p and your base clip is 4K, the editor scales the overlay up and softens it. Match resolutions where you can.
Can you overlay a video on a photo?
Drag your photo to the main track and your video to a track above it, then resize the video so the photo shows around it. The steps are the same as a video-on-video overlay.
What’s the difference between picture-in-picture and split screen?
Picture-in-picture floats a smaller overlay over a full-size base clip, so the base stays visible behind the overlay layer. Split screen divides the frame into equal halves or quadrants, with each clip taking a fixed region and no overlap. Both start the same way: stack clips on different tracks, then tell the editor which mode to use. You can even chain the two, opening on split screen and switching to picture-in-picture after.
Do you need a powerful computer to edit overlays?
Not for two or three overlay tracks at 1080p. Any laptop sold in the last five years can handle that. You start needing more horsepower when you stack five or more 4K overlays. We recommend at least 16 GB of RAM and an SSD for smooth 4K work.
Can you overlay videos on YouTube or TikTok directly?
YouTube Shorts and TikTok have basic overlay tools, but they only support one layer with limited resize options. Edit in CapCut or Filmora first for anything more polished, then upload the final file.
Should you use a free or paid editor to overlay videos?
The free editors are enough for one-off projects. Pay for Filmora or Premiere Pro only when you need faster rendering, recurring overlay templates, or commercial-friendly stock effects.
Google Messages Error 3100: Why RCS Is Broken on Galaxy
Google Messages RCS error 3100 hits Galaxy owners after phone or carrier switches. Google told 9to5Google a fix is coming. Here's what actually helps.

Is This Bank App Real? Spot a Fake App on Your Home Screen
A bank app can land on your home screen from a web page with no install warning. Learn the checks that tell a real banking app from a phishing web app.
Apps Crashing After iOS 27 Update? Fix Order (2026)
Apps crashing after the iOS 27 update? Update the app in the App Store first, then offload and reinstall to clear stale cache, then restart. The fix order.

Do AI Translation Earbuds Work Offline? What to Know
Do AI translation earbuds work offline? A few do with downloaded language packs, but most need the cloud. Here's what works offline and what you give up.