How to Add Picture in Picture in iMovie: Mac and iPhone
Add Picture in Picture in iMovie on Mac and iPhone with our step-by-step guide. Covers both flows in iMovie 10.4 and explains when Filmora is faster.
Quick AnswerIn iMovie on Mac, drag a second clip on top of your main clip in the timeline, click the Video Overlay Settings icon above the viewer, and choose Picture in Picture from the dropdown. On iPhone or iPad, tap the plus button, choose your clip, tap the three dots, and pick Picture in Picture.
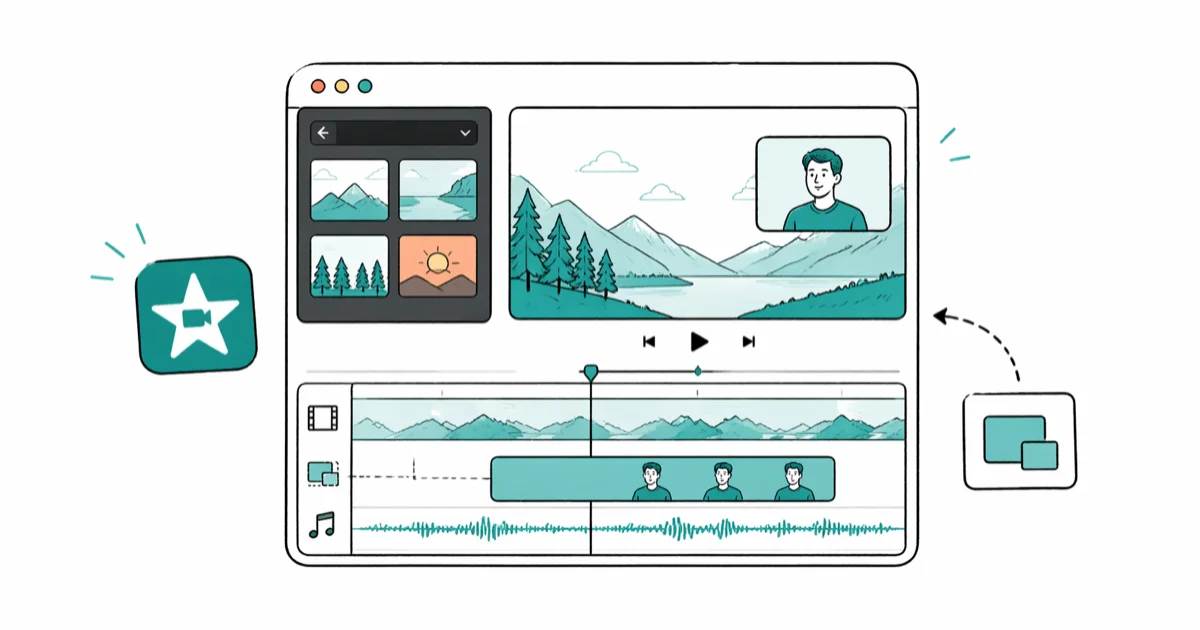
Picture in Picture in iMovie places a second video on top of your main clip, sized small and parked in any corner. The workflow exists in both iMovie for Mac and iMovie for iPhone, but the Mac version has a real PiP toggle while the iPhone version hides it under the three-dots menu.
- iMovie supports true Picture in Picture only when you drop a second clip on top of the main timeline track and pick the PiP overlay style
- On Mac, the Video Overlay Settings icon above the viewer is the only place to switch a clip to PiP, Cutaway, Side by Side, or Green Screen
- The iPhone and iPad version added PiP back in iMovie 2.2.4, accessed through the three-dots menu after you tap the overlay clip
- iMovie caps overlays at one PiP layer per clip, so combining a logo, a webcam feed, and B-roll needs a different editor like Filmora
- Picture in Picture inside iMovie is free, but exporting at high resolutions like 4K is more demanding and runs more reliably on a Mac with more RAM
#Adding Picture in Picture in iMovie on Mac
Three real steps. That’s it once both clips are in your project.
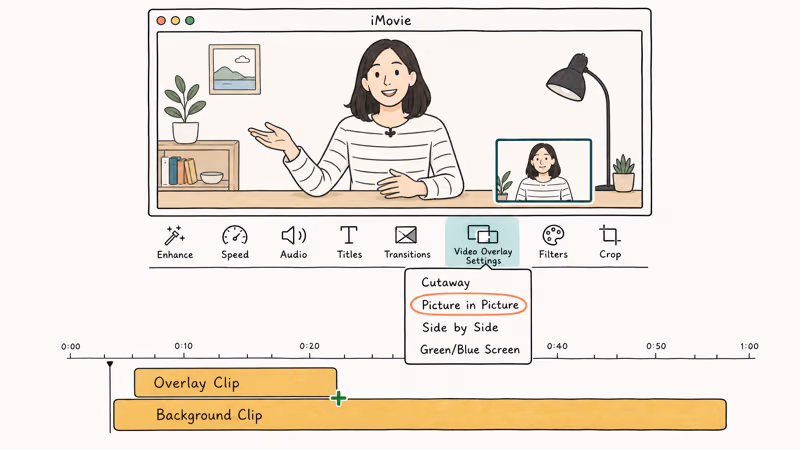
Open iMovie, create a new movie, and import the background clip and the overlay clip into the same event. Drag the background clip down to the timeline first, then drag the overlay clip directly on top of the background clip in the timeline. A green plus icon appears when iMovie is ready to accept the overlay.
According to Apple’s iMovie for Mac user guide, the overlay defaults to the Cutaway style, which replaces the main video. To switch it to PiP, click the overlay clip in the timeline so it gets a yellow border, then click the Video Overlay Settings icon above the viewer. The icon looks like two overlapping rectangles. The dropdown lists four overlay styles iMovie supports for any clip stacked above the main track.
Pick Picture in Picture from the dropdown.
Drag the small inset window in the viewer to position it. Pull a corner to resize. The default border is a thin white line, but the same dropdown lets you set border width, color, and a shadow. A custom border on a 1080p timeline stays crisp through export.
#What if the Video Overlay Settings Icon Is Missing?
If the overlapping-rectangles icon does not show up above the viewer, the overlay clip is not selected. Click once on the overlay in the timeline. The icon row only refreshes when iMovie has a clip in focus. The icon can also disappear after a window resize, and a quick Window > Zoom brings it back.
#Adding Picture in Picture in iMovie on iPhone or iPad
The mobile flow lives behind a less obvious menu.
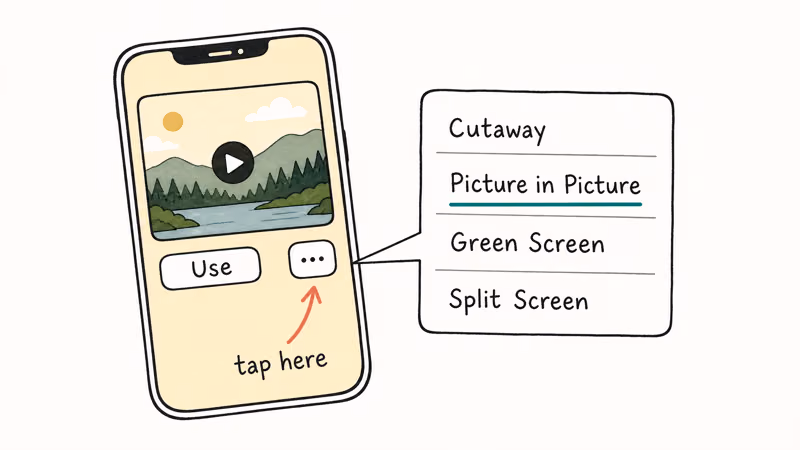
Open the iMovie app, tap Start New Project, and choose Movie. Select your main clip and tap Create Movie, and the clip drops onto the timeline as your main video.
Now tap the plus icon on the left side of the timeline and choose the second clip from your library. Before you tap Use, tap the three-dot icon at the bottom of the preview, and a list appears. Pick Picture in Picture.
The clip lands on a second timeline track above your main clip, already styled as a corner inset. Pinch in the viewer to resize. Drag it to any corner.
iMovie for iOS hides the border controls that the Mac version exposes, so you get the default thin white border with no thickness or color choice. Apple’s iMovie for iPhone documentation confirms that the same three-dots menu is where Cutaway, Picture in Picture, Green Screen, and Split Screen all live in the iOS app.
One more iOS-specific gotcha worth flagging.
On iPhone, the three-dots menu is easy to miss the first time because it sits below the preview thumbnail rather than above. If you tap Use by accident, the clip lands as a regular insert and you have to delete it and start the overlay step again.
#Picture in Picture vs Other iMovie Overlay Styles
iMovie ships four overlay styles in the same Video Overlay Settings dropdown.
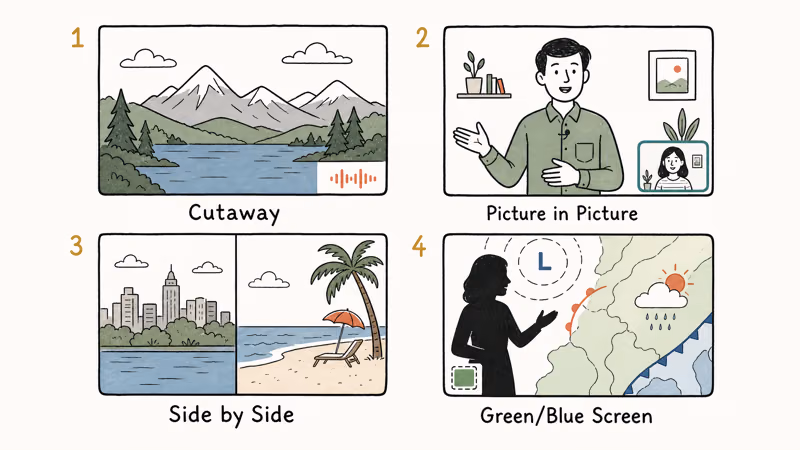
Cutaway, Picture in Picture, Side by Side, and Green/Blue Screen. Cutaway replaces the main clip’s video while keeping the main clip’s audio, which is useful for B-roll inserts during a voiceover. Picture in Picture parks a small inset on top of the main clip and keeps both clips visible at once.
Side by Side puts two clips next to each other at half-width, the format you see in reaction videos and split-screen interviews. Green Screen and Blue Screen key out a chroma background and composite the foreground onto the main clip, which works well for weather-map style backgrounds, news anchor inserts, gaming streamer face-cams over gameplay footage, and anything else where the foreground subject was originally shot against a solid green or blue cloth.
If you started with a Cutaway by accident, click the inset clip and pick Picture in Picture from the same dropdown. The clip restyles in place without losing trim points or color edits.
#What Are the Limits of Picture in Picture in iMovie?
iMovie’s PiP works for one inset at a time. That’s the headline limit.
You can’t stack a webcam feed, a logo, and a chart in the same frame with the built-in tools. The closest workaround is exporting your first PiP edit as an MP4, re-importing that file as a new background clip, and adding a second overlay on top, which is messy and lossy.
The mobile version has tighter limits than the Mac version. iOS iMovie does not let you change border width, border color, or shadow, and it does not support the keyframe-based motion that Mac iMovie offers through the inspector. If you need a moving inset (corner-to-corner during a 30-second segment), you have to do that work on a Mac.
Two upgrades cover that gap.
Filmora and DaVinci Resolve both have unlimited PiP layers and frame-by-frame keyframing. The broader Filmora flow is covered in our overlay video guide, and DaVinci Resolve handles up to 16 video tracks with full motion controls in its free tier.
#When Should You Choose a Different Editor?
Reach for a different tool when you need any of these:
- More than one PiP overlay on screen at the same time
- A moving inset that animates from one corner to another
- Custom border shapes, drop shadows beyond iMovie’s preset, or rounded corners
- Cross-platform export with the same project on Windows and Mac
Filmora is the most common upgrade for iMovie users because the UI is similar enough to feel familiar. Wondershare Filmora supports up to 100 video tracks and lets you keyframe position, scale, opacity, and rotation on every PiP clip. It runs on both macOS and Windows, which solves the cross-platform gap iMovie leaves open.
Some links on this page are affiliate links, which means fone.tips may earn a commission at no extra cost to you.
#What if iMovie Crashes or the Overlay Won’t Appear?
A small but real cluster of PiP issues comes down to clip codecs and project settings. iMovie expects H.264 or HEVC source files. A clip in a raw 10-bit format like XAVC-S can refuse to display as PiP even when it plays fine as the main background. Re-encoding to H.264 in HandBrake fixes it.
If the overlay shows up but the export fails, check the iMovie project resolution. Forcing a 4K project from 1080p source clips can trigger a render error on Macs with under 8 GB of RAM. Apple’s iMovie product page states that iMovie 10.4 needs macOS 13.5 Ventura or later and at least 4 GB of RAM, and in practice 16 GB makes 4K PiP exports noticeably faster than 8 GB on the same chip.
For deeper crash issues, our iMovie problems and solutions guide walks through the most common errors. If audio is the bigger problem, the iMovie audio fade tutorial covers the related fix path.
#When Filmora Beats iMovie for Picture in Picture
Filmora has a few real wins over iMovie for PiP work. The interface puts a dedicated Effects > Utility > Picture in Picture preset in the sidebar, which one-click applies a styled inset with shadow and border. iMovie hides PiP under a viewer dropdown that beginners often miss in the first session.
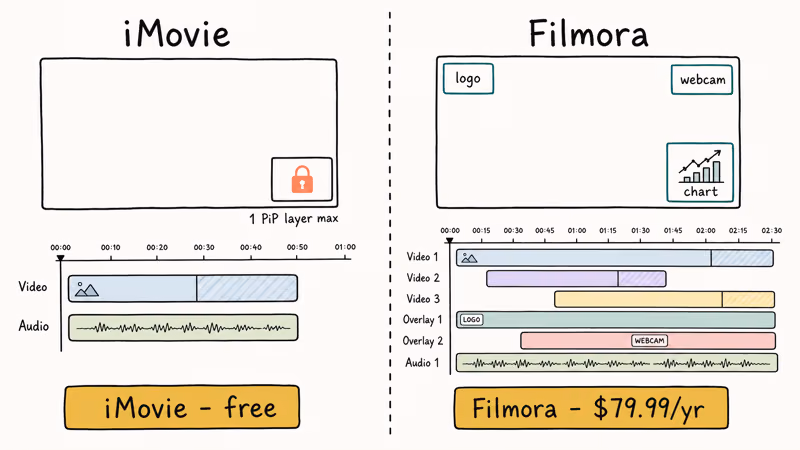
Filmora supports unlimited PiP layers on a single timeline.
Drop a webcam feed in the bottom-right, a logo in the top-left, and a chart in the top-right, all at once. iMovie caps at one inset per main clip. For tutorial creators and gameplay streamers, that single-layer cap is the actual blocker rather than any quality issue.
Cross-platform export is the third real difference. Filmora project files open on both macOS and Windows from the same .wfp file. iMovie projects stay locked to the Mac side because the iOS and macOS versions use different bundle structures and don’t share project files cleanly.
#What Filmora Costs vs Free iMovie
iMovie is free with any Mac, iPhone, or iPad. Filmora’s free tier exports with a watermark, and the paid tier runs $79.99 per year on the cross-platform plan as listed on Filmora’s pricing page. For occasional creators making 1-2 videos a month, iMovie is enough. For weekly content with multiple PiP overlays, the paid Filmora tier pays back in time saved within a month.
#Bottom Line
If you have a Mac and need exactly one PiP inset, iMovie does the job in three clicks once you know where the Video Overlay Settings dropdown lives. Pick that route first.
If you need multiple PiP overlays, animated insets, or a Windows-Mac project handoff, Wondershare Filmora is the cleanest upgrade with a familiar UI and a one-click PiP preset. Stick with iMovie if you only need one inset and your project lives entirely on Apple hardware.
#Frequently Asked Questions
Why is the Picture in Picture option missing in my iMovie?
The PiP option only appears after you click on the overlay clip in the timeline. If no clip is selected, the Video Overlay Settings icon disappears from the row above the viewer. Click once on the overlay clip so it gets a yellow border, then look for the two-overlapping-rectangles icon. Apple updated the icon position in iMovie 10.3, so older tutorials may show it in a different spot than your current version does.
Can I add multiple Picture in Picture overlays in iMovie?
No. iMovie supports only one PiP inset per main clip on the timeline. To stack a logo, a webcam, and B-roll in the same frame, export your first PiP edit as an MP4, re-import the file as a new background, and add a second overlay on top. That workaround works but loses some quality at each export pass.
Does iMovie for iPhone support Picture in Picture?
Yes. iMovie for iOS added PiP back in version 2.2.4.
Tap the plus icon on the timeline, choose your second clip, tap the three-dot icon below the preview, and pick Picture in Picture from the menu. The mobile version skips the border-color and border-width controls that the Mac version exposes, so any colored or shadowed frame still has to be styled on a Mac.
What size is the Picture in Picture window in iMovie?
iMovie defaults the inset to about 25% of the main clip’s width, parked in the lower-right corner. You can pinch to resize on iOS or drag a corner handle in the viewer on Mac. Both very small and very large inset sizes still render cleanly in 1080p export.
Can I add a border or shadow to Picture in Picture in iMovie?
Only on Mac. The Video Overlay Settings dropdown on macOS lets you set border width up to 8 pixels, pick any border color, and toggle a drop shadow.
iMovie for iOS gives you the default thin white border with no choices, which is the main reason serious creators move overlay work to a desktop editor.
How do I export an iMovie Picture in Picture project at high quality?
Click File > Share > File in iMovie on Mac and pick 1080p or 4K with high quality. A 1080p PiP project exports noticeably faster than the same project at 4K, and 4K export is far more demanding on the machine. Macs with less RAM can crash on 4K export from 1080p source clips, so match your project resolution to your source when possible.
Is Picture in Picture in iMovie free?
Yes. iMovie is free on every Mac and every iPhone or iPad sold after 2017. There are no in-app purchases for the PiP feature or any other built-in editing tool. The only cost is the storage your projects take up, which can hit 5-10 GB for a heavily edited 10-minute video at 4K.

iPhone 17 Cellular Data Not Working on iOS 26? 9 Fixes
iPhone 17 cellular data still dropping on iOS 26? Apple fixed the launch bug in iOS 26.0.1, but recovery failures persist. Here's the fix ladder.

iPhone Cellular Data Not Working Abroad? eSIM Fixes
Travel eSIM showing no data abroad? Fix iPhone roaming with the data-line check, Data Roaming toggle, APN settings, and network selection steps.

iPhone Cellular Data Not Working for Some Apps? 8 Fixes
Some iPhone apps refuse to load on cellular while others work fine. Check the per-app cellular toggle, Low Data Mode, VPN profiles, and Screen Time.

iPhone Stuck on EDGE? How to Get 5G or LTE Back (2026)
iPhone stuck on EDGE with crawling data? Here's why the E icon appears, which settings force 5G or LTE back, and when the problem is your carrier.