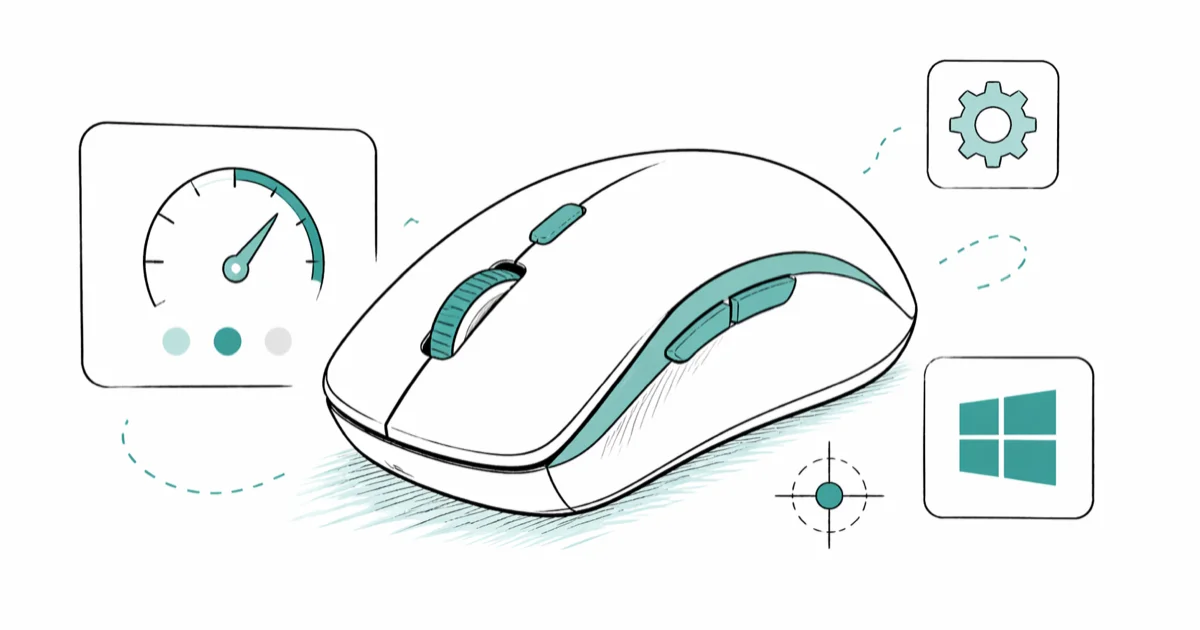
How to Check Mouse DPI on Windows: 4 Methods That Work
Check mouse DPI on Windows four ways: spec sheets, vendor software like Logitech G HUB or Razer Synapse, Microsoft Paint testing, and online DPI analyzers.
Quick AnswerTo check your mouse DPI on Windows, look up the model's spec sheet on the manufacturer's site, open the vendor app (Logitech G HUB, Razer Synapse, SteelSeries GG), or measure it yourself in Microsoft Paint by drawing a one-inch line and reading the pixel count after disabling pointer precision.
Knowing how to check mouse DPI matters whether you’re tuning a first-person shooter, fixing cursor drift, or shopping for a sensitive replacement. DPI (dots per inch) tells you how many pixels your cursor moves per inch of physical mouse travel. This guide walks through four practical methods.
- DPI describes how far your cursor moves per inch of mouse travel; higher DPI means faster on-screen movement for the same hand motion.
- Modern gaming mice ship with DPI ranges from 100 to 30,000, but most esports players cluster at 400, 800, or 1,600 because those values map cleanly to popular display resolutions.
- You must disable “Enhance pointer precision” in Windows before any DPI test, because it adds acceleration that distorts pixel-per-inch measurements.
- Vendor apps like Logitech G HUB or Razer Synapse show the exact stepped DPI value; the Microsoft Paint test reveals the real measured DPI, which often differs from the advertised one.
- DPI is not the same as in-game sensitivity; competitive players combine both into “eDPI” (DPI × in-game sensitivity) when comparing settings.
#What Is Mouse DPI and Why Does It Matter?
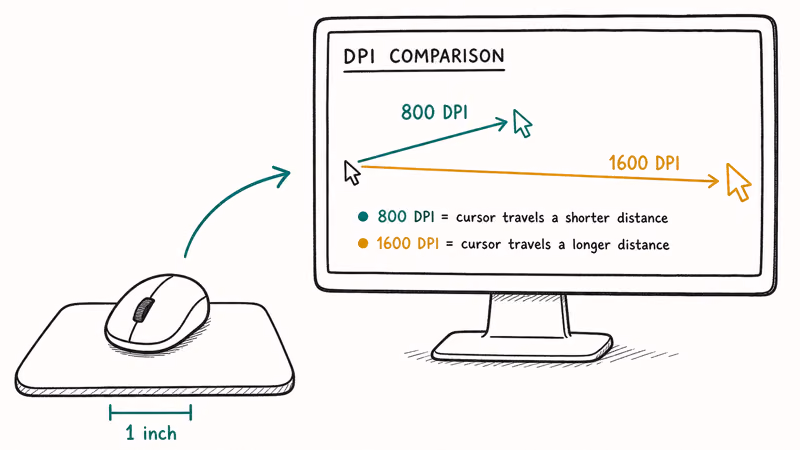
DPI, short for dots per inch, is the resolution at which your mouse sensor reports motion. A mouse set to 800 DPI moves the cursor 800 pixels for every inch you slide it across the desk. Double that to 1,600 DPI and the same one-inch sweep covers 1,600 pixels.
Two practical reasons push people to check their current DPI.
Gamers tuning aim need a known starting point so they can match a friend’s settings, port a sensitivity profile between mice, or calculate eDPI. Everyday users with a new high-resolution monitor often find their old cursor crawls across a 4K screen, and the fix usually involves nudging DPI up rather than fiddling with Windows pointer speed.
A common myth is that more DPI is always better. Lower DPI usually gives finer control for precision aim, while higher DPI moves the cursor farther with the same hand motion. The rated DPI is a useful baseline but not a guarantee.
Razer recommends pairing DPI with display resolution rather than maxing it out. Most esports settings databases (Liquipedia, ProSettings) cluster pro players at 400–800 DPI for that reason.
#Look Up Your Mouse’s Stated DPI on the Spec Sheet
The fastest way to learn your mouse’s advertised DPI is to read the spec sheet from the manufacturer. Open the product page on the vendor’s site (Logitech, Razer, SteelSeries, Corsair, Glorious, Endgame Gear, and similar), then look under “Sensor” or “Specifications” for a line that lists DPI range and the sensor model.
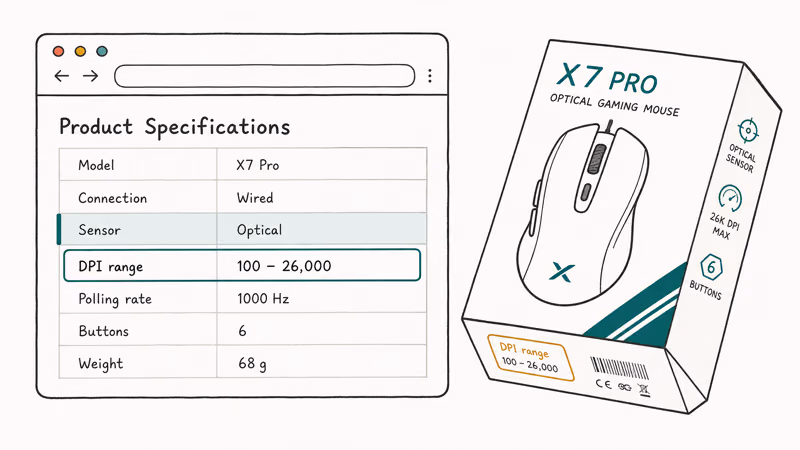
The box itself often prints the DPI range too, so flip the packaging over if you still have it. For unbranded mice or older models without a spec sheet online, this method fails and you should jump to the Paint test or an online analyzer instead. Big-box stores like Best Buy, Newegg, and Micro Center also list DPI prominently in product specs on their listing pages, which is handy when you’re cross-shopping similar models before reaching for the Paint method.
Spec sheets give you the range, not the current step. A mouse with on-board DPI buttons may be set anywhere within that range right now.
According to Logitech’s product documentation, every G-series spec sheet lists 4 or 5 preset DPI steps alongside the supported sensor range. Vendor software is the only way to read the active step exactly, covered further down.
The listed DPI range should match the manufacturer marketing page, but it still won’t tell you the active step.
#How Can You Measure Real DPI in Microsoft Paint?
The Microsoft Paint method gives you the actual measured DPI, which often differs from the rated value by a few percent because of sensor variance. It needs a ruler, a mouse pad with enough room for a clean one-inch sweep, and three minutes.
#Step 1: Disable Enhance Pointer Precision
Pointer acceleration kills DPI measurements because it scales movement non-linearly. Windows confirms that “Enhance pointer precision” applies acceleration on top of the raw sensor reading, so any test you run with it enabled will read inconsistently.
To turn it off:
- Press Windows + I, then go to Bluetooth & devices >
Mouse>Additionalmouse settings. - In the Mouse Properties dialog, open the Pointer Options tab.
- Uncheck “Enhance pointer precision.”
- Click Apply, then OK.
Our guide to Windows pointer precision covers the trade-offs.
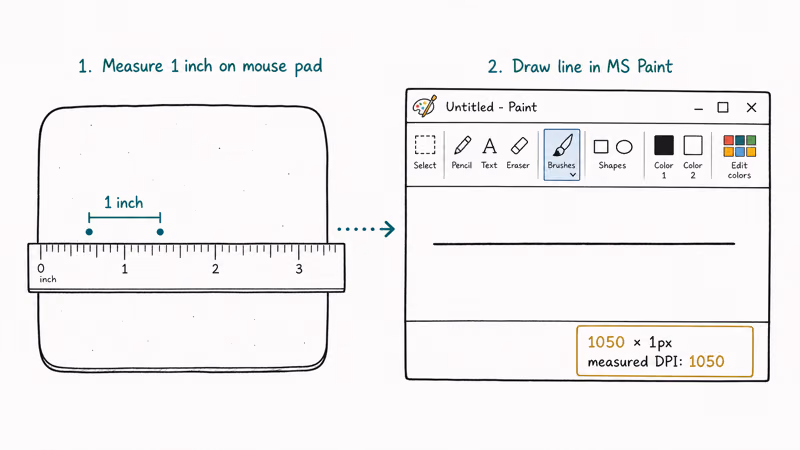
#Step 2: Mark a One-Inch Line on Your Mouse Pad
Place a ruler on your mouse pad and mark two points exactly 2.54 cm (one inch) apart with a pencil or small piece of tape. Pick a section of the pad with consistent surface texture and avoid the rubber edges, where most sensors lift-off. If your pad has a fabric weave, choose a flat zone away from logos and decorative print, because raised stitching can interfere with optical and laser sensors during the drag.
#Step 3: Draw and Read the Pixel Count
Open Microsoft Paint and confirm the zoom level reads 100% in the bottom-right corner. Anything else throws the measurement off.
- Click the Pencil tool.
- Move the cursor to the far left edge of the canvas until the coordinate readout in the bottom-left shows 0, 0 (or stalls at a number close to zero in the first axis).
- Place the mouse on your first pencil mark.
- Click and hold the left button.
- Slide the mouse smoothly to the second mark, exactly one inch away.
- Release the button.
- Read the first number in the coordinate readout. That number is your DPI.
A small variance from the advertised DPI is normal for optical sensors. Repeat the test four or five times and average the readings for a tighter result.
A handful of cases break this test: a mouse with built-in angle snapping (most gaming mice expose this in software and you should disable it first), DPI smoothing turned on, or in-game sensitivity wrappers running in the background. Close vendor overlays and any “smart” cursor utilities before you measure.
#Run an Online DPI Analyzer in Your Browser
Online analyzers track movement inside the browser.
The most widely cited one is the Mouse-Sensitivity.com DPI Analyzer, which esports settings sites recommend for its low-latency tracking. It uses the same one-inch principle as the Paint test, only instead of drawing into a canvas you drag a crosshair across the page.
Open the analyzer page and set Target Distance to 1 and Units to Inches. Leave Configured DPI blank if you don’t already know the value. Click and hold on the red crosshair, then drag exactly one inch across your mouse pad using the same two pencil marks from the Paint test. Release the button and read the “Actual DPI” value the analyzer reports.
The same prerequisites apply: pointer precision off, vendor angle snapping off, browser zoom at 100 percent.
Avoid hitting the edge of the screen during the drag because the cursor stops while the sensor keeps moving, which inflates the reading.
This approach has one quirk worth flagging. Browser-based analyzers run at the DPI Windows reports, not the raw hardware DPI, so they tend to match what the OS sees rather than the absolute sensor count. For most users the difference is negligible. Competitive players who care about exact hardware DPI should pull the value from vendor software instead.
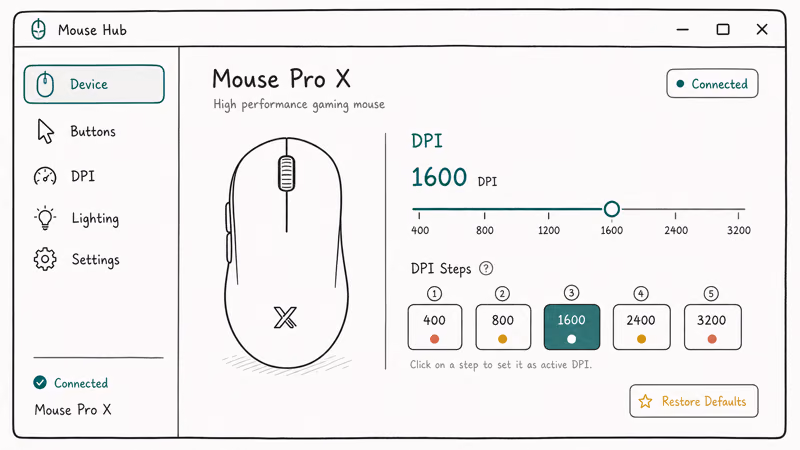
#Read Live DPI From Vendor Software
Manufacturer software is the only way to read the exact stepped DPI a gaming mouse is currently using, change it, and save it to on-board memory. The major utilities each list active DPI prominently on the device’s main page.
Common vendor tools include:
- Logitech G HUB for G-series and MX mice (download page)
- Razer Synapse for all Razer peripherals
- SteelSeries GG (covers Engine and Sonar) for SteelSeries mice
- Corsair iCUE for Corsair gaming hardware
- Glorious Core for Model O, D, and similar
- Microsoft Mouse and Keyboard Center for Surface, Pro IntelliMouse, and other Microsoft mice
Once you install the matching utility, open it, pick your mouse from the device list, then look under “Sensitivity,” “DPI,” or “Pointer” depending on the vendor’s naming. You’ll see the current step, a list of preset slots (most mice support four or five), and the option to set custom DPI on the fly. Logitech G HUB even lets you assign per-game profiles that swap DPI automatically when a title launches.
With bundled vendor software, the readout should match the active on-mouse DPI step. For lower-end mice without bundled software, you’re usually stuck reading the LED guide on the bottom of the device or running the Paint test instead.
#Common DPI Mistakes to Avoid
Three errors trip up most first-time DPI checkers.
First, leaving Enhance pointer precision on. Every test reads wrong, every time. Disable it system-wide before you start.
Second, mixing DPI with Windows pointer speed. The Windows slider is a software multiplier sitting on top of the hardware DPI; cranking it does not change the sensor’s reported DPI, only how Windows scales the output.
Third, comparing eDPI without normalizing for the in-game sensitivity scale. Valorant, CS2, and Apex use different sensitivity units; eDPI only compares cleanly within a single game.
If your cursor still feels wrong after setting a reasonable DPI value, the issue is usually elsewhere. A loose USB cable, a mouse pad with worn coating, or a sensor that needs lift-off distance calibration all show up as inconsistent tracking that DPI tweaks won’t fix. Our troubleshooting guide for cursor drift covers those edge cases.
#Bottom Line
The fastest DPI check is the spec sheet, the most accurate is the Paint test paired with a ruler, and the most useful is the vendor software readout because it shows the live stepped value you can change with one click.
For most users, install the manufacturer’s app, read the current DPI, and pick a step that matches your monitor and your hand. If you compete, run the Paint test once to confirm your sensor lines up with the advertised value, then save a single profile at 800 DPI and live there for a few weeks before changing anything. The cursor speed that wins matches is the one your muscle memory expects, not the highest number on the box.
If you’re shopping rather than measuring, our roundups of the best mouse for programming and the lightest gaming mice cover sensor-by-sensor DPI ranges so you can compare without opening five tabs.
Competitive shooter players will get more out of our dedicated best mouse for competitive Fortnite breakdown, which focuses on tracking and flick performance at the 400 to 800 DPI range most pros use.
#Frequently Asked Questions
What does mouse DPI actually mean?
DPI stands for dots per inch. It describes how many pixels your cursor moves per inch of physical mouse travel.
Is high DPI better than low DPI for gaming?
Not automatically. Most competitive first-person shooter players use 400 to 800 DPI because lower values give the muscle memory finer control over crosshair placement, especially for flick aim in titles like Valorant and CS2. Higher DPI helps for productivity on high-resolution monitors, ergonomic mice that get lifted often, and fast strategy games where the cursor needs to cross a wide screen quickly.
How do I check mouse DPI without software?
Use the Microsoft Paint test. Disable Enhance pointer precision in Mouse Properties, mark a one-inch line on your mouse pad with a ruler, open Paint at 100% zoom, click the Pencil tool, drag exactly one inch from the left canvas edge, and read the first coordinate number in the bottom-left readout. That number is your measured DPI.
Does Windows have a built-in DPI checker?
Windows does not ship a tool that reads mouse hardware DPI directly.
What’s the difference between DPI and CPI?
DPI and CPI describe the same metric and are generally interchangeable on consumer mice.
Can I change DPI on a basic office mouse?
Usually no. Office mice from Microsoft, HP, Dell, and similar OEMs ship with a fixed DPI step, often 1,000 DPI, and rely on Windows pointer speed for any tweaks. Some Microsoft Mobile and Surface mice expose a slider through Mouse and Keyboard Center, but most office models lock the hardware value. Gaming mice with a dedicated DPI button or vendor software are the ones that let you change it.
Does mouse DPI affect battery life on wireless mice?
Higher DPI and high polling rates can shorten wireless battery life, especially on flagship gaming mice. For long sessions on battery, drop polling to 1 KHz and pick a moderate DPI step.

Bluetooth Not Working on Snapdragon X? Fixes for 2026
Bluetooth not working on your Snapdragon X Copilot+ PC? Generic audio, mice, and keyboards work, but vendor apps often lack an ARM build. Fixes inside.

Docker Desktop and WSL2 Not Working on Snapdragon X? Fix It
WSL2 runs fine on Snapdragon X, but Docker Desktop ARM is Early Access and throws WSL errors. Use WSL2 plus native ARM64 Ubuntu and Docker Engine.

Does iTunes Work on Snapdragon X? ARM Windows 11 Guide
Yes, iTunes runs on Snapdragon X laptops through Prism emulation, but the Apple Devices app is the smoother route. Here is what to install on ARM.

Does OBS Studio Work on Snapdragon X? ARM64 Build Guide
Yes, OBS Studio has an experimental ARM64 build since version 31.1, but x64 plugins won't load and hardware encoding is missing. Here is what works.