How to Upload High-Quality Videos to Instagram (2026)
Upload high-quality videos to Instagram without losing sharpness. Reels, Feed, and Stories specs plus pre-upload export settings that survive compression.
Quick AnswerExport 1080p H.264 MP4 at 30fps with the matching aspect ratio (Reels and Stories 9:16, Feed 4:5 or 1:1), keep the video bit rate between 8 and 15 Mbps, and upload from the Instagram mobile app over Wi-Fi to keep the most quality through the platform re-encode.
Every Instagram upload is re-encoded before publish. Match the expected specs to preserve sharpness, color, and motion.
- Export at 1080×1920 (9) for Reels and Stories or 1080×1350 (4) for Feed posts, because Instagram resizes anything else and quality drops along the way.
- Use the H.264 codec, AAC audio, and a 30fps frame rate so the platform encoder has the cleanest possible source file to work from.
- Target a video bit rate between 8 and 15 Mbps: too low looks blocky after re-encoding, too high gets compressed harder than necessary.
- Upload from the Instagram mobile app over Wi-Fi, not the web uploader, since the app sends a higher-quality version of the file.
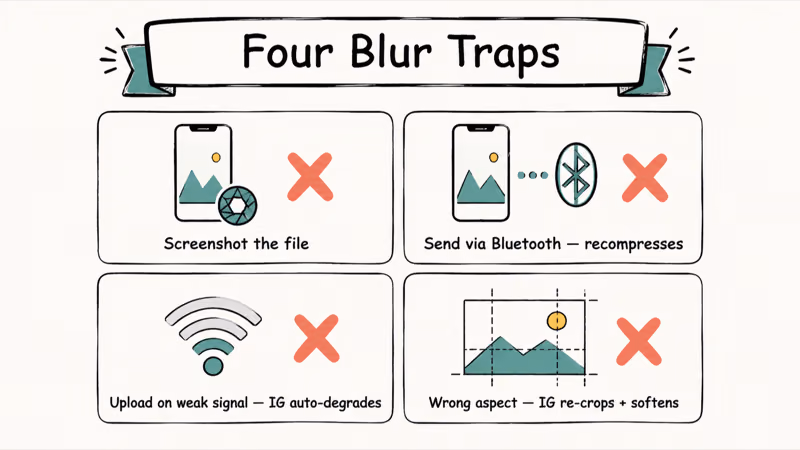
- Avoid re-uploading saved Reels, screen-recorded clips, or videos that have already gone through another platform’s compression, because each cycle compounds the loss.
#Why Does Instagram Compress Your Videos?
Every upload goes through Instagram’s server-side encoder before it’s live. That encoder standardizes the container, resolution, frame rate, and bit rate of each clip so playback stays smooth on cellular and older phones.
According to Instagram’s Help Center, Reels are meant to be shot vertically at 9
so the player doesn’t add black bars or crop into important parts of the frame.Wrong aspect ratios force a crop, stretch, or letterbox pass that softens the image.
The encoder also re-encodes the audio track and re-packages the file in Instagram’s own bitrate ladder. That’s why a sharp 4K master can come out looking a bit muddy: the platform isn’t keeping your bit rate, it’s recompressing the file at the level it wants. The closer your source is to what the encoder expects, the less aggressive its re-encode tends to be.
#What Are the Best Specs for Each Instagram Video Format?
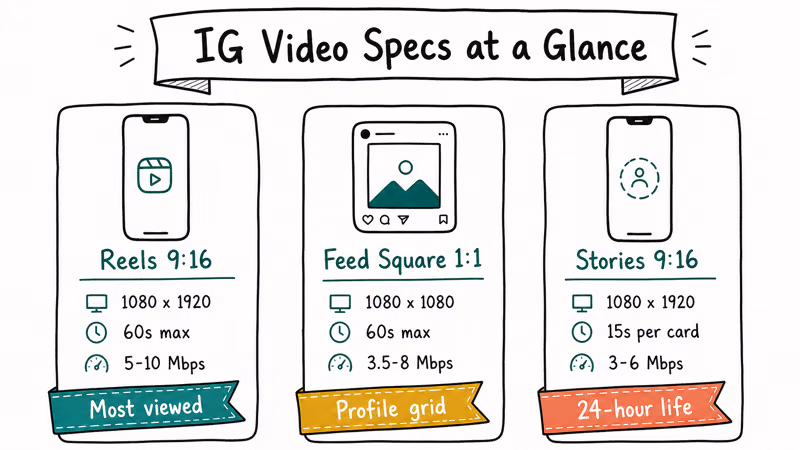
Instagram has three main public video surfaces in 2026: Reels, Feed video posts, and Stories.
Each one expects a slightly different shape, and exporting to the wrong one is the single biggest reason quality slips during upload.
#Reels
Reels are the default short-form video product now that IGTV is gone. Meta announced the IGTV brand was retired in 2022, and the long-form video player is folded into the standard Video tab. For Reels, target:
- Resolution: 1080×1920 pixels
- Aspect ratio: 9 (vertical)
- Codec: H.264, High Profile
- Audio: AAC, stereo, 128 kbps
- Frame rate: 30fps (24fps and 60fps both work)
- Length: up to 90 seconds for most accounts, with longer Reels rolling out
For most Reels, a 1080p H.264 MP4 is the safest source because it already matches Instagram’s expected delivery size. A 4K HEVC source can still upload, but it gets down-sampled before publishing, which can add softness if the resize happens on the platform instead of in your editor.
#Feed Video Posts
Feed videos still play inside the main grid and benefit from a taller crop than the old square shape. Recommended specs:
- Resolution: 1080×1350 (4) or 1080×1080 (1)
- Codec: H.264, AAC audio
- Frame rate: 30fps
- Length: up to 60 minutes (single video) or 60 seconds for carousel slots
The 4
portrait shape takes up more screen on mobile, which is where most plays happen. If you export a 16 landscape video for the Feed, Instagram letterboxes it with black bars and that whole frame counts as wasted real estate, even though the image quality of the visible strip stays the same.#Stories
Stories run full-screen, so 9
is the only practical choice:- Resolution: 1080×1920 pixels
- Codec: H.264, AAC audio
- Frame rate: 30fps
- Length: up to 60 seconds per clip; longer stories are split automatically
Stories tolerate slightly lower bit rates than Reels because they’re short and ephemeral, but a clean 8-10 Mbps export still looks dramatically better than auto-uploaded camera roll output. If your raw recording is the wrong shape, our internal guide on how to resize a video for Instagram covers crop tools that don’t introduce extra compression.
#How to Prepare a Video Before You Upload
Most of the quality battle is won or lost in your editor. Codec, bit rate, and aspect ratio matter most.
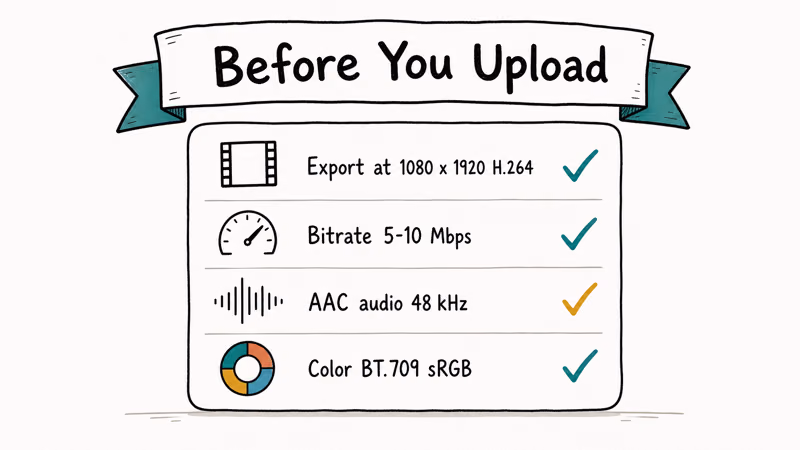
1. Pick the right codec. Adobe’s video format guidance recommends H.264 in an MP4 container for almost every social platform export because it strikes the best balance between file size and decode compatibility. H.264 is the same codec Instagram uses internally, so handing it an H.264 source skips one generation loss. HEVC (H.265) is technically supported but tends to get re-encoded harder.
2. Match the aspect ratio at export, not at upload. Export at the target shape from your editor (9
, 4, or 1) so Instagram has nothing left to crop. Our Instagram video format reference lists the full grid of supported sizes per surface.3. Hold bit rate in the 8-15 Mbps window. Below 6 Mbps motion smears; above 20 Mbps the platform re-encodes harder. 12 Mbps is the 1080p sweet spot.
4. Use the right audio settings. AAC at 128 kbps stereo is the standard. Higher bit rates get re-encoded down. Lower bit rates introduce audible artifacts in voiceovers and music.
5. Don’t pre-compress. If you’re trying to email or message the file before uploading, skip the extra compression step. Our video compression guide covers how to shrink for email without nuking the master, and the master is what should go to Instagram. Each compression cycle leaves visible artifacts.
If you’re starting from a clip that’s already in the wrong container (a MOV from an older iPhone, an MKV from a screen recorder), convert it to MP4 first so Instagram doesn’t have to wrap it in a fresh container at upload time.
#How to Upload Without Triggering Extra Compression
Once your file is exported correctly, the upload path itself can still cost you quality. The Instagram mobile app and the web uploader behave differently, and the network you’re on matters too.
Use the mobile app, not the desktop web uploader. The Instagram for Android and iOS apps are the safest default for preserving upload quality. The web uploader at instagram.com is convenient for scheduling, but the mobile app is the better choice when final image quality matters most.
Upload over Wi-Fi. Cellular triggers Instagram’s data-saver path, which lowers the bit rate before upload. Wi-Fi sends the full export.
On cellular, check Settings > Account > Cellular Data Use and turn off the high-resolution media saver to claw back some of that quality.
Skip the in-app filters and effects when you can. Every adjustment Instagram applies (filter, music overlay, AR effect) is rendered into a new copy of the file. If you’ve already color-graded and added music in your editor, leave the in-app effects off so you don’t stack a second encode on top of yours.
Don’t upload from the saved-Reels tab. Re-uploading a Reel you previously saved to your camera roll runs the file through the platform’s compression a second time. Always upload from the original master, not a re-shared copy.
If your upload keeps stalling or failing partway through, this can indicate a network or account issue rather than a file problem. The same symptoms appear when Instagram videos won’t play or Instagram can’t refresh the feed, and both troubleshooting guides walk through the usual fixes.
#Recording Habits That Help Final Quality
A few choices at the camera stage make a big difference in how your video looks after Instagram’s encoder gets done with it.
Shoot one step above your target. If you want a clean 1080p Reel, record at 4K and downscale to 1080p in your editor before export. The downscale step sharpens the image and gives you cropping headroom without dropping below 1080p output. This is the same principle as shooting RAW for stills: more data going in equals a cleaner final frame.
Stabilize the camera. Hand-held shake forces the encoder to spend its bit-rate budget on motion artifacts instead of detail. A small tripod or a gimbal keeps the frame steady so the bit rate goes toward what’s in the shot.
Light the scene clearly. Dark and underexposed footage compresses worst of all. Even a single soft window light or a $30 LED panel raises the floor of what the encoder has to work with, and the difference shows up immediately in skin tones and shadow detail.
#Mistakes That Drop Quality the Most
A few specific habits cause the biggest quality losses, and almost all of them are fixable in under a minute once you know what to look for.
| Mistake | What Happens | Quick Fix |
|---|---|---|
| Exporting at 720p instead of 1080p | Source resolution sets the ceiling. Instagram won’t upscale. | Re-export at 1080p before uploading. |
| Using HEVC/H.265 | Gets re-encoded harder than H.264 sources. | Switch the editor output to H.264. |
| Wrong aspect ratio | Triggers a crop or letterbox encode. | Export at 9, 4, or 1 directly. |
| Saving and re-uploading a Reel | Stacks two rounds of platform compression. | Upload from your original master. |
| Uploading on cellular with data saver on | Cuts source bit rate before reaching the server. | Switch to Wi-Fi or disable data saver. |
| Adding music in the app after a soundtrack in your edit | Forces a second render. | Pick one place to lay down audio. |
Table 1: Common Instagram upload mistakes and their fastest fixes.
Instagram’s Reel requirements help page states that H.264 video at 30fps in an MP4 wrapper is the recommended encode. Anything outside that envelope is more likely to get re-encoded more aggressively, and that’s where the visible quality drop comes from.
Moving a clip between phone, laptop, and editor? Our Instagram video converter guide covers tools that keep the file in spec across machines.
#Bottom Line
If you only change one thing about your Instagram upload workflow, change your export preset. Set it to 1080p H.264 MP4 at 30fps with an aspect ratio that matches your target surface: 9
for Reels and Stories, 4 for Feed.Pair that with a 10-12 Mbps video bit rate and an upload from the mobile app on Wi-Fi, and you’re handing Instagram the cleanest possible source. The platform’s re-encode is still going to touch your file, but the difference between a clip that survives that pass and one that doesn’t almost always comes down to those few export settings. Save a custom “Instagram 1080” preset in your editor of choice and use it for every clip going forward.
Instagram Tips & Tricks
#Frequently Asked Questions
Why does my Instagram video look blurry after uploading?
The most common cause is a mismatched aspect ratio or codec.
If you upload a 16
landscape clip to a vertical surface like Reels or Stories, Instagram has to crop, stretch, or letterbox the frame and re-encode the result, and any of those steps softens the image. Less commonly, a low source bit rate (under 5 Mbps) leaves the platform’s encoder no detail to preserve. Exporting at 9, 1080×1920, H.264 with a 10-12 Mbps bit rate before upload usually fixes both problems in one shot.Does Instagram lower video quality on Wi-Fi versus cellular?
Yes. On cellular, Instagram’s data-saver path lowers the source bit rate before uploading, which means the server-side encoder starts from a weaker file. Wi-Fi sends the full bit rate.
What is the maximum video size and length Instagram accepts?
For Reels, the cap is 90 seconds for most accounts, with longer Reels rolling out in stages. Feed video posts can run up to 60 minutes. Stories are capped at 60 seconds per clip and split automatically if longer. File size caps depend on the surface and the device you’re uploading from, but a normal 1080p export is typically inside the limit for practical uploads.
Can I upload 4K videos to Instagram?
Yes, but Instagram down-samples it to 1080p before publishing.
You won’t see the 4K source in the feed. Down-sampling in your editor usually gives you more control than relying on the platform’s automatic resize. Shoot in 4K to keep cropping headroom in your editor, then export at 1080p.
What codec works best for Instagram uploads?
H.264 in an MP4 container with AAC audio is the safest combination. HEVC and ProRes both technically work but get re-compressed more aggressively.
Why are my Reels lower quality than my Feed posts?
Reels are processed differently because the player has to load instantly when someone scrolls into them. The encoder leans toward smaller files for Reels, which can show up as softer detail in dark scenes. Boosting your source bit rate to 12-15 Mbps and exporting at exactly 1080×1920 helps close that gap.
Should I use the Instagram web uploader for higher quality?
No. The mobile app sends a higher-bit-rate source.
Can I avoid Instagram’s compression entirely?
Not really. Every video on Instagram goes through the server-side encoder before it’s published. The closest you can get is matching the platform’s recommended specs so the re-encode has the least amount of work to do, which keeps your final result as close to your master as possible.

Instagram Parental Controls: Family Center Setup (2026)
Set up Instagram Family Center, privacy settings, Hidden Words, content filters, and time limits with your teen's consent on iPhone or Android.

Instagram Notifications Not Working? Quick Fixes (2026)
Instagram notifications not working? Fix push alerts, DMs, likes, and Stories on iPhone and Android in under 5 minutes with proven 2026 steps.
Instagram "We Limit How Often" Error: How to Fix It 2026
Instagram says "we limit how often you can do certain things"? Wait 24-48 hours, slow down likes and follows, then appeal through Help Center.

Instagram Name Checker: Find Available Usernames Fast
Check Instagram username availability instantly with free tools like Namechk and KnowEm. Find perfect handles and avoid the frustration of taken names.