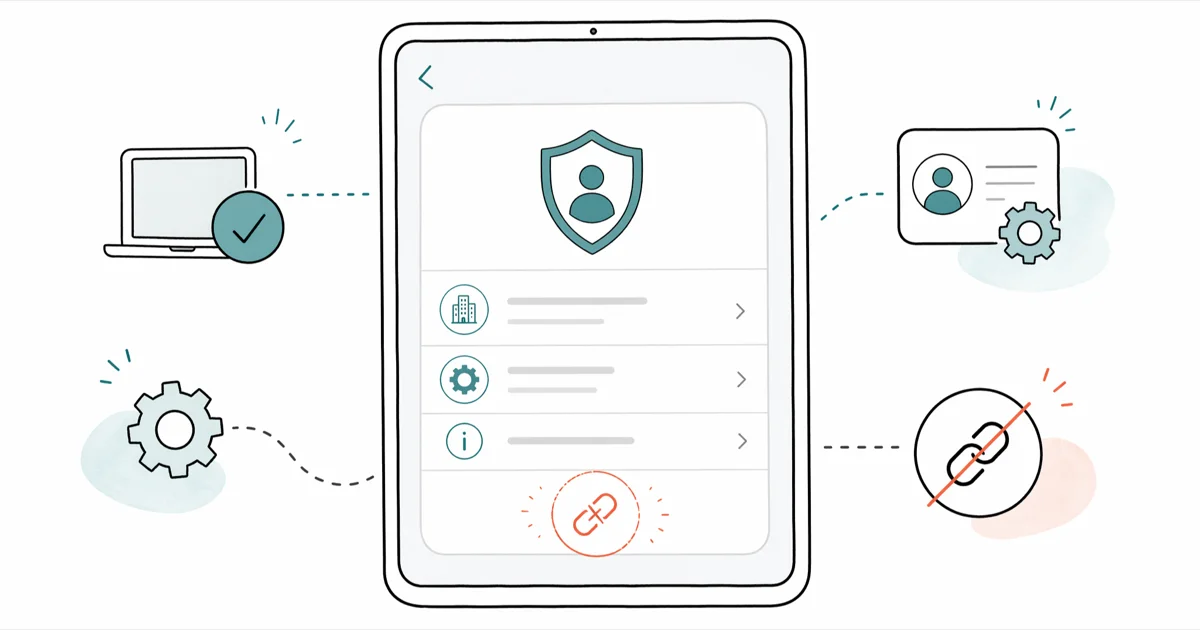
How to Remove a Jamf MDM Profile From Your Apple Device
Remove a Jamf MDM profile from your own iPhone, iPad, or Mac the right way: built-in settings, IT admin workflow, or Apple's official escalation.
Quick AnswerTo remove a Jamf MDM profile from your own Apple device, open Settings on iOS (or System Settings on Mac), go to General then VPN & Device Management, select the Jamf profile, and choose Remove Management. If your employer or school enrolled the device, contact your IT admin first because they hold the unenroll button in the Jamf console; you can't override that on the device side.
If you want to remove a Jamf MDM profile from an Apple device, the legitimate path depends on who owns the hardware. On a device you personally own and enrolled, Apple lets you delete the configuration profile in two taps. On an employer-owned or school-owned iPhone, iPad, or Mac, the unenroll command lives in the Jamf admin console.
- Jamf MDM profiles installed by your employer or school are typed as “supervised” on Apple’s side, which is why the Remove Management option is greyed out on the device.
- On a personally enrolled Mac or iPhone, the Jamf profile lives in Settings → General → VPN & Device Management and is deleted with a single tap, no extra tool required.
- For supervised devices, only the Jamf Pro or Jamf School administrator can release the device; the unenroll button is in the admin web console, not on the device itself.
- Inherited or second-hand Apple gear that’s still under another organization’s MDM has only two legitimate paths: ask the seller’s IT team to release it, or ask Apple to remove the activation enrollment with proof of purchase.
- Third-party “MDM bypass” tools usually require jailbreaking or rely on outdated iOS exploits, void your warranty, may breach the iOS license agreement, and almost never work on current iOS and macOS versions.
#What Is a Jamf MDM Profile, and Why Is It Hard to Remove?
Jamf is a mobile device management platform that IT departments use to configure and lock down Apple hardware. Two products dominate the conversation: Jamf Pro for enterprise fleets, and Jamf School for K-12 and higher education.
When an admin enrolls your iPhone, iPad, or Mac, Jamf installs a configuration profile that gives the admin remote control over Wi-Fi credentials, app installs, passcode rules, Safari content filters, and the ability to lock or wipe the device. The profile is signed by Apple’s MDM framework, not by Jamf, which is why iOS and macOS honor it at the operating system level rather than at the app level.
The reason removal is hard isn’t a Jamf invention. It’s an Apple design choice that Apple first described in its deployment guide: supervision was announced with iOS 7 in 2013 and has been reinforced with every major release since. Devices enrolled through Apple Business Manager or Apple School Manager with Automated Device Enrollment (ADE, formerly DEP) get marked as supervised, and the operating system then enforces the MDM as non-removable from the device side.
Even a full factory reset re-enrolls a supervised device the next time it touches Wi-Fi, because the enrollment record is tied to the serial number on Apple’s activation servers, not stored locally. That detail is what defeats most “I’ll just wipe it” instincts on inherited or surplus gear.
A user-installed MDM profile, by contrast, is removable. That’s the dividing line we use throughout the rest of this guide: who installed the profile, and how.
#How Can You Tell If Your Apple Device Is Jamf-Enrolled?
You don’t have to guess. Three quick checks cover almost every situation.
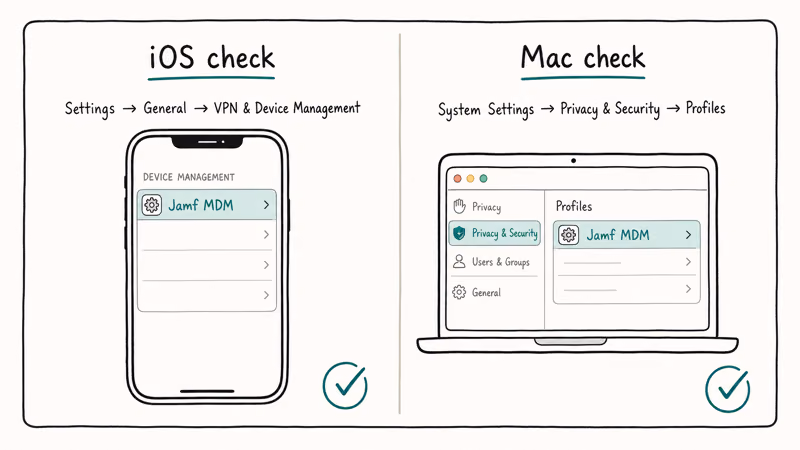
On iPhone or iPad, open Settings → General → VPN & Device Management. A profile entry titled “Jamf Pro,” “Jamf School,” or your organization’s name means the device is enrolled.
On Mac, open System Settings → Privacy & Security → Profiles. The pane only appears when a profile is installed, so an empty list means no MDM is present.
For a sanity check, open About on the device and look at the serial number, then ask your IT department whether that serial is registered in Jamf. On a personally bought device, you already know the answer. On a second-hand Apple device, this is the question that decides whether you go to a seller, an admin, or Apple Support.
If the profile says “This iPhone is supervised and managed by [organization]” on the Lock Screen or in Settings, that’s Apple’s plain-English way of telling you the device is owned by an organization, not by you. The walkthrough on the untrusted enterprise developer fix covers a related case where an enterprise certificate is involved but the device is not supervised.
#Remove a Jamf MDM Profile on Your Own iPhone or iPad
This section is for an iPhone or iPad you bought yourself and where you (or a previous personal owner) chose to install a Jamf profile. The Remove Management option is not greyed out in this scenario.
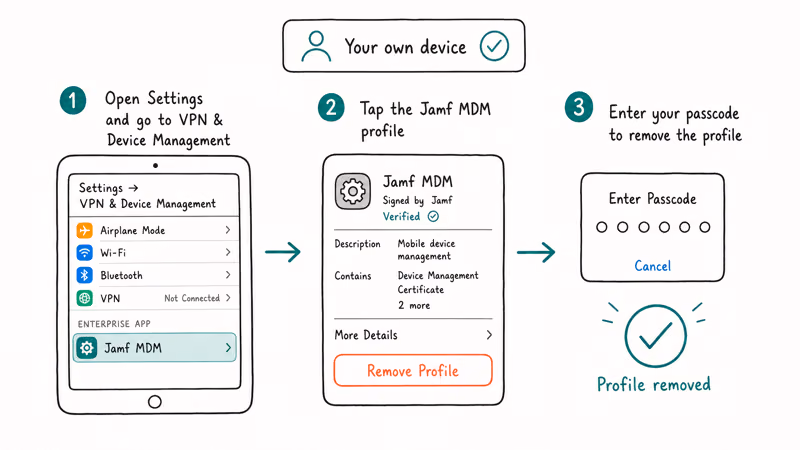
- Open Settings and tap General.
- Scroll to VPN & Device Management and tap the Jamf profile entry.
- Tap Remove Management at the bottom of the profile screen.
- Enter the device passcode and confirm.
The profile, along with every restriction it pushed (Safari filters, App Store blocks, custom Wi-Fi configurations), is removed once the command completes. On a personally enrolled iPhone, Remove Management clears the profile quickly, and Settings → General → VPN & Device Management then shows an empty list. Because the removal happens locally on the device, the change shows up the next time you open that screen rather than waiting on a server round-trip.
If the Remove Management button is greyed out or completely absent, your device is supervised through Apple Business Manager or Apple School Manager. That’s not a bug; that’s the supervision contract. Skip to the admin or employer / school section below.
Apple’s iPhone documentation confirms that the user can manage configuration profiles only when the device is enrolled in User Enrollment mode, not Device Enrollment mode. The same constraint applies to iPad. Our deeper walkthrough on removing a management profile from an iPhone covers the same flow with screenshots for older iOS versions and shows what the Remove option looks like when the device is actually user-owned.
#Remove a Jamf MDM Profile on Your Own Mac
The Mac flow is similar but uses a different settings pane. As before, this section applies only if you own the Mac and the profile was installed under a personal Jamf account or a trial.
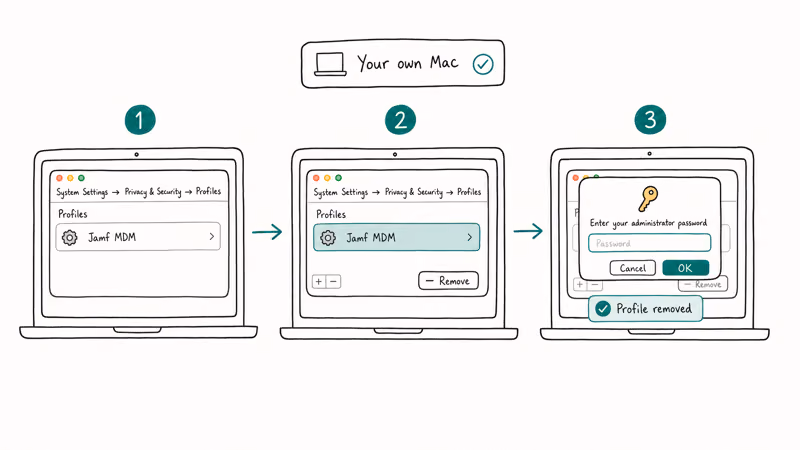
- Open System Settings (called System Preferences on macOS Monterey and earlier).
- Click Privacy & Security, then click Profiles at the bottom of the sidebar.
- Select the Jamf MDM Profile entry.
- Click the minus (–) button below the profile list.
- Enter your Mac admin password to confirm.
The Profiles pane disappears once the last profile is removed, which is your visual confirmation. On a Jamf-enrolled Mac, the Jamf binary at /usr/local/jamf/bin/jamf is also removed automatically when the profile is deleted, because the binary is signed against the enrollment.
If you want to verify cleanup, open Terminal and run:
profiles status -type enrollment
sudo profiles list
The first command should report Enrolled via DEP: No and MDM enrollment: No. The second should return an empty list, or only the system-level profiles that Apple installs by default.
A power-user note: if the Mac was enrolled by an IT admin and you still have admin rights on the device for some reason (rare for a supervised Mac, common for a Mac under User Approved MDM only), Jamf’s own removal binary can be invoked from Terminal as sudo jamf removeFramework. According to Jamf’s Learning Hub, this command is intended for admin use during decommissioning, and it will fail outright if the MDM has flagged the device as non-removable.
Don’t run it on an employer device without prior written authorization from your IT team. On a managed work asset, doing so can violate your company’s acceptable-use policy and, depending on jurisdiction, may breach computer-use laws.
#Unenroll a Device From Jamf Pro or Jamf School (Admin Workflow)
This is the path that applies when you are the IT administrator for the Jamf instance, or when you’ve been explicitly delegated removal authority by your IT lead. From the admin side, removing a device’s MDM enrollment is a few clicks; it’s the only sanctioned way to lift management from a supervised device.
In the Jamf Pro web console:
- Sign in to your Jamf Pro tenant URL with an admin account.
- Go to Devices → Search Inventory and locate the device by serial number, asset tag, or username.
- Open the device record and click Management Commands.
- Select Unmanage Device (or Wipe Device if you also need to factory-reset it before redeploying).
- Confirm the command.
Jamf states that the Unmanage Device command is queued to the device on its next check-in, which typically takes a few minutes when the device has cellular or Wi-Fi access. Once the command completes, the device is released from your Jamf tenant, the configuration profile is uninstalled, and the device row in inventory is removed.
The same flow exists in Jamf School under Devices → [select device] → Unenroll. Apple’s deployment documentation recommends running the unenrollment from the MDM console before the device is wiped or transferred, because that’s the step that clears the Automated Device Enrollment binding on Apple’s servers as well. If you wipe first and unenroll second, the device will reactivate into the Jamf tenant during setup and you’ll have a stuck Activation Lock screen on top of it.
For multi-device decommissioning, both Jamf Pro and Jamf School expose a bulk API. The Jamf Pro product page and the Jamf Learning Hub walk through the JWT authentication and the DELETE /devices/id/<id> call you’d run from a script.
At fleet scale, the bulk Unmanage API releases devices that are online on the first command. A device that is offline or slow to check in may need a manual reboot before it accepts the unmanage push, so plan a second pass for devices that don’t respond.
#When the Device Belongs to Your Employer or School
If you’ve reached this section, the device is supervised, the Remove Management option is greyed out, and you are not the IT admin.

There’s only one legitimate path forward: ask the people who own the device.
For an active employee or student, contact your IT help desk and request removal for a legitimate reason: end of employment, end of enrollment, device returned to personal stock, or a documented transfer of ownership. Most IT teams have a clean offboarding workflow that ends with the device being unmanaged or wiped and reissued.
For second-hand devices (you bought a used iPad on a marketplace and discovered it still says “managed by [organization]”), the path depends on whether the original organization is reachable:
- If you have a receipt and a contact at the organization, ask them to unenroll the device from their Jamf console. Most schools have a process for this when devices are sold from surplus.
- If the organization is unreachable or the device was sold without proper decommissioning, contact Apple Support with proof of purchase. Apple’s account security team can sometimes release the activation binding when documentation supports it; the Apple Business Manager overview describes the dispute process from the organization side, and Apple advisors walk through it from the buyer side.
This is the same path covered in our school iPad restrictions walkthrough, with the same takeaway: if the supervision was set up correctly on the seller side, only the seller’s Jamf console or Apple itself can unwind it. There is no shortcut.
For the related case where the device is signed out but the Settings option still appears blocked, the sign-out restrictions guide walks through what the system is telling you and what your IT admin can do about it.
A short legal note: in the U.S., bypassing a supervised MDM on a device you don’t own can run into the federal Computer Fraud and Abuse Act and state computer-trespass laws, even when the device is in your possession. On a work device that you own under a Bring-Your-Own-Device policy, removing the profile may violate your acceptable-use agreement and can be cause for termination.
The safe answer in every case is the same: get explicit, written authorization before running any removal step, and document who authorized it.
#Bottom Line
If the Jamf profile is on a device you personally bought and you installed the profile yourself, the fix is two taps inside Settings (iOS) or System Settings (macOS), and the whole job takes about three minutes from start to finish without any extra software.
If the device is supervised through Apple Business Manager or Apple School Manager, only the Jamf admin can run the unenroll command. Open a ticket with your IT team, document the reason, and let them do it from the console. For inherited or second-hand devices where the supervising organization is gone, gather your proof of purchase and contact Apple Support; the restore iPhone walkthrough covers what happens to your data during the reactivation step that usually follows.
Skip the third-party “MDM bypass” tools advertised in the older versions of this article. They typically rely on outdated iOS exploits, void the warranty, may breach Apple’s software license, and almost never survive a routine iOS update.
#Frequently Asked Questions
Can I remove a Jamf MDM profile without contacting the organization?
Only if you own the device and personally installed the profile. On a supervised device enrolled through Apple Business Manager or Apple School Manager, the Remove Management option is greyed out at the operating system level. The organization’s Jamf admin is the only party who can run the unenroll command; no app on the device side can override that.
Will removing the Jamf MDM profile delete my personal data?
No. The profile removal lifts policies but leaves photos, messages, and apps untouched. A wipe is a separate command.
Why is the Remove Management button greyed out on my iPhone?
That’s the system telling you the device is supervised. Supervision is set when a device is enrolled through Apple Business Manager or Apple School Manager with Automated Device Enrollment, and it’s specifically designed to prevent on-device removal. The fix isn’t on the iPhone itself; the fix is in your IT team’s Jamf console.
What does the sudo jamf removeFramework Terminal command do on a Mac?
It’s the command Jamf documents for decommissioning a Mac from the admin side. It removes the Jamf binary, the Jamf MDM profile, and the related launch daemons. On a managed work Mac it will usually refuse to run, or will run and then re-enroll the next time the Mac checks in with Apple’s activation servers. Run it only on a Mac you own or have explicit IT authorization to decommission.
Can I factory-reset the device to clear Jamf?
No. The serial number is bound to the org’s MDM on Apple’s servers, so the setup assistant re-installs the Jamf profile on the first reboot.
My company let me keep my old work iPhone. How do I remove Jamf?
Ask the IT team that issued it to run an Unmanage Device command in Jamf Pro before you wipe the phone. Once that command completes and the device is shown as unmanaged in the Jamf console, you can erase the iPhone, sign in with your personal Apple ID at setup, and use it normally. If you wipe first without the unenroll step, the phone will boot into the company’s setup screen on the next activation, and you’ll be locked out.
Are paid Jamf MDM “bypass” tools safe to use?
No, in almost every case. They lean on iOS or macOS exploits Apple patches in later updates, so the bypass either fails outright or breaks core features like cellular service, iMessage, and iCloud sign-in. Apple’s documentation states that circumventing supervision violates the iOS software license, and only IT-admin unenrollment or Apple Support proof-of-purchase leaves you with a fully working device.
What if I find an old UDID hint and want to whitelist my own device in Jamf?
Whitelisting requires admin access to the Jamf console; the device-side UDID is only useful as an identifier you hand to your IT team. Send them the UDID, the serial number, and your authorization context, and they can locate the device in inventory and apply the unenroll or scope change you need.

iPhone 17 Cellular Data Not Working on iOS 26? 9 Fixes
iPhone 17 cellular data still dropping on iOS 26? Apple fixed the launch bug in iOS 26.0.1, but recovery failures persist. Here's the fix ladder.

iPhone Cellular Data Not Working Abroad? eSIM Fixes
Travel eSIM showing no data abroad? Fix iPhone roaming with the data-line check, Data Roaming toggle, APN settings, and network selection steps.

iPhone Cellular Data Not Working for Some Apps? 8 Fixes
Some iPhone apps refuse to load on cellular while others work fine. Check the per-app cellular toggle, Low Data Mode, VPN profiles, and Screen Time.

iPhone Stuck on EDGE? How to Get 5G or LTE Back (2026)
iPhone stuck on EDGE with crawling data? Here's why the E icon appears, which settings force 5G or LTE back, and when the problem is your carrier.