PowerDirector Crop Video: Step-by-Step Guide for 2026
Crop videos in PowerDirector with the Crop & Zoom tool, keyframe animation, and aspect ratio presets like 9:16. Works on Windows, Mac, iOS, Android.
Quick AnswerDrop the clip on the timeline, click the Crop & Zoom button (the dotted square icon in the editing room), drag the corner handles to set the crop, pick an aspect ratio preset, and hit OK. Add keyframes inside the same panel for moving zoom or pan effects.
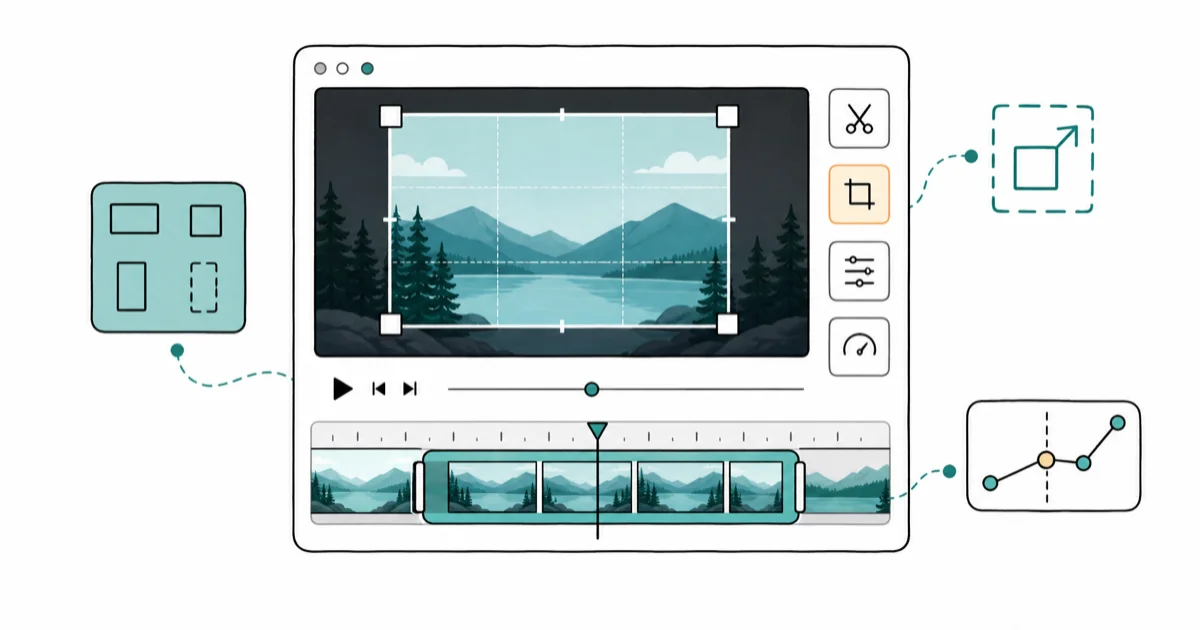
CyberLink PowerDirector hides its crop tool behind an icon, not a menu, and that one detail trips up most first-time users. The crop function lives in a panel called Crop & Zoom on the desktop app, and it stacks with keyframes for moving crops across current desktop and mobile versions.
- The Crop & Zoom tool sits in the editing room toolbar above the timeline; the icon is a dotted square with arrows, not a menu item.
- Aspect ratio presets cover 16, 9, 1, 4, 4, and 21, and the project ratio (set on launch) controls how the cropped clip fills the canvas.
- Keyframes inside Crop & Zoom let you animate position and zoom; PowerDirector interpolates linearly between any two keyframes you place.
- Cropping a 4K source down to 1080p delivery still looks sharp; cropping a 1080p source past about 50% of the frame area shows visible softness after export.
- The mobile apps (iOS, Android) crop with the same Crop & Zoom panel, but keyframe controls only appear in the paid plan, not the free tier.
#How Do You Open the Crop Tool in PowerDirector?
Drop your clip on the timeline first. The Crop & Zoom button only lights up when a clip is selected, which is the most common reason new users think the feature is missing.
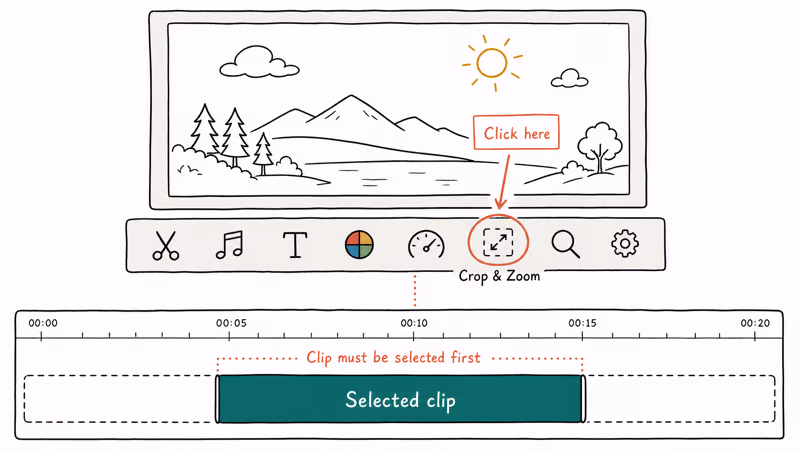
Look at the row of icons between the preview window and the timeline. The Crop & Zoom button is a dotted square with two diagonal arrows. Click it.
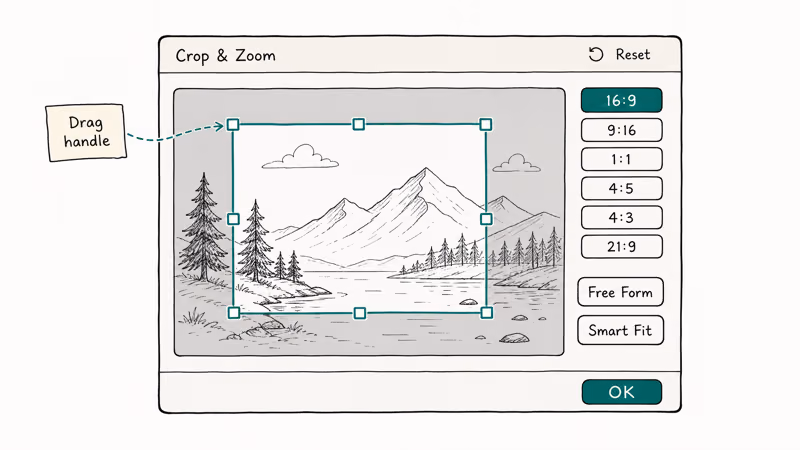
The Crop & Zoom designer opens as a modal panel with eight grab handles around the preview frame. From here you can drag any handle, type exact pixel values into the position fields, or pick an aspect ratio preset from the right-hand column. Each one applies live to the preview, which makes it easy to compare two crop options before committing.
If you can’t see the icon, your editing room toolbar is collapsed. Right-click any blank area in that toolbar and pick Customize, then drag Crop & Zoom into the visible row.
According to CyberLink’s PowerDirector help center, Crop & Zoom handles both static and motion crops in one panel.
#Step-by-Step: Crop a Static Frame
A static crop is the right choice when you want one fixed cropped area for the whole clip. Roughly two-thirds of cropping work is this kind. The other third is moving crops, covered later.
- Select the clip in the timeline.
- Click Crop & Zoom in the editing room toolbar.
- In the designer, drag any of the four corner handles inward. The dimmed area outside the box is what gets removed.
- Pick an aspect ratio from the dropdown on the right (16, 9, 1, etc.) if your platform requires one. Free Form lets you drag without a constraint.
- Drag the box itself to reposition the crop on the source frame.
- Click OK. The cropped clip stays cropped on the timeline, and the preview reflects the change.
Hardware acceleration matters: keep it on for export unless it causes render glitches, because disabling it forces PowerDirector to lean more heavily on CPU rendering.
The cropped result writes to the project file only. Your source footage is never altered. To revert, open Crop & Zoom again and click the reset arrow in the upper-right of the designer.
#Step-by-Step: Animate a Crop With Keyframes
Moving crops are sometimes called the Ken Burns effect. They pan or zoom across a still or video clip. PowerDirector handles this inside the same Crop & Zoom panel, no plugin needed, and the controls are identical whether your source is a JPEG or a 4K video.

Place your clip and open Crop & Zoom. Notice the small timeline strip at the bottom of the designer. That strip is local to this clip.
Set the playhead to 0
, position the crop where the animation should start, and click the diamond Add Keyframe button. Move the playhead to the end position (say, 0), drag the crop to its new spot or scale, and click Add Keyframe again. Two keyframes is the minimum for any movement.PowerDirector interpolates linearly. For ease-in or ease-out motion, click the keyframe and pick a curve from the dropdown: Linear, Ease-in, Ease-out, or Ease-in-out. Choose Ease-in-out for a gentler start and stop than Linear.
Three pitfalls worth knowing. First, keyframes deleted in the designer can’t be undone with Ctrl+Z after closing the panel. Second, if you change the aspect ratio mid-animation, every existing keyframe snaps to the new ratio, which can break a carefully framed pan. Third, copying a clip with keyframes to another project doesn’t always carry the keyframes; verify by opening Crop & Zoom on the pasted clip.
#Aspect Ratio Presets and What Each One Is For
Aspect ratio choice isn’t just cosmetic. Each platform reports the most uploads in a specific shape, and matching it avoids letterboxing.
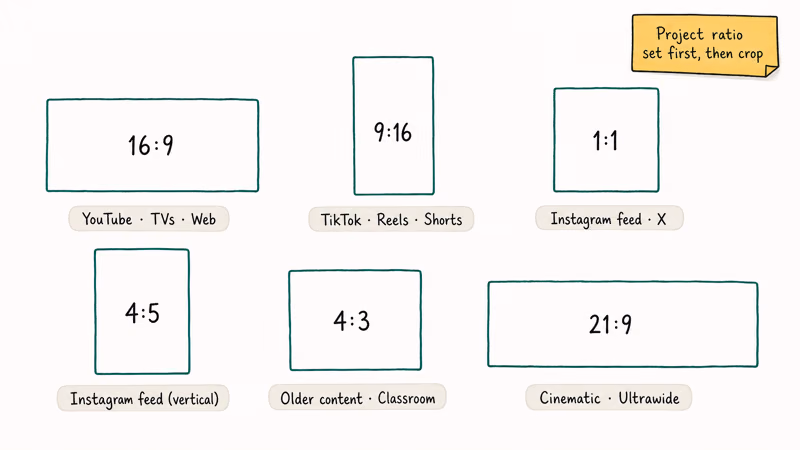
- 16 for YouTube long-form, embedded web video, most TVs.
- 9 for TikTok, Instagram Reels, YouTube Shorts.
- 1 for Instagram feed posts, square Twitter/X video.
- 4 for Instagram feed (the platform crops to 4 for vertical-leaning posts).
- 4 for older content, classroom playback systems, certain professional broadcasts.
- 21 for cinematic widescreen and ultrawide monitor playback.
Adobe’s Premiere Pro documentation on aspect ratios confirms that 9
and 1 are the two fastest-growing delivery ratios, driven by mobile-first platforms. PowerDirector’s ratio picker lets you switch between them without re-importing footage.The project ratio (set when you create the project, or changed in Project > Aspect Ratio) is separate from the crop ratio. If your project is 16
For a deeper comparison of aspect ratio behavior across editors, see this guide on how to change aspect ratio in iMovie, which covers a similar tool on the macOS side.
#Why Does Cropping Reduce Quality, and How Do You Avoid It?
Cropping is destructive scaling. You discard pixels from the source frame and the editor stretches what remains to fill the output resolution. Stretch too far and the result looks soft.
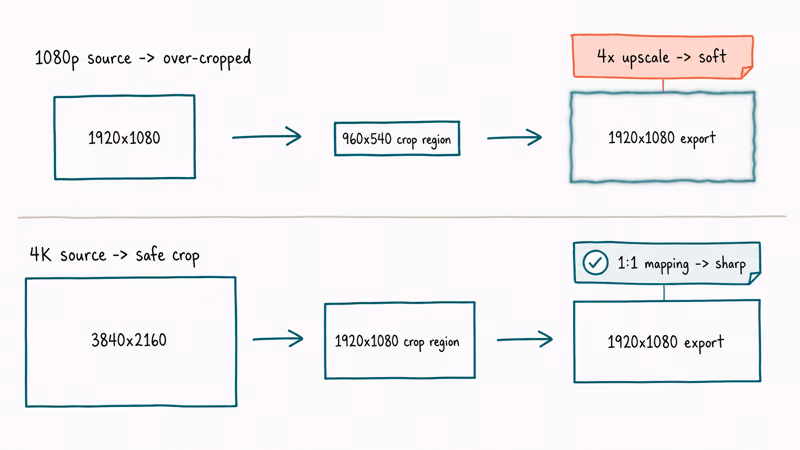
The math is straightforward. If your source is 1920×1080 and you crop to a 960×540 region, you have 25% of the original pixels. Exporting that to a 1920×1080 timeline means PowerDirector upscales 4x, which always shows softening on detail-heavy areas like text and faces. Crop a 4K source (3840×2160) down to a 1920×1080 region instead, and you keep 25% of pixels but with a 1
mapping at delivery: no upscaling, no softness.Practical rules for PowerDirector crop quality:
- Shoot at the highest resolution your camera offers if you know you’ll crop later.
- Keep the crop region at or above the delivery resolution. A 1080p delivery wants a crop region of at least 1920×1080 from the source.
- Avoid stacking a crop and a separate Zoom effect; both touch the same pixels and the second pass amplifies softening.
- Enable Smart Fit (the icon in the lower-left of the Crop & Zoom designer) to let PowerDirector pick the largest crop region that still fills the project ratio. It doesn’t restore lost detail, but it prevents accidental over-cropping.
The mobile apps add another layer of compression on export. According to CyberLink’s PowerDirector mobile FAQ, free-tier exports cap at 1080p, and 4K export needs the paid plan. Plan your crop around the export ceiling, not the preview.
#PowerDirector Crop Tool vs. Other Editors
CyberLink’s strength is keeping the crop tool a single click away. Some editors bury the same feature under multiple menus.
| Editor | Crop access | Keyframes | Notable limit |
|---|---|---|---|
| PowerDirector 365 | One click on toolbar | Yes | None for crop work |
| Filmora | Right-click clip > Crop and Zoom | Yes | Older Crop dialog reopens for keyframes |
| Adobe Premiere Pro | Effects panel > Transform > Crop | Yes (Position, Scale) | Effect must be applied first |
| DaVinci Resolve | Inspector > Transform | Yes | Transform vs. Crop are separate |
| iMovie | Crop button in toolbar | No (Ken Burns is separate) | No keyframe-based crop |
Some links on this page are affiliate links, which means fone.tips may earn a commission at no extra cost to you.
For a longer side-by-side on the professional side, see this DaVinci Resolve vs. Premiere Pro comparison.
PowerDirector trades depth for speed. Premiere Pro and Resolve give you finer control via separate Transform and Crop nodes, which is what colorists and compositors expect. PowerDirector folds everything into one Crop & Zoom panel, which is faster for typical YouTuber and short-form work but offers less granular control if you need separate position and scale keyframe tracks.
#Mobile Cropping: iOS and Android
The PowerDirector mobile apps (iOS, Android) crop in the same conceptual panel, though controls and paid features vary by platform.
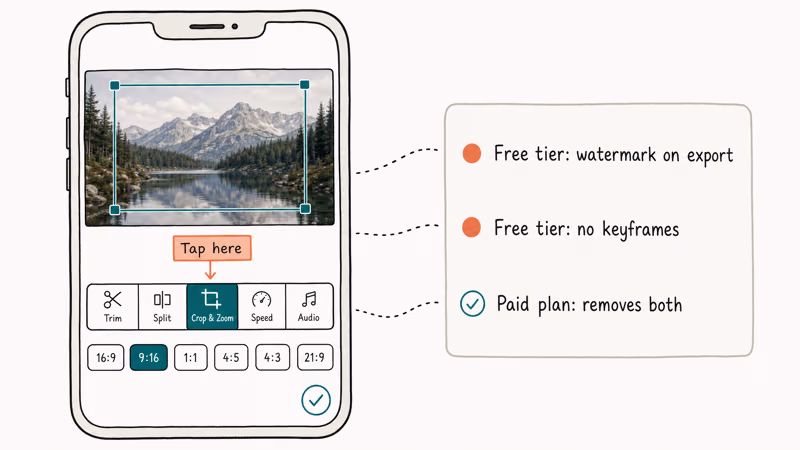
To crop on mobile: tap the clip on the timeline, scroll the bottom toolbar to find Crop & Zoom (it sits to the right of the Trim button), tap it, drag the on-screen handles, pick an aspect ratio, and tap the checkmark. Free-tier users see the same controls but the export adds a watermark in the lower-right corner. The paid plan removes the watermark and unlocks keyframe controls.
The mobile keyframe UI is a row of dots under the preview, not a timeline strip. Tap the diamond icon to add a keyframe at the current position. Small touch targets make mobile keyframes hard to nudge precisely. For any animation more complex than a slow zoom, the desktop app is the better tool.
For purely vertical content where you plan to crop landscape footage to portrait, see this guide on vertical video editor options. Several of them offer better mobile UX than PowerDirector for that one task.
#Common Cropping Problems and Quick Fixes
These issues come up often when cropping in PowerDirector. The fixes below are short on purpose.
- Crop button is grayed out. No clip is selected. Click the clip on the timeline first.
- Black bars appear after crop. Project ratio doesn’t match crop ratio.
Change Project>Aspect Ratio, then re-export. - Keyframes ignored on render. Hardware decoding is buggy on some Intel iGPUs.
Toggle Preferences>Hardware Acceleration off and re-render. - Cropped clip looks pixelated. Source resolution is lower than delivery resolution after the crop region is applied. Use 4K source for 1080p delivery.
- Watermark appears on mobile export. You’re on the free tier. The paid plan removes it.
For the Filmora equivalent, see how to export Filmora without a watermark.
There’s a related need worth flagging: fixing dim source footage before cropping. See this guide on how to brighten a video on Android. Brightness adjustments before crop usually beat color tweaks after.
#Specialized Crop Use Cases
PowerDirector handles a few niche crop scenarios that come up often enough to call out.
For cinematic looks, crop to 21
and pair it with a film grain effect. The full guide on how to make a video look like film covers the color and grain side. The crop alone (black bars top and bottom on a 16 timeline) does most of the visual work.Side-by-side layouts work the same way: crop each clip to half-frame, stack them on parallel tracks. The macOS equivalent is covered in how to put multiple videos on one screen in iMovie.
For event coverage like weddings, where the crop is usually about reframing handheld shots, batch-cropping speeds the work. PowerDirector lets you copy a clip’s Crop & Zoom settings (right-click > Copy Keyframe Attributes) and paste them onto other clips. The full event workflow appears in this guide on marriage video editing.
#Buying PowerDirector Safely
Stick to first-party channels. Buy or trial PowerDirector through CyberLink’s own store, the Microsoft Store on Windows, the Mac App Store on macOS, the Apple App Store for iOS, or the Google Play Store for Android. Those are the only distribution paths CyberLink supports, and they ship code-signed installers that pass Microsoft Defender checks cleanly. Each channel also handles updates automatically, so you’ll always be on a current build.
Skip the “lifetime activated” copies on YouTube and warez forums. Norton and Defender flag many of those installers as bundled malware. The free Essential trial lets you test the crop workflow on real footage at no cost.
#Bottom Line
Drop clip, click Crop & Zoom, pick the platform aspect ratio, drag corners, click OK. That’s the fast path for most YouTube, Reels, and Shorts work. Use 4K source whenever you plan to crop, set the project aspect ratio before exporting, and add keyframes only when you actually need motion. Stick with CyberLink’s official trial or paid plans through the channels above.
#Frequently Asked Questions
Can you undo a crop after applying it in PowerDirector?
Yes. Press Ctrl+Z (Windows) or Cmd+Z (Mac) immediately after closing the Crop & Zoom designer. If you’ve already saved or made later edits, reopen Crop & Zoom on the same clip and click the reset arrow in the upper-right of the designer to clear the crop without affecting other edits.
Does cropping in PowerDirector affect video quality?
Only if you over-crop. Cropping a 4K clip down to a 1080p delivery region keeps full sharpness because no upscaling is needed. Cropping a 1080p source past about 50% of the frame forces upscaling, which softens detail.
Can I crop multiple clips at once in PowerDirector?
No batch action exists. The workaround: crop one clip, right-click and pick Copy Keyframe Attributes, then paste onto each target.
How do I create a pan effect using the crop tool?
Open Crop & Zoom, set the playhead to 0
, position the crop on the left side of the source frame, and click Add Keyframe. Move the playhead to your end time, drag the crop to the right side, and click Add Keyframe again. PowerDirector interpolates the pan between the two keyframes. Pick Ease-in-out from the curve dropdown for a smoother motion.Is it legal to crop a video to remove a watermark?
Your own watermark, fine. Someone else’s copyrighted footage, no — it’s copyright infringement and violates platform terms.
Does PowerDirector mobile have the same crop features as desktop?
The same panel, but with limits. Free-tier mobile users get the static crop and aspect ratio presets but no keyframe animation and a watermark on export. Paid PowerDirector mobile (sold as a yearly subscription on the App Store and Google Play) unlocks keyframes and removes the watermark. The keyframe UI on mobile is dots-under-preview, not a timeline strip, which is harder to nudge precisely on small screens.
What aspect ratio should I crop a TikTok video to?
9
. TikTok displays full-screen vertical video at 1080×1920, and any other ratio gets letterboxed or cropped further by the app. Set your PowerDirector project ratio to 9 first, then crop, so the export matches the platform.How much does PowerDirector cost in 2026?
CyberLink lists PowerDirector 365 at around $4.33/month on annual billing and PowerDirector Ultra (one-time) at around $99.99 on the official CyberLink store; pricing varies by region and promotion. The free PowerDirector Essential trial covers basic cropping but limits export resolution and adds a watermark. Try the trial first to confirm the workflow fits your needs.