The Ultimate Guide to Discord Screen Share in 2026
Master Discord screen share on desktop and mobile with this guide covering setup, quality settings, troubleshooting, and tips for smooth streaming.
Quick AnswerTo screen share on Discord, join a voice channel or start a call, then click the 'Share Your Screen' button at the bottom of the window. You can share your entire screen or a specific application window.
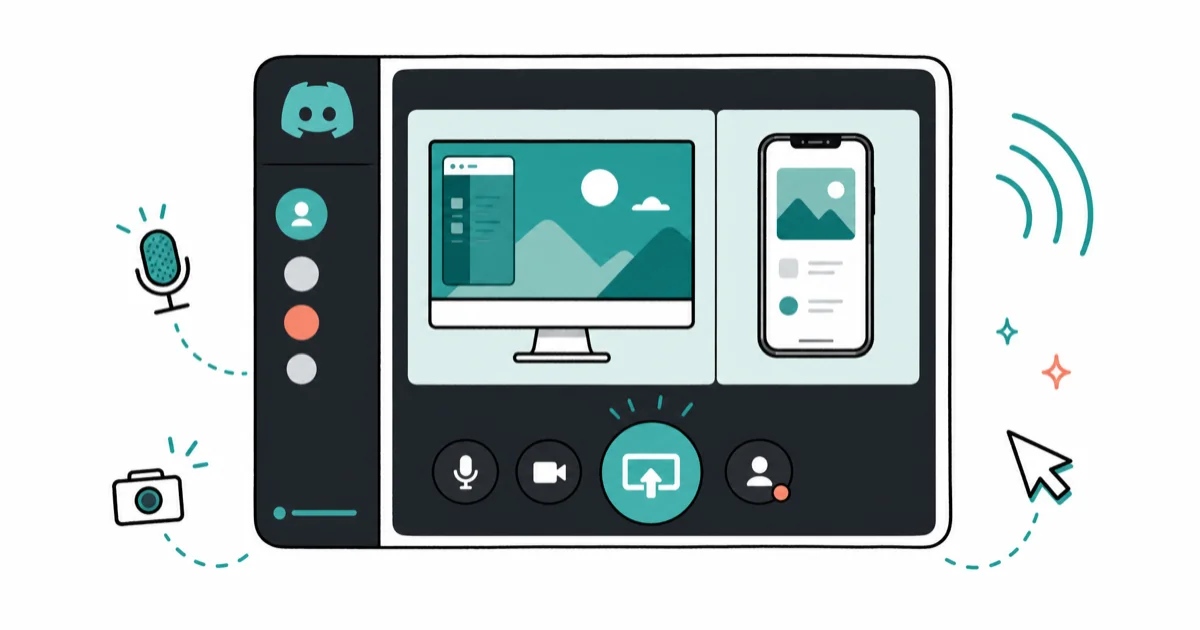
Discord screen share lets you broadcast your screen to anyone in a voice channel or direct call, with no extra software required. On Windows and macOS, the feature works as soon as you’re in a voice channel; the only friction is knowing where to find the button, which sharing mode to choose, and when to pause notifications before a private message or browser tab appears for everyone watching.
Use screen-share fixes only on your own device, your own Discord account, or a session you are authorized to host or support. Screen sharing can reveal messages, tabs, files, notifications, and private servers, so keep consent clear, follow legal privacy boundaries, close private content before testing capture settings, warn participants before sharing, and stop immediately if someone’s personal information appears on screen.
- Join a voice channel, click “Share Your Screen,” choose what to share, then click “Go Live” to start.
- Share your entire screen, a specific app window, or a single Chrome tab on desktop.
- Nitro subscribers stream at up to 4K/60 FPS; free accounts are capped at 720p/30 FPS.
- Windows shares audio automatically; macOS requires a virtual audio driver like BlackHole
- Use Ctrl + Shift + S to start or stop screen sharing instantly
#Discord Screen Share Overview
Discord screen share broadcasts your computer or mobile screen to others in a voice channel or direct message in real time.
According to Discord’s official help documentation, screen share is available on Windows, macOS, Linux, iOS, and Android; desktop versions support higher quality settings and application-specific sharing, while mobile supports full-screen sharing only.
The feature works for gaming sessions, remote collaboration, informal presentations, and technical support where showing a screen is faster than describing the problem.
#How to Screen Share on Discord Desktop
#Start the Screen Share
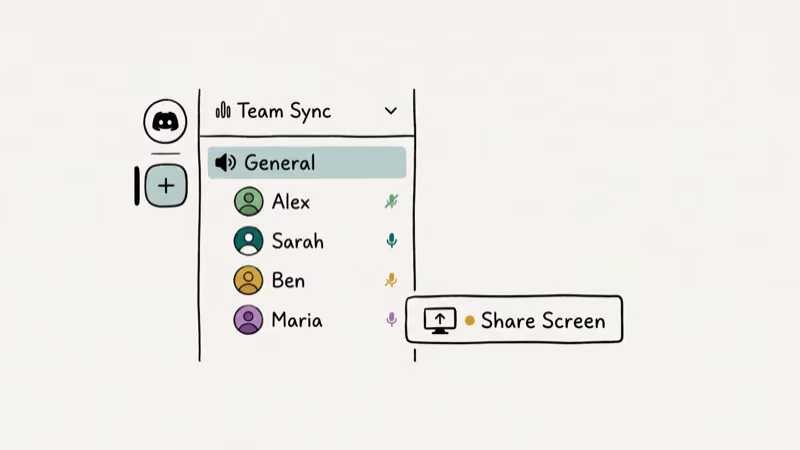
Open Discord and join a voice channel or start a voice call. Look for the Share Your Screen button at the bottom of the Discord window, then click it to open the sharing options.
#Choose What to Share
Discord offers three sharing modes on desktop. Entire Screen broadcasts everything on your monitor; any window you switch to becomes visible. Application Window shares only one specific program, keeping other windows private. Browser Tab shares a single Chrome tab; it’s ideal for presenting web content without showing your full browser.
For most use cases, Application Window is the right choice: it keeps your desktop, taskbar, and other open programs private while sharing only what you intend.
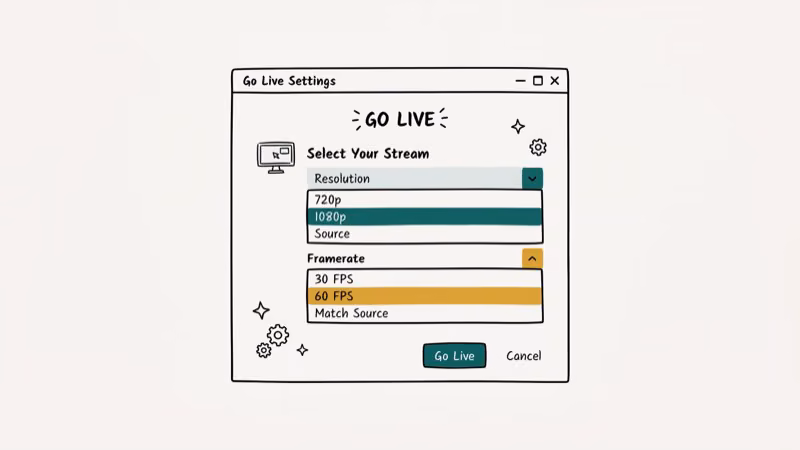
#Adjust Quality Settings
Before clicking Go Live, set your stream quality:
| User Type | Max Resolution | Max Frame Rate |
|---|---|---|
| Free | 720p | 30 FPS |
| Discord Nitro | 4K | 60 FPS |
Discord recommends 720p at 30 FPS for standard conversations and walkthroughs; game streaming benefits from higher settings if you have Nitro.
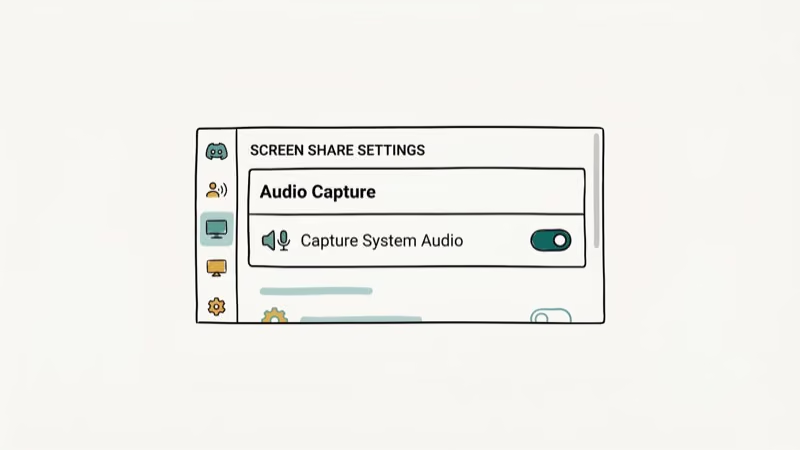
#Audio Sharing by Operating System
Audio behavior varies significantly by operating system. Windows captures and shares audio automatically. macOS requires installing additional software such as Loopback or BlackHole to capture system audio; Discord alone can’t share it without a virtual audio driver. Linux doesn’t support audio sharing at all.
If viewers can’t hear sound from your stream, check our guide on Discord stream no sound for specific fixes.
#How to Screen Share on Discord Mobile
#Start a Mobile Screen Share
Open Discord and join a voice channel or start a call. Tap the Share Screen button in the call controls, then confirm the permission prompt to allow screen recording. Your screen begins broadcasting immediately.
Mobile screen share captures your entire screen; you can’t limit it to a specific app. Some apps with DRM protection, like Netflix, will show a black screen to viewers even if your phone’s screen looks normal.
#End a Mobile Screen Share
Tap Stop Sharing at the top of the screen. Discord doesn’t stop sharing automatically.
#Why Is My Discord Screen Share Not Working?
#Black Screen for Viewers
If viewers see a black screen, switch the game or application out of full-screen mode; use windowed or borderless windowed mode instead. On Windows, some hardware-accelerated apps block screen capture; running Discord as administrator typically fixes this. Also verify you selected the correct window in the sharing options.
#Audio Not Working
Verify the correct audio output is selected in Discord’s Voice & Video settings. On Windows, check that the application you’re sharing is listed under Audio Source in the sharing panel. For macOS, confirm your virtual audio driver is installed and set as the output device.
#Permission Errors
On Windows, run Discord as administrator. On macOS, grant screen recording permission in System Settings > Privacy & Security.
#Connection and Performance Issues
Close unnecessary background applications to free CPU and GPU resources. Discord recommends sufficient upload bandwidth for stable streaming; check your connection speed and reduce stream quality in the share settings if you experience lag. Try disabling hardware acceleration in Discord Settings > Appearance > Advanced if performance is still poor.
#Advanced Tips for Better Screen Shares?
#Use Keyboard Shortcuts
Discord keyboard shortcuts speed up screen sharing on Windows. Ctrl + Shift + M mutes or unmutes your microphone. Ctrl + Shift + V toggles video. Ctrl + Shift + S starts or stops screen share.
The Ctrl + Shift + S shortcut is the fastest way to toggle sharing mid-conversation, since you don’t have to move the mouse to the call controls.
#Integrate with OBS Studio
For professional-quality broadcasts, use OBS Studio alongside Discord. Set OBS as a virtual camera, then select the OBS Virtual Camera as your video source in Discord. This lets you add overlays, switch between scenes, and control quality settings beyond Discord’s built-in options.
#Manage Notifications During Shares
Switch Discord to DND mode before screen sharing to prevent notification pop-ups appearing on your viewers’ screens. You’ll also want to close email clients or messaging apps that might reveal private information.
#Discord Screen Share vs. Other Platforms
Discord’s screen share integrates seamlessly with its chat and voice features, which gives it an advantage for ongoing communities. For comparison:
- Discord vs. Zoom: Zoom offers more meeting management tools; Discord is better for ongoing community channels
- Discord vs. Skype: Discord has better audio quality and tighter gaming integration
- Discord vs. Telegram: Telegram doesn’t support screen sharing, giving Discord a significant advantage for collaborative sessions
#Bottom Line
Screen sharing on Discord takes three clicks: join a voice channel, click Share Your Screen, and click Go Live. Application Window mode is the safest choice because it keeps the rest of your screen private. For audio on macOS, install a virtual audio driver before you start.
If you need 60 FPS or 4K quality, Discord Nitro is the only way to unlock those settings. For public broadcasts, see our Discord vs Twitch comparison.
#Frequently Asked Questions
Why can’t I see the Share Screen button?
The Share Your Screen button only appears when you’re in an active voice channel or voice call. It won’t show in text channels. If you’re in a voice channel and still don’t see it, try restarting Discord or updating to the latest version.
Can I screen share on Discord mobile?
Yes, on both iOS and Android. Tap Share Screen in your call controls. Mobile sharing is full-screen only; you can’t limit it to one app.
Why is my Discord screen share lagging?
Reduce your stream quality settings to 480p or lower, close background applications, and check your upload speed. For game streaming, disable in-game overlays from other apps like GeForce Experience or Steam that might conflict with Discord’s screen capture.
Does Discord screen share work in DMs?
Yes. Screen share works in one-on-one and group DMs, not just server voice channels. Start a call in the DM and click Share Your Screen exactly the same way you would in a server. The quality settings and sharing modes are identical whether you’re in a DM or a community channel.
Is Discord screen share free?
720p at 30 FPS is free. Nitro unlocks 1080p at 60 FPS and 4K for $9.99/month. Nitro’s higher resolution and frame rate make a noticeable difference for game streaming compared to the free 720p cap.
Can I screen share and use the Discord overlay at the same time?
Yes, but they can conflict on some hardware setups. If your overlay disappears during a screen share session, disable hardware acceleration in Discord’s Appearance settings. On many NVIDIA GPU systems this clears the overlay conflict and lets both features run at once. See our Discord overlay troubleshooting guide for more fixes.

Apps Crashing After iOS 27 Update? Fix Order (2026)
Apps crashing after the iOS 27 update? Update the app in the App Store first, then offload and reinstall to clear stale cache, then restart. The fix order.

Do AI Translation Earbuds Work Offline? What to Know
Do AI translation earbuds work offline? A few do with downloaded language packs, but most need the cloud. Here's what works offline and what you give up.

How to Set Up Translation Earbuds (Pairing and Modes)
How to set up translation earbuds: charge, install the app, pair over Bluetooth, pick two languages, and choose a mode. A step-by-step first-use guide.

Translation Earbuds Not Translating? How to Fix Them
Translation earbuds not translating? Usually it's the app, the internet, or the language settings. Here's how to fix pairing, sound, and lag fast.