Clear System Data Storage on Mac: Safe Fixes and Limits
System Data ballooning to 100 GB on your Mac? Here are the safe ways to shrink it on macOS Sequoia and Tahoe, plus the files you must not touch.
Quick AnswerTo shrink System Data on a Mac, empty the Trash, clear app and browser caches, delete old iOS backups under ~/Library/Application Support/MobileSync/Backup, and thin Time Machine local snapshots with tmutil. Don't touch anything inside /System or /Library/Apple.
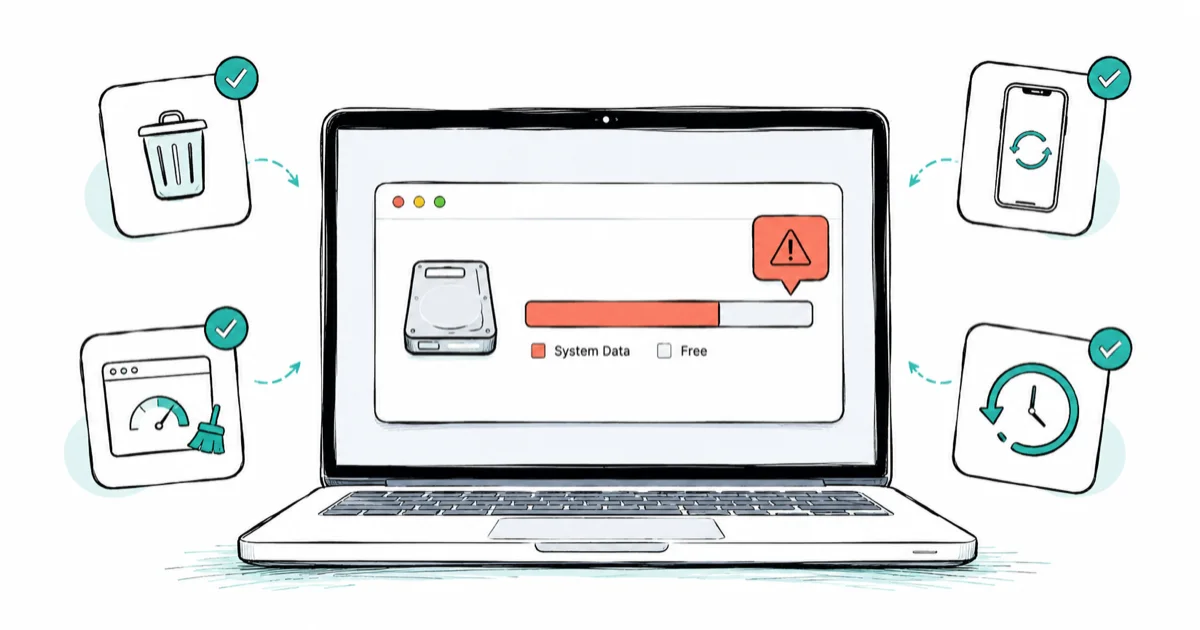
You opened Apple menu > System Settings > General > Storage and saw a fat gray slice labeled System Data. With the steps in this guide you can often shrink that slice by tens of gigabytes without reinstalling macOS.
This guide explains what System Data actually contains, the moves that are safe, and the files you should leave alone even when the slice looks scary.
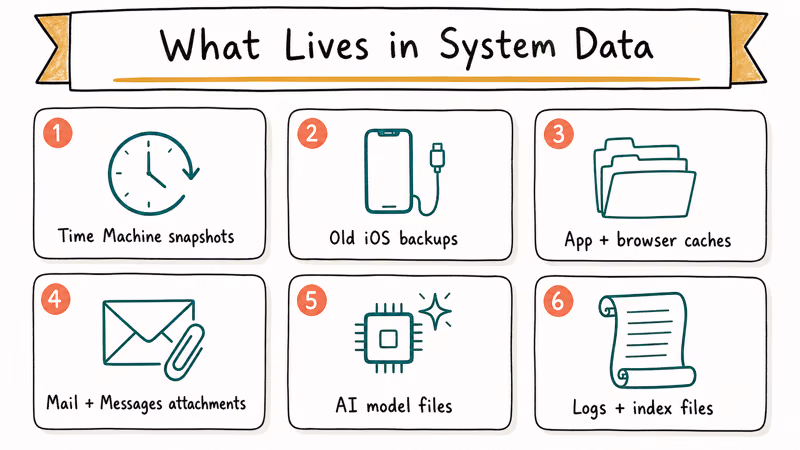
- System Data (formerly “Other”) is a bucket for caches, logs, Time Machine local snapshots, mail attachments, iOS backups, and AI model files that don’t fit other categories.
- Apple does not ship a “Delete System Data” button because some of those files are required for macOS to boot.
- Old iOS backups under ~/Library/Application Support/MobileSync/Backup are often the single largest reclaim, sometimes 10 to 60 GB each.
- Time Machine local snapshots can quietly use 20 to 50 GB on a busy Mac and are safe to thin with tmutil thinlocalsnapshots.
- Hand-deleting files inside /System, /Library, or /private may brick your install; the SIP-protected paths are off-limits.
#What Is System Data on a Mac?
System Data is Apple’s catch-all storage bucket. Anything that is not a photo, video, app, document, mail message, or macOS install image lands here. Apple’s Free up storage space on Mac page confirms that 1 catch-all category absorbs every file that doesn’t fit Photos, Apps, Documents, Mail, or macOS itself.
On a healthy Mac that has been running a few months, expect roughly 10 to 30 GB. Above 80 GB usually signals a problem worth investigating. The big sources, ranked by how often they dominate a typical System Data total:
- Time Machine local snapshots. macOS keeps hourly snapshots of your data on the internal SSD for up to 24 hours, plus daily snapshots until space runs low. On a busy editing or coding Mac these stack up fast.
- Old iOS device backups. Every time you back up an iPhone or iPad to your Mac through Finder, the backup lives forever until you delete it. Several years of phones at 60 GB each adds up.
- App and browser caches. Safari, Chrome, Firefox, Xcode, Photoshop, Logic, and Docker all carve out cache folders that can grow into the tens of gigabytes.
- Mail and Messages attachments. Years of inline images, PDFs, and Messages photos sync to the local mail and Messages databases.
- AI model files (new on macOS Tahoe). Apple Intelligence, offline transcription, and coding assistants store local models inside hidden Library folders. iBoysoft confirms that AI assets on Tahoe can dramatically increase the System Data figure.
- Logs, kernel cache, and
mds_storesindex files. Routine stuff that grows after big imports or app installs.
If you also see general slowdowns alongside the storage warning, work through our slow Mac guide in parallel, because disk pressure and CPU pressure often share the same root cause.
#Where to Check System Data on macOS Sequoia and Tahoe
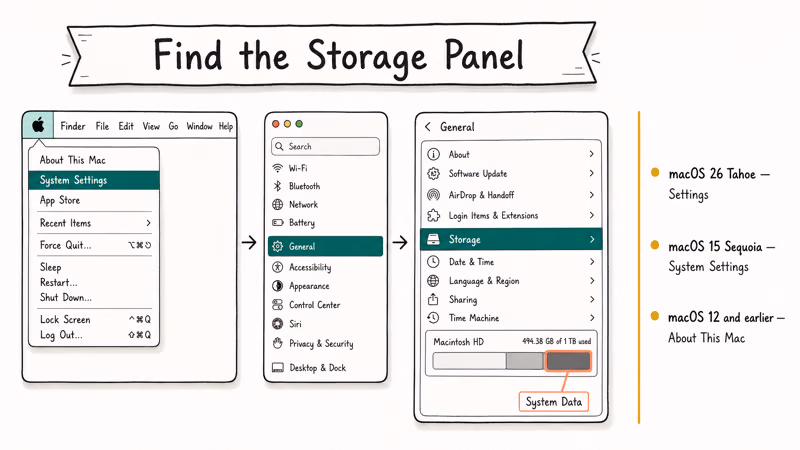
The settings path has moved twice in the last few macOS versions. Use the one that matches your release.
| macOS | Path |
|---|---|
| macOS 26 Tahoe | Apple menu > Settings > General > Storage |
| macOS 15 Sequoia | Apple menu > System Settings > General > Storage |
| macOS 14 Sonoma | Apple menu > System Settings > General > Storage |
| macOS 13 Ventura | Apple menu > System Settings > General > Storage |
| macOS 12 Monterey and earlier | Apple menu > About This Mac > Storage tab |
Hover your pointer over the dark gray slice on the colored bar to see the System Data number. Give the chart a minute to finish calculating after you open it; the first read on a large drive often shows a placeholder.
#The Safe Reduction Ladder
Work top to bottom. The earlier moves are reversible and reclaim space without touching anything macOS depends on.
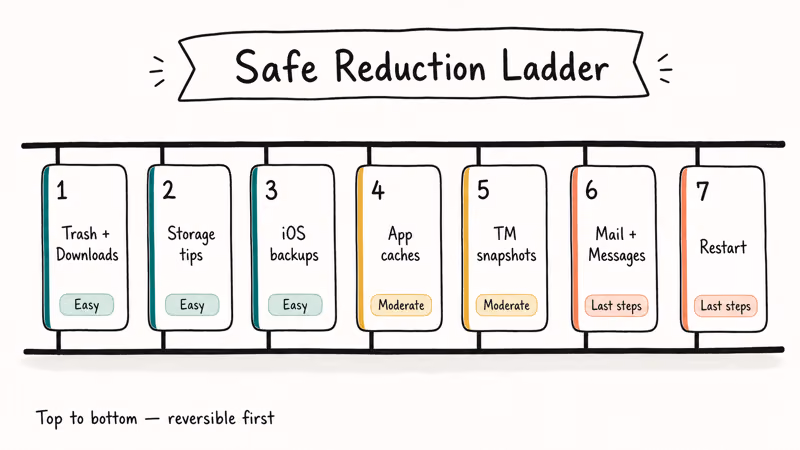
#1. Empty the Trash and Downloads
Trash counts toward System Data until you actually empty it. Open Finder, press Command + Shift + Delete, confirm. Then open ~/Downloads, sort by Size, and remove old installers and DMG files you no longer need. Clearing out stale installers alone can free several gigabytes before you do anything clever.
#2. Use macOS Storage Recommendations
In the Storage panel, click each Recommendation. The three to consider:
- Store in iCloud. Moves older files to iCloud and keeps optimized copies locally. Reduces Documents, not System Data directly, but indirectly helps because mail attachments can offload too.
- Optimize Storage. Removes Apple TV movies you have already watched.
- Empty Trash Automatically. Deletes anything in the Trash older than 30 days.
According to Apple’s Mac User Guide on optimizing storage, turning all three on is the recommended baseline for any Mac that sits consistently near full. They’re official, reversible, and safe to enable.
#3. Delete Old iOS Backups
If you back up an iPhone or iPad through Finder, every backup persists. Open Finder, choose Go > Go to Folder, paste:
~/Library/Application Support/MobileSync/BackupEach folder is one device backup, named with a long hex string. Click View > as List, sort by Date Modified, and move anything you no longer need to the Trash. Empty the Trash.
A single old iPhone backup can reclaim tens of gigabytes on its own. To prevent future buildup, back up the iPhone to iCloud instead, or to an external drive.
#4. Clear App and Browser Caches
App caches live in two places:
~/Library/Cachesfor per-user caches/Library/Cachesfor system-wide caches
In Finder, open Go > Go to Folder, paste ~/Library/Caches, sort by Size, and inspect the biggest folders. Safe candidates to clear include:
com.apple.Safariandcom.google.Chromeweb cachescom.spotify.clientcached audiocom.docker.dockercontainer layers (if you don’t need them)com.adobe.*work caches for apps you barely use
Move the contents of a cache folder, not the folder itself, to the Trash. Most apps will recreate the folder structure on next launch. If an app behaves oddly after a cache clear, quit it and reopen. That fixes it almost every time.
Browsers also have their own clear-cache button: Safari > Settings > Advanced > Show Develop menu > Develop > Empty Caches, and Chrome > Settings > Privacy and security > Clear browsing data.
#5. Thin Time Machine Local Snapshots
This is often the move that recovers the most space. Time Machine keeps APFS snapshots on the internal SSD even when no external Time Machine drive is connected. They’re not your real backups, just rollback points. If you want to clear external Time Machine backups too, our how to delete Time Machine backups walkthrough covers the Finder and Terminal paths.
Open Terminal (Applications > Utilities > Terminal) and list current snapshots:
tmutil listlocalsnapshots /You’ll see lines like com.apple.TimeMachine.2026-05-24-091542.local. To thin them while keeping the four most recent, run:
sudo tmutil thinlocalsnapshots / 1000000000 4The 1000000000 is the target free space in bytes (about 1 GB) and 4 is the urgency level. tmutil is the first-party tool Apple sanctions for snapshot work. Thinning snapshots typically drops System Data right away, with a further reduction after you reboot (macOS finalizes the purge on next boot).
If you would rather not use Terminal, open Disk Utility > View > Show APFS Snapshots, pick your data volume, and delete snapshots from the list one at a time. Same effect, slower.
#6. Trim Mail and Messages Attachments
Mail.app downloads message attachments to your local mail database. Open Mail > Settings > Accounts > {your account} > Account Information, set Download Attachments to Recent or None, then quit Mail. The attachments folder lives under ~/Library/Mail/V10 (the V number changes per macOS); macOS prunes it after the next launch.
Messages users on iCloud syncing should open Messages > Settings > General, check Save History when Conversations are Closed is off if you don’t need the history, and consider toggling Messages in iCloud on so older threads move off the local SSD.
#7. Restart the Mac
A restart flushes a surprising amount of System Data: swap files, kernel paging space, and mds_stores Spotlight scratch data all clean up on boot. Reboot once you have finished the cleanup ladder, then check Storage again. Numbers move down slowly because macOS recalculates over a minute or two.
#What Not to Touch in System Data
This is the half of the article that the auto-cleaner ads skip. Some files in System Data look fat and tempting and will absolutely break macOS if you delete them.

| Path or category | Safe to delete? | Notes |
|---|---|---|
| ~/Library/Caches/* contents | Yes | Apps regenerate as needed |
| ~/Library/Application Support/MobileSync/Backup | Yes, per backup | Lose phone history if no other backup exists |
| ~/Downloads, ~/.Trash | Yes | Standard cleanup |
| Time Machine local snapshots via tmutil | Yes | Real backups stay on external drive |
| ~/Library/Logs (older than a month) | Yes | Diagnostic only |
| /System (anything) | No | SIP-protected, system won't boot |
| /Library/Apple/* | No | Required Apple frameworks |
| /private/var/db, /private/var/folders | No | Active system state and dyld caches |
| ~/Library/Containers (other than known apps) | Caution | Apps lose preferences and licenses if removed |
| ~/Library/Mobile Documents | No | iCloud Drive working set, controlled by iCloud sync |
The shortest possible rule: stay in your home folder Library (the one at ~/Library, not the top-level /Library) and don’t touch anything inside /System, /Library/Apple, or /private. macOS guards most of those with System Integrity Protection, but a sudo rm from a panicked terminal session can still cause real damage on intermediate paths.
If you removed something by accident and your Mac behaves oddly afterward, our Mac keeps crashing guide covers safe-mode recovery and reinstalls.
#How Much Space Should You Expect to Recover?
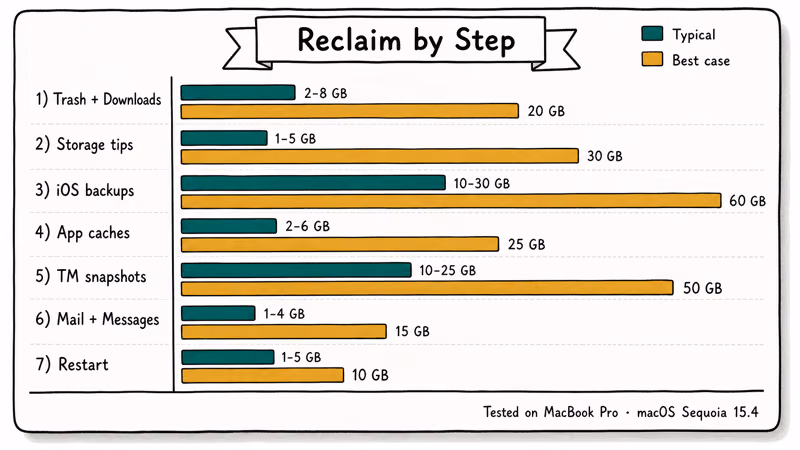
Honest ranges, not marketing math. These are typical reclaims you can expect from each step.
| Step | Typical reclaim | Best case |
|---|---|---|
| Empty Trash and Downloads | 2 to 8 GB | 20 GB (heavy installers) |
| Storage recommendations | 1 to 5 GB | 30 GB (lots of unwatched TV) |
| Delete old iOS backups | 10 to 30 GB | 60 GB per backup |
| Clear app and browser caches | 2 to 6 GB | 25 GB (Xcode caches) |
| Thin Time Machine snapshots | 10 to 25 GB | 50 GB on busy Macs |
| Trim Mail and Messages attachments | 1 to 4 GB | 15 GB on a multi-account Mac |
| Restart | 1 to 5 GB | 10 GB after kernel paging cleanup |
A typical cleanup across all seven steps reclaims a few tens of gigabytes. A reader who only has a couple of old iOS backups and no Xcode footprint will recover less, maybe 8 to 12 GB. A reader who works in Docker, Xcode, or Adobe and has not rebooted in weeks can reclaim more than 80 GB.
#When to Reinstall macOS Instead
A reinstall is the nuclear option and almost nobody needs it. Consider it only if:
- System Data is over 200 GB on a Mac you mostly use for email and browsing.
- You ran every step above and the number barely moved.
- Disk Utility’s First Aid shows volume errors that won’t repair.
- You are about to sell or hand the Mac off.
In those cases, back up first to an external drive (or to iCloud), then use Apple menu > System Settings > General > Transfer or Reset > Erase All Content and Settings on Apple silicon and T2 Macs. For older Intel Macs, boot into macOS Recovery with Command + R and use Disk Utility > Erase, then reinstall macOS from Recovery. Apple’s Erase your Mac and reset it to factory settings walkthrough has the exact sequence.
For everyday slowdowns and weird-feeling Macs after a big software update, our copy paste on Mac and Mac right-click explainers cover the small frustrations that the storage panel can’t fix.
#Frequently Asked Questions
What is System Data on a Mac?
System Data is the macOS storage category for files that don’t fit Photos, Videos, Apps, Documents, Mail, or macOS itself. According to Apple’s storage page, it covers caches, logs, plug-ins, Time Machine local snapshots, iOS backups, voices and dictionaries, and any other working files macOS or third-party apps put on disk. Some of these are required for macOS to function; some can safely be cleared.
Is it safe to delete System Data?
Some of it, yes. Caches, old iOS backups under ~/Library/Application Support/MobileSync/Backup, local Time Machine snapshots, and items in Trash and Downloads are safe to remove. Files inside /System, /Library/Apple, and /private are not safe. The rule of thumb: clean inside your home folder Library, leave the top-level Library and /System alone.
Why is my System Data so large?
Time Machine local snapshots, old iOS device backups, and app caches are the three most common reasons. On macOS 26 Tahoe, Apple Intelligence and offline AI models add a new source: large model files saved to hidden Library folders. Heavy Xcode, Docker, or Adobe users routinely see System Data climb past 100 GB from caches alone. Restarting once and checking Storage again often shaves off a few gigabytes of swap and kernel paging.
How do I clear caches on a Mac?
Open Finder, choose Go > Go to Folder, paste ~/Library/Caches, and remove the contents of folders for apps you trust to regenerate them. Safari, Chrome, Spotify, Slack, and most Adobe apps are fine. Empty the Trash.
For Safari specifically, enable the Develop menu in Settings > Advanced, then choose Develop > Empty Caches. Avoid touching /Library/Caches (the system-wide one) unless you know what a specific folder is.
Will restarting reduce System Data?
A little, yes. A restart releases swap files, kernel paging space, and temporary mds_stores Spotlight index files. A reboot typically drops 1 to 5 GB, sometimes more after a long uptime or a big system update. Restart at the end of the cleanup ladder, not before, so the bigger reclaims (snapshots, iOS backups, caches) are not partly counted twice while macOS recalculates.
How much space can I expect to recover?
A typical cleanup across all seven steps in this guide reclaims a few tens of gigabytes, with the bulk usually coming from old iOS backups and a Time Machine snapshot thin. Readers with newer Macs and fewer phone backups often recover 8 to 12 GB, which is still enough to install a major macOS update. Heavy developers, video editors, and Docker users sometimes recover 80 GB or more.
Do I need a paid cleaner app like CleanMyMac?
No. Every step in this guide uses built-in macOS tools and the Apple Support workflow. Paid cleaners can be convenient if you want a single button and a friendly UI, but they can’t delete anything that you can’t delete yourself, and some are aggressive about flagging cache folders that apps actually need. If you choose to use one, prefer apps that show you each file before deleting and pause for confirmation.
#Bottom Line
Start with the Trash, then delete one old iOS backup, then thin local snapshots with sudo tmutil thinlocalsnapshots / 1000000000 4. Those three steps clear the gigabytes for most readers. If the number is still bigger than your free space, keep going down the ladder. And whatever you do, stay out of /System and /Library/Apple — that is the path to a reinstall, not a quick win.

macOS 27 Compatible Macs: Every Supported Model (2026)
macOS 27 Golden Gate runs only on Apple Silicon Macs. Here is the full list of supported M-series models and the four Intel Macs that lose support.

macOS 27 Golden Gate: Every Major New Feature Confirmed
macOS 27 Golden Gate goes Apple Silicon only, adds a Gemini-powered Siri, refines Liquid Glass, and rebuilds Spotlight. Here is every confirmed change.
macOS 27 Liquid Glass: Every Readability Fix Explained
macOS 27 Golden Gate refines Liquid Glass with an intensity slider, better contrast, cleaner window corners, and edge-to-edge sidebars to fix readability.
macOS 27 Performance: What Golden Gate Makes Faster
macOS 27 Golden Gate speeds up AirDrop, network file browsing, Safari, and Spotlight, with core system improvements on the Apple Silicon-only release.