Remove Dropbox From Mac: Full Uninstall Guide (2026)
Remove Dropbox from Mac: sign out, uninstall, clear hidden Library files, revoke Full Disk Access, and verify. Covers macOS Sonoma and Sequoia builds.
Quick AnswerSign out of Dropbox in the menu bar, quit the app, drag Dropbox.app from Applications to Trash, and remove leftover files in ~/Library/Application Support/Dropbox and related Library subfolders. Files in your cloud account stay safe.
Removing Dropbox from a Mac takes more than dragging the app to Trash. Dropbox installs background helpers, login items, and a privileged update tool, and it can leave preference and cache data scattered across your Library folders.
- Sign out of Dropbox before uninstalling so the cloud account no longer treats this Mac as a linked device
- The Dropbox app, the local sync folder, and the Dropbox account are three separate things that you remove independently
- Hidden files live under ~/.dropbox, ~/Library/Application Support/Dropbox, ~/Library/LaunchAgents, and /Library/PrivilegedHelperTools
- Revoke Full Disk Access and Files and Folders permissions in System Settings so old grants don’t transfer if you reinstall
- Restart the Mac and check Activity Monitor afterward to confirm no Dropbox process is still running
#What’s the Difference Between Unlinking, Uninstalling, and Deleting Your Account?
People searching for “remove Dropbox from Mac” usually mean one of three things. Mix them up and the cleanup feels incomplete.
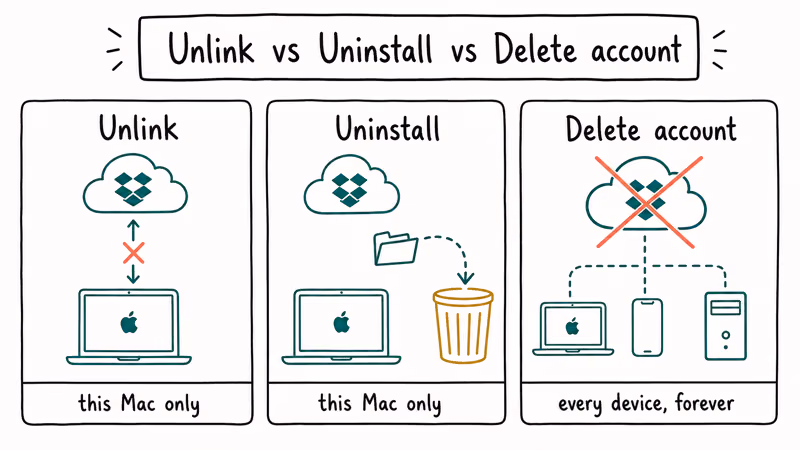
Unlinking disconnects this specific Mac from your Dropbox account. Sync stops here, but the cloud copy stays untouched and other devices keep working. Uninstalling removes the Dropbox app and its support files from this Mac. Deleting your account permanently wipes every file from Dropbox’s servers across every device.
Sort out which goal applies before you start. Switching to iCloud Drive or Google Drive only requires unlinking and uninstalling, and closing the account is rare. The third path is irreversible: once Dropbox finishes the deletion process there is no recovery, so reserve it for accounts you really want gone forever, not for a temporary break.
According to Dropbox’s uninstall help page, signing out of the desktop app before uninstalling is the official sequence. Skipping this step leaves stale credentials that can block a future reinstall.
#Step 1: Sign Out of Dropbox in the Menu Bar
Open the Dropbox menu bar icon (top-right of the Mac screen). Click your avatar, then Preferences, then the Account tab. Click Sign out. The icon disappears from the menu bar.
Signing out removes the auth token Dropbox keeps on this Mac. Cloud files stay put. The local sync folder stays too.
If the menu bar icon is missing, the app probably isn’t running. Open Applications, double-click Dropbox.app, wait for the icon to appear in the menu bar, then sign out using the steps above. The icon usually shows up within five seconds, but a slow Mac can take twenty seconds.
#Step 2: Quit Dropbox and Move the App to Trash
Click the menu bar icon one more time, hit the gear, and select Quit Dropbox. Wait three or four seconds for background helpers to settle.
Open Finder, go to Applications, and drag Dropbox.app to the Trash. Empty the Trash. macOS may ask for your password to remove the privileged components. Type it in.
That removes the visible app. Hidden files stay behind, which is the next step.
#What Leftover Files Does Dropbox Leave on Your Mac?
This is the part most uninstall guides skip. Dropbox installs files in several places, and only one of them lives in Applications. Check these paths after uninstalling:
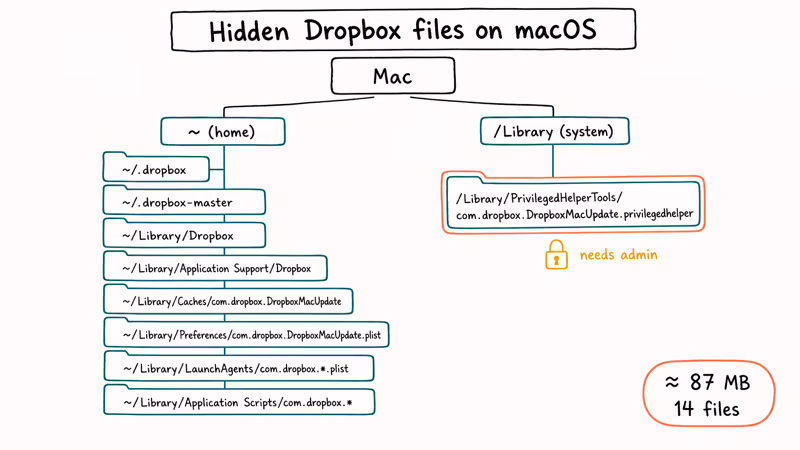
| Path | What’s there |
|---|---|
~/.dropbox | Account state, sync metadata |
~/.dropbox-master | Newer Dropbox state directory |
~/Library/Dropbox | Older versions only |
~/Library/Application Support/Dropbox | App support, badges, settings |
~/Library/Caches/com.dropbox.DropboxMacUpdate | Update cache |
~/Library/Preferences/com.dropbox.DropboxMacUpdate.plist | Updater preferences |
~/Library/LaunchAgents/com.dropbox.*.plist | Auto-start launch agents |
~/Library/Application Scripts/com.dropbox.* | App sandbox scripts |
/Library/PrivilegedHelperTools/com.dropbox.DropboxMacUpdate.privilegedhelper | System-wide helper (needs admin) |
To delete them, open Finder, press Cmd + Shift + G, paste each path, and drag whatever is in there to Trash. The last entry under /Library/PrivilegedHelperTools requires admin rights, so macOS prompts for your password.
If you only see two or three of those paths on your Mac, that’s normal. The exact set depends on which Dropbox version installed last.
#Step 3: Decide Whether to Keep the Local Dropbox Folder
The local Dropbox folder in your home directory (typically at /Users/yourname/Dropbox) is separate from the app. Removing the app doesn’t touch this folder, and it may hold a large local copy of synced files.
Back up first. Even though the cloud copies are safe, deleting this folder loses any local-only files you forgot to upload. Compare the folder’s size to your cloud quota at dropbox.com to confirm everything synced. Then drag the folder to Trash and empty it. Or rename it to Dropbox-archive and delete it later if you want a safety buffer.
If you want the cloud files later, sign in at dropbox.com without reinstalling the desktop app. The web interface streams every file without using local disk.
#Step 4: Revoke Full Disk Access and Login Items
macOS keeps a record of every permission grant, even after the requesting app is gone. Old Dropbox grants persist in System Settings until you remove them, and they get reused if you reinstall.
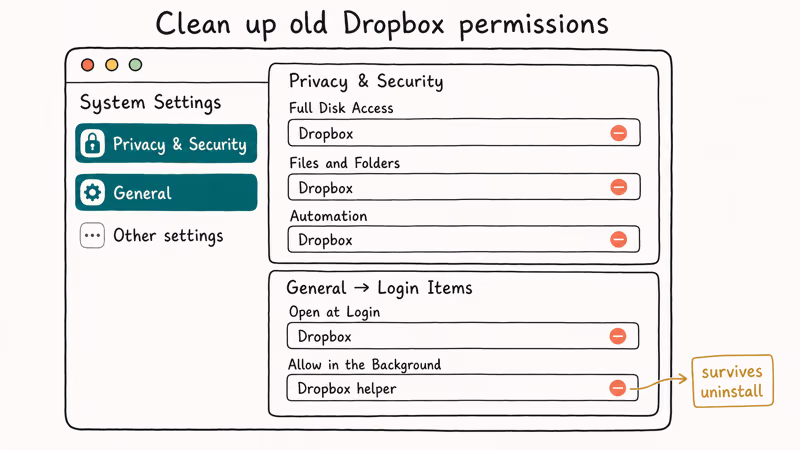
Go to System Settings → Privacy & Security. Check three lists:
- Full Disk Access: remove any Dropbox entry
- Files and Folders: remove Dropbox entries (per-folder grants)
- Automation: remove Dropbox if listed
Then go to System Settings → General → Login Items. Look in both Open at Login and Allow in the Background. Remove every Dropbox-related row.
Apple’s login items support page confirms that some background items only show up under “Allow in the Background” rather than the visible Login Items list, which is why a Dropbox helper can survive an app uninstall.
#Step 5: Restart and Verify Removal
Restart the Mac. Background helpers and launch agents that ignored the uninstall fully release on reboot.
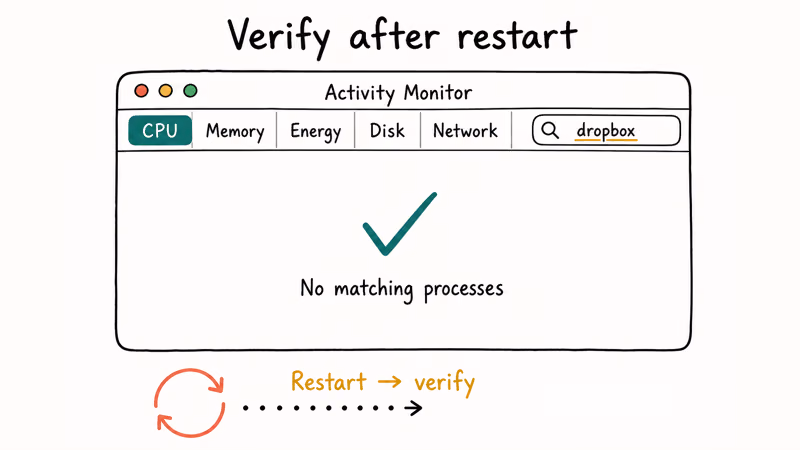
After restart, open Activity Monitor (Applications → Utilities). Type “dropbox” in the search box. The list should be empty. If anything still shows up, the file is most likely under ~/Library/LaunchAgents or /Library/PrivilegedHelperTools, so go back to the leftover-files table and delete that specific path.
Open Finder, press Cmd + Shift + G, and paste each path from the table again to confirm nothing reappeared. Some macOS versions recreate empty ~/.dropbox after a privileged helper unloads. An empty folder is fine.
For a parallel cleanup after this, the clear cache on Mac guide walks through what else builds up in ~/Library/Caches and how to thin it without breaking other apps.
#Third-Party Uninstallers (CleanMyMac, AppCleaner, Hazel)
Yes. Tools like CleanMyMac, AppCleaner (free), and Hazel scan for app binaries plus the Library paths above, then delete them in one pass. They can also catch stale helpers such as old launch agents or updater references after a manual uninstall.
Some links on this page are affiliate links, which means fone.tips may earn a commission at no extra cost to you.
If you uninstall apps often, a dedicated uninstaller is worth it. AppCleaner is free and covers nearly every case. CleanMyMac adds login-item and system-junk scans that pay off across many apps, not just Dropbox. For a one-time Dropbox cleanup, manual deletion using the table above is fine and free.
The same approach helps when you uninstall Spotify on Mac or any other app with a big cache footprint. The leftover-file pattern is the same. Only the paths change.
#Confirming the Mac Is Unlinked at dropbox.com
If you signed out of the app first (Step 1), this Mac is already unlinked. To double-check, sign in at dropbox.com → Settings → Security and scroll to Devices. Your Mac should not appear in the list anymore. If it does, the sign-out didn’t reach the cloud, usually because the menu bar app crashed before the request went through.
If it’s still there, click the X next to its name and confirm. Removing it from the device list also signs out any active web sessions tied to that device.
This is also the place to revoke linked apps (third-party services that connect to your Dropbox via OAuth). Those grants survive app uninstalls and are worth pruning while you’re already in the security tab.
#Bottom Line
For most people leaving Dropbox: sign out in the menu bar, quit and trash Dropbox.app, delete the leftover files in the nine Library paths, revoke Full Disk Access and Login Items, and restart. The local Dropbox folder is a separate decision based on whether you want a copy on disk. Use AppCleaner or CleanMyMac if you’d rather hit one button. Account-level deletion is a separate dropbox.com path that uninstalling never triggers.
If your Dropbox cleanup is part of a broader storage rescue, also clear out old Time Machine backups and old downloads. Those two folders alone often hold more space than every uninstalled app combined.
Mac Tips & Tricks
#Frequently Asked Questions
Will uninstalling Dropbox delete my cloud files?
No. Cloud files stay put. Sign in at dropbox.com to access them.
Do I have to remove the local Dropbox folder?
Not necessarily. If you want the local cache for offline access, leave it. If you’re freeing up disk space, delete it after confirming everything is uploaded. The folder is independent of the app.
What’s the safest order: sign out first, or quit first?
Sign out first, then quit. Signing out while the app is running gives Dropbox a clean shutdown signal and tells the cloud to drop the device entry. Quitting first is the common mistake that leaves a dangling device on dropbox.com requiring manual cleanup later. The order matters more than people expect, especially when reinstalling on the same Mac.
How do I delete my Dropbox account entirely?
Sign in at dropbox.com, click your avatar, go to Settings → General, scroll to Delete account, and confirm with your password. According to Dropbox’s deletion policy, data is purged within 60 days, with no recovery after that window. Cancel any paid plan first.
Why does Activity Monitor still show a Dropbox process after I uninstall?
Usually a launch agent in ~/Library/LaunchAgents/ or the helper at /Library/PrivilegedHelperTools/com.dropbox.DropboxMacUpdate.privilegedhelper. Delete it and restart.
Will reinstalling Dropbox restore my old setup?
It restores cloud files and most preferences. It doesn’t restore selective-sync exclusions, ignored folders, or local-only files you deleted. Sign in fresh and review your sync settings before walking away. If sync is misbehaving on the new install, the Dropbox not syncing guide lists the eight fixes that resolve most cases.
Is AppCleaner safe to use on Dropbox?
Yes. AppCleaner is open-source and well-documented. It scans the same nine Library paths shown above and prompts before deleting. It won’t touch the local Dropbox folder unless you tell it to, since that folder is data, not app support.

macOS 27 Golden Gate: Release Date and Compatible Macs
macOS 27 Golden Gate was announced at WWDC 2026. Here is the release date, the Apple Silicon-only compatible Mac list, and every confirmed new feature.
How to Copy and Paste on a Mac: Shortcuts and Fixes
Copy and paste on a Mac with Command-C and Command-V. Learn the cut shortcut, paste without formatting, Universal Clipboard, and fixes when it breaks.
How to Use the Phone App on Mac: macOS Tahoe Setup Guide
Set up the Phone app on macOS Tahoe to relay iPhone cellular calls. Covers requirements, FaceTime setup, Call Screening, and common firewall fixes.
How to Use iPhone Mirroring on Mac: Full 2026 Setup Guide
Set up iPhone Mirroring on macOS Sequoia with iOS 18. Covers hardware requirements, the six common error messages, EU limits, and a shared-Mac privacy fix.