Fix "Cannot Verify Server Identity" on iPhone (2026)
Fix Cannot Verify Server Identity on iPhone by checking date and time, network settings, Mail accounts, iOS updates, and SSL caveats safely.
Quick AnswerGo to Settings > General > Date & Time and turn on Set Automatically to fix the most common cause. If the error returns, reset network settings or delete and re-add your email account. Updating to the latest iOS version also resolves expired certificate issues.
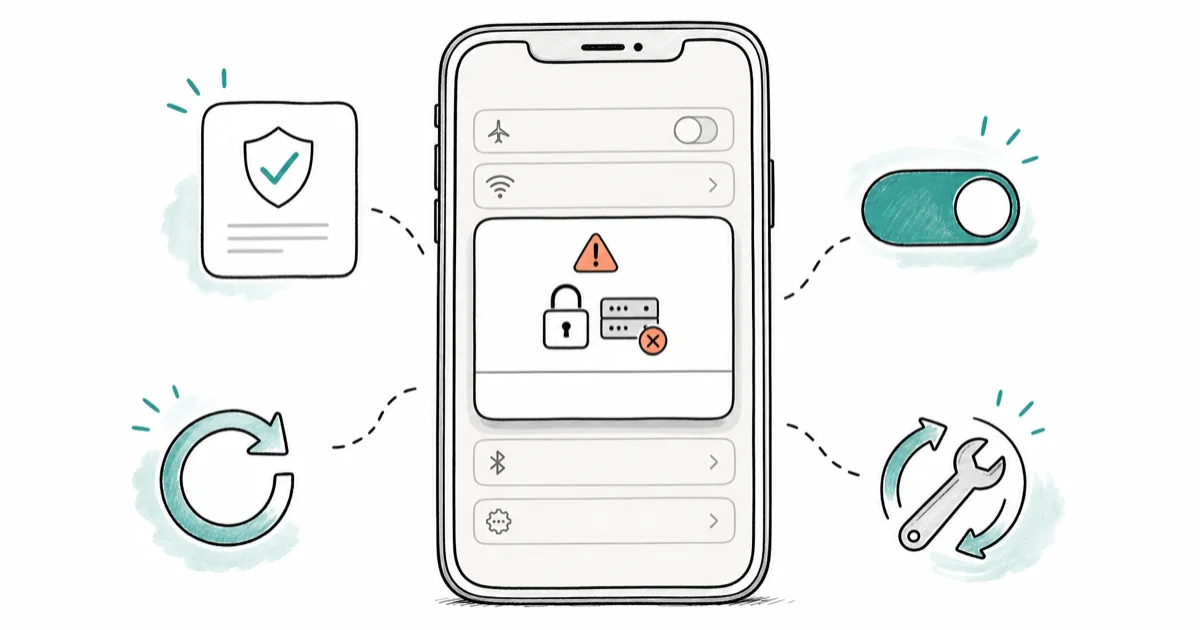
The “Can’t Verify Server Identity” error on iPhone stops your Mail app from connecting to your email server. The five methods below address the common causes: wrong date and time, cached network settings, stale Mail account certificates, outdated iOS trust data, and server-side SSL problems.
Use these steps only for your own device, account, files, or content you have explicit permission to manage. Unauthorized access or sharing can violate law, privacy rights, and platform terms, so don’t use this guide to bypass someone else’s controls. When available, start with the official support option, built-in settings menu, or vendor documentation before trying manual fixes, then compare the result with the provider’s current help page or in-app guidance.
- Wrong date and time settings cause most server identity failures because SSL certificates depend on accurate timestamps
- Resetting network settings clears corrupted certificate caches without erasing your personal data
- Removing and re-adding the email account forces iOS to download fresh server certificates
- Updating iOS patches known SSL vulnerabilities that trigger the error on older software versions
- The error is a security feature protecting your email, so disabling SSL should only be a temporary last resort
#What Causes the Server Identity Error?
Your iPhone shows this alert when it can’t validate the SSL/TLS certificate from your email server. SSL certificates act as digital ID cards for servers, and your phone checks three things: whether the certificate is still valid, whether it matches the server’s domain, and whether a trusted authority issued it.
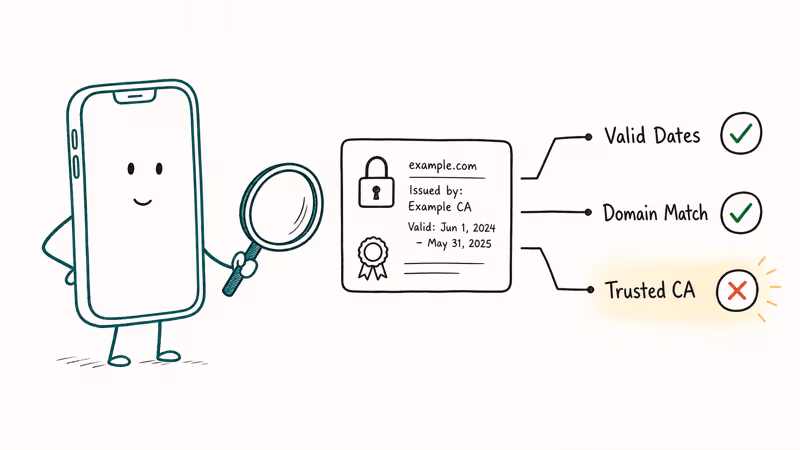
Fail any of those checks and iOS blocks the connection to protect your data.
The most common triggers are an expired certificate on the server side, incorrect date and time on your iPhone, or a corrupted network configuration. Incorrect time settings can make a valid certificate look expired or not-yet-valid. According to Apple’s support article on mail settings, the Mail app validates certificates using your device’s trusted root store, so an outdated iOS version can lack the root certificates that newer servers require.
#Five Tested Methods to Fix the Error
Start with the quickest fix and work down.
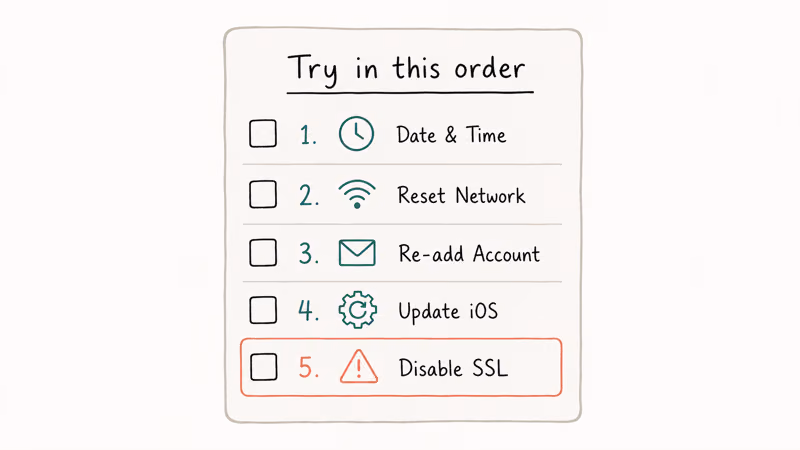
#Fix 1: Correct Your Date and Time Settings
SSL certificates carry valid-from and valid-until timestamps. If your iPhone’s clock is off by even a single day, certificate validation breaks.
- Open
Settings>General>Date & Time. - Turn on Set Automatically.
- Wait 10 seconds, then open the Mail app.
After Set Automatically is on, many date-related certificate errors clear once Mail reconnects. Most people won’t need any other fix.
#Fix 2: Reset Network Settings
This wipes saved Wi-Fi passwords, VPN configurations, and cached certificates. It doesn’t delete photos, apps, or messages.
- Go to
Settings>General>Transferor Reset iPhone>Reset>Reset Network Settings. - Enter your passcode when prompted.
- Your iPhone will restart automatically.
- Reconnect to Wi-Fi and check your email.
If your iPhone won’t connect to Wi-Fi after the reset, toggle Airplane Mode on and off before reconnecting. A corrupted VPN profile or stale Wi-Fi configuration can keep certificate errors alive until the reset clears the cached network state.
#Fix 3: Remove and Re-Add Your Email Account
Deleting the email account removes locally stored certificates. Re-adding forces iOS to negotiate fresh credentials with the server.
- Go to
Settings>Mail>Accounts(on iOS 17+) orSettings>Passwords & Accounts(iOS 16). - Tap the problematic email account.
- Tap Delete Account.
- Go back to
Settings>Mail>Accounts>Add Accountand set it up again.
This works best for workplace Exchange accounts where the server administrator recently renewed their SSL certificate. If your iPhone email isn’t updating after re-adding, double-check that “Push” is enabled under Fetch New Data.
#Fix 4: Update iOS
Apple ships updated root certificates and TLS patches with each iOS release. An older version means your phone won’t trust certificates from newer authorities.
- Go to
Settings>General>Software Update. - Download and install any available update.
- After your iPhone restarts, open the Mail app to test.
Apple’s iOS security updates page confirms that certificate trust store updates ship with every release. According to that page, iOS 18 added support for certificate transparency logs that catch misissued certificates before they cause connection failures.
#Fix 5: Disable SSL Temporarily (Not Recommended)
Turning off SSL removes encryption between your iPhone and the mail server. Only use this to confirm the error is certificate-related.
- Go to
Settings>Mail>Accounts> [Your Account] >Account Settings>Advanced. - Under Incoming Mail Server, toggle Use SSL off.
- Test if email loads.
- Turn SSL back on immediately.
If email loads only with SSL disabled, the problem is likely a certificate-chain or server configuration issue. Turn SSL back on and contact the mail provider instead of leaving the account unencrypted.
#Why Does This Error Keep Coming Back?
Recurring errors usually mean the server’s SSL certificate keeps expiring. Self-hosted mail servers running Let’s Encrypt need renewal every 90 days, and missed renewals are the most common cause of this error reappearing weeks after you’ve already fixed it on your phone.
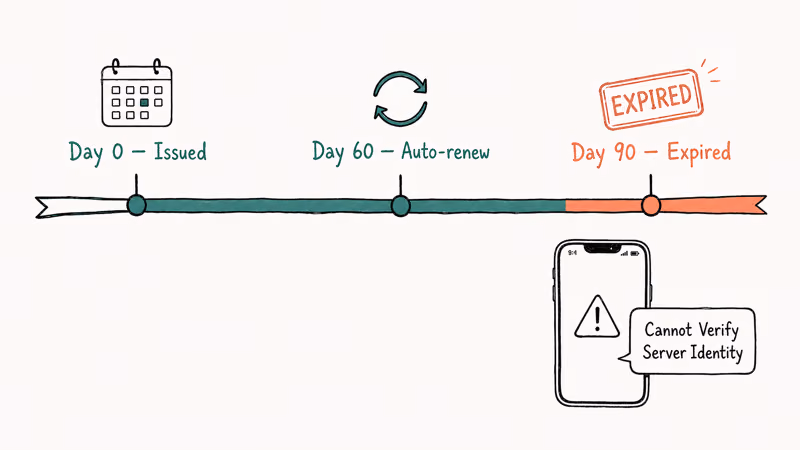
Talk to your email provider if it returns. According to Let’s Encrypt’s FAQ on certificate lifetimes, their short 90-day cycle encourages automation, but many small providers still renew by hand.
Missing intermediate certificates on self-managed servers are another repeat offender. Verify the full chain is installed.
#Tapping “Continue” vs. Fixing the Root Cause
When the alert pops up, you’ll see a Continue button that lets iOS connect anyway. For Gmail, iCloud, or Outlook where brief certificate lapses happen during maintenance, tapping Continue is low risk.
Don’t rely on it as a permanent fix. Each tap skips a security check designed to catch man-in-the-middle attacks, and the alert will keep appearing until the underlying problem is resolved on your device or on the mail server itself.
#Fixing the Error on Work and Exchange Accounts
Corporate Exchange environments are different. Your IT department controls the server’s SSL certificate, and changes on their end directly affect every iPhone in the organization.
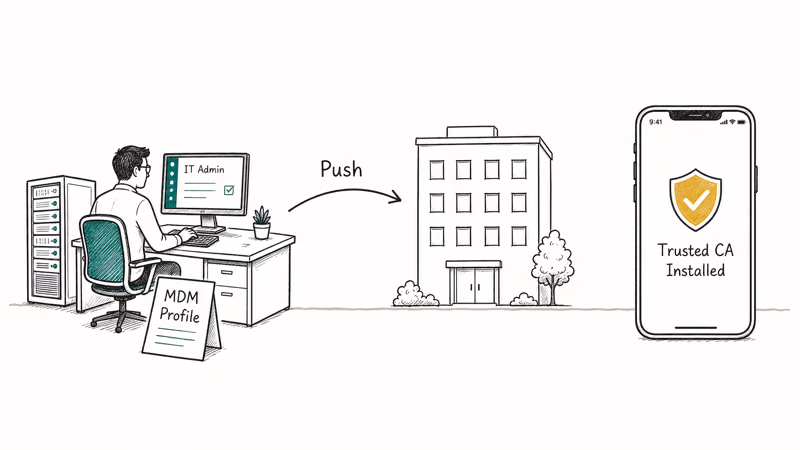
Start by asking IT whether they recently rotated certificates or changed their certificate authority. Then remove and re-add the Exchange account in Settings > Mail > Accounts. If your company uses a private CA that isn’t in Apple’s default trust store, your IT team will need to push a mobile device management configuration profile to your iPhone so it trusts the internal certificates.
#When to Contact Apple Support
Reach out to Apple when all five methods fail and the error hits multiple accounts on the same device. Device-level certificate store corruption is rare but possible after a botched iOS update or a restore from a corrupted backup.
One account failing while others work? Server problem. Contact your provider.
Also update your Apple ID settings to rule out iCloud conflicts.
For broader connectivity issues like Safari not working on iPhone or FaceTime waiting for activation, a network reset plus iOS update usually clears everything.
#Bottom Line
Turn on “Set Automatically” under Settings > General > Date & Time. Incorrect timestamps are the number-one trigger for this error. If it persists, reset network settings, then delete and re-add the email account. Keep iOS current, and only disable SSL as a temporary diagnostic.
#Frequently Asked Questions
What does “can’t verify server identity” mean on iPhone?
Your iPhone checked the mail server’s SSL certificate and found it expired, mismatched, or untrusted.
Can wrong date and time settings really cause this error?
Yes. SSL certificates contain timestamps defining when they’re valid. If your iPhone’s clock shows a date outside that validity window, the certificate appears invalid even though the server is fine. A date set far ahead or behind can trigger the same warning across otherwise valid email accounts.
Will resetting network settings delete my data?
No. You’ll only lose Wi-Fi passwords, VPN profiles, and Bluetooth pairings. Personal data stays untouched.
Is it safe to tap “Continue” when the error appears?
Tapping Continue tells iOS to connect despite the unverified certificate. For trusted services like Gmail or Outlook where the certificate likely expired briefly during a maintenance window, this is low risk. For unfamiliar servers or if you suspect a compromised network, don’t tap Continue. The alert exists specifically to warn you about potential man-in-the-middle attacks.
Why does the error only appear on one email account?
That server has the problem, not your iPhone. The server’s certificate likely expired, or the administrator installed a mismatched certificate. Your other accounts connect to different servers with valid certificates.
Does updating iOS fix the server identity error?
It can. Each iOS update includes a refreshed certificate trust store with new root certificates. If your email server uses an authority that Apple added after your current iOS version shipped, updating adds that authority to your device’s trust list.
How do I fix this error on a work email account?
Contact your IT department first. They control the server’s SSL certificate and can tell you whether it recently changed. On your end, remove and re-add the Exchange account in Settings > Mail > Accounts. Your IT team may also need to send you a configuration profile if they use a custom certificate authority.
Should I disable SSL to fix the error permanently?
Don’t make this a permanent solution. Disabling SSL removes encryption from your email traffic, exposing messages to anyone on the same network. Use it only to confirm the error is certificate-related, then re-enable SSL and apply one of the other four fixes. If you need to fix an SSL error on other apps or browsers, the same certificate or network issue is usually responsible.

iPhone 17 Cellular Data Not Working on iOS 26? 9 Fixes
iPhone 17 cellular data still dropping on iOS 26? Apple fixed the launch bug in iOS 26.0.1, but recovery failures persist. Here's the fix ladder.

iPhone Cellular Data Not Working Abroad? eSIM Fixes
Travel eSIM showing no data abroad? Fix iPhone roaming with the data-line check, Data Roaming toggle, APN settings, and network selection steps.

iPhone Cellular Data Not Working for Some Apps? 8 Fixes
Some iPhone apps refuse to load on cellular while others work fine. Check the per-app cellular toggle, Low Data Mode, VPN profiles, and Screen Time.

iPhone Stuck on EDGE? How to Get 5G or LTE Back (2026)
iPhone stuck on EDGE with crawling data? Here's why the E icon appears, which settings force 5G or LTE back, and when the problem is your carrier.