INDD to PDF: 5 Methods to Convert InDesign Files (2026)
Convert INDD to PDF using Adobe InDesign export, free online tools like CloudConvert, or Affinity Publisher 2. Print and web settings explained.
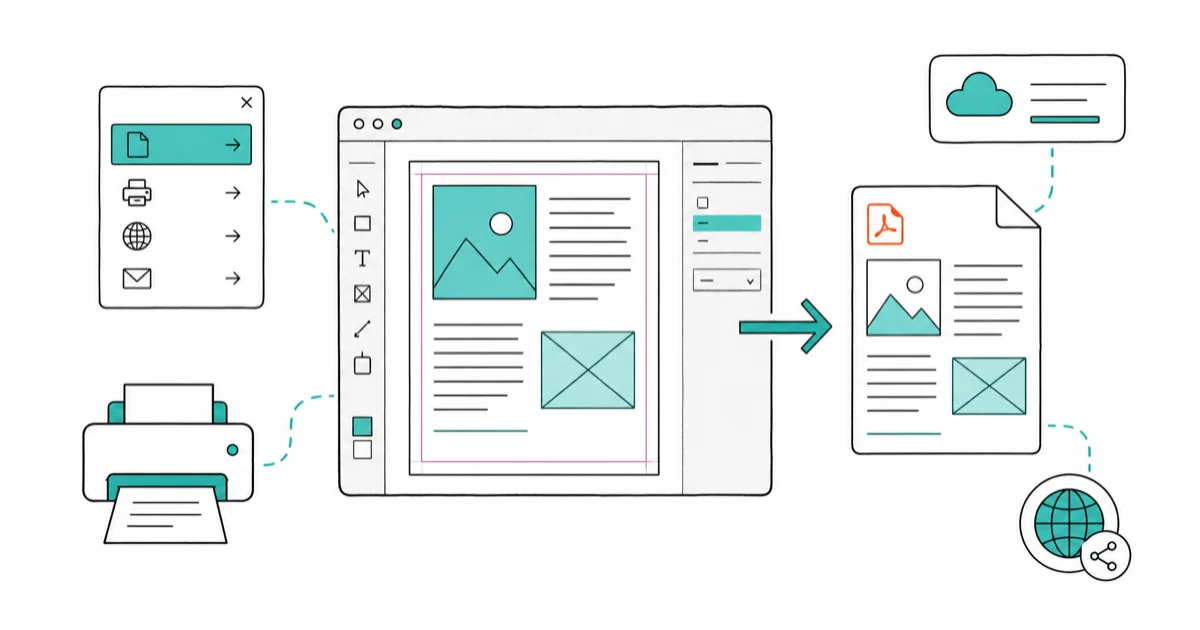
Quick AnswerOpen the INDD file in Adobe InDesign, choose File then Export, pick Adobe PDF (Print) as the format, select the High Quality Print preset for printing or Smallest File Size for web sharing, then click Export.
The fastest way to share an InDesign layout with someone who doesn’t own InDesign is to export it as a PDF. Five conversion paths exist, and the right one depends on where the file is headed.
- Exporting from File then Export inside InDesign is the highest fidelity path because it embeds fonts, preserves CMYK profiles, and keeps live transparency intact
- For commercial printing, set image resolution to 300 DPI and pick High Quality Print or Press Quality, both of which use lossless ZIP compression on line art
- Online converters like CloudConvert and Convertio cap free uploads at 1 GB and 100 MB respectively, and uploaded INDDs sit on third-party servers
- Affinity Publisher 2 opens IDML exports for a one-time license fee of about 70 USD, compared with the 22.99 USD per month Creative Cloud plan for InDesign
- Embedding fonts at 100 percent subset prevents the font substitution warning that appears when a print shop opens the PDF on a machine without your typefaces
#Why Choose PDF Over Sharing the Raw INDD File?
INDD is a working file, not a delivery format. It only opens in InDesign and a single missing link or font breaks the layout. PDF wraps everything into one self-contained file that opens in any browser, on any phone, on any operating system. It became an open ISO standard (ISO 32000-1) in 2008.
According to Adobe’s official guidance on PDF export, the Adobe PDF (Print) format embeds fonts, preserves color profiles, and supports the PDF/X-1a, PDF/X-3, and PDF/X-4 standards that commercial printers require. Adobe states that PDF/X-1a flattens transparency and converts everything to CMYK, which is why most US print shops still ask for it.
Print shops routinely ask for a PDF instead of a raw INDD package because their RIP software prefers the embedded color profile over having to relink loose images.
#Method 1: Export to PDF From Inside InDesign
This is the only method with full control over compression, bleed, fonts, and color. It’s the print-job standard.
- Open your INDD file in InDesign.
- Go to
File>Export(Ctrl + E on Windows, Cmd + E on macOS). - In the Export dialog, choose Adobe PDF (Print) from the format dropdown.
- Pick a save location, give the file a name, and click Save.
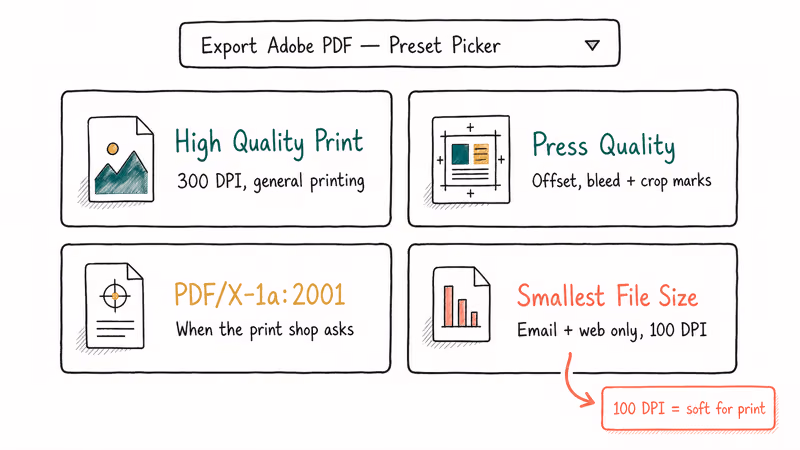
- In the Export Adobe PDF dialog, pick a preset:
- High Quality Print for general printing where 300 DPI images are needed.
- Press Quality for offset printing with bleed and crop marks already set up.
- PDF/X-1a when the print shop specifically asks for that standard.
- Smallest File Size for email attachments and web download.
- Open the Marks and Bleeds tab on the left and turn on Crop Marks plus Use Document Bleed Settings if you set bleeds in the document.
- Open the Output tab and set Color Conversion to Convert to Destination with the destination matching your print profile (for example, US Web Coated SWOP v2).
- Click Export.
On a typical 16-page magazine, the High Quality Print preset produces a large, high-fidelity PDF, while Smallest File Size shrinks the same file dramatically by downsampling images to 100 DPI.
To prep images first, see how to resize images in InDesign.
#Method 2: Convert INDD to PDF With Adobe Acrobat
If your team has Acrobat Pro on a different machine than your InDesign workstation, Acrobat can build the PDF using a watched folder workflow. This works only when InDesign is installed somewhere on the network.
Acrobat doesn’t natively open INDD files. The Create PDF tool on InDesign files relies on the InDesign installation to do the actual rendering in the background, which catches a lot of users by surprise.
- Open Adobe Acrobat Pro.
- Choose
Tools>Create PDF. - Pick Single File or Multiple Files.
- Select the INDD file and click Create.
- Acrobat opens InDesign in the background, which executes a silent export.
- Save the resulting PDF.
This method is slightly slower than a direct InDesign export, but the output PDF is byte-identical because Acrobat just calls the same export engine.
The advantage is batch processing. Point Acrobat at a folder of INDDs and walk away.
#Method 3: Use a Free Online Converter Like CloudConvert
Online converters work when you don’t have InDesign but the file isn’t confidential. CloudConvert and Convertio both handle InDesign packages cleanly.
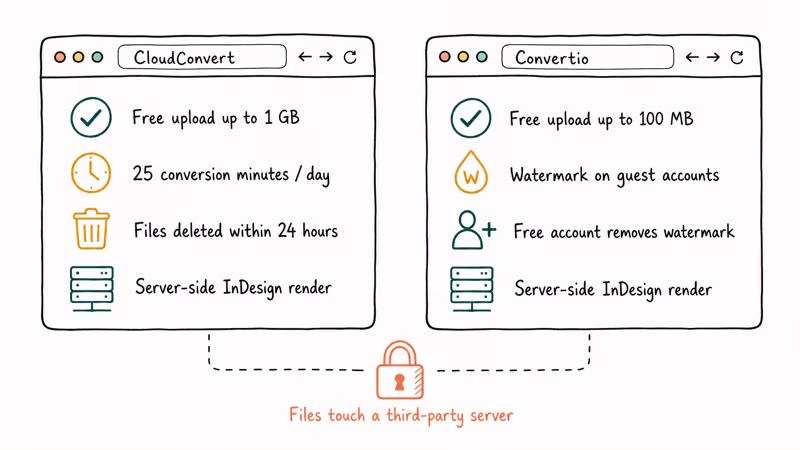
CloudConvert runs the conversion on its own servers. Convertio caps free uploads at 100 MB and watermarks guest accounts unless you register.
Uploading an INDD to CloudConvert takes a couple of minutes to convert, and fonts come through correctly as long as the source file already has them embedded as part of the InDesign package.
What to know before uploading:
- Your INDD will sit on a third-party server. CloudConvert’s data privacy page states that uploaded files are deleted within 24 hours, but that still means a third party touched the file.
- Linked images packaged inside the INDD travel up with it, but external linked assets that live outside the package will appear as gray boxes in the PDF.
- Free accounts on CloudConvert allow 25 conversion minutes per day. A multi-page brochure can eat that limit fast.
For a non-Adobe online editor that fits the same casual workflow, see our review of the Sejda PDF editor.
#Method 4: Open the INDD in Affinity Publisher 2
Adobe stopped selling perpetual licenses for InDesign in 2013, so Affinity Publisher 2 has become the most credible one-time-purchase alternative. According to Affinity’s official compatibility documentation, Publisher 2 imports IDML files that you can export from InDesign.
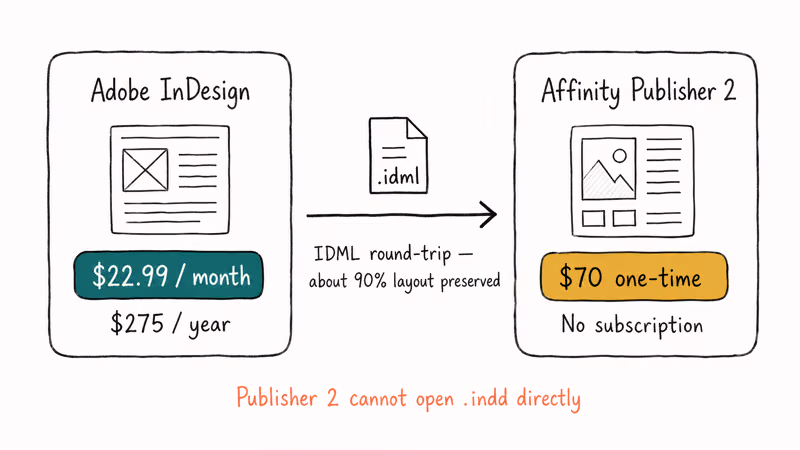
The catch: Affinity Publisher can’t open native INDD. It only opens the IDML companion format. So the workflow is:
- Open the INDD in InDesign on a machine where you still have access.
- Choose
File>Save Asand pick InDesign Markup (IDML) as the format. - Send the IDML file to the Affinity machine.
- Open Publisher 2, choose
File>Open, and select the IDML. - Choose
File>Export, pick PDF, and configure settings the same way you would in InDesign.
This path suits anyone leaving the Adobe ecosystem for good. The IDML import preserves most of a layout, though nested styles sometimes need a manual fix.
The cost difference is real. InDesign single-app costs 22.99 USD per month, which adds up to 275 USD per year. Affinity Publisher 2 is a 70 USD one-time purchase, with no subscription. For more options that read InDesign files, see the best InDesign alternatives for Mac.
#Method 5: Print to PDF Using the System Printer
This is a shortcut that almost no one talks about, but it works on every operating system without extra software. The output quality is lower than a true Export to PDF, but for a quick web-quality preview it’s fine.
On macOS:
- Open the INDD in InDesign.
- Go to
File>Print. - In the Print dialog, click the PDF dropdown in the bottom-left corner.
- Choose Save as PDF.
- Pick a destination and click Save.
On Windows:
- Open the INDD in InDesign.
- Go to
File>Print. - Pick Microsoft Print to PDF as the printer.
- Click Print and choose a save location.
The downside is that this path uses the operating system’s print pipeline, which rasterizes transparency and may downsample images to 150 DPI. A true File > Export PDF at Smallest File Size usually looks sharper on screen because the text stays as vector instead of being rasterized.
#Should You Use the Smallest File Size Preset for Print?
No. Smallest File Size downsamples color and grayscale images to 100 DPI and rasterizes everything that uses transparency. For a magazine printed at 300 DPI, this looks visibly soft and blurry, and a print shop will often reject the file.
Use Smallest File Size only when:
- The PDF will live on the web and be viewed on screen.
- You are emailing a draft for review and not for production.
- Total page count is over 100 and you need the file under 25 MB for email.
For anything destined for a printer, pick High Quality Print or Press Quality, both of which keep images at 300 DPI and use lossless compression on line art.
#Tips for High-Quality PDF Exports
These are the settings to lock in before any commercial print job:
- Image resolution: Color and grayscale at 300 DPI, monochrome line art at 1200 DPI.
- Color mode: CMYK with the destination profile your printer requested. Most US shops use US Web Coated SWOP v2.
- Bleed: 0.125 inches (3 mm) on all four sides if your design extends to the page edge.
- Crop marks: Turn on for any printed deliverable. Leave off for digital-only PDFs.
- Fonts: Set the subset threshold at 100 percent so the entire font is embedded.
- Transparency: Use the Flattener Preview panel before exporting if you have drop shadows or live transparency on top of placed images.
- PDF standard: PDF/X-1a for old-school print workflows, PDF/X-4 for modern presses that support live transparency.
For the related question of what gets corrupted when you place a PDF inside a layout, see how to insert images in InDesign.
#Common INDD to PDF Problems and How to Fix Them
Even with careful settings, exports can fail. Here are the issues that come up most often.
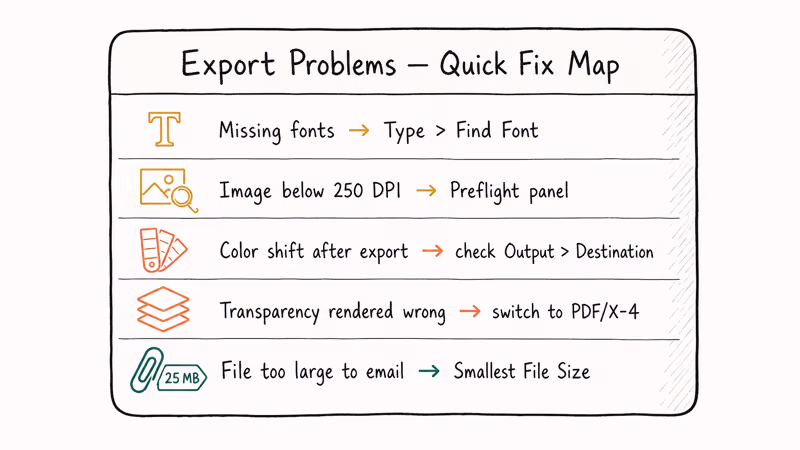
Missing fonts warning. This appears when InDesign can’t find a font that the document references. Fix it before exporting by going to Type > Find Font and replacing the missing font, or by using the Package feature (File > Package) to collect the fonts and links into a single folder. Adobe’s troubleshooting page on missing fonts recommends syncing through Adobe Fonts when the missing font is part of your Creative Cloud subscription.
Image resolution warnings. InDesign flags any image below 250 DPI when the export profile expects 300 DPI. Open the Preflight panel to find the offending images, then replace them with higher-resolution originals before exporting again.
Color shifts after export. This usually means your source image was RGB and the export converted it to CMYK using the wrong destination profile. Check the Output tab in the Export Adobe PDF dialog and confirm the destination matches what the printer asked for.
Transparency rendered incorrectly. Older PDF/X-1a flattens transparency, which can change how shadows look. Switch to PDF/X-4 if your printer supports it, or use the Flattener Preview panel to spot-check before exporting.
File size too large to email. Pick Smallest File Size instead of High Quality Print, or use a free service like Adobe’s online PDF compressor after the fact. An 80 MB PDF can drop to under 10 MB with no visible quality loss for screen viewing.
#Bottom Line
Export from File > Export inside InDesign with the High Quality Print preset for nine out of ten jobs. It’s the only method that gives you full control over fonts, color, and bleed, and the export takes under 30 seconds for most documents. If you don’t have InDesign, upload to CloudConvert for a free one-off conversion, or buy Affinity Publisher 2 for 70 USD and import IDML files instead.
#Frequently Asked Questions
Can I convert INDD to PDF without any Adobe software?
Yes. Upload the INDD to CloudConvert or Convertio, both of which run InDesign on their servers and return a PDF. CloudConvert allows files up to 1 GB on the free tier. The trade-off is that your file lives temporarily on a third-party server.
Will my interactive elements survive the conversion?
Only if you pick Adobe PDF (Interactive) inside InDesign. Print format strips them. Online converters default to Print mode.
How do I make sure the print shop sees the same fonts I see?
Set the font subset threshold at 100 percent in the Advanced tab of Export Adobe PDF. The whole typeface ships with the file.
Does Affinity Publisher open INDD files directly?
No. Publisher 2 only opens IDML files. You have to first export your INDD as IDML inside InDesign using File > Save As before Publisher can open it. The IDML round-trip preserves most of the original layout.
What is the smallest PDF I can produce from an INDD?
Pick the Smallest File Size preset and check Compress Text and Line Art. A 16-page magazine can drop from tens of megabytes to a few this way. The cost is image quality. Photos drop to 100 DPI, which is fine for screen but unacceptable for print.
Can I batch convert a folder of INDDs?
Yes, with Adobe Acrobat Pro. Use Tools > Create PDF > Multiple Files and select the folder. Acrobat calls your installed InDesign in the background to render each one, so InDesign still has to be on the same machine. A folder of more than a dozen INDDs converts unattended, and the output is byte-identical to running Export manually because Acrobat just drives the same export engine.
How do I edit the PDF after I make it?
A finished PDF is hard to edit in InDesign because InDesign treats placed PDFs as static images. For deeper edits you have two options: open the PDF in Adobe Acrobat Pro and use the Edit PDF tool, or convert the PDF to an InDesign file using a plugin like PDF2ID. We cover this workflow in our guide to edit a PDF in InDesign.
Can I convert other formats to PDF the same way?
The export workflow inside InDesign only handles InDesign documents. For other formats, use Acrobat or a dedicated converter. There are specific guides for insert PDF into Word and the niche case of how to convert PDF to MIDI.