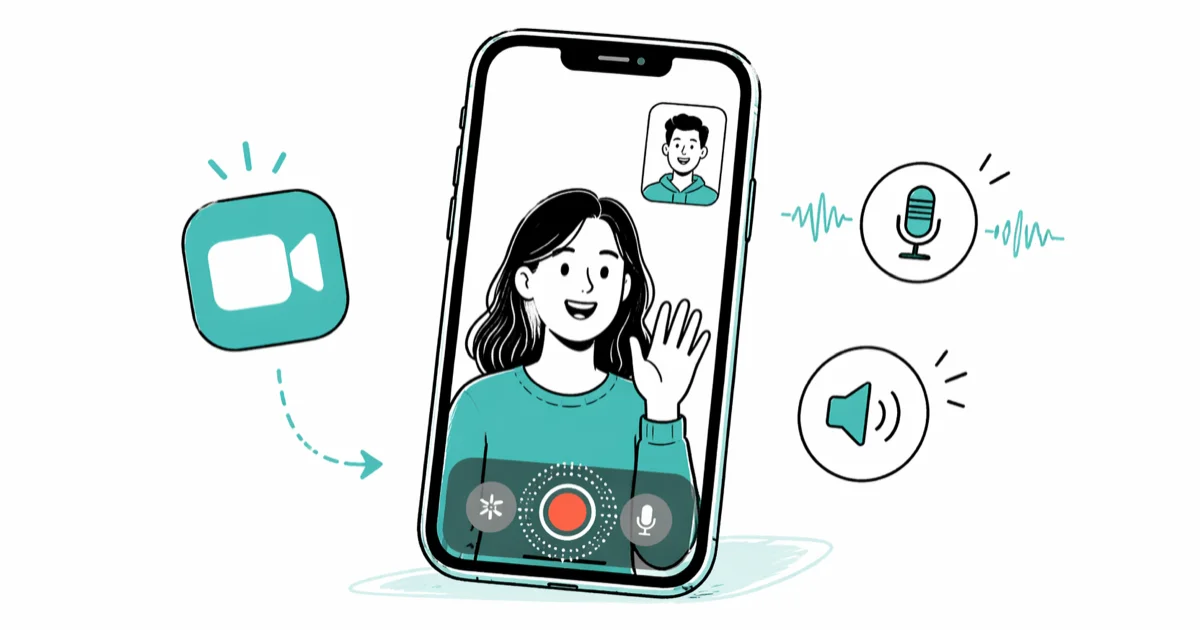
How to Screen Record FaceTime With Sound (iPhone & Mac)
Screen record FaceTime with sound on iPhone or Mac. Honest limits, the microphone workaround, and the legal consent rules every recorder should know first.
Quick AnswerFaceTime mutes call audio in iPhone screen recordings as a privacy feature, so the screen recorder only picks up your own microphone. To capture both sides of the call, record on a Mac with QuickTime Player and select the built-in mic as the audio source while the FaceTime audio plays through speakers.
Screen record FaceTime with sound is the question that breaks most “easy guide” promises. Apple mutes the other caller’s voice in iPhone screen recordings on purpose, so a tap-and-record approach captures only your end. This guide walks through what records, what doesn’t, and the consent rules to handle before you tap the red button.
Only record your own FaceTime calls, after the other person says yes. Recording without consent can break wiretap law.
- iPhone’s built-in screen recorder mutes FaceTime call audio by design; the Microphone toggle captures your voice and room noise only, not the other person’s stream.
- QuickTime Player on Mac records the screen and built-in microphone together, which gives both voices when FaceTime audio plays through the Mac speakers.
- macOS Mojave and later expose the same controls through the screenshot toolbar at Shift + Command + 5, no QuickTime launch needed.
- Eleven US states require all-party consent before recording a call; federal law and the remaining 39 states accept one-party consent.
- For studio-clean recordings on Mac, install a virtual audio driver like BlackHole and route FaceTime output to it so QuickTime captures the call stream directly.
#Why Does FaceTime Mute Audio in Screen Recordings?
FaceTime mutes the other caller’s voice in screen recordings as a privacy feature Apple built into iOS. According to Apple’s FaceTime privacy documentation, the call’s audio and video are end-to-end encrypted, and that protection extends to local capture pathways like the screen recorder.

The behavior is consistent across recent iPhones and iOS versions. The screen recording rolls cleanly, the timer runs, and the file saves to Photos, but audio for the remote caller stays silent. Toggling the Microphone on only layers your local mic input on top.
That’s the ceiling for iPhone-only recording.
#Method 1: iPhone Built-In Screen Recorder With Microphone
Apple’s screen recording on iPhone support page confirms that screen recording shipped in iOS 11 and that the Microphone toggle is opt-in per session. Here is the path:
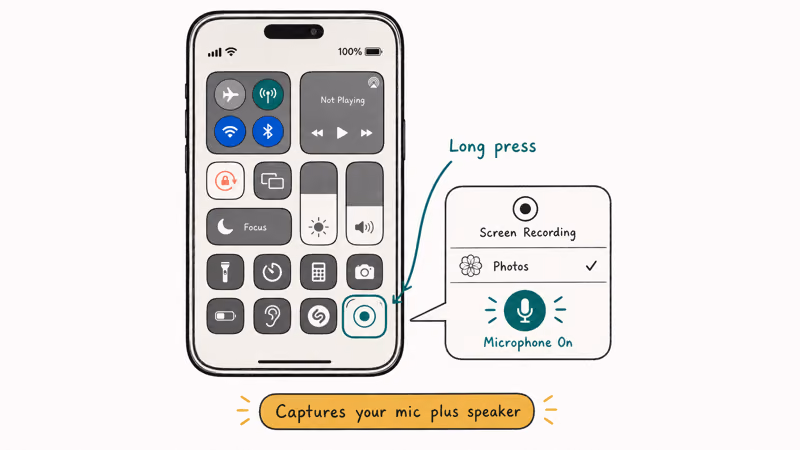
Open Settings>Control Center, scroll to More Controls, and tap the green plus next to Screen Recording.- Start your FaceTime call.
- Swipe down from the top-right corner (Face ID iPhones) or up from the bottom edge (Touch ID iPhones) to open Control Center.
- Press and hold the Screen Recording icon. A panel opens with a Microphone button.
- Tap Microphone so the icon turns red, then tap Start Recording.
- After a 3-second countdown, the status bar turns red and the capture begins.
- To stop, tap the red status bar at the top of the screen and confirm Stop. The clip saves to Photos.
This captures your own voice plus a soft hum of room noise. The other caller stays silent. If your recorder produces silent clips outside FaceTime too, the iPhone screen recording no sound guide covers microphone permissions, Focus Mode toggles, and storage triggers. For activation problems, our FaceTime waiting for activation guide covers the Apple ID fixes.
#Method 2: Mac Screen Recording With QuickTime Player
QuickTime Player is the official path for capturing both sides of a FaceTime call. The trick is that QuickTime records what the Mac’s built-in microphone hears, including the speaker output during a FaceTime call.
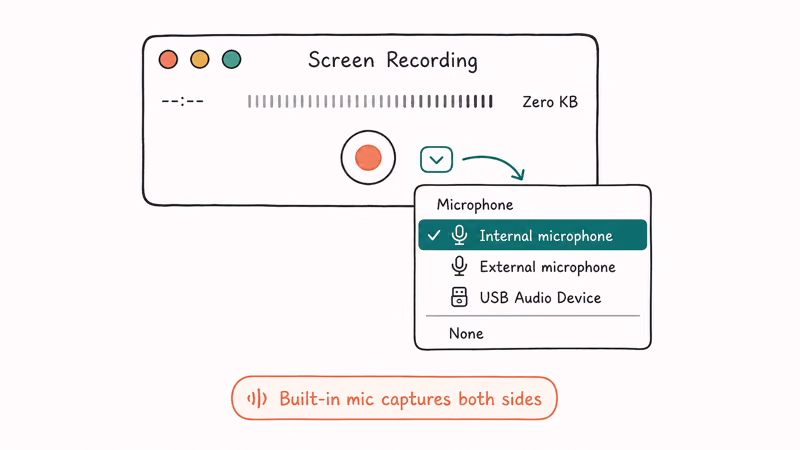
- On the Mac that will join the FaceTime call, open QuickTime Player from Applications.
- From the menu bar choose
File>New Screen Recording. - In the small recording window, click the arrow next to the red record button and pick your built-in microphone (or any external mic).
- Move the QuickTime volume slider to about 25% to avoid feedback when call audio plays through speakers.
- Place the FaceTime window where you want it captured. Set FaceTime audio output to the Mac speakers (not headphones), since QuickTime needs the audio in the air for the mic to pick up.
- Click Record, draw the capture area around the FaceTime window, then start your call.
- When the call ends, click the stop button in the menu bar. QuickTime opens the file for trim and save.
According to Apple’s QuickTime screen recording guide, recordings save as .mov files you can trim with the Edit menu before exporting.
With the speaker volume and QuickTime mic level set to moderate levels, this captures both voices with light room reverb. The result is fine for review, transcription, or accessibility playback, though not studio quality. That trade-off is on purpose, for the same privacy reasons that shape Method 1.
#Method 3: Mac Screenshot Toolbar (Shift + Command + 5)
Since macOS Mojave, the screenshot toolbar offers the same screen recording controls without opening QuickTime. It’s faster if you record FaceTime calls often.
- Press Shift + Command + 5 to open the toolbar at the bottom of the screen.
- Choose Record Selected Portion or Record Entire Screen.
- Click Options, then under Microphone pick your built-in mic or external interface.
- From the same Options menu set
Save To>Desktop(or your preferred folder). - Click Record, switch to FaceTime, and start the call.
- Stop with the small square icon in the menu bar, or press Command + Control + Esc.
Apple’s Mac screenshot and recording support article states that toolbar recordings save as .mov with H.264 video and AAC audio by default. A few-minute capture stays a manageable size for short interviews but is worth trimming before sharing.
For codec mismatch after macOS updates, see our QuickTime Player can’t open MOV fixes.
#Method 4: Use a Second Device as a Backup Recorder
If the recording matters (a remote interview, deposition prep, a doctor’s instructions), the simplest insurance is to point a second device at your screen and let it record off your speakers. It feels old-school. It works. When a primary recording gets truncated by a low-battery prompt or an interruption, a second-phone capture can save the whole conversation.
- Put the iPhone or iPad you’re calling on into a Focus Mode so notifications don’t beep mid-record.
- Place a second phone with Voice Memos or a recorder app 30 to 60 cm from your speaker, mic side toward you.
- Start Voice Memo first, then start your FaceTime call.
- Say out loud at the start that you’re recording and have consent. This stamps the file with provenance you may need later.
- Stop Voice Memo after you hang up.
The 2-device method tends to produce cleaner audio than the iPhone screen recorder’s Microphone toggle, because the second phone hears the FaceTime caller through the source phone’s speaker without the source phone’s own mic-mute logic getting in the way.
For camera or screen-share issues, see FaceTime camera not working and why can’t I screen share on FaceTime.
#What Are the Legal Rules for Recording FaceTime?
Recording laws split by jurisdiction and consent type. The Federal Communications Commission recording telephone calls guidance recommends putting consent on the recording itself, even where one-party consent is the legal floor.

A non-exhaustive snapshot:
Table 1: Recording consent rules for FaceTime by jurisdiction (US and selected international, 2026).
| Jurisdiction | Consent rule | Statute or note |
|---|---|---|
| Federal (US) | One-party | 18 USC §2511; at least one party (you) must agree. |
| California | All-party | Penal Code §632 |
| Florida | All-party | Statute §934.03 |
| Illinois | All-party | Eavesdropping Act 720 ILCS 5/14 |
| Massachusetts | All-party | Wiretap Statute MGL c.272 §99 |
| 39 other US states + DC | One-party | One participant’s consent is the floor. |
| United Kingdom | One-party (personal) | OFCOM allows personal use; publication needs consent. |
| EU (GDPR) | Consent + basis | Recording is personal data; inform and document basis. |
If the other party is in a stricter jurisdiction than you, the stricter rule applies. According to the Digital Media Law Project’s recording state-by-state guide, prosecution risk climbs sharply when a recording is shared, broadcast, or used commercially. A safe opening line is: “This call is being recorded for our records, is that OK with you?” Capturing their verbal yes on the same file as the rest of the call gives you provenance you may need later.
#Bottom Line
For a personal call where you only need your own side plus ambient context, the iPhone screen recorder with the Microphone toggle on does the job. For a real recording of both voices, set up QuickTime Player on a Mac with the built-in mic selected and FaceTime audio through speakers; that’s Apple’s official path. Whatever method you pick, ask first, get a clear yes, and put their consent on the recording.
iPhone tips & tricks
#Frequently Asked Questions
Why is my FaceTime screen recording silent on iPhone?
Apple mutes the other caller’s voice in screen recordings by design. The Microphone toggle resets to off each session, so long-press the Screen Recording icon, tap Microphone, and start the capture.
Can I record FaceTime audio on iPhone without a Mac?
You can record your own voice, but not a clean copy of the other person’s. The Microphone toggle picks up whatever the iPhone mic hears, including the caller faintly through the speaker on speakerphone, plus your voice and any room noise. For a real two-sided recording without a Mac, point a second device at the speakers and use a recorder app like Voice Memos; run a 10-second test first to confirm both voices come through clearly.
Does QuickTime record system audio on Mac?
QuickTime captures microphone audio, not system audio. For a clean internal capture during a FaceTime call, install a free virtual audio driver like BlackHole, route FaceTime output to BlackHole, and select BlackHole as the QuickTime audio input.
Will the other person know I’m recording the FaceTime call?
FaceTime sends no recording notification, so the other side gets no automatic signal. That’s exactly why your verbal consent step matters.
Is it legal to screen record a FaceTime call?
It depends on where each caller is sitting. Federal US law and 39 states allow one-party consent, so your own agreement is enough. Eleven states, including California, Florida, and Illinois, require everyone on the call to agree before recording starts. According to the FCC, if you cross jurisdictions, follow the strictest rule that applies to anyone on the line.
How long can I screen record on iPhone before it stops?
There is no fixed time cap. Recording stops when you tap Stop, the iPhone runs out of storage, or the battery dies. A 1080p capture records at a high data rate, so a 30-minute call eats a lot of storage.
What if the Screen Recording shortcut isn’t in Control Center?
Open Settings, scroll to Control Center, find Screen Recording under More Controls, and tap the green plus. It lands at the bottom of the Control Center grid.
Best Wireless Earbuds for iPhone in 2026: USB-C Era Picks
Best wireless earbuds for iPhone in 2026, comparing AirPods Pro 3, Sony WF-1000XM6, Bose QC Ultra, and Anker Liberty 4 NC on the USB-C iPhone lineup.
iPhone Keyboard Lag? 7 Proven Fixes for iOS 26 (2026)
Fix iPhone keyboard lag with 7 proven fixes for iOS 26. Covers restart, storage, predictive text, third-party keyboards, and dictionary reset.
How to Block Porn on an iPhone: A Guide for Parents
Learn how to block porn on iPhone using Screen Time, DNS filtering, and safe browsers. Step-by-step guide for parents to protect kids' devices.
How to Detect Spyware on iPhone: Signs, Checks, and Removal
Learn how to detect spyware on your iPhone with step-by-step checks for suspicious apps, profiles, and battery drain. Remove threats safely.