Best USB Flash Drive for Windows Install Media (2026)
The best USB flash drive for a Windows 11 or 10 install is the SanDisk Ultra 64GB. Why 16GB and USB 3.0 are the sweet spot, and which drives to skip.

Quick AnswerAny dependable 16GB or larger USB 3.0 stick handles Windows 11 and Windows 10 install media; Microsoft's tool needs just 8GB and erases the drive. The SanDisk Ultra 64GB (SDCZ48) is our pick for the job.
The best USB flash drive for Windows install media isn’t the biggest or fastest stick on the shelf. Microsoft’s tool asks for 8GB and writes the installer once.
- Microsoft’s media creation tool needs a blank USB flash drive with at least 8GB, and it erases everything on the drive during setup
- A 16GB to 64GB USB 3.0 stick is the sweet spot: enough headroom for current Windows images without paying for space the installer never touches
- Write speed, not the read number printed on the package, decides how long the tool spends building your drive
- The SanDisk Ultra 64GB (SDCZ48) is our top pick; the Samsung BAR Plus is the upgrade if you want a metal body and faster transfers
- Skip 20Gbps solid-state sticks for this job, because install media gets written once and the speed advantage barely registers
Our general USB flash drive roundup covers everyday transfers, encrypted drives, and high-capacity picks. This guide is the dedicated companion for one scenario: building a bootable Windows 11 or Windows 10 installer. The two jobs reward different drives, and the install-media job is far less demanding than most buying guides admit.
#How Much Storage Does a Windows Install Drive Need?
According to Microsoft’s create installation media guide, you need “a blank USB flash drive with at least 8 GB of space,” and the requirement applies to both Windows 11 and Windows 10. The same page warns that any content on the drive is deleted, so Microsoft recommends starting with a blank stick rather than one holding your tax documents.
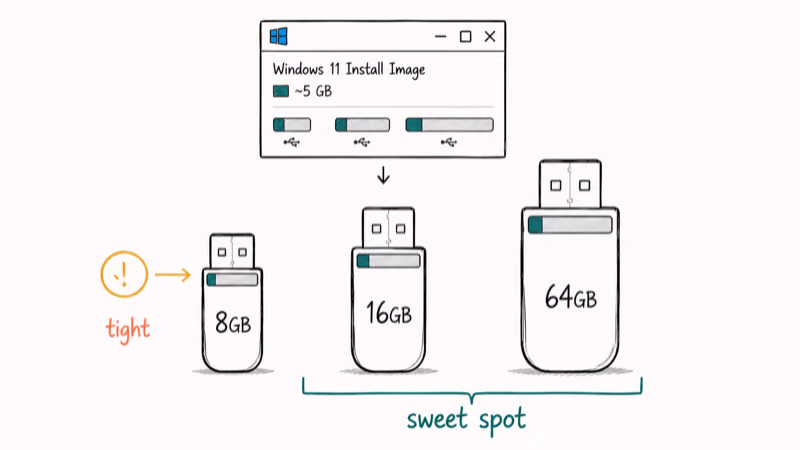
That 8GB minimum is tight. Windows images keep growing, and sticks format to less space than labeled. A 16GB drive removes the guesswork.
Going bigger costs almost nothing in 2026, which is why our pick is a 64GB model: street prices between 16GB and 64GB are often within a coffee of each other, and the extra room lets the same stick double as a driver-backup or file-rescue drive between installs. If you’re planning an upgrade from Windows 10 to Windows 11, that spare capacity is also where you stash the old machine’s driver folder before you wipe anything.
What you don’t need is 256GB or beyond. The installer occupies the same few gigabytes no matter how large the drive is, and the media creation tool won’t use the rest.
#Does Drive Speed Matter for the Media Creation Tool?
Less than the marketing suggests. The number printed on the box is nearly always the peak read speed, but building install media is a write job: the tool downloads the Windows image and then writes it to your stick. A drive with a flashy read rating and a weak write rating still crawls through that second phase.

The media creation tool has two bottlenecks: downloading Windows and writing the stick. A faster drive can’t speed up a slow connection.
Bus generation still matters at the extremes. According to the USB Implementers Forum’s USB 3.2 overview, the SuperSpeed bus spans 5 to 20 Gbps depending on generation, while old USB 2.0 ports top out far below that. A USB 2.0 stick will finish the job, but the write phase stretches out enough to be annoying. USB 3.0 or newer is the practical floor, and anything beyond USB 3.2 Gen 1 is overkill for a one-time write.
Reliable media matters too. Stalls mid-write can corrupt media and trigger setup failures like error 0x80300001 during installation.
#Top Pick: SanDisk Ultra 64GB USB 3.0 (SDCZ48)
The SanDisk Ultra 64GB is the practical default when a Windows machine needs rescuing. It’s not the fastest stick SanDisk sells, and that’s the point: it’s inexpensive, available everywhere, and built around the exact trade-off install media rewards, which is dependable writes at an affordable price rather than headline speed.
Last updated on Jun 10, 2026
As an Amazon Associate fone.tips earns from qualifying purchases.
A few practical design notes matter for this job. The slide-out connector means there’s no cap to lose in a drawer between emergencies. The USB-A plug fits the desktops and older laptops that most often need a reinstall. And 64GB leaves room to keep a folder of network drivers next to the installer, the one thing a freshly installed Windows machine often lacks.
For the Windows 10 automatic repair loop scenario, the important requirement is dependable boot media rather than a premium transfer benchmark. That is why premium sticks are hard to justify for this scenario.
#Two Alternatives Worth a Look
Samsung BAR Plus. If you want one stick that handles install duty and regular file shuttling, the BAR Plus is the step up. Samsung’s BAR Plus product page states that the drive reaches up to 400MB/s data transfer speed on the 128GB model, and the one-piece metal body shrugs off keyring abuse and water. It costs more than the SanDisk Ultra, and none of that extra speed shortens a Windows install meaningfully, but it’s the better everyday-carry drive.
SanDisk Ultra Fit. The low-profile sibling of our top pick sits nearly flush in a USB port. That’s handy if you want a recovery stick living permanently in the back of a desktop, though the tiny body is easy to misplace in a drawer and gets warm during long writes. For a build-it-and-store-it install drive, the full-size Ultra is the saner shape.
Both share the trait that matters: established brands with real quality control. That beats any speed figure here.
#Why a Huge or Ultra-Fast Drive Is Wasted Here
Install media is a one-time write. You build it, boot it once, and back in the drawer it goes. Premium features exist for sustained workloads this scenario never produces.
A 20Gbps solid-state stick like the ones topping our everyday-drive rankings earns its price when you move large folders weekly. Pointed at install media, it spends its life waiting on a download, gets written once, then idles for months. The capacity story is the same: setup uses the same few gigabytes whether the drive holds 64GB or 1TB.
There’s one exception worth naming. If you maintain several machines and rebuild media often, a faster drive with strong sustained writes does shave real minutes across a year of rebuilds. For everyone else, put the savings toward a second SanDisk Ultra. A labeled spare means a corrupted stick or a BOOTMGR is missing error at midnight doesn’t require a second working PC to fix.
That’s the honest division of labor between our two guides: the general roundup optimizes for drives you use constantly, and this page optimizes for the drive you hope to never need.
#FAT32, NTFS, and the Reformat Step
You don’t need to format anything yourself. The media creation tool reformats the drive as part of the build, which is exactly why Microsoft’s warning about erased content exists. Hand the tool a stick, and it handles partitioning, file system, and boot flags without asking you a single technical question.
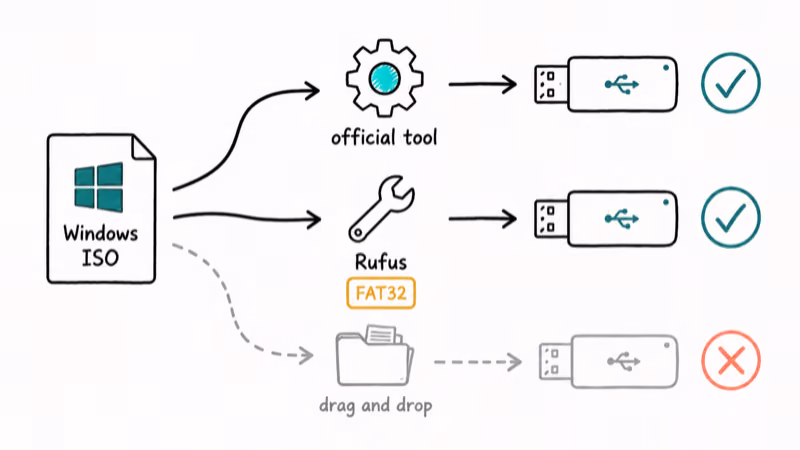
The file-system question only appears when you skip the official tool and build media manually from an ISO. UEFI firmware boots most reliably from FAT32, but FAT32 caps individual file sizes, and the main image file inside recent Windows ISOs has outgrown that cap. The free tool Rufus automates the workaround and is the route we suggest when the official tool fails or you need a specific ISO.
Why care at all? A wrongly formatted drive is invisible to the boot menu, which sends people chasing phantom hardware failures. The boot-time error pages we maintain see this regularly: a machine throwing error 0xc0000098 needs working install media to repair its boot data, and a drive built by hand with the wrong layout can’t even reach the repair screen. When the drive boots but setup fails partway, the media itself is the first suspect to eliminate.
So the rule is short. Official tool: format nothing, it’s automatic. Manual ISO: use Rufus and accept its defaults.
#Bottom Line
Buy the SanDisk Ultra 64GB (SDCZ48), run the media creation tool, write the date on the stick with a marker, and store it where you can find it during a no-boot morning. It’s affordable enough to dedicate to the job permanently, which is the entire trick: a drive that lives in a drawer as a known-good installer beats a faster drive you’d have to erase and rebuild mid-crisis.
If you already own any 16GB-or-larger USB 3.0 stick from a real brand, use it and spend nothing. If you want one drive for installs plus daily file shuttling, get the Samsung BAR Plus instead and accept that you’ll need to rebuild the installer after the drive fills up with other files.
#Frequently Asked Questions
Does the media creation tool delete everything on the USB drive?
Yes. Microsoft’s documentation states that any content on the drive is deleted during the process, which is why the official requirement specifies a blank drive. Back up anything on the stick before you start.
Can I use a 128GB or 256GB flash drive for Windows install media?
Yes, it works without issues. The tool reformats the drive and uses only the few gigabytes the installer needs, so the remaining capacity sits idle until you reformat the stick for other duties. It’s wasteful rather than harmful.
Will a USB 2.0 flash drive work for installing Windows?
It will, and the finished installer boots fine. The write phase takes noticeably longer over USB 2.0, and the file-copy stage of Windows setup drags too. If you’re buying new anyway, USB 3.0 costs nearly the same and removes the wait.
Can I reuse the drive for normal storage afterward?
Yes. Reformat it in File Explorer or Disk Management and it returns to full capacity as an ordinary stick. We’d argue against it, though: a dedicated, labeled install drive is worth far more during an emergency than the few dollars a spare stick costs.
Do I need a USB-C flash drive for Windows install media?
Usually not. Most desktops and the older laptops that most often need reinstalls still have USB-A ports, and many motherboards make booting from a rear USB-A port the most reliable option. A USB-C stick only earns its place if your newest machine has no USB-A at all.
Why won’t my PC boot from the USB drive?
Three causes cover most cases: the boot menu key (usually F12, F11, Esc, or F9) wasn’t pressed in time; Secure Boot or the UEFI boot order is skipping the stick; or the media was built wrong, often by manually copying an ISO. Rebuild the drive with the official tool first, since that eliminates the most common variable.
Is a no-name flash drive safe for install media?
We’d avoid it. Counterfeit sticks that report more capacity than they physically contain are common in marketplace listings, and they corrupt data silently once writes pass the real capacity. A failed install caused by fake storage looks identical to a hardware problem, and you’ll waste an evening on the wrong diagnosis.

Bluetooth Not Working on Snapdragon X? Fixes for 2026
Bluetooth not working on your Snapdragon X Copilot+ PC? Generic audio, mice, and keyboards work, but vendor apps often lack an ARM build. Fixes inside.

Docker Desktop and WSL2 Not Working on Snapdragon X? Fix It
WSL2 runs fine on Snapdragon X, but Docker Desktop ARM is Early Access and throws WSL errors. Use WSL2 plus native ARM64 Ubuntu and Docker Engine.

Does iTunes Work on Snapdragon X? ARM Windows 11 Guide
Yes, iTunes runs on Snapdragon X laptops through Prism emulation, but the Apple Devices app is the smoother route. Here is what to install on ARM.

Does OBS Studio Work on Snapdragon X? ARM64 Build Guide
Yes, OBS Studio has an experimental ARM64 build since version 31.1, but x64 plugins won't load and hardware encoding is missing. Here is what works.