How to Bypass iPad Passcode in 2026: The Ultimate Guide
Locked out of your own iPad? Learn 4 methods to bypass the iPad passcode in 2026, including iTunes, iCloud, Recovery Mode, and trusted third-party tools.
Quick AnswerTo bypass an iPad passcode on your own device, use iTunes or Finder to restore from a backup, use iCloud Find My to erase remotely, or put the iPad into Recovery Mode. Third-party tools like Tenorshare 4uKey can bypass the passcode without a backup.
Forgetting your iPad passcode locks you out of your device completely, blocking access to all apps, photos, and data. These methods apply only to your own iPad that you legally own. Bypassing another person’s device without their permission is illegal under computer fraud statutes.
- iTunes/Finder restore works only if you’ve previously synced with that computer
- iCloud remote erase requires Find My iPad to have been enabled before the lockout
- Recovery Mode is the most universal method and works on any iPad, but erases all data
- Tenorshare 4uKey bypasses any passcode type including Face ID and Touch ID in minutes
- Back up regularly to iCloud or iTunes to avoid permanent data loss after a bypass
#Apple’s Official Methods to Remove the Passcode
Apple provides two built-in paths for recovering a locked iPad. Both require prior setup, so try these first before turning to any third-party tool.
#Erase iPad Directly From the Lock Screen (iPadOS 15.2+)
On iPadOS 15.2 and later, the lock screen itself offers a way out after repeated wrong entries, and it needs no computer at all. iPadOS escalates lockouts as you miss: one minute at the sixth wrong attempt, climbing to an hour at the ninth, with the tenth triggering the permanent “iPad Unavailable” or Security Lockout state.
Once Erase iPad appears in the bottom corner of that screen, tap it, confirm, and enter the Apple ID password tied to the device to sign out of the account. The iPad wipes itself and restarts to the Hello screen, with Activation Lock cleared as part of the wipe. The iPad must be online for the Apple ID verification; offline devices or anything on iPadOS 15.1 or older won’t show the button.
#Bypass iPad Passcode with iTunes or Finder
If you’ve previously synced your iPad with a specific computer, iTunes (Windows/older macOS) or Finder (macOS Catalina+) can restore it and remove the passcode.
Connect your iPad to the computer you’ve synced it with before and open iTunes or Finder. The app should detect your iPad automatically and begin syncing.
Once the sync and backup complete, click Restore iPad, then choose Restore from iTunes Backup. Select your device in the sidebar and pick the most recent backup to remove the passcode.
This method only works on the specific computer where you previously synced. If you never synced, this option isn’t available.
#Bypass iPad Passcode with iCloud
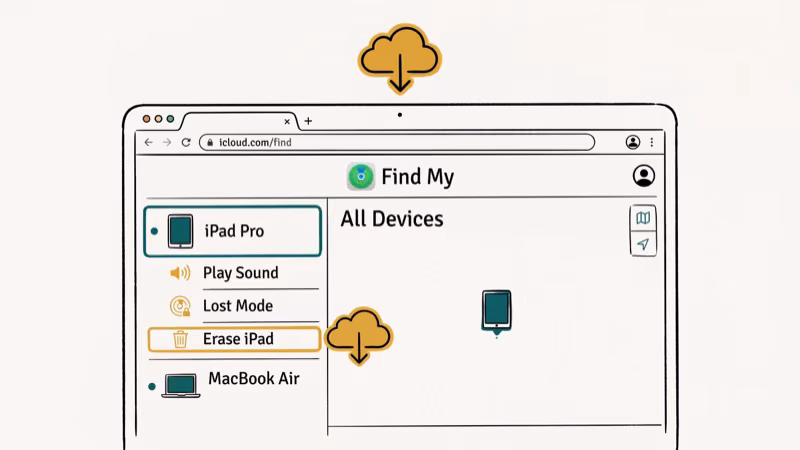
If you enabled Find My iPad before losing access, you can erase the device remotely from any browser.
Go to icloud.com and sign in with your Apple ID. Click Find iPhone, then All Devices at the top, and select your iPad from the list. Tap Erase iPad to wipe the device, including the passcode. You can then restore from an iCloud backup during setup.
This erases all data on the iPad. Having an iCloud backup taken before the lockout makes recovery straightforward.
#Does Recovery Mode Work When Other Methods Fail?
Recovery Mode is the most reliable fallback when you don’t have access to your sync computer or iCloud.
Recovery Mode can restore most iPad models using a Mac or PC, though how long it takes depends on your firmware download speed. Apple’s developer documentation confirms that the button sequence to trigger Recovery Mode varies across current iPad models.
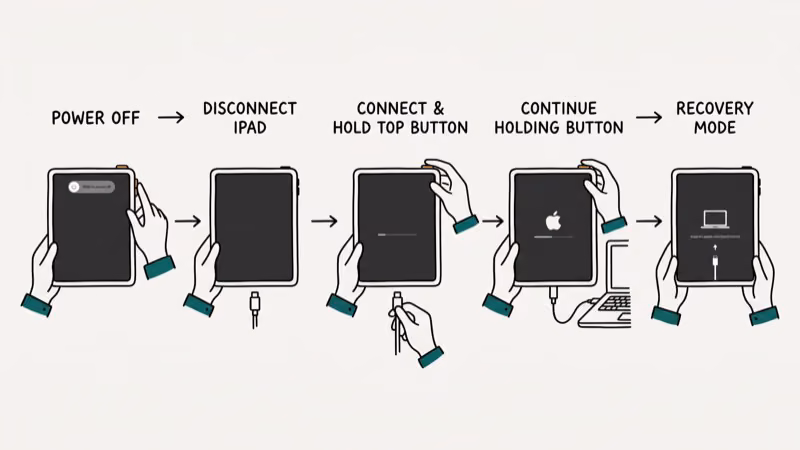
Connect your iPad to a computer while holding the appropriate button:
- iPad with Face ID: Hold the top button and volume down button together
- iPad with Home button: Hold the Home button while connecting
Keep holding until the Recovery Mode screen appears. Open iTunes or Finder on your computer. When prompted, click Restore. This erases all data and installs the latest iPadOS, removing the passcode.
According to Apple’s official support guide for Recovery Mode, this method works on every iPad model including those running iPadOS 17. Apple confirms that all iPad models manufactured after 2011 support Recovery Mode through a connected Mac or PC. Your device must be connected to a computer during the entire process.
If the restore stalls or throws error 4013/4014, the usual culprits are a worn or uncertified cable, an outdated Finder/iTunes that can’t fetch the latest firmware, or Windows antivirus blocking the Apple Mobile Device Service. Apple’s update error guidance recommends swapping the cable and USB port first. If the iPad won’t enter Recovery Mode at all, DFU mode is the deeper fallback; see what restoring an iPad means for when to use it.
#Third-Party Passcode Removal with Tenorshare 4uKey
If you’ve never synced with a computer or enabled iCloud backup, third-party tools offer a practical alternative. Tenorshare 4uKey can remove a passcode without any iTunes backup on your own device.

This tool only works on your own device. Use it only for devices you legally own with no other recovery option available.
Steps to use Tenorshare 4uKey:
Download and install 4uKey on your computer, then connect your locked iPad via USB cable. Select Unlock Lock Screen Passcode and click Start. The app then downloads a firmware package, which takes a few minutes.
Once downloaded, click Unlock Now and confirm by entering 000000. The passcode removal completes in 5 to 10 minutes.
4uKey removes 4-digit codes, 6-digit codes, Touch ID, and Face ID on all iPad models including the latest iPadOS versions.
Some links on this page are affiliate links, which means fone.tips may earn a commission at no extra cost to you.
#Preventive Steps to Avoid Future Lockouts
Once you regain access, take these steps to prevent a repeat:
- Enable Face ID or Touch ID for everyday access — you only enter the passcode occasionally
- Turn on iCloud Backup in Settings > [your name] > iCloud so your data is protected
- Set a passcode that’s memorable but not trivially guessable (avoid birthdays and repeating digits)
- Write the passcode in a secure location like a password manager
- If your iPad already shows “iPad is disabled” or Security Lockout, use the lock-screen Erase option or Recovery Mode steps above
- If you need to reset your iPhone passcode instead, see iPhone passcode reset
You can also link your iPad to a trusted computer through iTunes or Finder to keep a local backup as a fallback.
#Data Loss: What Each Bypass Method Erases
Understanding which data survives each method helps you choose the least destructive option. No bypass method preserves data that wasn’t backed up. The difference is only in what backup gets restored afterward.
iTunes/Finder restore restores to a previous backup, so data added after that backup is lost. iCloud erase restores from an iCloud backup if one exists. Recovery Mode reinstalls iPadOS fresh. Tenorshare 4uKey also performs a firmware restore; data not in a backup is gone.
If you have a recent backup, all methods effectively restore you to that state. If you’ve never backed up, contact Apple Support before proceeding.
#Is It Legal to Bypass an iPad Passcode?
Bypassing the passcode on your own iPad is legal. Courts consistently recognize the right to access hardware you own. However, accessing another person’s iPad without authorization violates the Computer Fraud and Abuse Act in the US and equivalent laws in other countries.
Apple Store technicians can verify ownership using a purchase receipt and unlock devices through official channels. If you’re unsure whether a device is yours to access, contact Apple Support with proof of purchase before attempting any bypass method.
#Bottom Line
The fastest path depends on what you set up before the lockout. iTunes/Finder is the most reliable if you’ve synced previously; iCloud erase is the easiest remote option.
Recovery Mode works on any iPad but erases everything. Tenorshare 4uKey is the best option when no backups exist. Always keep regular iCloud or iTunes backups to avoid permanent data loss.
#Frequently Asked Questions
Is it illegal to bypass iPad passcode?
Bypassing the passcode on an iPad you own is not illegal. However, bypassing someone else’s iPad without permission is a criminal offense under computer fraud laws in most countries. Apple and law enforcement agencies coordinate on unauthorized device access cases.
Will I lose data by bypassing iPad passcode?
Most methods involve a restore that erases data not included in a backup. Recovery Mode always erases everything; iCloud erase wipes the device and restores from a backup; iTunes restore does the same. Tenorshare 4uKey also performs a firmware restore. Back up before proceeding whenever possible.
How can I recover my data after bypassing the passcode?
The best option is to restore from an iTunes or iCloud backup taken before the lockout. During iPad setup after bypassing, choose Restore from iCloud Backup or Restore from Mac or PC to recover your data.
What if I never backed up my iPad?
Without a backup, data recovery after bypassing the passcode requires professional recovery services, which are expensive and not guaranteed. Going forward, turn on iCloud Backup in Settings to prevent this situation.
Can Apple Store employees bypass passcodes?
Yes. Apple Store technicians can remove passcodes for devices you can prove you own. Bring the original purchase receipt and a government-issued ID. They use Apple’s internal tools and won’t charge for the service on devices under warranty.
How does Recovery Mode work differently from a standard restore?
Recovery Mode forces the device into a low-level bootloader state where iTunes or Finder can push a fresh firmware image. This bypasses the passcode check entirely because iPadOS is reinstalled from scratch. A standard restore through Settings requires passcode authentication before it can run.
Which passcode types can third-party tools remove?
Reputable tools like Tenorshare 4uKey remove all passcode types: 4-digit PIN, 6-digit PIN, custom alphanumeric code, Touch ID, and Face ID. They work by reinstalling iPadOS firmware, which bypasses the authentication layer entirely.

iPhone 17 Cellular Data Not Working on iOS 26? 9 Fixes
iPhone 17 cellular data still dropping on iOS 26? Apple fixed the launch bug in iOS 26.0.1, but recovery failures persist. Here's the fix ladder.

iPhone Cellular Data Not Working Abroad? eSIM Fixes
Travel eSIM showing no data abroad? Fix iPhone roaming with the data-line check, Data Roaming toggle, APN settings, and network selection steps.

iPhone Cellular Data Not Working for Some Apps? 8 Fixes
Some iPhone apps refuse to load on cellular while others work fine. Check the per-app cellular toggle, Low Data Mode, VPN profiles, and Screen Time.

iPhone Stuck on EDGE? How to Get 5G or LTE Back (2026)
iPhone stuck on EDGE with crawling data? Here's why the E icon appears, which settings force 5G or LTE back, and when the problem is your carrier.