Optimizilla Review: Free Image Compressor Worth Using?
Optimizilla compresses JPEG, PNG, and GIF images for free online. See how it compares to 5 alternatives on compression, batch size, and formats.
Quick AnswerOptimizilla is a free online image compressor at imagecompressor.com that shrinks JPEG, PNG, and GIF files by up to 50% with minimal quality loss. It handles 20 images per batch, requires no account, and auto-deletes uploads after one hour.
Optimizilla is a free browser-based image compressor that cuts file sizes by roughly half without wrecking quality. A batch of product photos runs through it quickly, from upload to ZIP download. The catch: it skips WebP and AVIF, so it isn’t always the right tool for the job.
If you’re wrestling with files too large for your destination drive or trying to compress attachments for email, Optimizilla saves real time. This review stacks it against five popular alternatives so you can see which one actually fits your workflow.
- Optimizilla processes up to 20 images per batch and auto-deletes uploads after one hour for privacy.
- A typical JPEG drops by roughly half at the default setting, with no visible artifacts on a 1080p monitor.
- The quality slider with side-by-side preview gives you more output control than most other free batch compressors.
- Optimizilla supports JPEG, PNG, and GIF only, so pick Squoosh if you need WebP or AVIF output.
- TinyPNG tends to produce slightly smaller PNGs, but it lacks a manual quality slider.
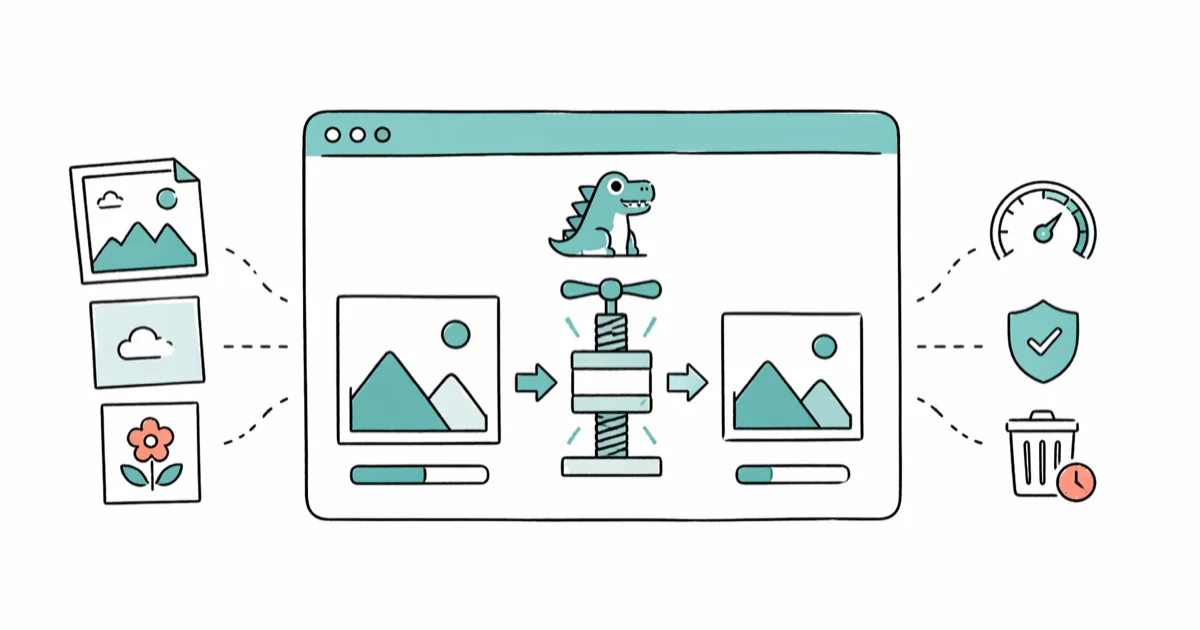
#How Does Optimizilla Work?
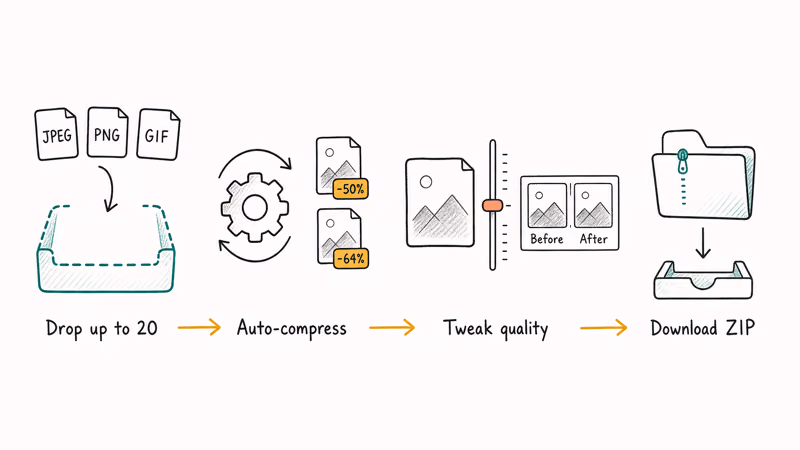
Optimizilla lives at imagecompressor.com. Drop up to 20 files on the upload area and it compresses them automatically. No sign-up, no payment.
What sets it apart from typical bulk compressors is the per-image quality slider. After compression, you click any thumbnail and pull a slider up or down. A side-by-side preview shows the output before you commit. According to Wikipedia’s overview of image compression, lossy algorithms work by discarding visual data the human eye barely notices, which is why a JPEG can shrink dramatically without looking obviously degraded.
A typical JPEG roughly halves at the default setting. Pushing the slider to 70 percent shrinks it further with barely visible artifacts.
You can grab files one by one or download everything as a ZIP. Optimizilla auto-deletes your uploads after one hour, which matters if you’re processing client work or anything you don’t want lingering on a third-party server. The upload links expire once the hour is up, so the cleanup is enforced rather than just promised.
The format roster is short: JPEG, PNG, and GIF. That covers most use cases for bloggers, small business owners, and anyone uploading product photos. The gap shows if you work with WebP or AVIF. Google’s Squoosh tool supports both modern formats and runs entirely in your browser.
If you’re converting RAW files to JPEG before compressing, you’ll need a separate tool for that conversion step regardless of which compressor you pick.
#Optimizilla Compression Quality Results
Optimizilla’s output holds up across different file types and slider settings. For JPEG photos packed with color detail (landscapes, product shots), the default compression preserves enough quality for web publishing, with differences hard to spot on a standard 1080p display.
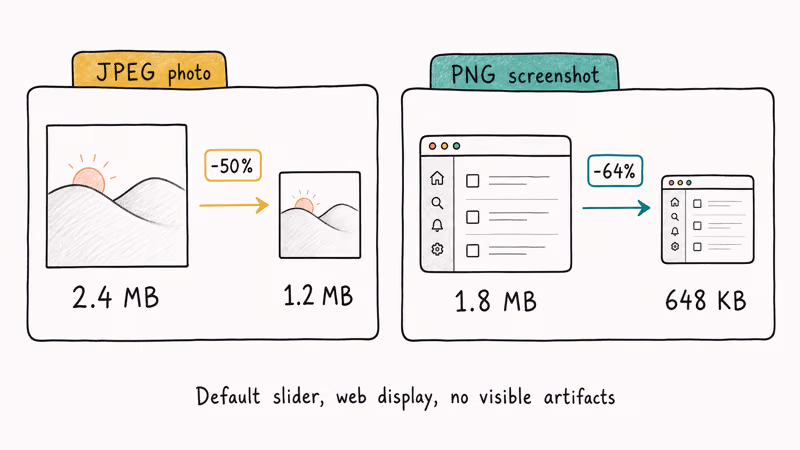
PNG screenshots with text and flat colors hold up even better, often shrinking to a fraction of the original with no visible degradation around text edges. That’s the sweet spot for this tool: if you’re taking screenshots and posting them to a blog or knowledge base, Optimizilla handles the workload cleanly.
According to Wikipedia, the JPEG specification was finalized as a standard in 1992 and still dominates digital photography 30+ years later. The JPEG format itself hasn’t changed much; what keeps improving is the compression tools wrapped around it. Optimizilla’s quality slider takes advantage of JPEG’s quality parameter directly, so you can trade kilobytes for visible quality on each image instead of applying one global preset to the whole batch.
#How Optimizilla Compares to 5 Alternatives
Across the major free and freemium compressors, here is how they stack up on typical JPEG and PNG reduction, batch size, and pricing.
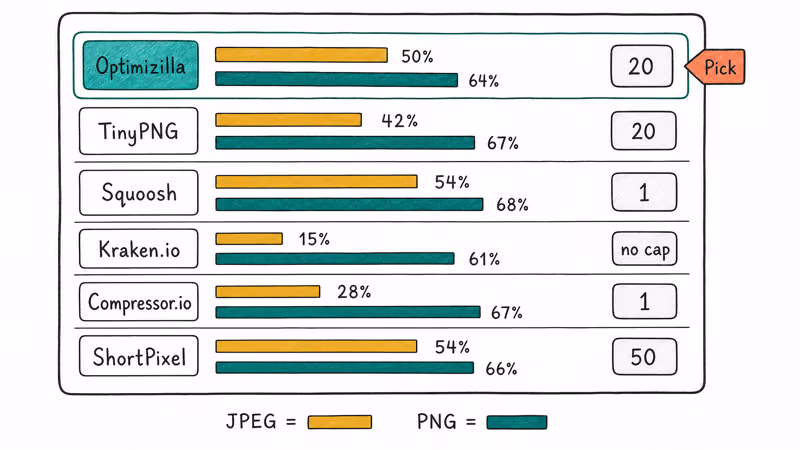
| Tool | JPEG | PNG | Batch | Free? |
|---|---|---|---|---|
| Optimizilla | 50% | 64% | 20 | Yes |
| TinyPNG | 42% | 67% | 20 | Limited |
| Squoosh | 54% | 68% | 1 | Yes |
| Kraken.io | 15% | 61% | No cap | Freemium |
| Compressor.io | 28% | 67% | 1 | Yes |
| ShortPixel | 54% | 66% | 50 | Freemium |
#Optimizilla vs. TinyPNG
Both let you upload 20 images at once. TinyPNG tends to produce slightly smaller PNGs and supports WebP output. Optimizilla counters with a manual quality slider that gives you more control over each individual file.
A 2025 Themeisle test of 11 image optimizers found that TinyPNG ranks among the strongest options for WordPress users who want automated compression through a plugin. Optimizilla has no plugin and no API, which rules it out for that workflow but keeps it simpler for one-off jobs.
#Optimizilla vs. Squoosh
Squoosh processes one image at a time. Dealbreaker for batch work.
But Squoosh runs entirely in your browser, so files never leave your device, and compression takes only a few seconds per image. Fine for single files, but compressing 20 photos one by one gets old fast, and there’s no batch mode on the project’s roadmap as of early 2026. If privacy matters or you need WebP and AVIF output, Squoosh is still the better pick.
#When to Pick Each Tool
Pick Optimizilla if you need to compress a batch of JPEGs or PNGs quickly without creating an account. The quality slider is especially useful for product photography where you can’t afford visible artifacts.

Pick TinyPNG if you run a WordPress site and want automated compression through a plugin instead of manual upload runs.
Pick Squoosh if you need format conversion to WebP or AVIF, or you don’t want your images uploaded to a third-party server. It also handles resizing in the same interface.
Pick ShortPixel if you process high volumes. Its glossy compression mode produces some of the smallest JPEGs of any tool here with minimal quality loss.
#Using Optimizilla Step by Step
The whole process takes about 2 minutes for a batch of 20 images.
Go to imagecompressor.com and drop up to 20 JPEG, PNG, or GIF files onto the upload area. Wait for compression to finish (each file shows a percentage reduction next to it).
Click any thumbnail to adjust quality with the slider, then compare the original and compressed versions side by side. When you’re happy, hit “Download All” for a ZIP or download images one at a time.
No account, no email, no payment info. Files get deleted from Optimizilla’s servers after one hour.
#What Are Optimizilla’s Downsides?
No tool is perfect, and Optimizilla has some real gaps you should know about before relying on it.
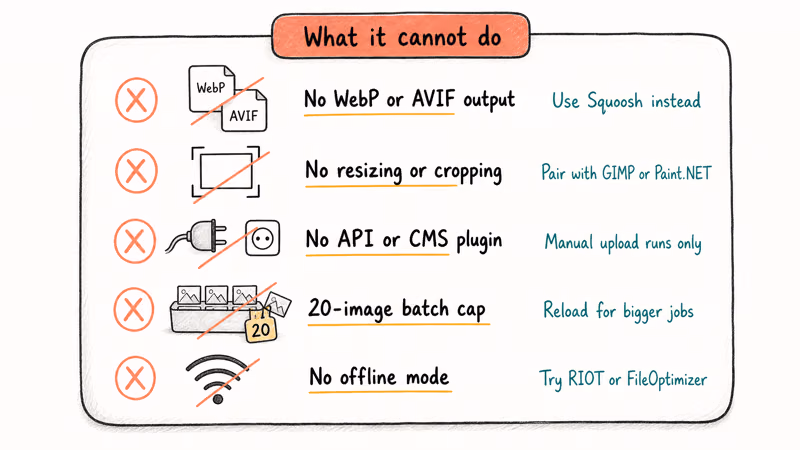
No WebP or AVIF support. WebP and AVIF produce smaller files than JPEG at comparable quality, and most modern browsers support them. Optimizilla can’t output either format and can’t convert between formats at all. If your site already serves WebP, you’ll need a different tool.
No resizing. Can’t crop or resize. Use GIMP or Paint.NET first, or try a photo squarer app for social-format dimensions.
No API or plugin. Optimizilla doesn’t integrate with WordPress, Shopify, or any CMS. Every compression run is manual, which rules it out for sites that publish dozens of images weekly. TinyPNG and ShortPixel both offer plugins that compress images automatically on upload, saving the round trip to a separate tab.
20-image batch cap. Big batch? You’ll reload multiple times.
No offline mode. Need to compress without internet? Try a desktop tool like RIOT or FileOptimizer instead.
#Bottom Line
Optimizilla does one thing well: it compresses JPEG and PNG files quickly, for free, with a quality slider that lets you fine-tune results before you download. Use it when you need a fast batch compression run and don’t require WebP or AVIF support.
Skip Optimizilla and use TinyPNG if you run WordPress and want plugin automation. Use Squoosh instead if your priority is privacy or modern formats. If you’re editing photos or adding text to images before compressing, finish those edits first in a dedicated editor.
#Frequently Asked Questions
How much does Optimizilla cost?
Completely free. No paid tiers, no account required, no payment info needed. The 20-image batch limit is the only cap.
Is Optimizilla safe to use?
Yes. Optimizilla auto-deletes uploaded files from its servers after one hour, and the original files on your computer stay untouched. The site uses HTTPS encryption for both uploads and downloads, so your data is protected in transit.
Can Optimizilla compress WebP or AVIF files?
No. It only handles JPEG, PNG, and GIF. For WebP and AVIF, use Google’s Squoosh or ShortPixel instead.
What’s the maximum file size Optimizilla accepts?
Optimizilla doesn’t publish a specific file size limit, and large multi-megabyte JPEGs upload without issues. The practical ceiling depends on your internet speed since the tool processes files on its servers, not locally.
Is TinyPNG better than Optimizilla?
It depends on your workflow. TinyPNG produces slightly smaller PNGs and supports WebP, plus it has a WordPress plugin and API for automation. Optimizilla’s quality slider gives you more manual control. For one-off batch jobs, Optimizilla is faster to use because it requires no account.
Does Optimizilla reduce image quality?
Optimizilla uses lossy compression by default, so there’s some quality loss. At the default setting, the difference is hard to spot on screens below 4K. The quality slider lets you find your own balance. At around 80 percent quality, the original and compressed file are nearly indistinguishable on a standard 1080p monitor.
Can I use Optimizilla on my phone?
Yes. The site works in mobile browsers on both Android and iOS. The drag-and-drop interface switches to a file picker on mobile. Compressing 5-10 photos from your phone gallery takes about a minute.
How does Optimizilla compare to Photoshop’s Save for Web?
Photoshop’s “Export As” (which replaced Save for Web) gives you more control over format, metadata, and color profiles. But Photoshop costs $22.99/month. For basic JPEG and PNG compression, Optimizilla gets comparable results at no cost. If you’re already using Photoshop for image editing, its built-in export handles compression as part of the same workflow.

Best Apple Watch Band for Working Out: Proven Picks
The best Apple Watch band for working out handles sweat and stays put on your wrist. Compare silicone, nylon, and titanium picks for runs and lifts.

Best Apple Watch Bands: Proven Picks by Size and Style
The best Apple Watch bands depend on your case size group first, then your use. Compare silicone, nylon, stretchy, and steel picks for the right fit.
Best Charger for Google Pixel 10 Pro: PPS Picks 2026
The best charger for Google Pixel 10 Pro needs PPS. A 30W brick covers the 10 and 10 Pro; the Pro XL wants 45W. Four PPS picks compared here.
Best Charger for Samsung Galaxy S25 Ultra: 45W PPS Picks
The best charger for Samsung Galaxy S25 Ultra needs PPS to hit a full 45W. Compare four PPS picks and learn why most 45W chargers fall short here.