myQNAPcloud: How to Set Up Remote Access to QNAP NAS
Set up myQNAPcloud to access your QNAP NAS from anywhere. Step-by-step guide covers SmartURL, CloudLink relay, security settings, mobile apps, and QVPN.
Quick AnswerInstall myQNAPcloud Link from your QNAP App Center, sign in with your QNAP ID, register a unique SmartURL, then reach your NAS from any browser at example.myqnapcloud.com or through the Qfile mobile app.
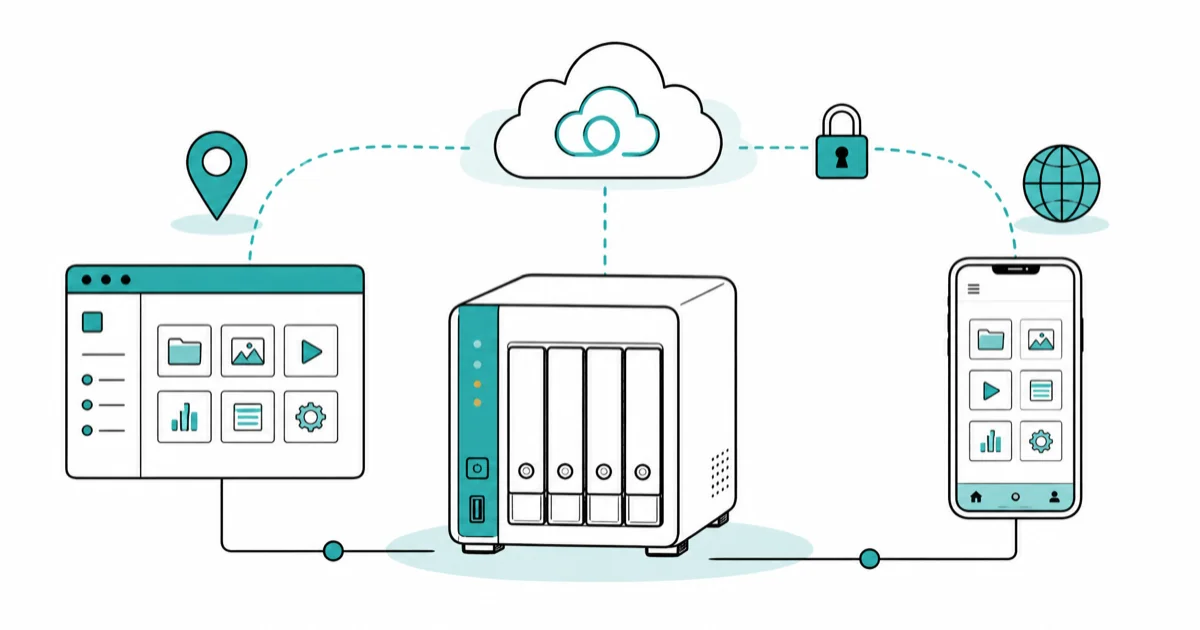
myQNAPcloud is QNAP’s free remote-access service for reaching your QNAP NAS from any internet connection without manual port forwarding or a static IP. It gives the NAS a SmartURL and can route access through myQNAPcloud Link or CloudLink, depending on how your network is set up.
This guide covers the full setup, the security trade-offs each connection type makes, and the QNAP-recommended hardening steps you should apply before publishing anything to the public web.
Use these steps only on your own device, account, network, or files, or with explicit consent from the owner.
Use QNAP’s official QVPN tool for legally authorized access only; publishing someone else’s data without consent can be illegal.
- myQNAPcloud assigns your NAS a unique SmartURL like example.myqnapcloud.com so you can reach it from any browser without configuring port forwarding or a static IP on your router.
- Standard setup involves six steps: create a QNAP ID, install myQNAPcloud Link from App Center, enable remote access, register a SmartURL, pick which services to expose, and install the Qfile mobile app.
- All connections use SSL/TLS encryption by default, and enabling two-factor authentication on your QNAP ID adds a second login factor for both the web portal and your NAS sign-in flow.
- The free CloudLink relay tunnels traffic through QNAP servers without storing file contents, so you can avoid exposing your home IP address or opening firewall ports to the internet.
- For the strongest privacy, QNAP recommends running QVPN Service rather than publishing File Station, Photo Station, or Music Station directly to the public web through SmartURL.
#How myQNAPcloud Works in Plain Terms
myQNAPcloud is the umbrella name QNAP uses for three related remote-access tools. There’s a SmartURL hostname tied to your QNAP ID, a free CloudLink relay that tunnels traffic without open ports, and an optional myQNAPcloud DDNS record for users who want to publish their NAS directly. The service is built into QTS and QuTS hero, with most of the moving parts inside the myQNAPcloud Link app from the App Center.
A QNAP NAS itself is a network-attached storage appliance that runs as its own file server on your home or office network.
How you connect remotely depends on your network. According to QNAP’s myQNAPcloud overview, if your NAS sits behind a router that supports UPnP, myQNAPcloud Link can negotiate port-mapping automatically and give you a direct connection. If UPnP is blocked or your ISP uses carrier-grade NAT, the service falls back to a relay tunnel through QNAP’s CloudLink servers without any router changes.
That means the same SmartURL can keep working whether direct UPnP mapping is available or the relay path is needed.
Most users only ever see the SmartURL itself. Instead of remembering an IP address that changes whenever your ISP rotates a DHCP lease, you visit a name like yournas.myqnapcloud.com from any browser, sign in with your NAS account, and get the same File Station UI you’d see on the local network.
The SmartURL is registered against your QNAP ID, which is also how QNAP licenses tie back to your account and how the company verifies ownership during a recovery flow. If you have a heap of legacy data sitting on external drives that you want to consolidate onto a NAS, a hard drive docking station is usually the fastest way to copy from desktop SATA disks before you wipe and resell them.
#How Do You Set Up myQNAPcloud Step by Step?
QTS’s built-in setup wizard does the heavy lifting. The six-step flow below mirrors what QNAP’s onboarding screens walk you through, and it takes about ten minutes on a NAS with internet access.

- Create a QNAP ID. Open a browser, go to account.qnap.com, and register a QID using a working email address. This account becomes the master credential for myQNAPcloud, software licenses, and forum access.
- Install myQNAPcloud Link. Sign in to your NAS web admin, open the App Center, search for
myQNAPcloud Link, and install. On QTS 5.x the app is preloaded but may not be active until you launch it. - Run the myQNAPcloud wizard. Open the myQNAPcloud icon on the QTS desktop and sign in with your QID. The wizard asks for a device name, which becomes the prefix in your SmartURL.
- Pick a SmartURL. Choose a short, memorable name. The full URL becomes
<yourname>.myqnapcloud.com, and once registered it sticks with your QID, so you can’t reuse a name another customer already claimed. - Choose which services to publish. The wizard lists every service the NAS exposes (File Station, Photo Station, Container Station, SSH, etc.). Turn on only the ones you actually need remotely. Each enabled service is one more attack surface.
- Install the mobile clients. Download Qfile Pro for browsing files, Qmanager for admin, and Qphoto for photos. Sign in with the same QID. The mobile clients use the same SmartURL hostname and inherit the encryption settings from the web flow.
If a TLS warning appears when you load the SmartURL for the first time, work through the SSL error troubleshooting guide before you assume the NAS is broken. The most common cause is a stale certificate cache on the client device, not the server.
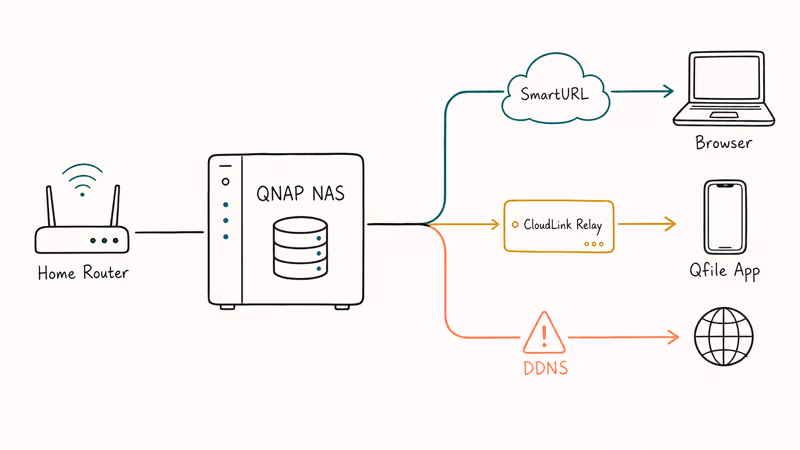
#SmartURL, CloudLink, and DDNS Explained
A lot of myQNAPcloud confusion comes from people mixing up the three connection paths the service offers. Each one has a different security and reliability profile.
The wizard picks a default automatically, but you should know what’s happening under the hood before you trust it with sensitive files.
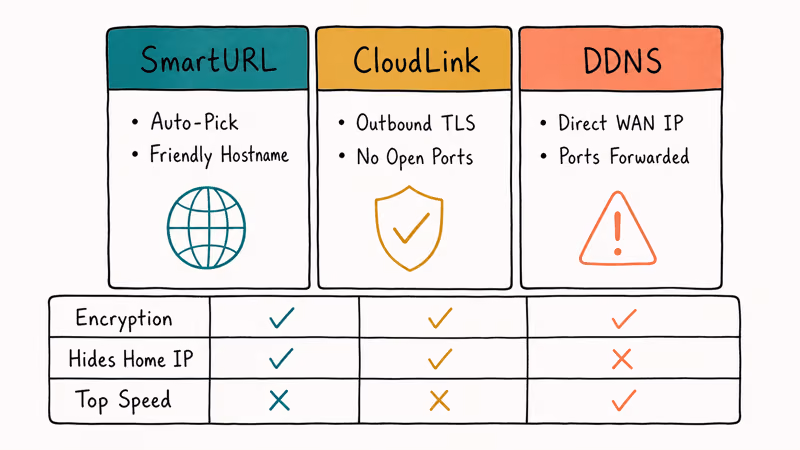
SmartURL is a friendly hostname. It points to whichever connection method myQNAPcloud thinks is best for your NAS at the moment. If UPnP works the SmartURL resolves to your home WAN IP, and if UPnP fails it resolves to a CloudLink relay endpoint instead. Either way, the URL stays the same.
CloudLink is QNAP’s free relay service. Your NAS opens an outbound TLS tunnel to a QNAP server while your remote browser opens a separate TLS connection to the same server, and the server bridges them without seeing file contents because both tunnels are encrypted end to end. CloudLink does see metadata like timing, source IPs, and bandwidth, so for most home users this is the safer default because nothing inbound is open on your router.
myQNAPcloud DDNS is the opposite trade-off. You publish your real WAN IP under your SmartURL hostname, and you forward router ports so the world can reach the NAS directly.
Performance is faster than CloudLink because there’s no relay hop. The cost is that you’ve put your NAS on the public internet, which is exactly the configuration ransomware crews like DeadBolt have used to compromise tens of thousands of QNAP boxes. According to QNAP’s security advisory page, the company has issued repeated warnings against direct internet exposure and recommends a VPN whenever possible.
If your goal is consolidating cloud accounts you keep for backup redundancy, the walkthroughs on moving Dropbox files to Google Drive and shifting OneDrive content to Google Drive cover the most common transfer paths without downloading everything to a local disk first.
#How Should You Secure myQNAPcloud Remote Access?
The single biggest decision is whether you want any service published to the public internet at all. QNAP itself answers this clearly: avoid it where possible, and lean on QVPN.
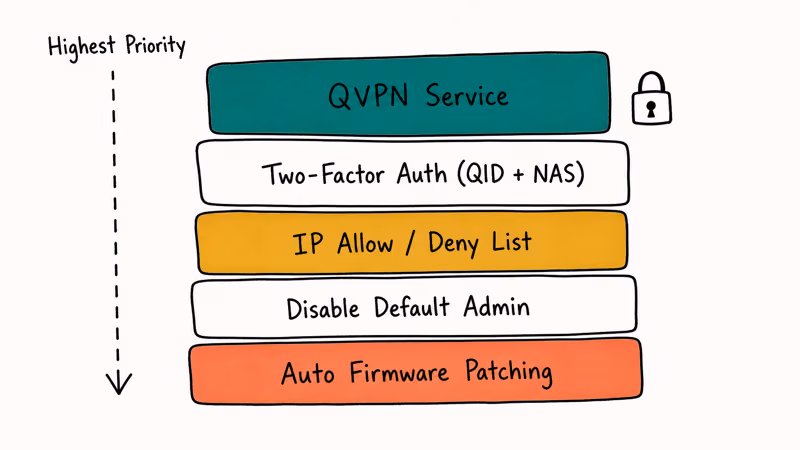
Use these layers in order from highest to lowest priority:
- Run QVPN Service instead of public SmartURL. QNAP recommends QVPN Service as the safest remote-access path because it tunnels every protocol, not just HTTP, and it never exposes File Station to random internet scanners. Set up an OpenVPN, WireGuard, or QBelt profile on the NAS, install the QVPN client on your phone or laptop, and connect to your home network first. The explainer on what a VPN actually does on iPhone is a good intro if VPN concepts are new to you.
- Enable two-factor authentication on the QNAP ID and on the NAS user. The QID 2FA lives at account.qnap.com and gates the SmartURL portal; the NAS-side 2FA lives under
Control Panel>Users> 2-Step Verification and gates QTS sign-in. Turn on both. They’re separate systems despite sharing a name. - Restrict NAS user access by IP.
Under Control Panel>Security>Allow/ Deny List, restrict admin accounts to your known home and office IP ranges. Anyone hitting the SmartURL from elsewhere just sees a generic failure, which slows down credential-stuffing bots. - Disable the admin account, create a named admin instead. The default
adminusername is the first thing automated scanners try. Make a fresh account with admin privileges, sign in once to confirm it works, then disableadminfrom Control Panel. - Patch on a schedule. QNAP publishes firmware updates regularly.
Set Control Panel>System>Firmware Update>Live Updateto auto-install security patches at a time the NAS is normally idle.
If your NAS sits behind a shared family router and you want network-wide control over which devices can talk to the internet, a router from the parental-control router roundup gives you per-device blocking that complements NAS-side restrictions.
#Common myQNAPcloud Issues and Fixes
A clean myQNAPcloud setup mostly stays clean. Four problems show up often enough to be worth listing the fix path:
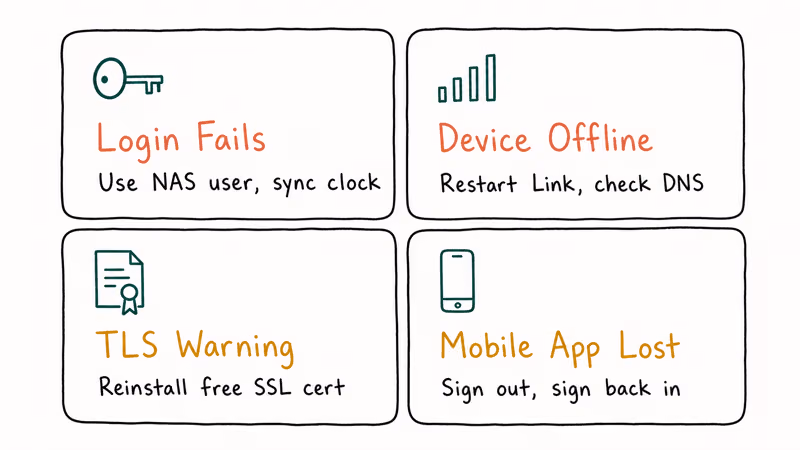
- SmartURL loads but login fails. The credentials you use are the QTS user account, not your QNAP ID. The QID logs you into the myQNAPcloud portal where you pick the device, then the device prompts for the local user. If the device prompt itself rejects valid credentials, check that 2FA is enabled and that the time on the NAS is in sync, since TOTP codes drift when the NAS clock is wrong.
- SmartURL says “device offline.” myQNAPcloud Link lost its outbound tunnel. Restart the app from App Center.
Check Network & Virtual Switch>Network Connectionsto confirm DNS is resolving. If your ISP changed the WAN IP and DDNS hasn’t refreshed yet, give it ten minutes and try again. - TLS certificate warning every time. The free myQNAPcloud SSL certificate covers the SmartURL hostname, but you have to install it from the myQNAPcloud Link app. Open my
QNAPcloud>Access Control>SSL Certificate andclick Install Certificate. After it deploys, restart your browser to clear the old cert from cache. - Mobile app can’t find the NAS. Sign out of the QID inside the mobile app, then sign back in. The QID-to-device mapping is cached locally and a fresh sign-in rebuilds it.
#myQNAPcloud Storage as an Optional Backup Target
myQNAPcloud Storage is a separate, paid cloud-backup service that lives next to the free remote-access features. It targets users who want an off-site backup target for Hybrid Backup Sync without standing up a second NAS at a friend’s house.
Plans and pricing change with QNAP’s promotional cycles, so check the live myQNAPcloud Storage page before you commit. The architectural advantage is integration: backup jobs configured in HBS3 can write directly to myQNAPcloud Storage with the same QID credentials that power the rest of the service, so there’s no third-party API key to manage.
For users who already pay for Google Drive, OneDrive, or Dropbox and want a NAS-to-cloud copy instead of a separate subscription, HBS3 still has connectors to all three.
#Bottom Line
For most home and small-office QNAP owners, the right setup is myQNAPcloud Link with the CloudLink relay enabled, two-factor authentication turned on at both QID and NAS-user level, and File Station as the only service published through the SmartURL. That gives you fast, encrypted access from a phone or laptop without inbound ports on your router.
If you store sensitive client data, run a business off the NAS, or have already been targeted by a ransomware probe, switch to QVPN-only access and disable public SmartURL links entirely. The convenience hit is small once you have the QVPN client installed on your devices, and it removes your NAS from the population of internet-facing boxes that automated ransomware crews crawl every day.
#Frequently Asked Questions
Is myQNAPcloud free?
Yes. The myQNAPcloud Link app, SmartURL registration, CloudLink relay, and free SSL certificate are all included with your QNAP NAS at no extra cost.
Is myQNAPcloud safe to use?
It’s safe when configured properly. The CloudLink relay path keeps your home IP hidden and your firewall closed. The danger comes from publishing services like File Station or SSH directly to the public internet through DDNS without 2FA, which is the configuration most often hit by ransomware campaigns. According to QNAP’s security advisories, sticking with CloudLink, enabling 2FA on both the QID and the local NAS user, and patching firmware monthly closes most of the known attack vectors.
What is the difference between SmartURL and DDNS?
SmartURL is a friendly hostname tied to your QNAP ID that automatically picks the best connection path, including the free CloudLink relay. DDNS publishes your actual WAN IP under that hostname and requires you to forward router ports so the world can reach your NAS directly. SmartURL with CloudLink is the safer default; DDNS is faster but exposes the NAS to the public internet.
Why can’t I connect to my NAS through myQNAPcloud?
The most common causes are an offline NAS, a stale myQNAPcloud Link tunnel, or an expired SSL certificate. Restart myQNAPcloud Link from the App Center and reinstall the free SSL certificate.
Do I need to forward ports to use myQNAPcloud?
No. CloudLink uses outbound connections from the NAS, so no inbound ports need to be open on your router. Port forwarding is only needed for the direct-IP DDNS path.
Can I use myQNAPcloud without exposing my NAS to the internet?
Yes. Run the QVPN Service instead of publishing any web services. With QVPN, your client device connects to the NAS through an encrypted VPN tunnel first, then talks to File Station, Photo Station, or any other service over the local network. From the public internet, the NAS looks like nothing more than a single VPN listener, which is the smallest attack surface you can have while still being remotely reachable.
What is myQNAPcloud Storage and is it worth it?
myQNAPcloud Storage is QNAP’s optional paid cloud-backup target that integrates with Hybrid Backup Sync. It’s worth considering when you want a single-vendor off-site backup without setting up a second NAS or learning another cloud provider’s permissions model. If you already pay for Google Drive, OneDrive, or Dropbox, HBS3 can back up to those instead and you may not need a separate subscription.
How do I delete or unregister my SmartURL?
Open myQNAPcloud Link on the NAS, go to Access Control or Device Information, and remove the device from your QID. The SmartURL hostname goes back into the QNAP pool after the unregistration completes, though for security reasons your old name is generally not immediately reusable by another customer.

Best Apple Watch Band for Working Out: Proven Picks
The best Apple Watch band for working out handles sweat and stays put on your wrist. Compare silicone, nylon, and titanium picks for runs and lifts.

Best Apple Watch Bands: Proven Picks by Size and Style
The best Apple Watch bands depend on your case size group first, then your use. Compare silicone, nylon, stretchy, and steel picks for the right fit.
Best Charger for Google Pixel 10 Pro: PPS Picks 2026
The best charger for Google Pixel 10 Pro needs PPS. A 30W brick covers the 10 and 10 Pro; the Pro XL wants 45W. Four PPS picks compared here.
Best Charger for Samsung Galaxy S25 Ultra: 45W PPS Picks
The best charger for Samsung Galaxy S25 Ultra needs PPS to hit a full 45W. Compare four PPS picks and learn why most 45W chargers fall short here.