How to Make a Transparent Background in Paint.NET (Fast)
Make a transparent background in Paint.NET with the Magic Wand tool, layer setup, and PNG export. Free, Windows-only, takes about 3 minutes.
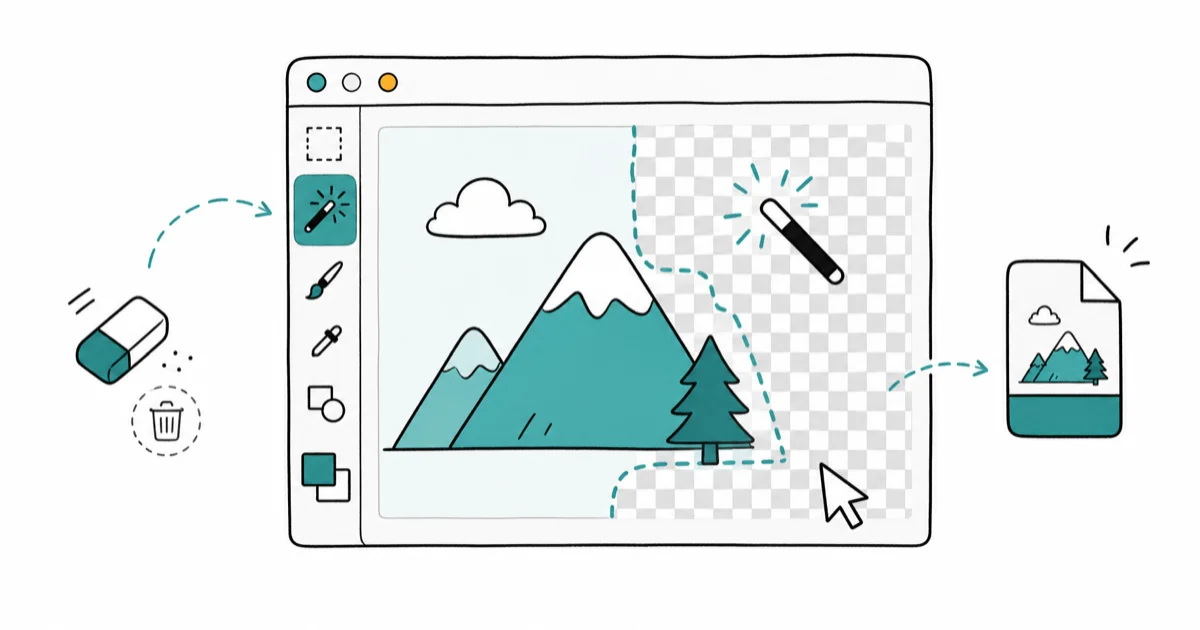
Quick AnswerOpen the image in Paint.NET, click the Magic Wand tool, click the background, press Delete to reveal the checkered transparency, then save as PNG to keep the background see-through. JPEG won't preserve it.
Paint.NET makes a background transparent in about three minutes once the layers are set up correctly. The Magic Wand tool selects the background by color, the Delete key removes it, and a PNG export keeps the checkerboard pattern see-through in your final file. Skip the PNG step and you’ll lose the cutout to a flat white fill.
The Magic Wand works best on flat backgrounds like product shots and logos. Edge cases like fur and hair usually need manual cleanup at 400% zoom.
- Paint.NET 5.1 is free Windows-only software; Mac and Linux users need GIMP or Photoshop instead.
- The Magic Wand tool selects pixels by color similarity; a tolerance of 25% to 50% covers most flat-color backgrounds.
- Always export as PNG to keep transparency; JPEG fills the empty pixels with white and destroys the cutout.
- Working on a duplicated layer keeps the original intact, so a wrong delete is one Ctrl+Z away.
- BoltBait’s Plugin Pack adds a Feather Selection effect for soft edges, which Paint.NET’s stock build doesn’t include.
#How Does Paint.NET Handle Transparency?
Paint.NET treats transparency as a fourth color channel called alpha. Every pixel stores red, green, blue, and alpha values, and the alpha value controls how see-through the pixel is. Zero alpha means fully invisible; 255 means fully opaque.
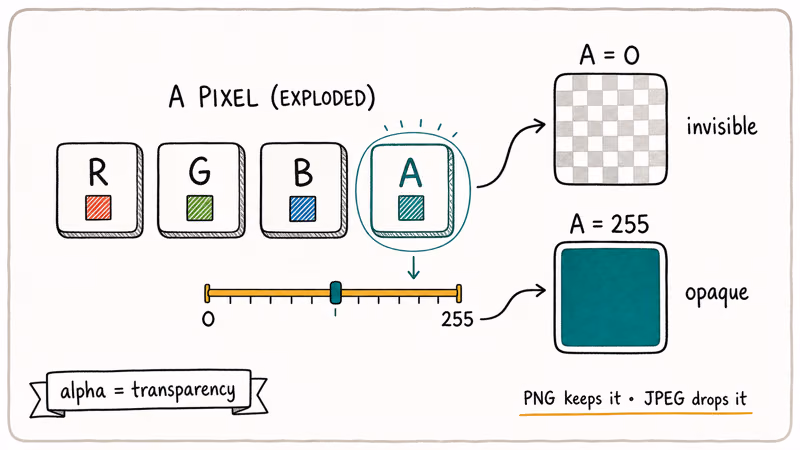
The checkered grid is just a visual cue.
When you delete a selection, the pixels are not actually erased. Their alpha value is set to zero, which the editor renders as the gray-and-white checker pattern. Export the file in a format that supports alpha, and those pixels stay see-through.
According to Wikipedia’s article on Paint.NET, the application has shipped since 2004 and supports 32-bit alpha compositing across all 8 layers in its modern builds. The underlying transparency model hasn’t changed since version 3.0, which is why ten-year-old tutorials still apply to the current build.
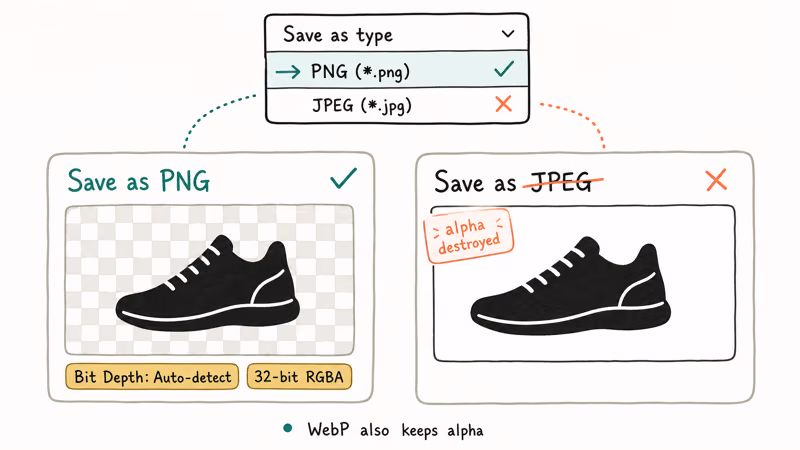
PNG and WebP support alpha. JPEG does not.
This guide reflects Paint.NET 5.1, which is available directly from getpaint.net. It’s also distributed through the Microsoft Store as a paid convenience listing, available here. Both binaries are identical; the Store version just gets automatic updates through Windows.
#Setting Up the Layers Before You Cut
Duplicate your source image into a working layer first. This is the single most useful habit you can build.
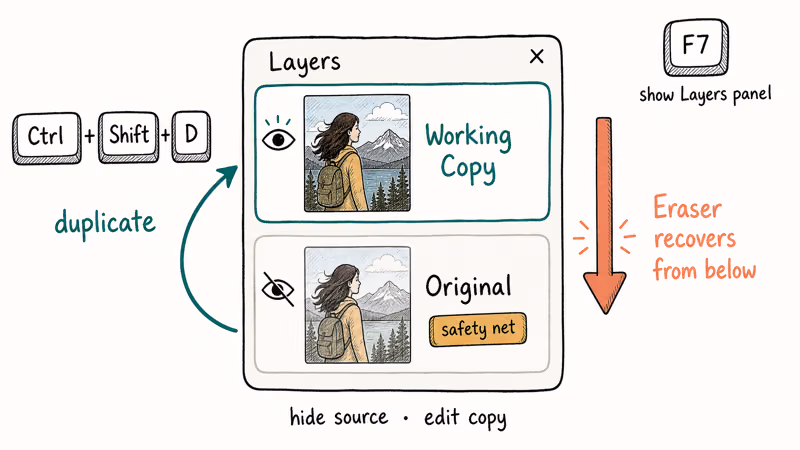
Backgrounds that look simple can still contain color noise the Magic Wand grabs too aggressively. Having the original layer underneath lets you erase mistakes by uncovering the source pixels with the Eraser, no undo history needed.
Open Paint.NET and load your image with File > Open, or drag the file onto the canvas. Press F7 to show the Layers window if it isn’t visible.
Press Ctrl + Shift + D to duplicate.
The duplicate appears on top in the Layers panel. Click the eye icon next to the original layer to hide it while you work, then click the duplicate to make it active. Every selection and delete now affects the duplicate only, leaving the source pixels safely tucked underneath as a recovery layer.
That setup pays off the first time you misclick.
Want a colored backdrop visible while you cut? Add a new solid-color layer with Ctrl + Shift + N and drag it to the bottom of the stack. Hide it before export and the final transparent file is unaffected.
#Using the Magic Wand to Select the Background
The Magic Wand selects all pixels within a color tolerance of wherever you clicked. Press the S key four times to cycle to it, or pick it from the Tools window. The toolbar at the top now shows Tolerance and Flood Mode controls.
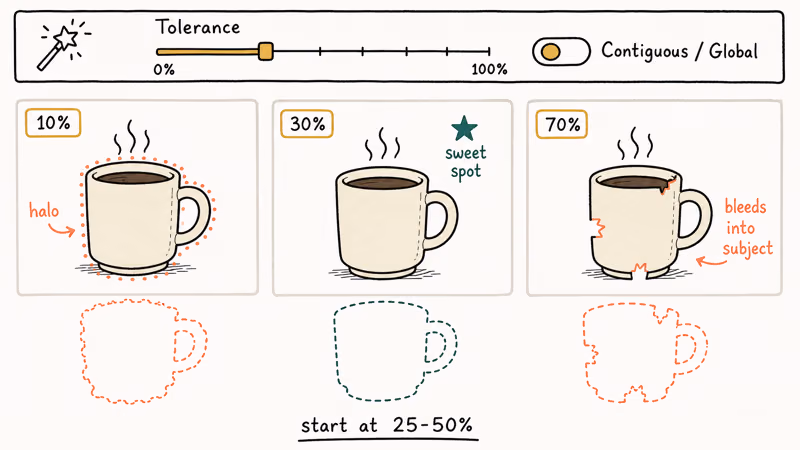
Set Tolerance to about 30% as a starting point. Lower values pick a tight color range and may leave halos; higher values bleed into the subject.
A tolerance in the 25% to 50% range is a practical starting range for flat backgrounds. Gradient backgrounds often need two passes with Shift-click to add unselected patches the wand can’t sample on the first try.
Set Flood Mode to Contiguous for backgrounds that are one connected area, or Global when the background color also appears between the subject’s elements (think of letters in a word with hollow middles). Click anywhere on the background. A marching-ants outline shows your selection.
Hold Shift to add. Hold Ctrl to subtract.
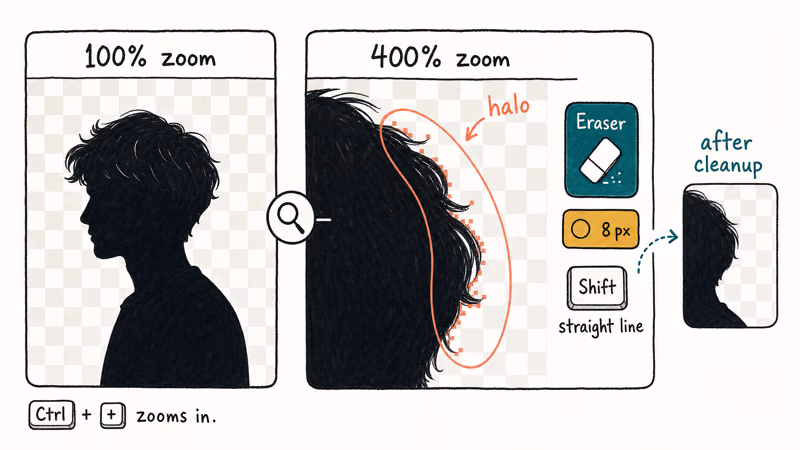
Zoom to 200-400% with Ctrl + + before fine-tuning, since edge pixels are easier to judge close up.
#Deleting the Background and Cleaning Up Edges
With the background selected, press Delete. The selected pixels turn into the checkerboard transparency pattern.
If they turn white instead, you’re working on the background layer rather than a duplicated layer with transparency support. Undo with Ctrl + Z and re-check the layer setup before trying again.
Now check the edges.
Zoom to 400% along the subject’s edge and look for stray background pixels. The Magic Wand misses pixels whose color falls just outside the tolerance range, especially around hair, fur, and antialiased edges where the colors blend gradually rather than meeting sharply.
Switch to the Eraser tool with the E key, set the brush size to 8-15 pixels, and clean up manually. Hold Shift while dragging to constrain the eraser to a straight line for clean edges on graphics and screenshots.
For complex subjects like a person’s hair, the stock Paint.NET build doesn’t include feathering. The community plugin BoltBait’s Plugin Pack adds a Feather Selection effect.
The plugin install path is straightforward. According to Microsoft’s Windows desktop documentation, Win32 apps like Paint.NET load extensions from DLL files placed in their plugin directories; for Paint.NET, that’s the Effects folder inside the install path, and BoltBait’s pack adds 30+ extra filters once you restart the app.
When the cutout looks clean at 400%, deselect with Ctrl + D and zoom back out with Ctrl + B to inspect the full image.
#Saving as PNG to Preserve Transparency
The export step decides whether your work survives. Go to File > Save As (or press Ctrl + Shift + S), pick a folder, and set the Save as type dropdown to PNG (*.png).
Click Save.
A PNG configuration dialog appears next. Set Bit Depth to Auto-detect so Paint.NET picks 32-bit (RGBA) when transparency is present. Leave Dithering off for solid-color edges, then click OK to confirm the settings.
Paint.NET then asks whether to flatten visible layers. Click Flatten. Open the saved PNG in any image viewer or browser to verify the transparency stuck.
Saw white in the preview? You either saved as JPEG by mistake, or the bit depth was forced to 24-bit. Re-export with the bit depth set to Auto-detect or 32-bit and the alpha channel will come back.
Why PNG and not GIF?
Wikipedia confirms that the PNG specification supports a full 8-bit alpha channel with 256 levels of transparency per pixel. That’s why PNG cutouts with soft edges fade smoothly into any background, while GIF files (which have only 1-bit transparency) show jagged outlines along the edge.
#Why Did the Magic Wand Miss Half the Background?
Backgrounds rarely hold one color.
The Magic Wand only grabs pixels in one click when Flood Mode is set to Contiguous and the background is a single connected region. Photos taken outdoors often have a background that looks uniform but actually contains 50-100 distinct color values from sky gradient, lens flare, or JPEG compression noise.
A phone photo with a “white” wall background can hold many distinct shades of off-white. A low tolerance may grab only the lightest patch. Switching to Global mode and raising tolerance can select more of the wall in one pass.
Three quick fixes when one click isn’t enough:
- Hold Shift and click each missed patch to add it to the selection.
- Switch Flood Mode to Global so all matching pixels get selected, even disconnected ones.
- Increase Tolerance to 40-50%, but watch the subject’s edge for color bleed.
If the subject and background share colors, the Magic Wand can’t tell them apart. A white shirt against a white wall is the classic case. Switch to the Lasso Select tool (S key, two presses) and trace the subject manually instead.
#Common Issues and How to Fix Them
Five problems come up over and over. Here’s how to fix each one.
The deleted area is white, not transparent. You’re editing the background layer directly. Paint.NET’s bottom layer doesn’t support transparency by default. Duplicate the layer with Ctrl + Shift + D, hide the original, and delete on the copy.
The PNG opens with a white background in another app. The image was saved as JPEG by mistake, or the PNG was forced to 24-bit instead of 32-bit. Re-save with Save as type set to PNG and Bit Depth set to Auto-detect.
Halos along the edge? Raise tolerance and re-select.
Halos or color fringe around the subject. The Magic Wand left antialiased edge pixels behind. Raise tolerance to 40-45% and re-select, or switch to the Eraser at a 5-pixel brush and clean up manually at 400% zoom.
Background Eraser is missing from my version. Background Eraser is a plugin, not a stock feature. Download it from the Paint.NET plugins forum and drop the DLL into the Effects folder inside Paint.NET’s install directory, then restart Paint.NET to load it.
Need a smaller file?
The file size is huge. A 32-bit PNG is roughly twice the size of a JPEG. If file size matters and the subject doesn’t have soft edges, save as 8-bit indexed PNG with Bit Depth set to 8-bit. This caps transparency at 1-bit (on or off) but cuts file size by 60-70%.
For images that started out blurry, removing the background won’t sharpen them. Read our guide on how to unblur a picture or an image before cutting. If you want to convert your transparent PNG to a different format later, our walkthrough on HEIC to JPEG and PNG conversion covers Windows tools that preserve alpha when possible.
#Bottom Line
The four-step recipe handles 90% of cutout jobs.
Duplicate the layer, Magic Wand at 30% tolerance, Delete, then File > Save As to PNG with Auto-detect bit depth. Drop to manual Eraser cleanup only on the edges that need it.
Stock toolset feeling thin?
Install BoltBait’s Plugin Pack from the Paint.NET forums before reaching for paid software. It adds the feathering and advanced background eraser tools that Paint.NET’s default install skips, and it’s been the de facto extension pack since 2010.
Mac users without a Windows machine should read GIMP versus Paint.NET for the cross-platform alternative.
Want a different finish? Pick the workflow that matches your goal:
- Swap rather than remove: our guide on changing photo background to white walks through replacement workflows.
- Blur instead of remove: blur background apps for iOS, Android, and PC lists tools that match the platform you’re on.
- Browser-based work: compare with our Canva transparent background walkthrough.
#Frequently Asked Questions
Does Paint.NET work on Mac or Linux?
No, Windows only. The developer’s official FAQ says there are no plans to port the app off .NET Framework. Mac users pick GIMP, Pixelmator, or Affinity Photo; Linux users go with GIMP or Krita.
Is Paint.NET actually free?
Yes, free with no time limit, ads, or feature locks when downloaded from getpaint.net. The Microsoft Store version charges a small fee as a convenience for one-click install and automatic Windows updates, but both binaries are identical and Microsoft Store sales help fund development. Pick whichever fits your update workflow.
Why does my transparent background look white in Microsoft Word?
Word reads PNG alpha correctly when the image is added with Insert > Pictures, so the white usually means the file was saved as JPEG. Reopen in Paint.NET, pick File > Save As, and confirm the dropdown shows PNG.
Can I make only part of an image transparent in Paint.NET?
Yes. Select the area with the Magic Wand or Lasso, then press Delete. The Eraser also works with a soft brush set to 50% hardness for a gradual fade.
What tolerance should I use on the Magic Wand?
Start at 25-30%. Raise it to 40-50% if the background has gradient or JPEG noise. Drop it to 10-15% if the background and subject share similar colors. Tolerance values above 60% almost always bleed into the subject, while values below 10% almost always leave halos.
Will saving as WebP keep transparency?
Yes, Paint.NET 5.0 added native WebP export with alpha channel support. Set quality to 90 in the export dialog for a good balance between file size and edge sharpness.
How do I remove a complex background like hair or fur?
The Magic Wand alone struggles with hair and fur. Clear the bulk of the background first, then switch to the Eraser at a 5-8 pixel brush, set hardness to about 60%, and zoom to 400% before tracing the edge manually. BoltBait’s Plugin Pack adds a Feather Selection effect that softens those hard edges in one click after the cut.
Can I undo a delete after I save and close the file?
Only if you saved as a Paint.NET native .pdn file. The PDN format keeps every layer and the full undo history. Once you flatten and export to PNG, the layer information is gone and the undo stack resets when you reopen the file. Always keep a .pdn master copy of important work.