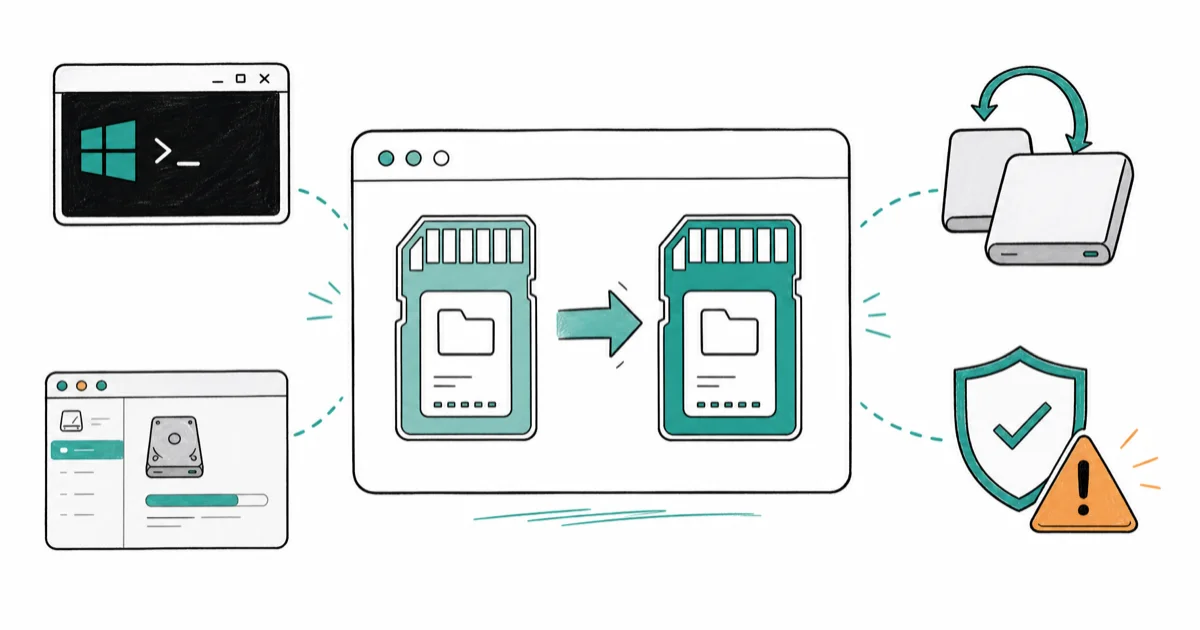
How to Convert exFAT to FAT32 on Windows and Mac (2026)
Convert exFAT to FAT32 on Windows or Mac using Disk Management, diskpart, Disk Utility, or free third-party tools. Works past the 32 GB limit too.
Quick AnswerOn Windows, open Disk Management or run `format X: /FS:FAT32` in an admin Command Prompt. On Mac, open Disk Utility and choose MS-DOS (FAT). Back up your data first, because the drive is erased during conversion.
Converting exFAT to FAT32 is usually about compatibility, not performance. Old car stereos, PS3-era consoles, and digital cameras often only read FAT32. Windows blocks FAT32 on drives above 32 GB, but the file system itself supports up to 2 TB.
Before changing these settings, use the steps only on your own device, computer, or account, or with explicit permission from the owner. Unauthorized access can violate law, privacy rights, and platform terms, so don’t use this guide to bypass someone else’s controls. When available, start with the official support option, built-in settings menu, or vendor documentation before trying manual fixes, especially if the device or account belongs to work, school, or another person.
- FAT32 has a hard 4 GiB per-file limit, so a single 4K movie won’t fit
- Windows Disk Management only shows FAT32 on drives up to 32 GB
- Both
diskpartandformat /FS:FAT32hit the same 32 GB cap on Windows 11 - Disk Utility’s MS-DOS (FAT) format is FAT32 under an older Apple name
- Rufus and EaseUS Partition Master can write FAT32 on drives above 32 GB
#When Should You Convert exFAT to FAT32?
Short answer: only when a device refuses to read exFAT.
FAT32 is older, slower with large files, and has a 4 GiB ceiling per file. You only want it on the drive if the hardware on the other end demands it. That’s the core reason people do this conversion: some older car stereos, cameras, consoles, and embedded devices read FAT32 but ignore exFAT.
Common devices that still require FAT32 in 2026:
- Older car stereos and in-dash navigation systems (pre-2015 models)
- Nintendo 3DS, Wii, and original Wii U (Switch accepts exFAT)
- Some digital cameras and camcorders that predate 2014
- Certain Samsung and LG smart TVs sold before 2016
- PS3 consoles for media playback (PS4 and PS5 accept exFAT)
- Raspberry Pi bootloaders and some industrial equipment
If your device manual lists FAT32 as the only supported format, you have no real alternative. Anything newer should work fine with exFAT, which has no 4 GiB file cap.
#What Is the Real Difference Between exFAT and FAT32?
Both file systems are Microsoft designs, but they were built for different eras. FAT32 shipped with Windows 95 OSR2 in 1996. exFAT came out in 2006 specifically to handle the growing capacity of flash drives and SDXC cards without the FAT32 limits.
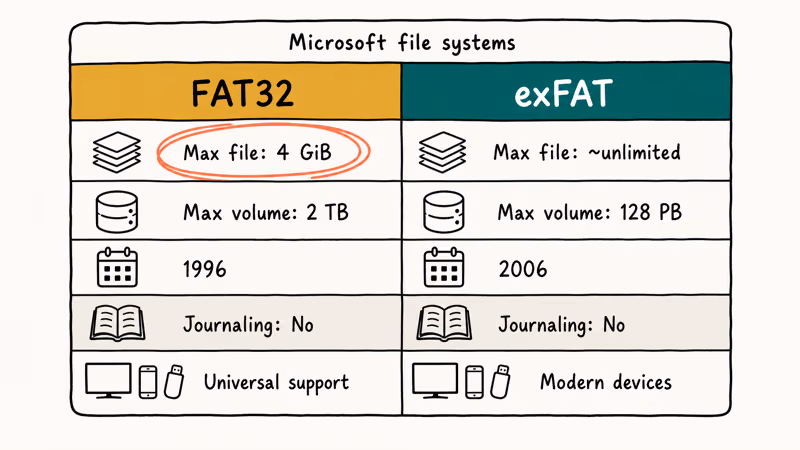
Microsoft’s file system comparison documentation confirms that FAT32 caps each file at 4 GiB while exFAT supports files up to 2^64 minus 1 bytes, and that neither file system has metadata journaling. That matters if you care about recovering data after a power loss during a write.
| Spec | FAT32 | exFAT |
|---|---|---|
| Max file size | 4 GiB (about 4.29 GB) | Effectively unlimited |
| Max volume size | 2 TB (theoretical, per spec) | 128 PB |
| Year introduced | 1996 | 2006 |
| Journaling | No | No |
| Device support | Near-universal | Modern devices only |
| Windows format cap | 32 GB (Microsoft imposed) | None |
The 32 GB limit is the one that trips most people up. It isn’t a FAT32 limit. It’s a choice Microsoft made in Windows to nudge users toward exFAT or NTFS on larger drives. The drive itself can hold FAT32 up to 2 TB, and third-party tools will write that format for you.
If you’re still fuzzy on how storage types differ at the hardware level, our guide on RAM vs memory explains why file systems sit between the physical disk and what you see in File Explorer.
#Converting exFAT to FAT32 on Windows
Every Windows method erases the drive. Copy your data to an internal drive or cloud storage before you start.
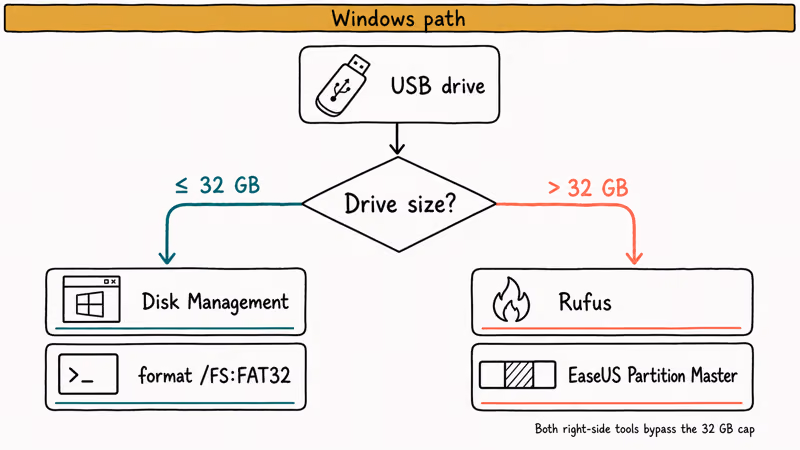
#Method 1: Disk Management (Simplest, Up to 32 GB Only)
Disk Management is the built-in tool most people see first. It only offers FAT32 as a format option on drives 32 GB or smaller.
Press Windows + X and select Disk Management. Right-click your USB drive in the bottom panel and choose Format. In the dialog, open the File system dropdown and pick FAT32. If FAT32 isn’t listed, the drive is over 32 GB and you need Method 3 or 4.
Leave the allocation unit size at Default, check Perform a quick format, click OK, and confirm. A quick format usually finishes within minutes on a healthy USB drive.
#Method 2: Command Prompt with format (Also 32 GB Cap)
This is the same limit as Method 1, but it’s faster if you already have a terminal open.
Press Windows + S, type cmd, right-click Command Prompt, and pick Run as administrator. Type format E: /FS:FAT32 /Q and press Enter, replacing E: with the letter your drive uses in File Explorer. Press Enter at the volume label prompt, then type Y to confirm.
If the drive is above 32 GB, Windows returns “The volume is too big for FAT32” and refuses to proceed. That’s where third-party tools come in.
#Method 3: Rufus (Free, Handles Drives Above 32 GB)
Rufus is an open-source USB formatter that most people know as an ISO burner. It has a hidden FAT32 trick: it bypasses the Windows 32 GB cap by using its own format engine instead of Microsoft’s. The tool is portable and ships as a single .exe, so no installer is needed.
Download Rufus from rufus.ie and run the file. In the Device dropdown, pick your USB drive, then set Boot selection to Non bootable. Open the File system dropdown and select Large FAT32, which only appears on drives above 32 GB. Click Start and confirm.
Rufus can write FAT32 on larger USB drives that Windows’ built-in formatter refuses. Test the drive in the older device before copying files back.
#Method 4: EaseUS Partition Master (GUI, Larger Drives, Extra Tools)
EaseUS Partition Master handles FAT32 conversion on drives well past 2 TB and includes partition resizing if you need to split a drive first. It’s the more guided option when the drive has multiple partitions or when Rufus feels intimidating.
Some links on this page are affiliate links, which means fone.tips may earn a commission at no extra cost to you.
After installing EaseUS, right-click the exFAT partition in the main view and choose Format. Pick FAT32 from the File System list and click OK. Then hit Execute 1 Task in the bottom-right corner and confirm.
Expect a quick format in 1-3 minutes on a 256 GB drive. A full format takes 20 minutes or more, depending on USB speed.
#Converting exFAT to FAT32 on Mac
Mac users have their own built-in path: Disk Utility. Apple labels FAT32 as “MS-DOS (FAT)” in the format dropdown, which confuses people because the naming implies something older.
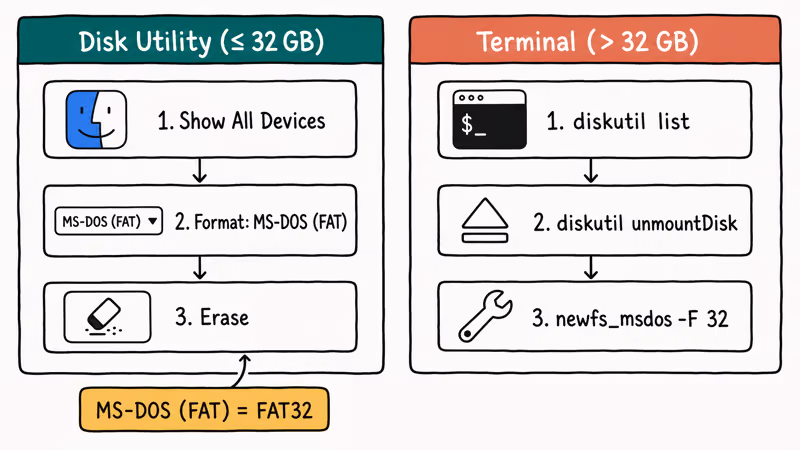
#Method 1: Disk Utility (GUI, Up to 32 GB)
According to Apple’s Disk Utility documentation, MS-DOS (FAT) is the right choice for Windows volumes at 32 GB or smaller, and ExFAT is the pick for anything larger. Same 32 GB split as Windows, just described more politely.
Plug in the USB drive and open Disk Utility from Applications > Utilities. Click View > Show All Devices in the top-left menu so the physical disk shows up, not just the volume. Select the physical drive (the top-level entry) in the sidebar and click Erase at the top.
Set Format to MS-DOS (FAT) and Scheme to Master Boot Record. Click Erase and wait. A quick erase usually finishes within minutes on a healthy USB drive.
#Method 2: Terminal with newfs_msdos (For Drives Above 32 GB)
When Disk Utility refuses, Terminal will still do it. This is the Mac equivalent of Windows’ diskpart, but it doesn’t share the 32 GB Windows cap.
Open Terminal from Applications > Utilities and run diskutil list to see every attached disk. Find your drive by size; it’ll look like /dev/disk4 (the disk number varies). Unmount it with diskutil unmountDisk /dev/disk4, then format as FAT32 with sudo newfs_msdos -F 32 -v MYDRIVE /dev/disk4s1. Enter your Mac password when prompted.
When the command finishes, eject and reconnect the drive, then confirm that it mounts as FAT32 before copying files back.
If your drive is acting up before you even get to formatting, check our guide on fixing Seagate external drives not showing up, since the same USB port and cable checks apply to any external drive.
#Handling Files Larger Than 4 GB on FAT32
You can’t, at least not as single files. FAT32’s 4 GiB ceiling is structural, not a setting you can flip. This is the biggest complaint people have about the format.
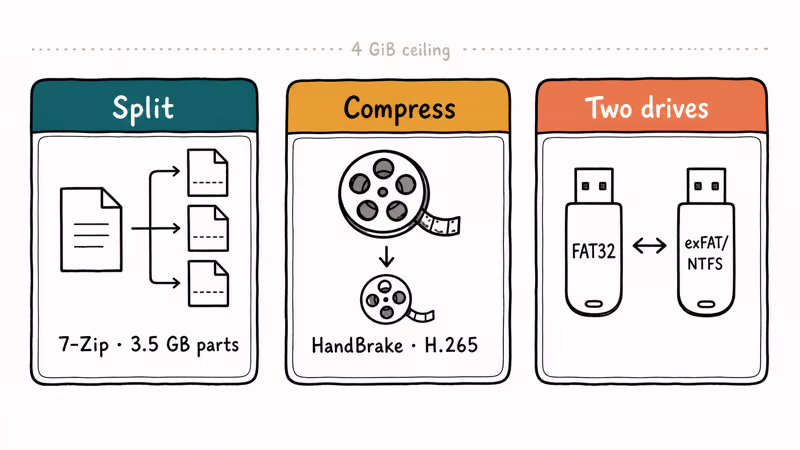
Three workarounds that actually work:
Split the file. Free tools like 7-Zip can create multi-part archives with a maximum part size of 3.5 GB. The device reads each part as a separate file, and you recombine them on a computer that supports larger formats.
Compress it. A 4.5 GB .mkv often drops below 4 GB after H.265 re-encoding in HandBrake. The quality hit is usually invisible at typical viewing distances.
Keep two drives. One FAT32 drive for the finicky device, one exFAT or NTFS drive for large files. This avoids forcing every storage task through FAT32’s 4 GiB limit.
If you hit a generic “file too large” message while copying to any drive, our dedicated fix for the file too large for destination file system error walks through the NTFS conversion path, which keeps your data intact instead of erasing it.
#Troubleshooting Common Format Errors
These four errors are common when converting exFAT to FAT32. Each has a specific fix, not just a generic “try again.”
“The volume is too big for FAT32.” You’re hitting the Windows 32 GB cap. Skip Disk Management and use Rufus (Method 3) or EaseUS Partition Master (Method 4) instead.
“Windows was unable to complete the format.” This usually means the drive has bad sectors or a corrupt partition table. Microsoft’s diskpart command reference states that the clean command wipes the partition table and all volume data on the selected disk. Open an elevated Command Prompt, run diskpart, then list disk, select disk X, clean, and create partition primary. Retry the format.
“The device is write-protected.” Check for a physical lock switch on SD cards and older USB sticks. If none exists, run diskpart as administrator, select the drive, and type attributes disk clear readonly. This strips the software-level write protection.
“The device is not ready.” Try a different USB port, preferably one directly on the motherboard instead of a hub. Cheap USB hubs can cause this error even when the drive is fine. Our guide on USB storage not connected errors covers more port-level fixes.
If you frequently swap drives for conversion work, a good hard drive docking station removes the USB cable as a variable.
#Bottom Line
For drives 32 GB or smaller, start with Disk Management on Windows or Disk Utility on Mac. For larger drives, use Rufus on Windows or Terminal’s newfs_msdos -F 32 on Mac. Back up first — every method here erases the drive.
#Frequently Asked Questions
Can I convert exFAT to FAT32 without losing data?
No built-in tool does this. Back up first, format, then copy back.
Why does Windows hide FAT32 on drives larger than 32 GB?
Microsoft made that choice to push users toward exFAT and NTFS on larger drives, where FAT32’s lack of journaling and 4 GiB file cap become real problems. The underlying file system supports volumes up to 2 TB. Windows simply refuses to create them. Third-party tools like Rufus bypass the restriction by implementing their own format routine.
Does converting to FAT32 make my USB drive slower?
Not at normal flash drive sizes. The bigger practical difference is compatibility: FAT32 works with older hardware, while exFAT handles large files without the 4 GiB cap.
Can macOS read and write FAT32 drives?
Yes, fully. Apple’s Disk Utility documentation confirms MS-DOS (FAT) is the label macOS uses for FAT32, and the file system has native read and write support on every macOS version. You don’t need extra drivers, unlike NTFS which requires a third-party tool for write access.
Is FAT32 the same as MS-DOS (FAT) in Disk Utility?
Close, but not identical. On drives 32 GB or smaller, Disk Utility’s “MS-DOS (FAT)” is exactly FAT32 — Apple just keeps the historical label. On drives above 32 GB, the same option can fall back to FAT16 or exFAT depending on volume size and allocation settings, which is why Terminal with newfs_msdos -F 32 is the right tool for larger FAT32 volumes. The -F 32 flag explicitly forces a 32-bit FAT, removing that ambiguity.
Will a FAT32 drive work on both Windows and Mac?
Yes. That’s FAT32’s main appeal in 2026: it’s the most universally read format. Every current Windows, macOS, Linux, Android, and embedded system reads FAT32 natively. The tradeoff is the 4 GiB per-file cap and the smaller practical volume ceiling.
Can I go back to exFAT after converting to FAT32?
Yes, using the same tools in reverse. In Disk Management or Disk Utility, right-click the drive and reformat, this time choosing exFAT. The drive’s contents are erased again, so back up before you switch. If you swap formats often, the rotation setup we cover in moving files from SSD to HDD reduces wear on the USB stick itself.