How to Fix iPhone Could Not Be Updated Error 14 in iTunes
Fix iPhone Error 14 with 6 proven methods. Replace your USB cable, delete corrupt IPSW files, update iTunes or Finder, and use Recovery Mode if needed.
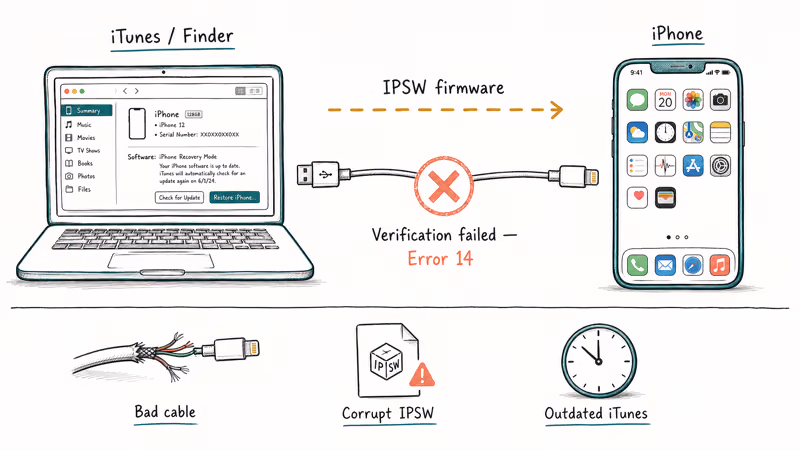
Quick AnswerError 14 means iTunes or Finder can't verify the firmware file during an iPhone update or restore. Replace your USB cable with an Apple-certified one, delete old IPSW files, and retry the update to fix it.
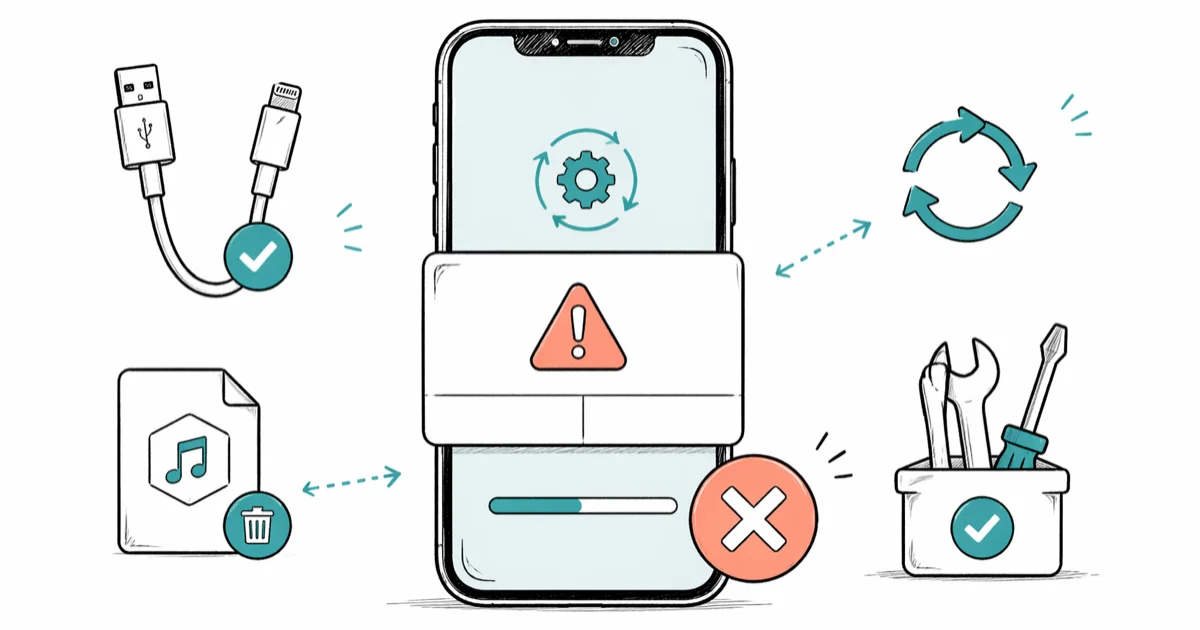
iPhone Error 14 kills your update or restore mid-process, and the error message from iTunes or Finder tells you almost nothing useful. Six fixes cover nearly every cause, and a USB cable swap is the one that clears it most often.
- Error 14 is a firmware verification failure that blocks iTunes and Finder updates or restores
- Replacing a faulty USB cable with an MFi-certified one is the fix that clears Error 14 most often
- Deleting old IPSW firmware files forces a fresh download and eliminates corrupted file problems
- Updating iTunes on Windows or macOS on Mac removes version mismatch triggers for Error 14
- Recovery Mode restore erases all data and should only be used after all other methods fail
#What Causes iPhone Error 14?
Error 14 fires when iTunes or Finder can’t verify the IPSW firmware file needed to update or restore your iPhone. The verification fails, and your phone sits there unusable.
According to Apple’s support page on iPhone update and restore errors, Error 14 falls under 1 of 14 documented error categories for iPhone restore failures, specifically targeting firmware file integrity problems between your computer and your iPhone during transfer.
The most common triggers are a damaged or uncertified USB cable, a corrupted IPSW download, outdated iTunes or macOS software, or a VPN that interfered with the firmware download. Your iPhone stuck on the Apple logo after a failed update is a related symptom, where the update crashes partway through and the phone can’t finish booting.
#Replace Your USB Cable First
Swap your cable. This single fix clears Error 14 more often than anything else.
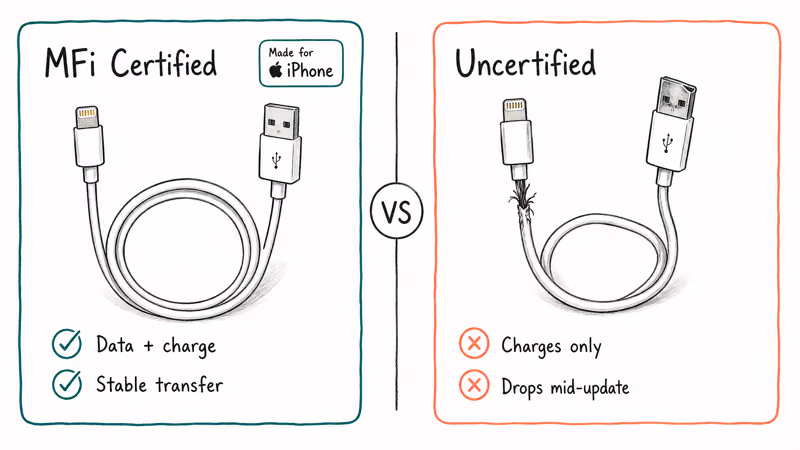
Use an Apple-branded Lightning or USB-C cable, or one with the MFi (Made for iPhone) certification logo. Third-party cables without MFi certification often lack proper data transfer pins, and that causes iTunes to lose connection during firmware verification. A cable that charges fine can still fail at data transfer.
A cheap non-MFi cable often throws Error 14 shortly after the update starts, and switching to an Apple cable clears it immediately. Here’s the full checklist:
- Plug the cable directly into your computer’s USB port, not through a hub or adapter
- Try a different USB port on the same computer
- Inspect both ends for bent pins, fraying, or corrosion
- Test the cable with another device to confirm it transfers data
If you’re also getting iTunes connection errors alongside Error 14, the cable is almost certainly your problem.
#Update iTunes or macOS Before Retrying
Outdated software can’t handle newer firmware files. Checksums won’t match.
On a Mac running macOS Catalina or later, iTunes no longer exists. Finder handles all iPhone management instead, so you’ll need to update macOS itself rather than a separate iTunes app. Go to System Settings > General > Software Update to check. On Windows, open the Microsoft Store and update iTunes from there.
Apple’s iTunes download page states that outdated builds lack the firmware signing certificates needed for newer iOS releases, so running anything below the latest version is a recipe for Error 14. If your Mac runs macOS Ventura or Sonoma, these certificates ship with OS updates, which means a pending macOS update can directly cause Error 14. Outdated iTunes or Finder versions also trigger other iTunes upgrade errors with similar symptoms.
#Delete and Redownload the IPSW Firmware File
A corrupted IPSW file blocks the entire update. Delete it to force a fresh download.

Close iTunes or Finder, then find the file:
- Mac: ~/Library/iTunes/iPhone Software Updates
- Windows: C:\Users\YourName\AppData\Roaming\Apple Computer\iTunes\iPhone Software Updates
Delete every .ipsw file in that folder, then reopen iTunes or Finder and retry the update. The fresh firmware download takes about 5-15 minutes depending on your connection speed. IPSW files range from 4 GB to over 6 GB depending on your iPhone model and iOS version, so a wired ethernet connection works better than Wi-Fi for this step.
You can also restore your iPhone without updating instead.
#How Do You Use Recovery Mode for Error 14?
Recovery Mode forces your iPhone to communicate with iTunes or Finder at a basic level, bypassing the normal update path entirely. This method works when standard updating fails repeatedly because it strips away the layers that normally handle firmware verification and lets iTunes push the update through a simplified channel. Only use this when every other method has failed.
Warning: a Recovery Mode restore erases everything on your phone. Back up first. You can try to recover data from a dead phone afterward, but backing up beforehand is far easier than recovering after.
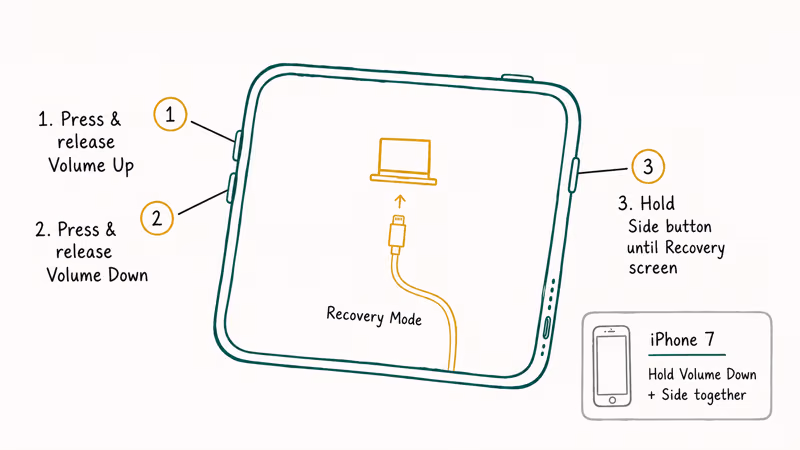
To enter Recovery Mode on iPhone 8 and later: press and release Volume Up, press and release Volume Down, then hold the Side button until the recovery screen appears. For iPhone 7, hold Volume Down and the Side button together.
According to Apple’s Recovery Mode documentation, the “Update” option reinstalls iOS without erasing data, while “Restore” wipes the device completely. Apple states that Update should always be attempted first, and the whole process takes 20-30 minutes. Keep in mind that installing unsigned or modified IPSW files from third-party sources can violate Apple’s terms of service and void your warranty, so always download firmware through official channels.
#Reset Network Settings on Your iPhone
If your iPhone still works but Error 14 keeps popping up during over-the-air updates, resetting network settings can clear the corrupted configuration data causing the problem.
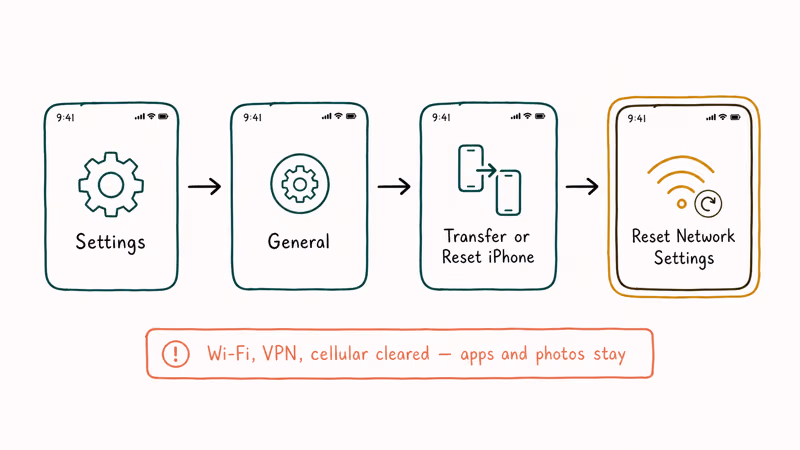
Go to Settings > General > Transfer or Reset iPhone > Reset > Reset Network Settings. Write down your Wi-Fi password first. This erases all saved networks, VPN configurations, and cellular settings, but your apps and photos stay untouched.
Apple’s network settings reset guide confirms that only network-related preferences are removed. After the reset, reconnect to Wi-Fi and retry the update. If your iPhone won’t connect to Wi-Fi after resetting, restart your router.
#When to Contact Apple Support
If every method above fails, the problem is probably hardware.
A damaged Lightning or USB-C port, a failing NAND chip, or a logic board issue can all produce Error 14 as a secondary symptom. Book a Genius Bar appointment or reach out to Apple Support online for a proper diagnosis of the underlying hardware fault.
An iPhone that won’t restore even in Recovery Mode typically needs board-level testing. Also check for an iCloud Activation Lock on used devices.
#Bottom Line
Start with the USB cable. That single swap takes seconds and is the fix that works for most people dealing with this error. If the cable checks out, delete your IPSW files and let iTunes or Finder download fresh firmware.
Recovery Mode is your last option before heading to Apple. Choose “Update” first, and only pick “Restore” if that fails. Back up your phone before any restore.
#Frequently Asked Questions
Can Error 14 be fixed without a computer?
No. You need a Mac or Windows PC with a USB cable connected to your phone because Error 14 happens during an iTunes or Finder firmware verification process that the iPhone can’t handle on its own.
Does Error 14 mean my iPhone is bricked?
Error 14 is a software-level failure, not permanent hardware damage. Nearly all phones recover completely after a cable swap or IPSW file deletion. The rare case that needs an Apple Store visit involves a physically damaged Lightning port that can’t maintain a stable data connection during the firmware transfer.
Will fixing Error 14 erase my data?
No. The cable swap, IPSW deletion, software update, and network reset all keep your data safe.
How long does it take to fix Error 14?
The cable swap takes seconds. IPSW redownload runs 5-15 minutes. A full Recovery Mode restore takes 20-30 minutes.
Is Error 14 the same as Error 9?
They’re related but different. Error 9 fires when the USB connection drops mid-restore, while Error 14 specifically targets firmware file verification. The fixes overlap since both involve USB connectivity, but the root causes differ and Error 9 tends to be more intermittent while Error 14 blocks the process consistently.
What iPhone models get Error 14 most often?
Any model can trigger it. Older devices like iPhone 6s through iPhone 8 see it more frequently because their Lightning connectors degrade with years of repeated use, and worn connectors create intermittent data transfer failures that trigger firmware verification errors. iPhone 15 and later use USB-C, which resists physical wear much better over time. Error 4013 follows a similar pattern with aging hardware.
Does updating macOS help fix Error 14?
Yes. On Macs running Catalina or later, Finder handles iPhone management instead of iTunes, and an outdated macOS version may lack firmware verification certificates for newer iOS updates. Go to System Settings > General > Software Update.
Can a VPN cause Error 14?
Absolutely. A VPN routes traffic through servers that can modify or drop packets during the large IPSW firmware download, corrupting the file and causing the verification check to fail. Disconnect your VPN before starting any iPhone update through iTunes or Finder. Corporate firewalls and proxy servers that inspect large file transfers cause the exact same problem.

iPhone 17 Cellular Data Not Working on iOS 26? 9 Fixes
iPhone 17 cellular data still dropping on iOS 26? Apple fixed the launch bug in iOS 26.0.1, but recovery failures persist. Here's the fix ladder.

iPhone Cellular Data Not Working Abroad? eSIM Fixes
Travel eSIM showing no data abroad? Fix iPhone roaming with the data-line check, Data Roaming toggle, APN settings, and network selection steps.

iPhone Cellular Data Not Working for Some Apps? 8 Fixes
Some iPhone apps refuse to load on cellular while others work fine. Check the per-app cellular toggle, Low Data Mode, VPN profiles, and Screen Time.

iPhone Stuck on EDGE? How to Get 5G or LTE Back (2026)
iPhone stuck on EDGE with crawling data? Here's why the E icon appears, which settings force 5G or LTE back, and when the problem is your carrier.