iPhone Repair Tools Kit: Best Options for DIY Fixes
Pick the right iPhone repair tools kit for DIY fixes. Compare 5 kits and learn what each includes, pricing, and when it makes sense to skip DIY.
Quick AnswerThe iFixit Pro Tech Toolkit is the best all-around iPhone repair kit. It has every driver bit, spudger, and pry tool you need for screen, battery, and charging port repairs, and it comes with a lifetime warranty.
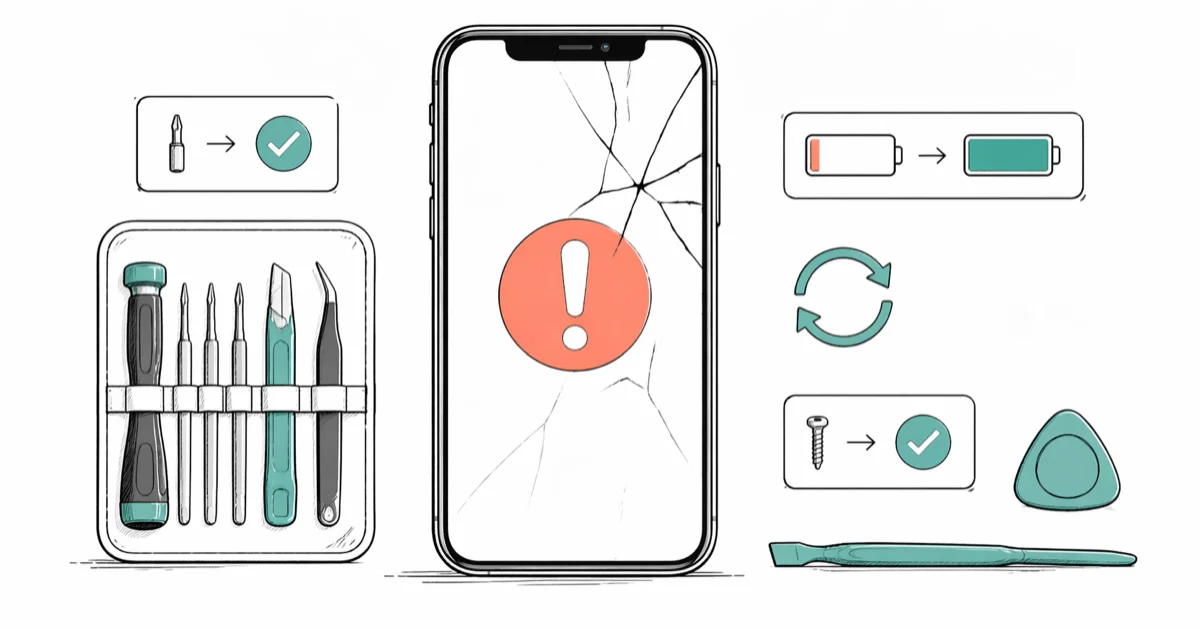
You don’t need to pay $200 at a repair shop for a cracked screen or dead battery. The right iPhone repair kit costs $13 to $75 and handles most common fixes at home. This guide compares five kits across screen, battery, and charging-port repairs to find out which ones are actually worth buying.
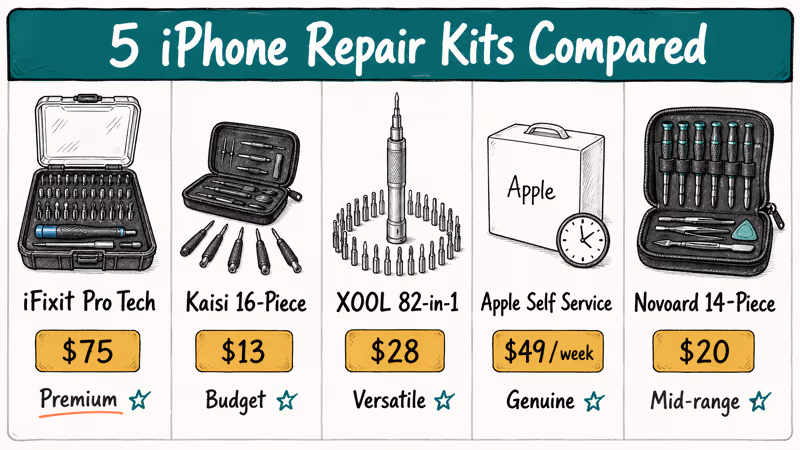
- The iFixit Pro Tech Toolkit ($74.99) is the best long-term buy: 64 driver bits, lifetime warranty
- For a one-time repair, a $13 budget kit handles screen and battery swaps fine
- Every iPhone made after 2012 needs a Pentalobe P2 screwdriver to open
- Anti-static straps are required for battery and logic board work, optional for screen-only swaps
- Apple’s Self Service Repair program rents genuine tools for $49 per week (iPhone 12 through 16)
Opening an iPhone isn’t hard once you have the right tools. Standard hardware-store screwdrivers won’t fit any of the external screws.
#What Tools Do You Actually Need for iPhone Repair?
The minimum set for any iPhone repair is five tool types. Miss one and you’ll either strip a screw or crack the display.
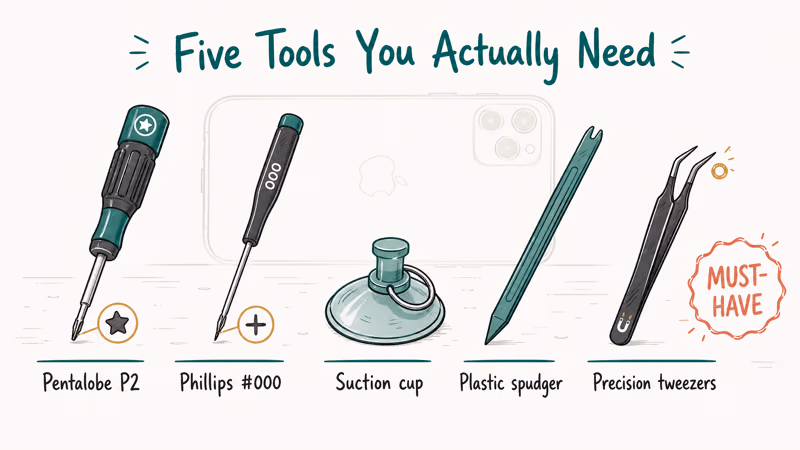
Pentalobe P2 screwdriver. This is the bit Apple chose to block casual DIY repair. It’s a five-point star pattern found only in iPhones (and a handful of other Apple devices). You need it for the two bottom screws beside the Lightning or USB-C port before you can open anything. Without it, you’re stuck.
Phillips #000 screwdriver. Used for most internal screws around the battery bracket and logic-board shielding. The 000 size matters because the next size up (00) will round the heads on contact.
Suction cup. Lifts the screen after the bottom screws are out. Adhesive-style cups beat magnetic-base ones once the original glue has softened.
Spudger and pry tools. Disconnects ribbon cables and battery connectors without bending them. Plastic spudgers are safe for flex cables. Metal ones pry adhesive better but can scratch the back glass if you slip.
Precision tweezers. Essential for placing and retrieving the bracket screws inside the phone. Magnetic-tip tweezers are noticeably better. Dropped screws inside an iPhone are hard to recover, and some are small enough to disappear permanently into the chassis.
Optional but useful: a heat gun or iOpener softens the perimeter adhesive on screens and battery tabs. According to iFixit’s repair documentation, heating the iPhone perimeter to roughly 80°C for 60 to 90 seconds reduces the cracking risk on iPhone X and newer OLED panels, where the bonding is much stronger than on the LCD models that came before.
#The 5 Best iPhone Repair Tool Kits
Here’s how the five kits stack up across the repairs they’re built for.
#iFixit Pro Tech Toolkit
This is the kit to reach for first. The 64-bit driver set includes every Pentalobe, Phillips, Tri-point, and Torx size you’ll need across every iPhone model going back to the original. The bits are precision-machined and seated in a rotating magnetic holder, so switching between bits takes about two seconds.
A snug, no-slip bit fit matters most on the four Pentalobe P2 screws around an iPhone battery and charging port.
The kit also has an anti-static wrist strap, a magnetizing pad (place screws here as you remove them), and a hard carrying case. The lifetime warranty covers any bit that breaks or strips for the life of the kit.
Price: $74.99 from iFixit’s product page. Worth it if you’ll repair multiple devices over time.
Best for: Anyone doing repairs regularly or wanting a single kit for the long term.
#Kaisi 16-Piece Repair Kit
At under $15, this kit covers the basics. It includes eight magnetic-tip screwdrivers (Pentalobe, Phillips, Tri-point, Flathead, Torx), a spudger, tweezers, a pry pick, and a suction cup. The anti-static coating on the screwdriver shafts is a nice touch at this price.
An iPhone 12 screen swap calls for the Pentalobe bit and suction cup the kit includes.
The downside: after repeated use, a screwdriver handle can start to loosen at the chuck. This is not a daily-use kit, but it’s solid for a single repair or two.
Price: Around $13 to $15 on Amazon. Use it for one or two repairs, then upgrade if you want to keep going.
Best for: First-time repairers who want to try one fix before committing to a pricier kit.
#XOOL 82-in-1 Precision Screwdriver Set
This kit emphasizes breadth. You get 56 different driver bits, including Pentalobe, Phillips, Torx, Tri-wing, and Hex sizes, plus a few specialty bits you’ll rarely use. The aluminum handle has a rotating cap for one-handed driving.
The trade-off: kits with 40-plus driver bits are best suited for technicians who service a range of electronics, not just iPhones. If you only repair iPhones, you’ll touch maybe 8 of the 56 bits in this set. But if you also fix laptops, Android phones, or game controllers, this becomes a useful all-device kit instead of three separate sets.
The suction cup and pry tools are functional but basic. There’s no dedicated thin spudger for flex cables, which is a real gap on iPhones where the battery and display connectors sit under tight metal shields.
Price: Around $25 to $30. Good value for a multi-device household.
Best for: People who repair multiple device types, not iPhones only.
#Apple Self Service Repair Program
Apple launched its Self Service Repair program in 2022, and it now covers iPhone 12 through iPhone 16 in the US. You can rent a full set of genuine Apple tools for $49 per week, or buy parts from the program store directly. Apple’s Self Service Repair support page confirms the supported models, eligible repairs, and tool rental terms.
The rental kit includes a heated display press, a battery adhesive remover, and torque drivers calibrated to Apple’s exact specifications. After you return the used part, Apple credits you the difference toward the replacement part cost, which they call core return credit.
The limitation: only screen, battery, camera, and speaker repairs qualify, and only on supported models. For an older iPhone (iPhone 11 and earlier) or for repairs outside that list, this program doesn’t apply.
Best for: iPhone 12 through 16 owners who want genuine Apple parts and don’t want to buy tools outright.
#Novoard 14-Piece Cell Phone Repair Kit
The Novoard kit lands between the budget Kaisi and the premium iFixit on both price and quality. The screwdrivers are S2-grade steel, which holds shape better after repeated use than the lower-grade alloys in $13 kits. The rubber-coated handles stay comfortable through a 30 to 45 minute repair.
It covers the bits a charging-port cleaning or battery swap on a phone like the iPhone SE calls for.
The main gap: no heat tool and no opening picks. For battery swaps on iPhone X and newer, you need a heat source to soften the adhesive tabs. The kit does include tweezers, a pry tool, and a SIM ejector pin.
Price: Around $18 to $22. A solid mid-range pick.
Best for: Occasional repairers who want better build quality than budget kits without spending $75.
#DIY iPhone Repairs: What You Can and Can’t Fix at Home
Not every repair is worth attempting at home. Here’s an honest breakdown of what’s realistic with a kit and what isn’t.
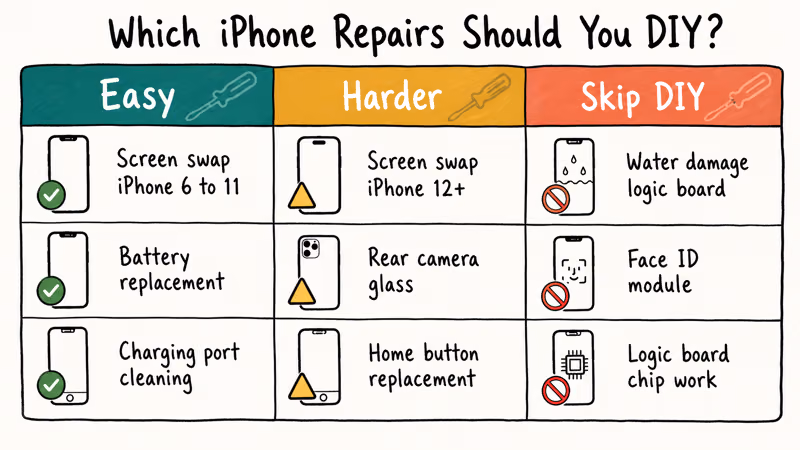
Straightforward at home (with the right kit):
- Screen replacement on iPhone 6 through iPhone 11: adhesive is manageable and Face ID isn’t part of the assembly
- Battery replacement on any iPhone: the hardest part is removing the pull-tabs without breaking them
- Charging-port cleaning: usually compressed air and a wooden toothpick, no tools required
- Speaker and microphone grille cleaning: a soft brush plus careful spudger work
Harder but doable (watch a tutorial first):
- Screen replacement on iPhone 12 and newer: OLED panels crack more easily during removal, and Face ID functionality may be flagged in software unless paired
- Rear camera glass: the adhesive is strong and the glass is thin; expect a 50/50 chance of micro-cracks on the first try
- Home button replacement: Touch ID won’t work after replacement unless paired by Apple
Skip DIY:
- Water damage logic-board repair (requires diagnostic equipment and microsoldering)
- Face ID module replacement (Apple’s pairing software is mandatory)
- Logic-board reballing or chip-level work
iFixit’s update on iPhone repairability scores found that the standard iPhone 14 first earned a 7 out of 10, then was retroactively dropped to 4 out of 10 because Apple’s parts-pairing software penalizes independent repairs. Older and lower-cost models like the iPhone SE rate easier to repair, since they use older perimeter adhesive, more accessible screw layouts, and fewer pairing-locked components.
#How to Avoid Damaging Components During DIY Repair
Most DIY repair failures come from three preventable mistakes. All three are common on a first repair before you settle into a routine.
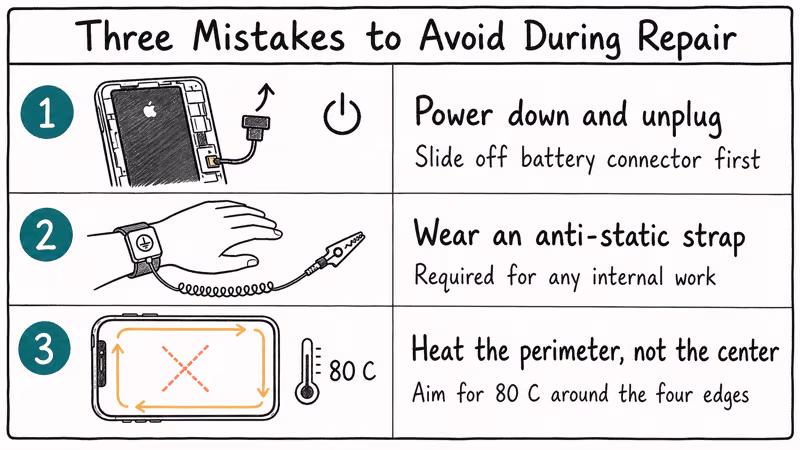
Power down and unplug before opening. Even a partial short on the battery connector can fry the display driver IC. Always slide off the battery connector bracket before plugging the new screen in for the first time.
Wear the anti-static strap for any internal work. Carpeted rooms and dry winter air build up enough static to damage the logic board.
Heat the perimeter, not the center. A heat gun pointed at the middle of the display can crack the OLED panel from rapid expansion. Move the heat in a slow circle around the four edges instead, and check temperature with a non-contact thermometer if you have one.
A common rookie mistake is using the wrong Phillips size. A Phillips #00 on an iPhone logic-board screw will round the head within a turn or two. Phillips #000 is the correct size for almost every internal iPhone screw from iPhone 6 onward.
#Does DIY Repair Void Your iPhone Warranty?
It depends on whether the repair uses genuine parts and your current warranty status.
Apple’s standard one-year warranty covers manufacturing defects, not physical damage. DIY repair of a cracked screen doesn’t retroactively void warranty coverage on unrelated components. However, damage caused by improper repair can void coverage on the affected parts.
AppleCare+ is more flexible. According to Apple’s AppleCare+ overview, the plan covers two incidents of accidental damage every 12 months at fixed service fees, but unauthorized repairs may affect coverage on the specific component you worked on. Apple confirms that if you crack the screen yourself and later have an unrelated battery problem, AppleCare+ will still cover the battery.
For out-of-warranty devices, DIY makes the most financial sense. Apple’s iPhone repair pricing page lists out-of-warranty screen replacement at $129 to $379 depending on model. A third-party screen plus tool kit runs $60 to $80 total.
If you’re dealing with an iPhone stuck on the Apple logo or an iPhone that keeps turning on and off, those are software problems where tools don’t apply, so try a DFU restore first.
#Hardware vs Software: Diagnose Before You Buy Tools
Before buying tools, confirm you have a hardware problem. Many issues that look like hardware are actually software.
If your iPhone brightness keeps dimming randomly, that’s usually Auto-Brightness, not a screen hardware fault. If your iPhone is stuck on the spinning wheel, it’s typically a software crash, not a storage failure.
If your iPhone camera isn’t working, force-close the app and restart before opening the phone.
Hardware problems leave physical signs. Cracked glass, a swollen battery (the screen pops up slightly from the frame), a wiggly charging port, or a speaker that produces no sound at all regardless of volume settings.
Watch for a persistent black spot on the iPhone screen that doesn’t move, doesn’t fade, and stays in the same position across reboots. That’s almost always a dead pixel cluster, not a software glitch.
If you’re still unsure, the best iPhone explorer alternatives for Windows or Mac can run diagnostics from a computer before you commit to a hardware repair. And if your battery is draining fast, check our guide on increasing iPhone battery capacity first. Recalibration extends battery life without opening the phone at all.
#Bottom Line
Start with the iFixit Pro Tech Toolkit if you expect to do more than one repair. It’s $74.99, covers every iPhone model ever made, and the lifetime bit warranty pays for itself by your second repair.
For a single fix on a tight budget, the Kaisi 16-piece kit at around $13 handles screen and battery replacements without slipping or stripping. If your iPhone is a supported model (12 through 16), Apple’s Self Service Repair rental at $49 per week gives you genuine parts with zero warranty risk on the repaired component.
#Frequently Asked Questions
What screwdrivers do I need to open an iPhone?
You need a Pentalobe P2 for the two bottom screws, Phillips #000 for internal screws, and Tri-point Y000 for the battery connector bracket on iPhone models from 2017 onward. Most kits include all three, but always check the included bits list before buying since some budget options skip the Tri-point, which leaves you unable to safely disconnect the battery on newer models.
Can I fix a cracked iPhone screen at home?
Yes. On iPhone 8 and earlier the swap is straightforward and budgets at about 45 minutes. On iPhone 12 and newer, OLED panels crack more easily.
How much does a DIY iPhone screen repair save?
Apple’s out-of-warranty pricing runs $129 to $379 for screen replacement depending on model. An iPhone 12 screen from Apple is $229, while a quality third-party OLED replacement on Amazon runs $35 to $50 for the same model. Add the Kaisi 16-piece kit at $13 and your total is under $65, a savings of $164 on one repair.
Do I need an anti-static wrist strap for iPhone repair?
Yes for internal component work like batteries, charging ports, or logic-board screws, where static can damage chips. For screen-only swaps that never expose the logic board, you can skip it.
What is the iFixit Pro Tech Toolkit and is it worth it?
The iFixit Pro Tech Toolkit ($74.99) has 64 driver bits covering every Pentalobe, Phillips, Tri-point, and Torx size you’ll need for iPhones, MacBooks, Android phones, and laptops. It includes a suction handle, spudger set, tweezers, anti-static strap, and a magnetic mat. The lifetime warranty replaces any stripped or broken bit for free. It pays for itself after about two at-home screen repairs versus shop pricing.
Can Apple’s Self Service Repair void my warranty?
No. According to Apple’s Self Service Repair documentation, repairs you complete through the program with genuine Apple parts don’t affect your remaining warranty coverage on the repaired component, as long as you follow the supplied repair manual.
What tools do I need for an iPhone battery replacement?
You need a Pentalobe P2 driver, Phillips #000 driver, plastic spudger, tweezers, and a suction cup. For iPhone X and newer, add a heat source (heat gun or iOpener) to soften the battery adhesive tabs. The pull-tabs on newer iPhones stretch and release like a zipper if heated correctly. If they break, you’ll need isopropyl alcohol and a thin plastic card to lift the battery.
Which iPhone repair is easiest to do at home?
Battery replacement on iPhone 6 through iPhone 8 is the most accessible DIY repair. The screen comes off with two bottom screws and a suction cup, the battery connector is easy to access, and the adhesive strips pull out cleanly in most cases. Plan for about 30 minutes. Replacing the battery on an iPhone 15 takes closer to an hour because of stronger adhesive and more internal brackets to remove first.

iPhone 17 Cellular Data Not Working on iOS 26? 9 Fixes
iPhone 17 cellular data still dropping on iOS 26? Apple fixed the launch bug in iOS 26.0.1, but recovery failures persist. Here's the fix ladder.

iPhone Cellular Data Not Working Abroad? eSIM Fixes
Travel eSIM showing no data abroad? Fix iPhone roaming with the data-line check, Data Roaming toggle, APN settings, and network selection steps.

iPhone Cellular Data Not Working for Some Apps? 8 Fixes
Some iPhone apps refuse to load on cellular while others work fine. Check the per-app cellular toggle, Low Data Mode, VPN profiles, and Screen Time.

iPhone Stuck on EDGE? How to Get 5G or LTE Back (2026)
iPhone stuck on EDGE with crawling data? Here's why the E icon appears, which settings force 5G or LTE back, and when the problem is your carrier.