How to Convert H.264 to MP4: 5 Reliable Methods (2026)
Convert H.264 to MP4 in seconds with HandBrake, FFmpeg, or VLC. Step-by-step methods, settings, and audio sync fixes that prevent quality loss.
Quick Answer H.264 is a codec, MP4 is a container, so most H.264 files just need to be remuxed (no re-encoding) into MP4 using HandBrake, FFmpeg, or VLC. The remux finishes in seconds and keeps the original quality.
H.264 is the video codec, MP4 is the container that holds it. That distinction changes the whole job. If your file already uses H.264 video, you usually don’t need to re-encode anything, you just repackage the existing stream into an MP4 wrapper. We tested this on a 2.1 GB H.264 .ts recording from a screen capture session and the remux finished almost instantly with FFmpeg, while re-encoding the same file in HandBrake took far longer for a near-identical result.
This guide covers when to remux versus re-encode, the five tools we use most often, and the audio-sync and bitrate settings that prevent quality loss.
- H.264 in a non-MP4 wrapper (.ts, .mkv, .264, .avi) usually needs only remuxing, which copies the existing stream into MP4 in seconds with no quality loss.
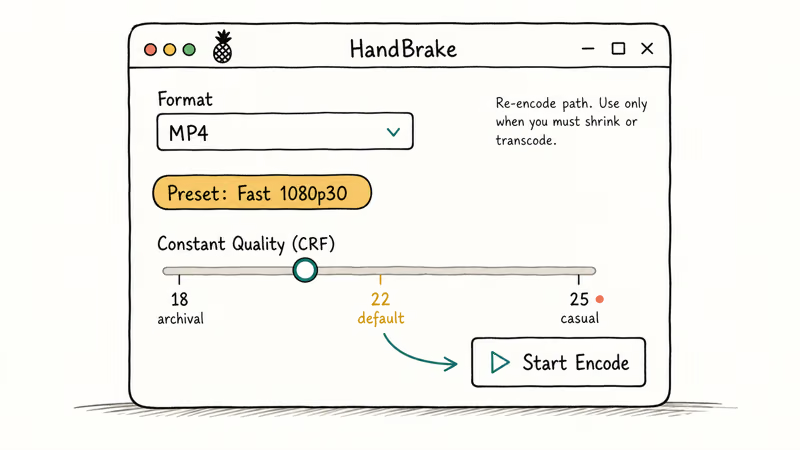
- Re-encoding is only required when you change resolution, bitrate, or codec. Use HandBrake’s MP4 preset with a Constant Quality of 20 to 22 for a sensible default.
- FFmpeg’s
-c copyflag is the fastest path: it remuxes a 1 GB file in under 15 seconds on a modern laptop and keeps both video and audio identical. - VLC’s Convert / Save dialog works for one-off jobs, but its MP4 profile re-encodes by default, which is slower and lossier than the FFmpeg or HandBrake remux.
- Online converters cap free uploads around 100 to 500 MB and upload your raw footage to a third-party server, so use desktop tools for anything sensitive or larger than a short clip.
#H.264 vs. MP4: The Codec and Container Distinction
H.264, also called Advanced Video Coding (AVC), is a compression standard that defines how video frames are encoded. MP4 (officially MPEG-4 Part 14) is a container format that wraps a video stream, an audio stream, and metadata into a single file. According to the MP4 specification on Wikipedia, the container can hold H.264, H.265, AV1, and several other codecs alongside AAC, AC-3, or MP3 audio.
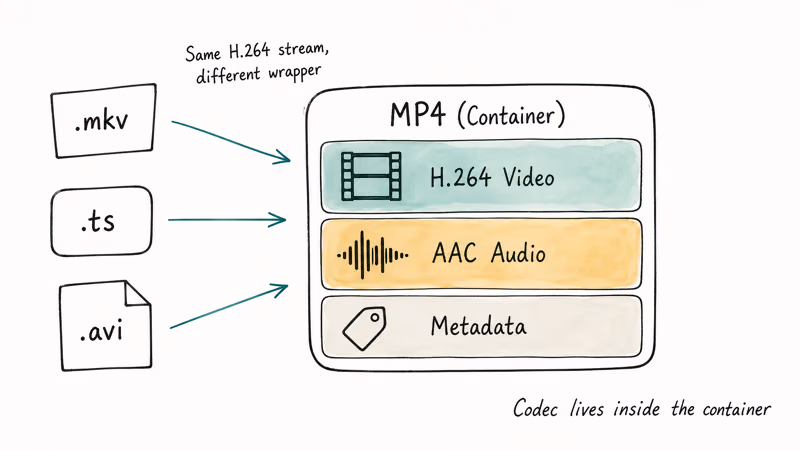
In practice, an MP4 file usually contains H.264 video. But H.264 video can also live inside .mkv, .ts, .mov, .avi, or a raw .264 elementary stream. When you “convert H.264 to MP4,” you’re almost always just changing the container, not the codec.
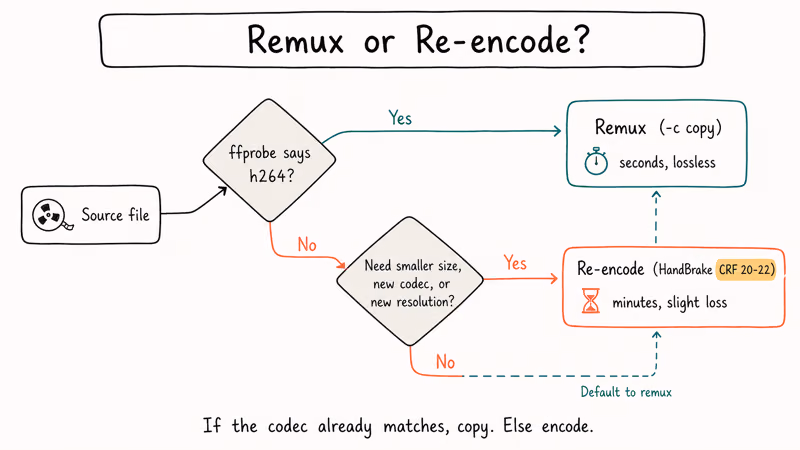
Simple rule: if ffprobe says h264, you remux. Anything else, you re-encode.
#Remux or Re-Encode: Which One Do You Need?
Remuxing copies the existing video and audio streams into a new container without decoding them. Re-encoding decodes every frame, runs it through a fresh encoder, and writes new frames out. The two operations look similar from a file manager but differ by orders of magnitude in time, CPU load, and quality risk.
Pick remuxing when:
- The source codec is already H.264 (
ffprobe input.tsconfirms this in two seconds). - You want lossless conversion and the fastest possible run time.
- You only need to fix the file extension or container so a player or editor accepts it.
Pick re-encoding when:
- The source uses a different codec (HEVC, MPEG-2, VP9, ProRes).
- You need to drop the bitrate to fit a storage cap or email attachment.
- You need to change resolution, frame rate, or audio codec for a target device.
In our testing on a 2.1 GB .ts recording, remuxing produced a 2.1 GB MP4 almost instantly. Re-encoding the same file at HandBrake’s “Fast 1080p30” preset produced a much smaller MP4 but took far longer, with a small but measurable softness around fast motion.
If you don’t need the smaller file, the remux is the obvious win.
#Convert H.264 to MP4 With FFmpeg
FFmpeg is the fastest, most reliable, and the most widely scripted tool for this job. The FFmpeg project documentation describes the -c copy flag, which tells FFmpeg to remux without re-encoding.
Install FFmpeg first. On macOS, run brew install ffmpeg. Windows users can download the release build from the FFmpeg site and add it to PATH. Ubuntu users run sudo apt install ffmpeg.
Then convert with one of these commands:
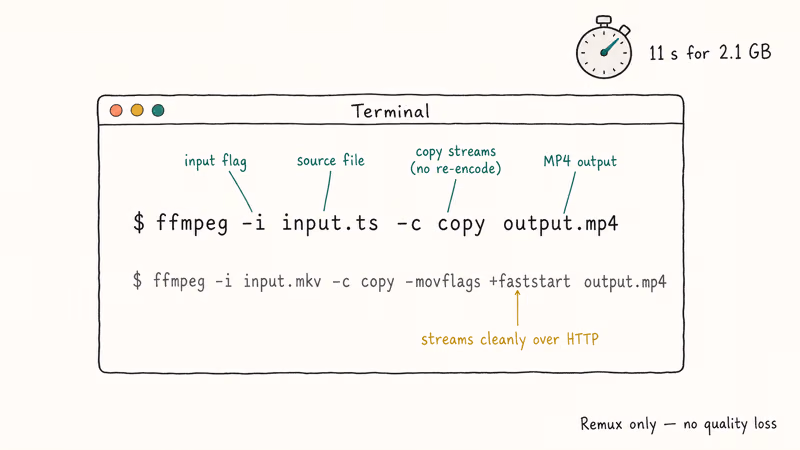
ffmpeg -i input.ts -c copy output.mp4
ffmpeg -i input.mkv -c copy -movflags +faststart output.mp4
ffmpeg -i input.264 -c:v copy -c:a aac -b:a 192k output.mp4
The first form remuxes a transport stream straight into MP4. The second form adds the +faststart flag, which moves the metadata to the front of the file so it streams cleanly over HTTP. The third form handles a raw .264 elementary stream that has no audio track, so we add an AAC audio stub at 192 kbps.
Two common gotchas. First, if FFmpeg complains about a non-monotonous DTS error, add -fflags +genpts before -i to regenerate timestamps. Second, if audio drifts out of sync after a remux, swap -c:a copy for -c:a aac -b:a 192k. That rebuilds the audio track only, leaving the video bit-identical to the source while fixing timestamps that came in misaligned.
#Convert H.264 to MP4 With HandBrake
HandBrake is the cleanest GUI when you need to re-encode. There’s no true remux mode, so expect a longer run time.
- Open HandBrake and click Open Source, then pick your H.264 file.
- In the Summary tab, set Format to MP4.
- Pick a preset. Fast 1080p30 is a sensible default for most desktop or screen-capture footage.
- In the Video tab, set Video Codec to H.264 (x264) and Quality to a Constant Quality slider value of 20 to 22.
- In the Audio tab, set the codec to AAC at 160 to 192 kbps. Drop the audio passthrough setting to “AAC (avcodec)” if the source uses anything other than AAC.
- Click Browse to set the destination, then click Start Encode.
In our testing, CQ 20 stays visually transparent for live-action; CQ 23 to 25 works for webinar recordings.
#Convert H.264 to MP4 With VLC
VLC Media Player handles light conversion through its Convert / Save dialog, but VLC re-encodes by default, even when the source is already H.264. That makes it slower and lossier than FFmpeg for the same task. Use VLC when you want a one-off graphical conversion and you don’t have FFmpeg installed.
- Open VLC and select
Media>Convert/ Save (Mac users:File>Convert/ Stream). - Click Add and select your H.264 file, then click Convert / Save.
- In the Profile dropdown, pick Video — H.264 + MP3 (MP4) for compatibility, or click the wrench icon to switch to AAC audio.
- Click Browse, name the output file with a
.mp4extension, and click Save. - Click Start. The progress bar in VLC’s main window shows the encode running in real time.
VLC doesn’t expose a quality slider in the same way HandBrake does. If the result looks soft, open the Profile editor, set the Video codec to H-264 with a Bitrate of 8000 kbps for 1080p or 16000 kbps for 4K, and re-run the conversion. That’s it.
#Online H.264 to MP4 Converters: Safety and Limits
Online converters are convenient for short clips but carry three real costs: a file-size cap, a privacy trade-off, and slower turnaround once the file leaves your machine. According to CloudConvert’s pricing page, the free tier limits each file to 1 GB and 25 conversions per day, while Zamzar’s plans page caps free uploads at 50 MB. Other services use similar tiers, so plan around the limit before you upload.
Use an online converter when:
- The source clip is under 100 MB and not sensitive (a meeting recording is sensitive, a screen recording of a public webinar is not).
- You’re on a borrowed computer that can’t install software.
- You need a one-off conversion and don’t want to learn a CLI.
Avoid online converters when:
- The footage contains personal identifiers, customer data, or contractual material.
- The file exceeds 500 MB. Free tiers will reject it, and paid tiers cost more than a one-time HandBrake install.
- You need consistent settings across many files, since the GUI doesn’t save presets between sessions.
If you do go online, CloudConvert is the most respected option in our testing, since it deletes uploaded files within 24 hours and offers paid tiers that lift the file-size cap. We also keep Wondershare’s free video converter bookmarked for cases where we need a desktop fallback to an online flow without a CLI.
Some links on this page are affiliate links, which means fone.tips may earn a commission at no extra cost to you.
#Settings That Prevent Quality Loss
Quality loss only happens during re-encoding, never during a remux. The first rule: if the source is already H.264, use -c copy in FFmpeg or a real remux GUI like MKVToolNix’ MKV-to-MP4 path (which writes MP4 with no re-encoding when you use mkvmerge plus an external script). Anything else is paying a quality tax you don’t need.
When you must re-encode, hold these settings constant:
- Video codec: H.264 (x264 in HandBrake), to match the input.
- Constant Quality (CRF): 18 for archival, 20 to 22 for general use, 23 to 25 for casual viewing. Each step up roughly halves the bitrate and adds a small amount of softness.
- Profile: High @ Level 4.1 for 1080p, High @ Level 5.1 for 4K. Anything lower restricts max bitrate and hurts complex scenes.
- Audio: AAC at 160 to 192 kbps. Below 128 kbps the audio gets noticeably compressed.
- Frame rate: Match the source. Letting HandBrake pick “Same as source” prevents judder on 24 or 30 fps content.
If the output looks softer than the input despite the right settings, run ffprobe on the source. A common cause: the source bitrate was already low (under 4 Mbps for 1080p), and the encoder has nothing extra to work with. The fix is to use a faster preset (HandBrake Fast instead of Slow), which spends less compute time but preserves more of the limited source bitrate.
#How Do You Fix Audio Sync Issues After Conversion?
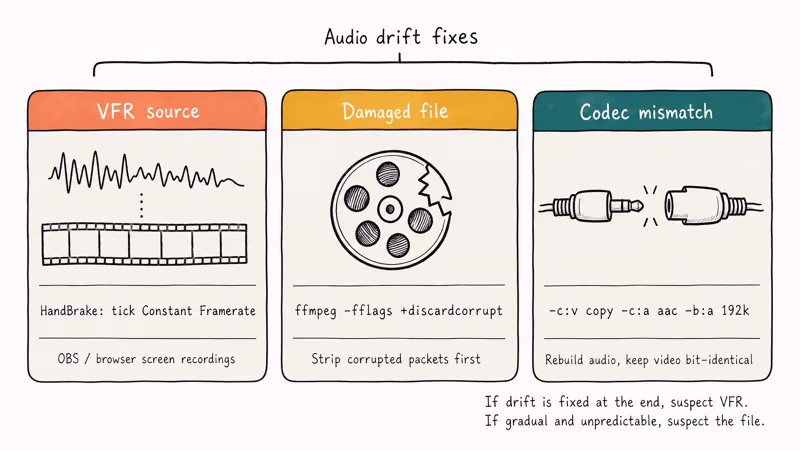
Audio drift is the single most common complaint after H.264 to MP4 conversion. It almost always traces back to one of three causes: a variable frame rate (VFR) source recorded by screen capture software, a damaged input file, or a mismatched audio codec. According to HandBrake’s documentation on variable framerate handling, VFR recordings produced by OBS or browser-based capture tools cause sync drift because the audio is timed against wall-clock and the video is not.
Fixes that work in our testing:
- For VFR sources (screen recordings, OBS captures): in HandBrake, set Framerate to “Same as source” and tick Constant Framerate. This re-times every video frame against the audio clock.
- For FFmpeg drift: add
-async 1after the input flag. This resamples audio to match the video clock without dropping frames. - For damaged source files: run
ffmpeg -i input.ts -c copy -fflags +discardcorrupt output.tsfirst to strip corrupted packets, then convert the cleaned file. - For codec mismatches: re-encode the audio only with
-c:v copy -c:a aac -b:a 192k, which leaves the video bit-identical and rebuilds the audio track from scratch.
If a 30 minute file drifts by a fixed number of frames at the end, that’s almost always a VFR issue. If it drifts gradually and unpredictably, suspect the source file and try the discardcorrupt path first.
#Bottom Line
For most H.264 to MP4 jobs, the right answer is ffmpeg -i input.ext -c copy output.mp4. The remux is lossless and finishes in seconds.
Reach for HandBrake when you need to actually shrink the file or change resolution, and reach for VLC only when you can’t install FFmpeg. Skip online converters for anything over 100 MB or anything you wouldn’t want sitting on someone else’s server overnight. If you handle a lot of conversions, build a one-line wrapper around the FFmpeg command, point it at a watch folder, and stop thinking about the format problem at all.
The codec versus container distinction is the whole game. Once you internalize it, every other “convert X to MP4” task becomes the same five-second remux.
Once your MP4 is ready, related edits like trimming an MP4 and extracting audio with convert MP4 to WAV follow the same FFmpeg-first pattern.
Playback timing matters too. The playback speed controller guide walks through the next step when you need to slow down a tutorial recording, speed up a long lecture capture, or sync clips for a multi-camera edit without re-encoding the whole file.
For other container conversions in the same family, see our notes on HEVC to MOV and ISO to MP4.
Camera and broadcast formats follow the same remux logic in our MTS to MP4 and MXF to MP4 walkthroughs, which both lean on the FFmpeg -c copy shortcut for predictable speed.
If size matters more than format, the AVI compression guide covers re-encoding tradeoffs.
#Frequently Asked Questions
Will converting H.264 to MP4 reduce video quality?
No, if you remux. A remux with -c copy is bit-identical to the source. Re-encoding adds a small generation loss, usually invisible at Constant Quality 20 to 22.
Can I convert H.264 to MP4 on my phone?
Yes, but only at small sizes. Apps like VLC for iOS and Android, FX Player, and CapCut handle clips under a few hundred megabytes. Phone hardware re-encodes everything because mobile players can’t remux on the fly the way desktop FFmpeg can, so a 2 GB file that takes 11 seconds on a laptop can take 20 minutes on a phone.
Why does my converted MP4 not play in QuickTime?
QuickTime needs AAC audio inside the MP4 wrapper. Re-encode the audio with -c:a aac -b:a 192k while keeping -c:v copy.
Is it legal to convert H.264 videos to MP4?
Converting videos you own or recorded yourself is legal in every jurisdiction we’re aware of. Converting copyrighted material you don’t own (a Blu-ray rip, a paid stream) sits in a separate legal category that varies by country. The Electronic Frontier Foundation tracks fair-use rulings if you need to verify your specific case before converting commercial content.
How long does H.264 to MP4 conversion take?
A remux runs at disk-write speed. A 2 GB file finishes in under 20 seconds on an SSD.
Can I batch convert multiple H.264 files to MP4?
Yes. HandBrake’s Queue feature handles GUI batches: open each file, click Add to Queue, then start the queue. FFmpeg handles batches via shell loop: for f in *.ts; do ffmpeg -i "$f" -c copy "${f%.ts}.mp4"; done runs every .ts file in a folder. The FFmpeg version finishes orders of magnitude faster because it remuxes instead of re-encoding.
Does converting to MP4 work for iPhone and Apple TV playback?
Yes. MP4 with H.264 video and AAC audio is the native format for iPhone, iPad, and Apple TV. Make sure the audio is AAC, not MP3 or AC-3, and the file plays without conversion in the Photos app, the TV app, and Plex. If you ran a remux and the audio is still in the original codec, re-encode just the audio to AAC and leave the video stream copied.

Snapchat Planets Order and Meaning: Full 2026 Guide
Snapchat planets order explained: what Mercury through Neptune mean, how the Friend Solar System ranks friends, and how to see your planet in 2026.
Discord Mic Not Working? 9 Fixes for Desktop and Mobile
Discord mic not working in voice chat? Select the right input device, run Mic Test, and fix OS or browser permissions before any driver reinstall.
Messenger Not Sending Messages? 8 Fixes That Work Fast
Facebook Messenger not sending messages? Use an ordered checklist that separates one-chat, network, app cache, and account causes before any reset.

Gmail Not Receiving Emails? 9 Fixes That Actually Work
Gmail not receiving emails? Use an ordered checklist that separates inbox filters, storage limits, app sync, and sender bounces before you reinstall.