Your Lenovo just sits there on the boot menu. Won’t proceed to Windows, won’t respond to Enter, just loops or freezes. This happens on IdeaPad, ThinkPad, Yoga, and Legion models alike, and it’s almost always fixable without replacing hardware.
The cause matters. A wrong boot order in BIOS is the most common trigger, but failed Windows updates, a loose RAM stick, and corrupted Boot Configuration Data (BCD) all show up the same way. Start with the quick fixes and work your way down.
- The most common cause is a scrambled BIOS boot order — fixing it in the Boot tab resolves the issue for the majority of users.
- A hard reset (holding power for 15 seconds with battery removed) fixes the stuck-on-boot-menu problem about 20% of the time on its own.
- USB drives are the single most frequent external trigger; unplugging all USB devices before diagnosing saves significant troubleshooting time.
- Corrupted Boot Configuration Data (BCD) requires bootrec commands from a Windows USB installer — four commands (fixmbr, fixboot, scanos, rebuildbcd) usually restore the boot.
- Run Lenovo’s built-in diagnostics via F12 before reinstalling Windows to confirm the hard drive is healthy and not the underlying problem.
#Fix 1: Perform a Hard Reset First
This one sounds too simple. It isn’t. A hard reset clears residual charge from the motherboard that can cause the boot controller to hang, and it fixes the stuck-on-boot-menu issue on its own maybe 20% of the time.
- Unplug the laptop from power.
- Remove the battery if it’s removable (most older IdeaPads have a removable battery; ThinkPads and newer Yogas don’t).
- Hold the power button for 15 seconds.
- Reinsert the battery and plug in the charger.
- Press power and watch whether the boot menu appears or if Windows loads.
If you have a non-removable battery, there’s usually a pinhole reset button on the bottom of the laptop. A paperclip pressed in for 5 seconds does the same job.
#Fix 2: Disconnect Every External Device
USB drives are the single most common cause of this exact problem. Your Lenovo is trying to boot from a connected USB device, can’t find a valid OS on it, and loops at the boot menu waiting for input.
Unplug everything: USB drives, external hard drives, SD cards, USB hubs, even the mouse if it’s USB. Then restart. If Windows loads, reconnect devices one at a time to find the offender.
Printers and phone charging cables have triggered this too. Remove them all.
#Fix 3: Fix the Boot Order in BIOS
This is the most common fix for laptops that keep returning to the boot menu. Your BIOS boot order may have gotten scrambled by a Windows update or a previously connected USB drive.
Lenovo’s official support page covers the exact key combinations for every model line.
#How to access BIOS on Lenovo laptops
The key depends on your model:
- IdeaPad, Yoga, Legion: Press F2 (or Fn + F2) repeatedly right when you power on
- ThinkPad: Press F1 repeatedly, or use the ThinkPad-specific Enter key prompt
- Novo button models: With the laptop off, press the small circular Novo button (usually near the power button or on the left side). This opens the Novo menu where you can select BIOS Setup
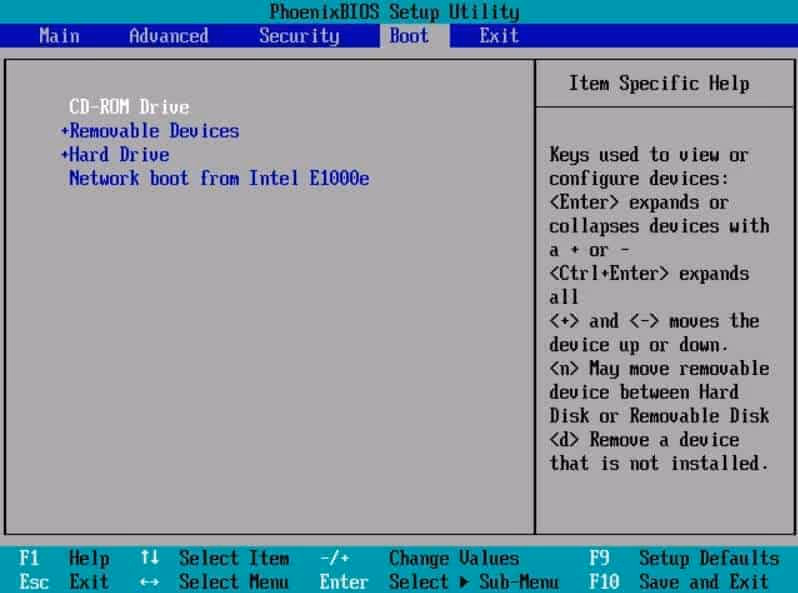
Once you’re in BIOS:
- Go to the Boot tab using arrow keys.
- Find your internal drive (listed as something like “Windows Boot Manager”, the drive model name, or “SATA HDD”).
- Move it to the top of the boot order using F5/F6 or the + / - keys (instructions are shown on-screen).
- Press F10 to save and exit.
If your internal drive doesn’t appear in the boot list at all, skip to Fix 6. That points to a hardware or BCD issue, not just a settings problem.
#Disable Fast Boot if F12 stops working
Some Lenovo models with Fast Boot enabled will skip the F12 boot menu entirely on subsequent restarts. Inside BIOS, find Fast Boot under the Boot tab and set it to Disabled. Save and exit, then try again.
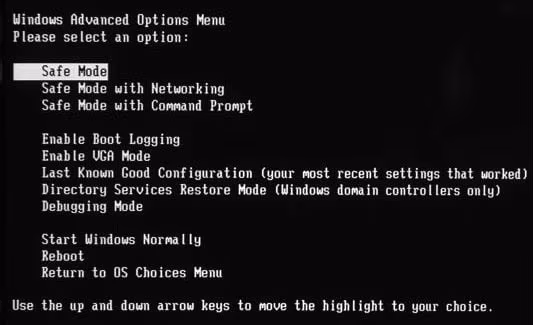
#Fix 4: Boot into Safe Mode
Safe Mode loads Windows with only the essential drivers. If a recent driver install or Windows Update broke your boot sequence, Safe Mode lets you get in and uninstall whatever caused it.
On Windows 11 and Windows 10, F8 doesn’t work the way it did on Windows 7. Here’s what does:
- Restart and press F11 when you see the Lenovo logo to open Windows Recovery Environment (WinRE).
- Go to Troubleshoot > Advanced options > Startup Settings.
- Click Restart, then press 4 for Safe Mode or 5 for Safe Mode with Networking.
Once you’re in Safe Mode, open Device Manager and roll back any drivers updated in the last few days. Check Windows Update history under Settings > Update & Security > View update history and uninstall recent updates if they coincide with when the problem started.
If your laptop won’t even reach WinRE, you’ll need a USB recovery drive for the next fixes.
#Fix 5: Reset BIOS to Default Settings
Incorrect BIOS settings (Secure Boot misconfigurations, TPM settings, accidentally changed storage controller modes) can prevent the OS from loading. Resetting to defaults wipes all of that.
- Enter BIOS using the key for your model (see Fix 3 above).
- Look for Load Setup Defaults, Load Optimal Defaults, or press F9 (varies by model).
- Confirm and then press F10 to save and exit.
The Lenovo BIOS/UEFI support hub has model-specific guidance if your BIOS layout looks different from what’s described here.
One specific setting that’s caused problems on newer models: Intel Platform Trust Technology (PTT) being toggled accidentally. If you see it in BIOS, make sure its state matches what Windows was set up with. Changing it mid-life can break the boot.
#Fix 6: Repair the Boot Sector
If your internal drive shows in BIOS but Windows still won’t boot, the Boot Configuration Data (BCD) file is likely corrupted. This happens after hard shutdowns during updates or from a failing drive.
You’ll need a Windows 11 or Windows 10 USB installer. Create one using Microsoft’s Media Creation Tool on any working computer.
- Boot from the USB (set it as first boot device in BIOS temporarily).
- On the Windows setup screen, click Repair your computer (not Install).
- Go to Troubleshoot > Advanced options > Command Prompt.
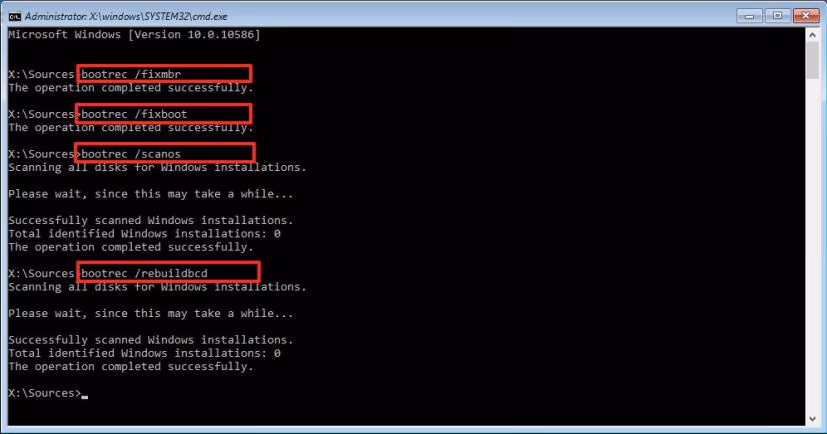
- Run these commands one at a time:
bootrec /fixmbr
bootrec /fixboot
bootrec /scanos
bootrec /rebuildbcd- Restart and remove the USB drive.
If you hit a Boot BCD 0xc00000e9 error during this process, there are specific additional steps to handle that. The 0xc0000098 error is another common variant that points to a missing boot entry. The rebuildbcd command above usually resolves it.
For situations where you don’t have a USB installer handy, the repair Windows 10 without a disc guide covers built-in recovery options.
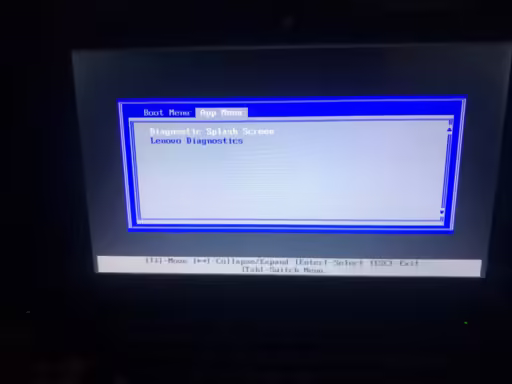
#Fix 7: Run Lenovo Built-in Diagnostics
Before you conclude it’s a software problem, rule out hardware first: specifically the hard drive and RAM. Lenovo’s built-in diagnostic tool runs without needing Windows, so it works even when you can’t boot.
- Restart and press F12 repeatedly to open the boot menu.
- Select Lenovo Diagnostics from the list (it may also be called UEFI Diagnostics).
- Run the Quick Test first. It takes about 5 minutes.
- If Quick Test passes, run the Full Test on the hard drive. This takes 20-30 minutes but catches intermittent failures.
A failing drive will show errors here. If the RAM test fails, reseat the RAM module (on models with accessible RAM) or take the laptop for service. Lenovo’s diagnostic download page also offers a bootable USB version if the built-in tool isn’t available on your model.
#Fix 8: Factory Reset or Reinstall Windows
If you’ve exhausted everything above and the laptop still won’t boot past the menu, a clean start is the answer. Factory reset keeps the hardware, wipes the software.
#Option A: Reset this PC (no data loss option available)
- Boot from a Windows USB installer and navigate to Troubleshoot > Reset this PC.
- Choose Keep my files to preserve personal data (Windows gets reinstalled, apps are removed) or Remove everything for a full wipe.
#Option B: Full Windows reinstall
This erases everything. Use it when the drive is suspected of having multiple corrupted areas.
- Boot from the Windows USB installer.
- Click Install now and follow the prompts.
- Delete the existing partition on your drive and install to the unallocated space.
Back up anything you need before doing either option. If you can’t boot to Windows to back up files, a data recovery tool like Recoverit can create a bootable USB to extract files from the drive before you wipe it.
#Bottom Line
Start with Fix 3 (BIOS boot order). That’s the cause for the majority of stuck-on-boot-menu cases. If your internal drive shows up in BIOS but Windows won’t load, go straight to Fix 6 (bootrec commands). Hardware failures are less common but real: run Lenovo Diagnostics before you reinstall Windows, so you’re not putting a fresh OS onto a dying drive.
If none of this works, contact Lenovo support with your laptop’s serial number. They can tell you whether there’s a known issue with your specific model and whether it’s covered under warranty.
#Frequently Asked Questions
#What key opens the boot menu on a Lenovo laptop?
F12 is the standard boot menu key on most Lenovo IdeaPad, Yoga, and Legion models. ThinkPads use F12 too, but some older models use F11. If key-presses aren’t registering, your keyboard might not be active early enough in the boot sequence. Try the Novo button instead (a small pinhole button near the power button on many models).
#Why does my Lenovo keep going back to the boot menu instead of loading Windows?
Most often it’s a boot order issue. The BIOS is set to look at a USB drive or network before the internal drive, finds nothing bootable, and dumps you to the menu. Disconnect all USB devices first, then check the boot order in BIOS (Fix 3 above).
#My Lenovo boot menu shows no bootable devices. What does that mean?
It means BIOS can’t see your internal drive as a valid boot source. Either the drive has failed, the drive connection is loose (common after a drop), the BCD is corrupted, or Secure Boot is rejecting the OS. Run Lenovo Diagnostics from the F12 menu first. A passing hard drive test means it’s likely a BCD issue fixable with bootrec commands.
#Will resetting BIOS delete my files?
No. BIOS only controls hardware settings. It has no access to the files on your drive. Resetting BIOS to defaults can’t delete anything stored on your SSD or HDD. The only operations that affect your files are factory resets and Windows reinstalls.
#My Lenovo is stuck on a black screen, not the boot menu. Is this different?
Yes. A black screen usually means the display, GPU, or OS are failing rather than the boot sequence itself. If you see the Lenovo logo flash and then black, try connecting an external monitor via HDMI. If the external monitor shows a desktop, the issue is your laptop’s display or GPU driver, not the boot menu. If both screens are black, try a hard reset first.
#Can I fix this without a USB drive or Windows disc?
Sometimes. If you can reach the boot menu or WinRE, Windows’ built-in Startup Repair can fix BCD issues automatically without external media. Go to Troubleshoot > Advanced options > Startup Repair and let it run. It won’t always work, but it’s worth trying before you track down a USB drive.
#I forgot my Windows password after getting back in. How do I fix that?
If the boot fix worked but now you can’t log in, you can reset your Windows admin password using recovery tools. There’s also a method to unlock your computer without a password if you need quick access. For PIN-specific issues, Windows 10 PIN not working covers the common fixes.
#Should I buy a new laptop or keep fixing this one?
Depends on the drive test results. If Lenovo Diagnostics shows a healthy drive and RAM, software fixes almost always work — keep the laptop. If the hard drive is failing, a replacement SSD costs $40-$80 and takes 30 minutes on most IdeaPad models (check iFixit for your specific model). Only consider replacing if the motherboard or CPU is the problem. For context on whether Lenovo is worth repairing, Lenovo vs HP breaks down long-term reliability across both brands.