Fix "Last Line No Longer Available" iPhone Error (2026)
Fix the iPhone Last Line No Longer Available error with 7 dual SIM solutions: airplane mode, carrier settings, eSIM reset, and network resets that work.

Quick AnswerTo fix the Last Line No Longer Available error, toggle Airplane Mode on for 30 seconds, restart your iPhone, and update carrier settings under Settings → General → About. If the error keeps coming back on a dual SIM iPhone, reset network settings or remove and reinsert the affected eSIM line.
The “Last Line No Longer Available” error blocks your iPhone from placing a call on your default cellular line and pushes you onto the secondary line instead. It hits dual SIM iPhones running iOS 13 and later. The error almost always traces back to a brief carrier handoff failure rather than a broken SIM.
Start with Airplane Mode because it forces both cellular lines to reconnect from scratch.
This guide is for your own iPhone and SIM lines; running these steps on a phone or carrier account that isn’t yours can break carrier terms.
- The error appears only on dual SIM iPhones (XS through 16 series, plus SE 2nd and 3rd gen) when one cellular line briefly loses contact with the carrier.
- Toggling Airplane Mode for 30 seconds is the fastest fix because it forces both lines to renegotiate with their carriers from a clean state.
- An outdated carrier settings bundle is the second most common trigger; check Settings → General → About and watch for the carrier update prompt within 15 seconds.
- Disabling Wi-Fi Calling on the affected line stops the error when voice traffic is bouncing between Wi-Fi and cellular mid-call.
- A network settings reset under Settings → General → Transfer or Reset iPhone clears the cause but erases every saved Wi-Fi password, VPN profile, and Bluetooth pairing.
#What Causes the “Last Line No Longer Available” Error?
The error fires when iOS tries to route a call through your default cellular line and the radio module fails to register that line with the carrier in time. The phone falls back to your secondary line and asks for permission to use it. The trigger is usually transient: a tower handoff, a stalled carrier negotiation, or a Wi-Fi Calling session that didn’t transition cleanly to LTE or 5G.
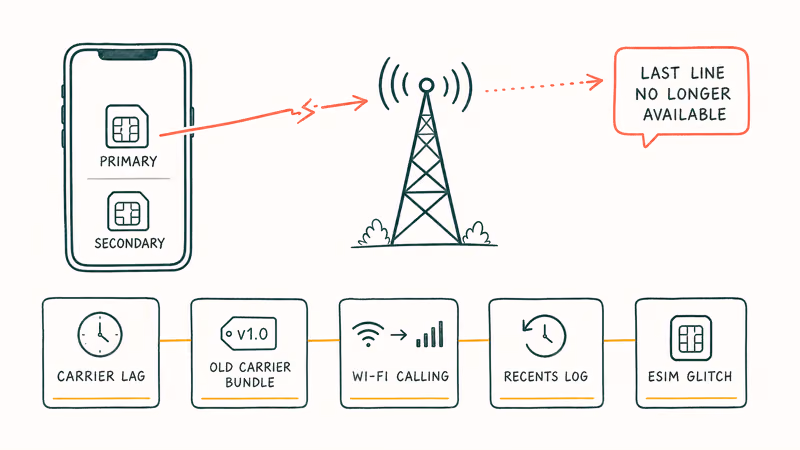
According to Apple’s Use Dual SIM with two nano-SIMs page, the iPhone designates one line for cellular data and voice and treats the other as a backup; when the primary line is temporarily unreachable, the system prompts the user to switch lines for the call. That prompt is the “Last Line No Longer Available” message.
A few specific causes show up over and over:
- Carrier negotiation lag. Your primary line drops to “No Service” for a second or two and the dialer can’t bind to it.
- Outdated carrier settings. Apple ships small carrier configuration bundles that tell iOS how to talk to specific networks. An old bundle on a new tower release is a frequent culprit.
- Wi-Fi Calling handoff failures. A call started on Wi-Fi that can’t transition to cellular often shows the error on the next outbound call.
- Corrupted recents log. A small subset of cases trace to a damaged Phone app call history that confuses line selection.
- eSIM provisioning glitches. Recently swapped or transferred eSIMs sometimes register as the primary line but fail the first authentication attempt.
The error is annoying, but it almost never indicates a hardware problem. It points at line registration rather than battery health, cellular antenna damage, or the SIM failure error message that points at a physical card issue.
#Quick Fixes That Work in Under 5 Minutes
These are the methods to try first, in order. Each one takes under a minute and addresses the most common causes. Run them in sequence rather than picking one at random.
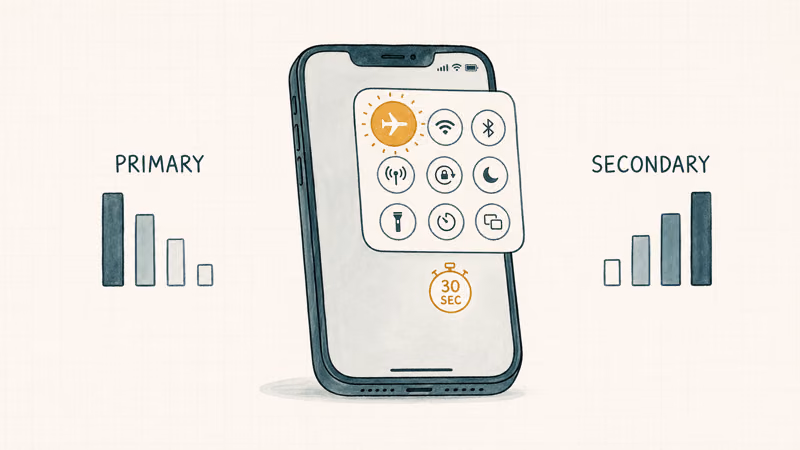
#Toggle Airplane Mode
Start here because it forces both cellular lines to drop their carrier connections and re-register from scratch.
- Swipe down from the top right corner to open Control Center.
- Tap the airplane icon to enable Airplane Mode.
- Wait 30 seconds. Less than that and the carriers may not fully drop the registration.
- Tap the airplane icon again to disable it.
- Wait until both lines show signal bars before placing a test call.
If the error survives the first toggle, repeat the reset before moving on. Note that Airplane Mode does not turn off GPS, so location-based features keep working through the reset.
#Restart Your iPhone
A full restart clears the cellular baseband state more thoroughly than airplane mode does. It’s the right next step when toggling airplane mode fixes the error temporarily but it returns within a few minutes.
- Press and hold the side button and either volume button.
- When the slider appears, drag it to power off.
- Wait 30 seconds. The carrier-side session needs time to expire.
- Press and hold the side button until the Apple logo appears.
Place a test call after both signal bars come back.
#Clear the Recents Call Log
This sounds unrelated, but Apple Community threads have flagged corrupted recent calls as a trigger for over a year. The fix takes 10 seconds.
- Open the Phone app and tap Recents.
- Tap Edit in the upper right.
- Tap Clear in the upper left and confirm with Clear All Recents.
If the error stops after this and never returns, the recents log was the issue. If it comes back, move to the carrier settings update step below.
#Why Does Dual SIM Trigger This Error More Often?
Single SIM iPhones can experience cellular drops too, but they handle them silently because there’s no second line to fall back to. With dual SIM, iOS exposes the failure to you so you can decide whether to use the backup line for the call. The error message is doing its job; it’s just not the call-routing experience anyone wants.
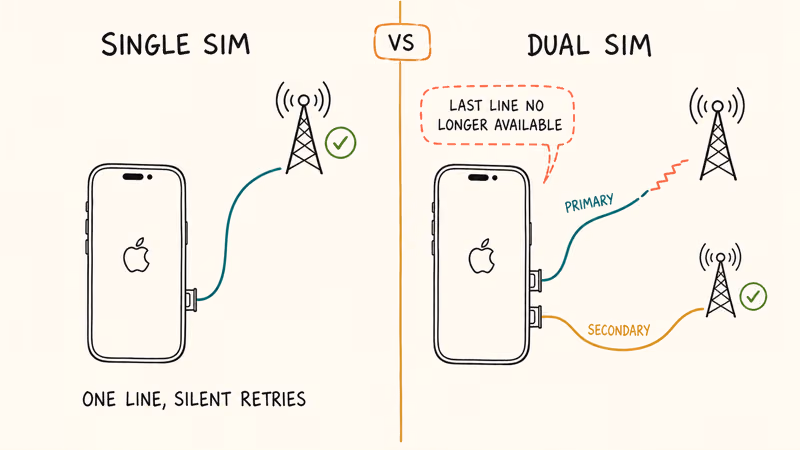
Dual SIM models are more vulnerable for three reasons. First, the radio module has to maintain two carrier registrations simultaneously, which doubles the surface area for handoff failures. Second, eSIM provisioning is newer than physical SIM provisioning and ships with more edge cases, especially right after a transfer or carrier swap. Third, Wi-Fi Calling on dual SIM is configured per line, and a misconfigured secondary line can interfere with the primary.
The dual SIM iPhone models that show this error are:
- iPhone XS, XS Max, XR
- iPhone 11, 11 Pro, 11 Pro Max
- iPhone 12 series (12 mini, 12, 12 Pro, 12 Pro Max)
- iPhone 13 series and 14 series
- iPhone 15 series and 16 series
- iPhone SE (2nd and 3rd generation)
Owners of single SIM iPhones who see this error usually have an iCloud or call relay configuration in play, or the device is misreporting line status to iOS. The fixes below still apply.
#Carrier Settings and iOS Update Path
After the quick fixes, the next thing to verify is whether your carrier has pushed a settings update that your phone has not picked up yet.
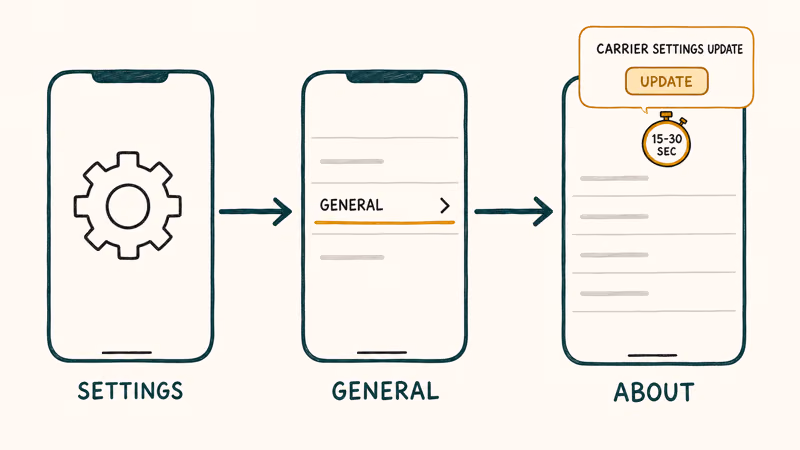
#Update Carrier Settings
- Connect your iPhone to Wi-Fi or a working cellular connection.
- Go to Settings → General → About.
- Wait 15 to 30 seconds on this screen. If a carrier update is available, an alert appears asking you to update.
- Tap Update if prompted, then wait for the install to complete.
Apple’s carrier settings update support article states that updates push to your iPhone automatically when connected to a cellular or Wi-Fi network, and that some updates can take up to 24 hours to reach your device after your carrier releases them. If you suspect a recent network change on your carrier’s end, check this screen daily for a few days.
If your carrier shows up as “Carrier 50.X” or similar, that’s the bundle version, not an error. Apple’s bundle naming convention has stayed consistent since iOS 12.
#Update iOS
A pending iOS update can also cause repeated “Last Line No Longer Available” errors. Apple folds carrier and modem firmware fixes into point releases.
- Go to Settings → General → Software Update.
- If an update is available, tap Download and Install.
- Keep the iPhone on Wi-Fi and charging until the install completes.
If the update fails with a Cellular Update Failed message, retry after toggling airplane mode. If iOS itself refuses to install because of an Apple ID issue, follow the Sign Out Is Not Available Due to Restrictions guide to clear that block first.
#Wi-Fi Calling and eSIM-Specific Fixes
Wi-Fi Calling and eSIM are the two settings most likely to interact poorly with dual SIM line selection.
#Disable Wi-Fi Calling on the Affected Line
Wi-Fi Calling can confuse the line selector when the call started on Wi-Fi but moved to cellular mid-conversation. Apple’s Wi-Fi Calling support page confirms that Wi-Fi Calling depends on a stable Wi-Fi connection and that not every carrier supports the handoff between Wi-Fi and cellular while a call is active.
To disable Wi-Fi Calling for a specific line:
- Go to Settings → Cellular.
- Tap the affected line under SIMs (for example, “Primary” or your carrier name).
- Tap Wi-Fi Calling and toggle Wi-Fi Calling on This iPhone off.
If the prompt appears around Wi-Fi Calling, disabling it on the affected line can stop iOS from bouncing the call path between Wi-Fi and cellular. Re-enable Wi-Fi Calling once the underlying issue is fixed if you depend on it for indoor coverage. For deeper Wi-Fi Calling diagnostics, see the iPhone Wi-Fi Calling not working guide.
#Remove and Re-Add Your eSIM
If the affected line is an eSIM, the cleanest reset is removing and re-adding it. You’ll need your carrier’s eSIM transfer QR code, app activation method, or carrier eSIM Quick Transfer support before you start. Without one of these, don’t delete the eSIM.
- Go to Settings → Cellular and tap the eSIM line.
- Scroll to the bottom and tap Delete eSIM, then confirm.
- Re-add the eSIM through your carrier’s app or the QR code.
- Restart the iPhone after the eSIM activates.
This procedure is the dual SIM equivalent of reseating a physical SIM. The carrier-side provisioning record gets refreshed and any stale state from the prior activation gets dropped.
#Reseat a Physical SIM
For a physical SIM, the equivalent procedure is simpler:
- Power off the iPhone.
- Use a SIM eject tool to remove the SIM tray.
- Inspect the SIM card for visible scratches or contamination on the contacts.
- Wait 30 seconds, reinsert the SIM, then power the iPhone back on.
If reseating still produces a SIM failure message on the same line, the card itself may be damaged and your carrier will need to issue a replacement.
#When to Reset Network Settings (And What You Lose)
Reset network settings is the strongest fix that does not erase your data. It rebuilds every cellular, Wi-Fi, and VPN profile from scratch. Use it when the quick fixes and carrier settings update have not stopped the error.
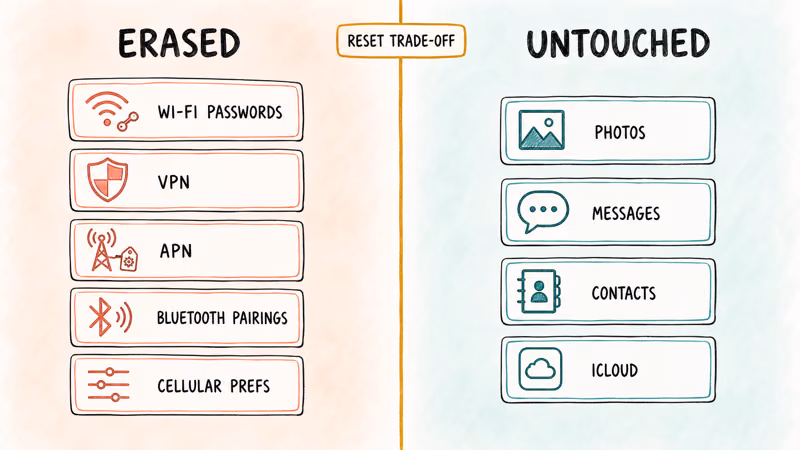
What gets erased:
- All saved Wi-Fi networks and passwords (you’ll need to re-enter them)
- VPN configurations
- APN settings (custom carrier configurations)
- Bluetooth pairings
- Cellular settings preferences
What stays untouched:
- Photos, videos, contacts, and messages
- App data and login states
- Apple ID and iCloud sync state
Steps:
- Go to Settings → General → Transfer or Reset iPhone.
- Tap Reset.
- Tap Reset Network Settings.
- Enter your passcode and confirm.
The phone restarts automatically. Reconnect to Wi-Fi, then place a test call to see whether the error is gone.
If you also see related cellular issues, the Cellular Network Not Available fix covers a wider set of carrier-side prompts that overlap with this one.
#When the Error Is Coming From Your Carrier
Sometimes the error is not your iPhone at all. Carriers occasionally push tower software updates that break dual SIM authentication for hours at a time. Three signs that this is the case:
- Multiple iPhone owners on the same carrier in your area report the error within the same window.
- Your secondary line works perfectly while the primary line shows the prompt.
- Toggling airplane mode helps for a few minutes and then the error returns.
Check your carrier’s status page or social media support account before you spend more time on phone-side fixes. The major US carriers have all had short dual SIM authentication windows where this exact error spiked, and the fix on those days is patience rather than another network reset.
If your carrier confirms an outage, wait for the fix and avoid the network settings reset. Resetting during an outage won’t change anything except your saved Wi-Fi networks. Once the carrier resolves the issue, the error usually stops without any action on your end.
If you also see the secondary line going straight to voicemail during the same window, that’s another carrier-side symptom rather than an iPhone bug.
#Bottom Line
Start with Airplane Mode for 30 seconds. It clears the error for most iPhone owners on the first try, and it costs nothing. If the error returns within a few minutes, update carrier settings under Settings → General → About and install any pending iOS update.
Save the network settings reset for last, since you’ll lose every saved Wi-Fi password and VPN profile in the process. If the error is hitting only one cellular line and that line is an eSIM, deleting and re-adding the eSIM through your carrier is faster and less disruptive than the full network reset.
#Frequently Asked Questions
Why does this error only appear on iPhones with dual SIM?
Single SIM iPhones hit the same handoff failures, but iOS handles them silently. With dual SIM, the system surfaces the failure as a prompt so you can pick a backup line.
Will resetting network settings delete my contacts or photos?
No. Network settings reset only touches Wi-Fi networks, VPN profiles, APN settings, Bluetooth pairings, and cellular preferences. Your contacts, photos, messages, app data, and Apple ID stay completely intact. You’ll need to reconnect to your Wi-Fi networks and re-pair Bluetooth devices afterward.
Does this error mean my SIM card is failing?
Almost never. The error is a signal-side problem, not a SIM hardware problem. If you see “Invalid SIM” or “SIM failure” alongside the Last Line No Longer Available prompt, then the SIM is the issue and your carrier should issue a replacement. The Last Line message on its own points at carrier handoff or carrier settings, not at the SIM card itself.
How long does a carrier settings update take?
The download is small, usually under 5 MB, and it installs within 30 seconds of you tapping Update. The longer wait is on the carrier side: Apple’s documentation confirms that updates can take up to 24 hours to reach your iPhone after your carrier releases them. If you suspect a recent network change, leave Settings → General → About open for 15 to 30 seconds each day for a few days.
Can iOS updates fix the Last Line No Longer Available error?
Yes, especially when the error spiked right after a major iOS release. Apple ships modem firmware and dual SIM logic fixes inside iOS point updates. Check Settings → General → Software Update and install any pending update before you move on to a network reset.
Should I remove and re-add my eSIM if airplane mode doesn’t work?
Only if the airplane mode toggle, restart, and carrier settings update have all failed and the error is hitting your eSIM line specifically. Removing the eSIM requires re-adding it through your carrier’s app or QR code, and you can’t easily undo the deletion without that path. Confirm you have the eSIM Quick Transfer or carrier app re-activation method available before you delete.
Does this error affect 5G connectivity?
Indirectly. The error is about line registration with the carrier, not about which radio technology is in use. On dual SIM iPhones with 5G, the radio sometimes negotiates 5G on one line and LTE on the other.
If you see the error frequently and have 5G enabled on both lines, try setting one line to LTE under Settings → Cellular → [line] → Voice & Data and watch whether the error rate drops.

iPhone 17 Cellular Data Not Working on iOS 26? 9 Fixes
iPhone 17 cellular data still dropping on iOS 26? Apple fixed the launch bug in iOS 26.0.1, but recovery failures persist. Here's the fix ladder.

iPhone Cellular Data Not Working Abroad? eSIM Fixes
Travel eSIM showing no data abroad? Fix iPhone roaming with the data-line check, Data Roaming toggle, APN settings, and network selection steps.

iPhone Cellular Data Not Working for Some Apps? 8 Fixes
Some iPhone apps refuse to load on cellular while others work fine. Check the per-app cellular toggle, Low Data Mode, VPN profiles, and Screen Time.

iPhone Stuck on EDGE? How to Get 5G or LTE Back (2026)
iPhone stuck on EDGE with crawling data? Here's why the E icon appears, which settings force 5G or LTE back, and when the problem is your carrier.