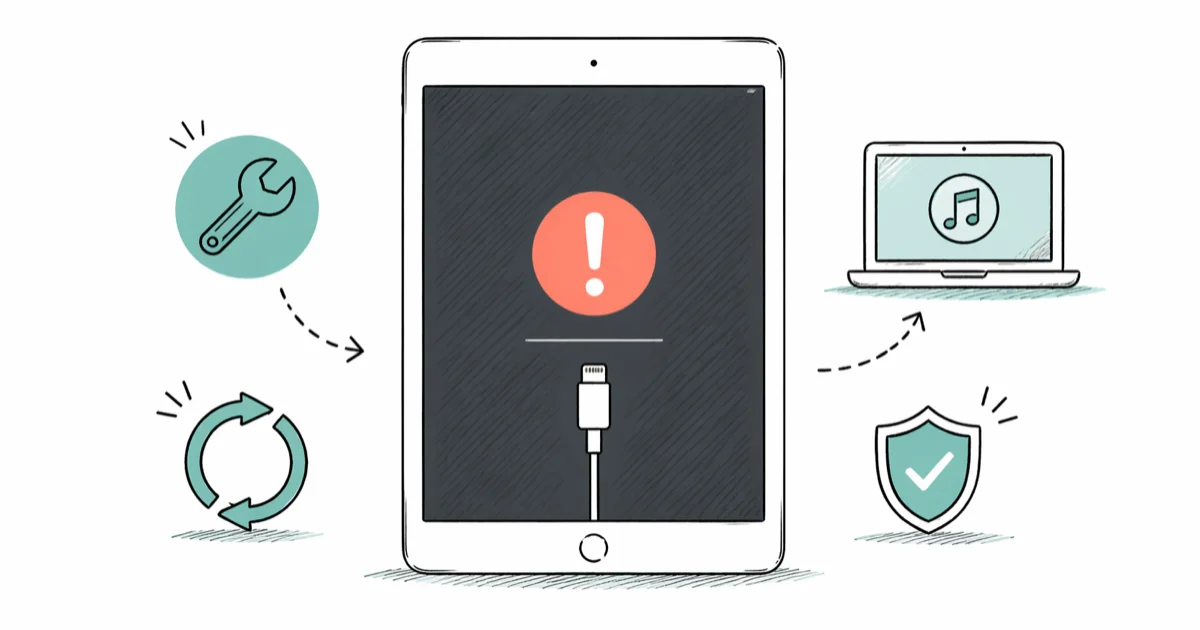
Fix iPad Is Disabled Connect to iTunes Error (2026)
Fix the "iPad is disabled connect to iTunes" error with 4 proven methods. Recovery mode, Find My erase, and third-party tools all covered step by step.
Quick AnswerPut your disabled iPad into recovery mode, connect it to a Mac or PC with iTunes or Finder, and click Restore. This erases the device and removes the passcode lock so you can set it up fresh.
The “iPad is disabled connect to iTunes” message appears after too many wrong passcode attempts. Recovery mode is the most direct Apple-supported fix, while Find My and unlock tools are alternatives for specific situations.
- Apple disables an iPad after 6 consecutive wrong passcode entries, with escalating lockout timers up to 1 hour before permanent disable
- Recovery mode restore through iTunes or Finder is the most reliable fix and works even if you never synced the iPad before
- Find My iPad erase works remotely without a computer, but requires your Apple ID password and an internet connection on the device
- All four methods erase your data, so an iCloud or iTunes backup made before the lockout is the only way to recover your files
- Third-party unlock tools like iToolab UnlockGo and Tenorshare 4uKey automate the firmware download and restore process for less technical users
#Why Does an iPad Get Disabled?
Apple’s passcode lockout escalates fast. Six wrong entries trigger a 1-minute lock, seven means 5 minutes, eight means 15 minutes, nine means an hour, and ten wrong entries disable the iPad permanently.
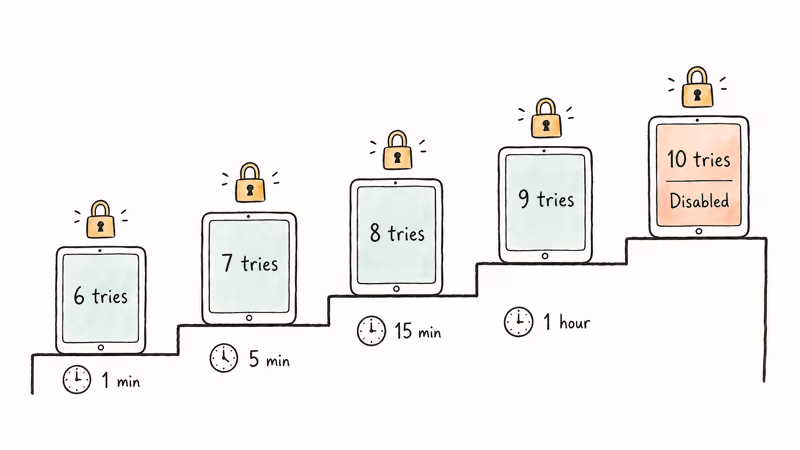
Apple confirms that 10 consecutive wrong passcode attempts force a full device erase as the only recovery path. There’s no backdoor. Kids playing with the lock screen, a forgotten passcode after vacation, or a used iPad with the previous owner’s code are the most common triggers.
This security design protects your data if the iPad is lost or stolen. If you enabled iCloud backup before the lockout, you can restore everything after the fix.
#Restoring Your iPad Through Recovery Mode
Recovery mode is the go-to method and it works whether you’ve synced with iTunes before or not. The whole restore depends mostly on the firmware download, so fast broadband can finish quickly while slower connections take longer.
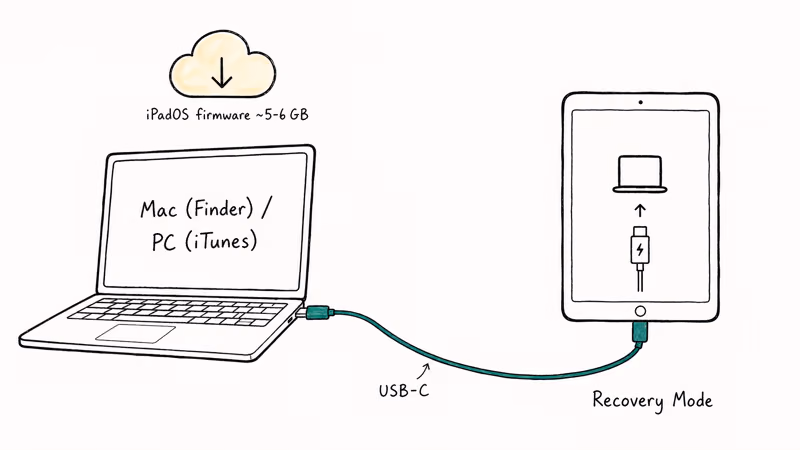
You’ll need a Mac running macOS Catalina or later (which uses Finder instead of iTunes), or a Windows PC with iTunes installed. Grab a USB cable that fits your iPad model and make sure you have an internet connection since the computer downloads the iPadOS firmware during the restore, which typically runs about 5-6 GB.
#Steps to Restore via Recovery Mode
-
Turn off your iPad completely. Press and hold the top button until the power-off slider appears, then slide to power off.
-
Connect the USB cable to your computer but don’t plug it into the iPad yet.
-
Enter recovery mode using the right button combo for your iPad model:
- iPad with Face ID (no Home button): Press and hold the top button while plugging in the cable. Keep holding until the recovery mode screen appears.
- iPad with Home button: Press and hold the Home button while plugging in the cable. Keep holding until the recovery mode screen appears.
-
iTunes or Finder will detect the iPad in recovery mode and show a dialog with Update and Restore options. Click Restore.
-
Wait for the firmware to download and install. Don’t disconnect the iPad during this process.
-
Once the restore finishes, set up your iPad as new or restore from a backup.
If your iPad gets stuck during this process, check our guide on fixing an iPhone stuck in recovery mode since the troubleshooting steps apply to iPads too.
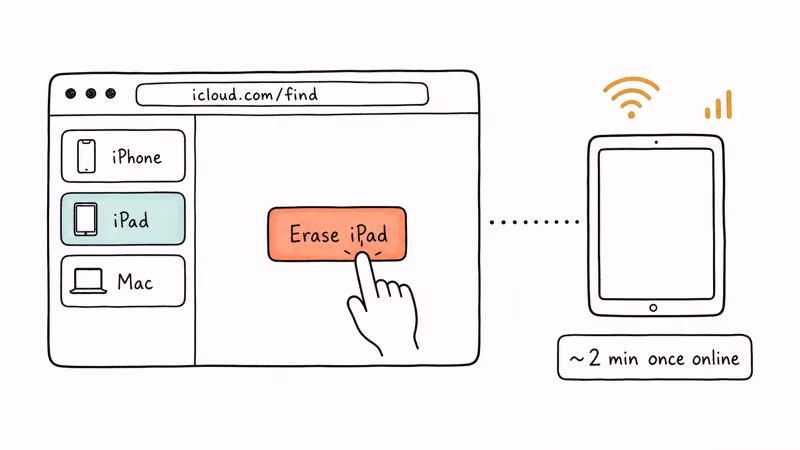
#How to Erase a Disabled iPad Using Find My?
Find My works when you don’t have access to a computer. Your iPad needs to be connected to Wi-Fi or cellular data, and you need to remember your Apple ID password.
-
Go to iCloud.com/find on any browser, or open the Find My app on another Apple device.
-
Sign in with the Apple ID linked to the disabled iPad.
-
Select your iPad from the device list.
-
Click Erase iPad and confirm when prompted.
-
The iPad will reset to factory settings once it connects to the internet. Set it up and restore from backup if available.
Apple’s Find My documentation confirms that erasing through Find My removes the passcode lock along with all content and settings on the device. Once the disabled iPad has an internet connection, the remote erase command can run without plugging it into a computer.
If your iPad lost its Wi-Fi connection after being disabled, the erase command queues up server-side and executes the next time the device reconnects. That delay can take hours or even days.
#Fixing a Disabled iPad With Third-Party Tools
Third-party unlock tools wrap the same firmware restore process in a friendlier interface. They download the correct iPadOS firmware automatically and guide you through each step.
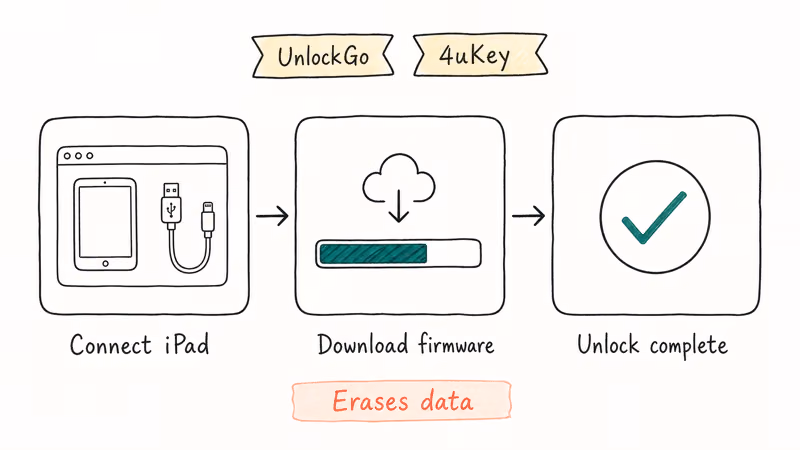
#iToolab UnlockGo
iToolab UnlockGo supports all iPad models including the latest iPad Pro M4 and removes 4-digit passcodes, 6-digit passcodes, Touch ID, and Face ID locks. The tool auto-detects your iPad model, downloads the matching firmware, and handles the DFU mode entry if your computer doesn’t recognize the device right away.
Some links on this page are affiliate links, which means fone.tips may earn a commission at no extra cost to you.
- Download and install UnlockGo on your Mac or PC.
- Click Start and connect your disabled iPad with a USB cable.
- If your computer doesn’t detect the iPad, follow UnlockGo’s prompts to enter DFU mode.
- Verify your iPad model info and click Download to grab the firmware.
- Click Unlock Now and wait for the process to finish. Don’t disconnect during the unlock.
Most of the wait comes from downloading the iPadOS firmware, so the same unlock flow can feel quick on fast broadband and slow on weak Wi-Fi.
#Tenorshare 4uKey
Tenorshare 4uKey is another option that works on both Mac and Windows. For a detailed breakdown, read our Tenorshare 4uKey review.
- Install 4uKey and launch it.
- Connect your disabled iPad and click Start to Unlock.
- Download the firmware when prompted.
- Click Start Remove to begin the unlock.
- Wait for the iPad to restart, then set it up fresh.
Both tools perform the same underlying restore that iTunes handles. Their value is the guided walkthrough and automatic firmware matching.
#Picking the Right Method for Your Situation
Your circumstances determine the best approach:
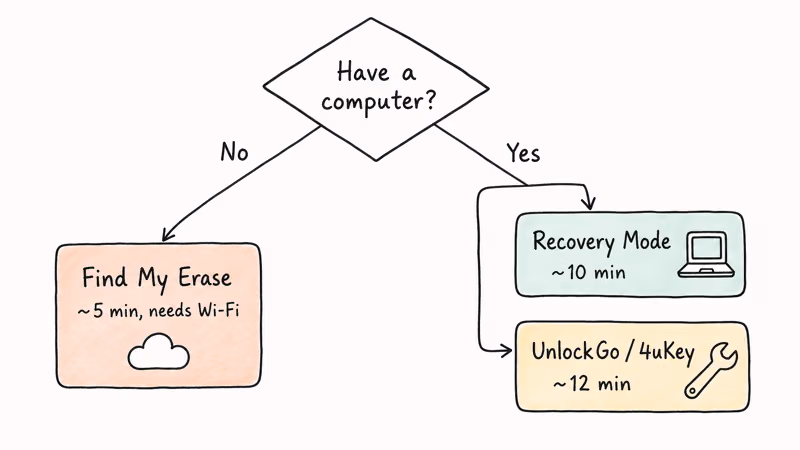
| Method | Needs Computer | Needs Internet on iPad | Time |
|---|---|---|---|
| Recovery mode | Yes | No | ~10 min |
| Find My erase | No | Yes | ~5 min |
| UnlockGo / 4uKey | Yes | No | ~12 min |
For most people, recovery mode through iTunes or Finder is the right choice. Free, works without prior setup, and Apple supports it directly.
Use Find My if you don’t have a computer nearby but your iPad still has an internet connection. Third-party tools like UnlockGo or 4uKey simplify the flow if you’re uncomfortable entering recovery mode manually.
Knowing what “restore iPhone” actually means helps set expectations. A restore wipes everything and reinstalls the operating system from scratch.
#Preventing Future Lockouts
Apple added a Security Lockout feature in iPadOS 15.2 that lets you reset a locked device directly from the lock screen using your Apple ID. Apple’s support page for passcode resets recommends enabling this feature, which eliminates the need for a computer if you get locked out again.
A few practical habits that help:
- Use a memorable passcode. Avoid random strings you’ll forget after two weeks.
- Enable Face ID or Touch ID. Biometric unlock means you rarely type your passcode.
- Set up iCloud backup. Go to Settings → your name → iCloud → iCloud Backup. Turn it on. Backups run automatically when the iPad is charging and on Wi-Fi.
- Write your passcode down somewhere secure. A password manager or a physical note in a locked drawer works.
If you’re dealing with a similar lockout on your iPhone, our guide on how to undisable an iPhone covers the same territory with iPhone-specific steps. You can also check out methods for unlocking an iPhone without a password for more options.
#Bottom Line
Start with recovery mode. Plug your disabled iPad into a Mac or PC, enter recovery mode, and click Restore in iTunes or Finder. The process works on every iPad, costs nothing, and finishes in about 10 minutes. Use Find My if you don’t have a computer, or grab iToolab UnlockGo or Tenorshare 4uKey if you want a guided walkthrough.
#Frequently Asked Questions
How many wrong passcode attempts disable an iPad?
Six wrong entries start the lockout. After 10 consecutive wrong attempts total, the iPad shows “disabled, connect to iTunes” permanently.
Can I fix a disabled iPad without losing my data?
No. Every method involves erasing the device. Restore from an iCloud or iTunes backup made before the lockout to get your files back. No prior backup means permanent data loss, which is why Apple pushes automatic iCloud backups so heavily in the setup process.
Does Find My work if my disabled iPad is offline?
The erase command queues on Apple’s servers. It executes when the iPad reconnects to Wi-Fi or cellular. If the iPad never reconnects, use recovery mode with a computer instead.
Will restoring my iPad remove the Apple ID lock?
Restoring removes the passcode lock but not Activation Lock. You’ll still need the Apple ID and password linked to the iPad during setup. This theft-deterrent feature has no legitimate workaround, and anyone selling a “locked” iPad likely can’t provide the credentials you’d need to actually use the device after restoring it.
Do third-party unlock tools like 4uKey actually work?
Yes. They perform the same firmware restore as iTunes but with a guided interface. They can’t bypass Activation Lock.
Is it safe to buy a “disabled” iPad from someone?
Risky. If someone else’s Apple ID is on it, Activation Lock will brick the device after restore. Verify the seller can sign out of their Apple ID before buying. Purchasing a device you know is stolen can create legal trouble, so if they refuse, walk away.
How long does the recovery mode restore take?
The firmware download is the bottleneck. On a typical broadband connection, expect about 5-8 minutes for the download and 2-3 minutes for the actual restore. Total is roughly 10 minutes on fast internet, but slower connections under 25 Mbps can stretch it to 20-30 minutes since iPadOS firmware files run about 5-6 GB depending on the iPad model and iPadOS version.
Can I prevent my iPad from getting disabled?
You can’t turn off the lockout. Set a memorable passcode, enable Face ID or Touch ID, and keep the iPad away from curious kids. iPadOS 15.2+ also lets you reset from the lock screen using your Apple ID, which is the best safety net.

iPhone 17 Cellular Data Not Working on iOS 26? 9 Fixes
iPhone 17 cellular data still dropping on iOS 26? Apple fixed the launch bug in iOS 26.0.1, but recovery failures persist. Here's the fix ladder.

iPhone Cellular Data Not Working Abroad? eSIM Fixes
Travel eSIM showing no data abroad? Fix iPhone roaming with the data-line check, Data Roaming toggle, APN settings, and network selection steps.

iPhone Cellular Data Not Working for Some Apps? 8 Fixes
Some iPhone apps refuse to load on cellular while others work fine. Check the per-app cellular toggle, Low Data Mode, VPN profiles, and Screen Time.

iPhone Stuck on EDGE? How to Get 5G or LTE Back (2026)
iPhone stuck on EDGE with crawling data? Here's why the E icon appears, which settings force 5G or LTE back, and when the problem is your carrier.